

 Thanks:
  Likes:
  Needs Pictures:
  Picture(s) thanks:
Results 16 to 30 of 42
Thread: French doors WIP
-
23rd June 2011, 04:16 PM #16
 Senior Member


- Join Date
- Jul 2009
- Location
- queensland
- Posts
- 129

Sorry, but probably a stupid question, BUT what prcess did you actually use to cut the haunch and tennon sections. i.e. hand saw, bench, circular.chisels??
-
23rd June 2011 04:16 PM # ADSGoogle Adsense Advertisement
- Join Date
- Always
- Location
- Advertising world
- Posts
- Many
-
26th June 2011, 07:06 AM #17
GOLD MEMBER
- Join Date
- Aug 2007
- Location
- St Georges Basin
- Posts
- 1,017
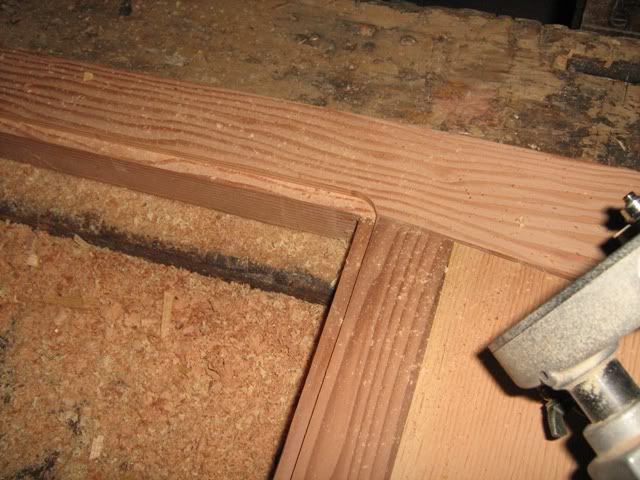
Not a stupid question at all! While the stile was still parallel and with the mortises cut, I marked out and cut tenons on the rail for a fit to the mortises as they were. I cut the shoulders on a compound sliding saw and cut out the waste sections between the tenons with the bandsaw. That left much less wood to work through when cutting off the cheeks of the tenons with a handsaw. Then I cut the haunch on the stile (circular saw for the long cut and then bandsaw for the hip) and used that profile to mark where the hip should be on the rail. Then it was a matter of extending the tenons back to the new mark, same process as above. It was a fiddly job to get good matches and I probably should have taken some pics to explain it all. I imagine other people would have used a different method, but there's a fair bit of working backwards in this job, and the process I used helped me to get my head around it. Originally Posted by skippy
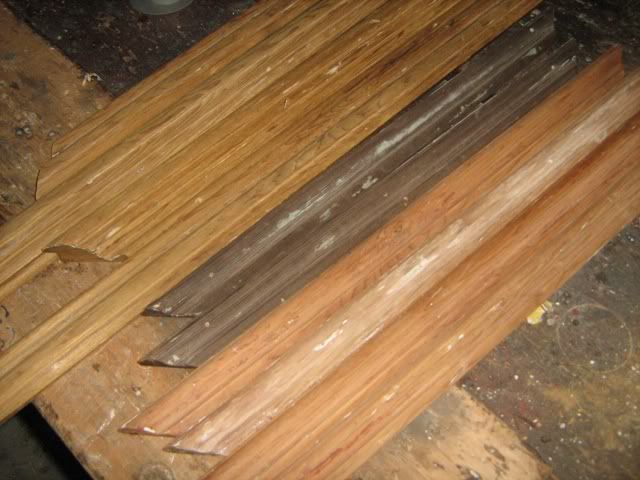

Any way, here's the mouldings cleaned up. A dirtier job than the last, heat gun, caustic and sandpaper for a good finish.
-
26th June 2011, 03:20 PM #18
Senior Member
- Join Date
- Jul 2009
- Location
- queensland
- Posts
- 129
Thanks for the excellent reply. I understand your process clearly now. I like the way you have done these doors, a little different to the norm
-
26th June 2011, 05:05 PM #19
Novice
- Join Date
- Jun 2011
- Location
- Sth Coast NSW
- Posts
- 20
Very nice work BB.

I'm a fan of the dowelling jig myself. I was lucky enough to pick one up at a garage sale for $20. Its a Silex No.30 and works a treat. Have yet to use it for mortering but can't wait.
-
27th June 2011, 09:15 AM #20
GOLD MEMBER
- Join Date
- Aug 2007
- Location
- St Georges Basin
- Posts
- 1,017
Good score, even better if it is metric! Originally Posted by Nursey
Anyway, I'm on to routing the rebates for the glass. The old Oregon is quite brittle so a few shallow passes will prevent tear-outs. I'm using the collett I got from Gifkins and still am impressed with it!
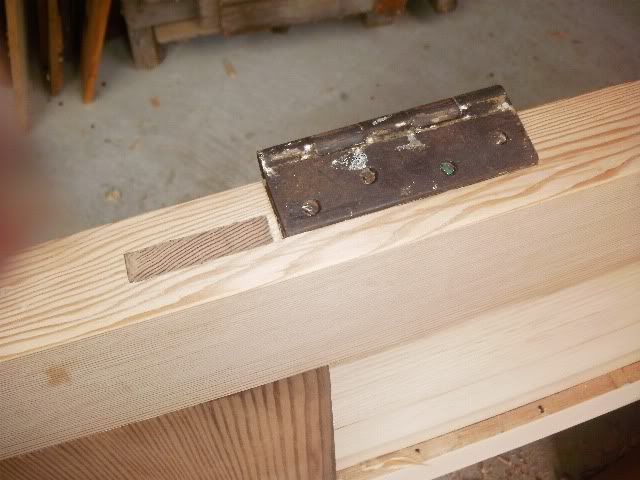
The round corners will square up with a chisel. I've got a Roman Ogee router bit on the way so a bit of a wait until that arrives. In the meanwhile I can start putting the hinges on.
-
2nd July 2011, 07:16 PM #21
GOLD MEMBER
- Join Date
- Aug 2007
- Location
- St Georges Basin
- Posts
- 1,017
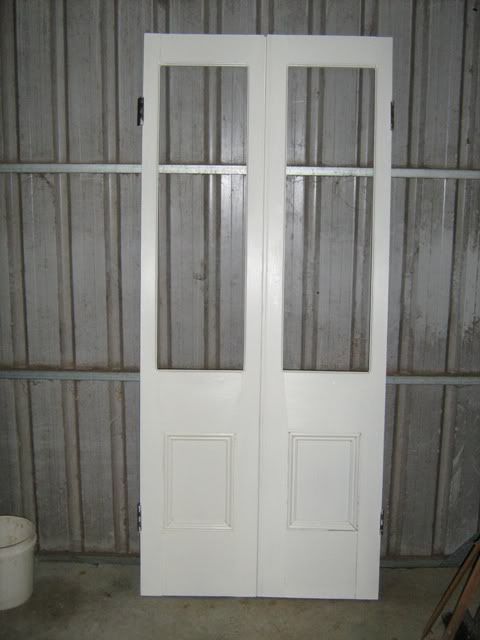
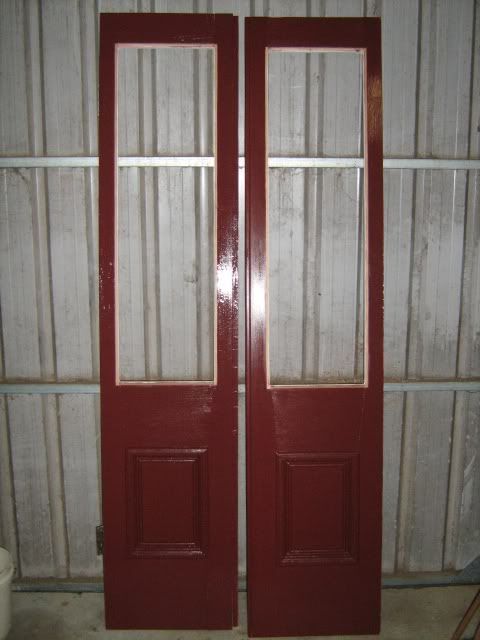
Getting close to the finish now, the Roman Ogee bit arrived and I finished the routing, cleaned up the corners and assembled it all one last time. Then it was a matter of wedging the tenons and then cleaning them up.
I put the mouldings back on too.

And here they are ready for painting.
 .
.
-
2nd July 2011, 07:34 PM #22
Mildly Moderate
- Join Date
- Nov 2007
- Location
- Albury Well Just Outside
- Posts
- 13,315
What colour?
-
2nd July 2011, 07:42 PM #23
The Laird
- Join Date
- Jan 2007
- Location
- Katoomba NSW
- Posts
- 4,778
Excellent work Burra.

Seems a bit of a shame to paint over all that crisp joinery.
-
2nd July 2011, 10:17 PM #24
Mildly Moderate
- Join Date
- Nov 2007
- Location
- Albury Well Just Outside
- Posts
- 13,315
Why are you quoting Groggy in your signature? Originally Posted by NCArcher

-
3rd July 2011, 11:12 AM #25
The Laird
- Join Date
- Jan 2007
- Location
- Katoomba NSW
- Posts
- 4,778
Because I can. Christos, If you want to get into my sig you need to say something memorable.

Sorry for the highjack Burra,
-
3rd July 2011, 12:01 PM #26
Neander Normite
- Join Date
- Jan 2005
- Location
- Melbourne
- Age
- 65
- Posts
- 11,997
Usually the only time I get quoted is by the missus "You said you were going to fix that tap!"
-
3rd July 2011, 08:20 PM #27
Skwair2rownd
- Join Date
- Nov 2007
- Location
- Dundowran Beach
- Age
- 76
- Posts
- 19,922

Top work there BB!!
-
4th July 2011, 07:26 AM #28
GOLD MEMBER
- Join Date
- Aug 2007
- Location
- St Georges Basin
- Posts
- 1,017
Cottage Cream on the inside, Originally Posted by Christos
and Indian Red on the out.
Once these doors are up, they will just be a piece of a house, filling a hole in a wall, and no-one will look twice at them ,let alone think about the processes of making them, so it has been good to have the opportunity to share what I've done. Thanks for your comments and questions! I hope that somewhere down the track, someone will look at these doors and will find them, "still warm with the life of the forgotten man who made them" as I did when I started to pull apart the bits and pieces that went into putting them together.
I suppose I should also thank the forum in general for the inspiration and advice that I have gained over a long period, particularly in regard to pulling out the box of old tools from my grandfather. Cleaned up, properly sharpened I have used a lot of them on this job instead of relying on power tools. The shoulder plane, the block plane and the chisels that I have used have made the process a pleasure and given me a new insight into the nearly forgotten man who used them before me.
That's enough, I'll get out of your way now.
-
4th July 2011, 11:28 AM #29
The Laird
- Join Date
- Jan 2007
- Location
- Katoomba NSW
- Posts
- 4,778
We're going to need a pic of them installed as well. You don't get out of it that easy.
 Nice job. The colours look good too.
-
4th July 2011, 12:29 PM #30
Lignum Vexator
- Join Date
- May 2007
- Location
- North of the coathanger, Sydney
- Age
- 68
- Posts
- 9,417
Nice work that man

That's the problem with these type jobs - once done they don't look like anything's differentregards
Nick
veni, vidi, tornavi
Without wood it's just ...

 Reply With Quote


Similar Threads
-
maranti french doors
By ian h in forum FINISHINGReplies: 4Last Post: 1st August 2018, 07:33 PM
