

 Thanks: 0
 Likes: 0
 Needs Pictures: 0
 Picture(s) thanks: 0
Results 31 to 45 of 83
Thread: Hall Table a Pressie -WIP
-
15th January 2011, 04:19 PM #31
 Jim
Jim


- Join Date
- Feb 2008
- Location
- Victoria
- Posts
- 3,191

Enjoyable to watch Peter.
Cheers,
Jim
-
15th January 2011 04:19 PM # ADSGoogle Adsense Advertisement
- Join Date
- Always
- Location
- Advertising world
- Posts
- Many
-
20th January 2011, 09:31 AM #32
GOLD MEMBER
- Join Date
- Sep 2004
- Location
- Melbourne
- Age
- 87
- Posts
- 1,327
Sopme progress and some problems
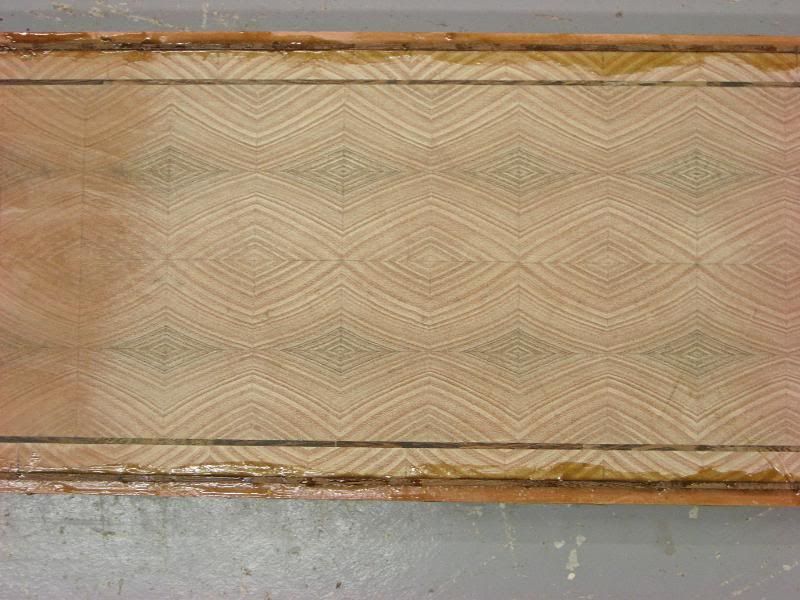
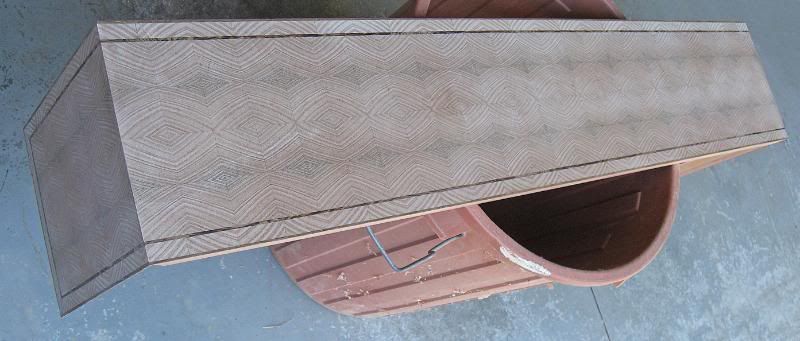
I have the bulk of the "table runner glued up

This is actually the second time I have glued up the runner as the first attempt some of the tile strips lifted on the ends overnight so I went back to square one.
This attempt is a bit dissapointing also as the runner has warped both across the board and down the length .

Across the width there is about 1.5-2mm and about 3mm over the length .
What bugs me most is the separation between some of the tiles .

The biggest gap is about 0.5mm.They bug me . Gaps on something like WW's cross banded moulding , when filled , would blend in I would have thought but here I think they would stand out like the proverbial DB's and say that I could'nt be bothered .
Any suggestion as to how I could correct the warps by application of heat/water gratefully recieved .
Should I tile/veneer the underside ?
Should I just plane out the warp ?
Should I start again and pick a day when the humidity is "average" , not that I know what the humidity was on the day I glued the tiles.
Looking forward to some advice.Last edited by Peter36; 20th January 2011 at 10:33 AM. Reason: Spelling
I've just become an optimist . Iv'e made a 25 year plan -oopps I've had a few birthdays - better make that a 20 year plan
-
20th January 2011, 09:50 AM #33
What... you mean it's not 1792?
- Join Date
- Oct 2006
- Location
- Melbourne
- Posts
- 5,271
I can imagine your frustration! I normally veneer in "average" weather as you suggest. I also veneer on timber such that the natural shrinkage will cancel the pull of the veneer. Occasionally, I will intentionally warp the ground and then veneer it in anticipation of the veneer's pull.
There are no hard and fast rules for these steps, just experience. I had to undergo further learning when I first moved to Australia. It took me a year or so to adapt to the highly variable Melbourne climatic changes. Even then, there have been a few extreme weather events here that gave me cause for concern, but nothing that couldn't be remedied with judicial applications of size..
I know you believe you understand what you think I wrote, but I'm not sure you realize that what you just read is not what I meant.
Regards, Woodwould.
-
20th January 2011, 11:00 PM #34
GOLD MEMBER
- Join Date
- Nov 2006
- Location
- Rockhampton
- Age
- 63
- Posts
- 2,236
Planing/thicknessing is not gonna leave u much thickness of veneer at the ends, altho nothing ventured nothing gained.
If I were having these probs I might try a few things like veneer both sides, the unseen side only needs to be something that's um unseen
or like WW says pull a curve in the substrate before veneering (this should help with gaps)
either dampen the veneered side to expand it into a curve or mechanically (clamps)
may have to do both dampen then clamp to bench or something ridgid with the curve in then allow to dry
maybe use some good quality multiplyboard as the substrate
substrate with a higher moisture content than the tiles say 12 to 14 % and/or have the tiles very dry 6% (at a guess this will help with gaps)
I think u were using horse sauce, I'm not sure how this goes as far as the tiles sucking up moisture from the glue and expanding but maybe here u could use a non moisture type glue epoxy or such
just a few thoughts, hope something works out for u cos it is frustrating to put all that work in and have it turn out no good, let us know how u go
Pete
-
21st January 2011, 01:30 AM #35
Novice
- Join Date
- Dec 2010
- Location
- michigan
- Age
- 79
- Posts
- 19
FWIW Ive been taught that what you do to one side of a board you must do to the other side to prevent what happned to your runner.
Now i don't think i would do all the tiles like on the top but would put a slice of the same stuff on the bottom side. ( same thickness & width &length.)
Just my humble opinon.
Rich.
-
20th February 2011, 04:19 PM #36
GOLD MEMBER
- Join Date
- Sep 2004
- Location
- Melbourne
- Age
- 87
- Posts
- 1,327
I have decided to start again (3rd time) but this time I will use West system epoxy and tile the underside of the top as well .Last time I cut individual tiles and glued them with horse sauce into strips of 4 tiles . To save time , I cut a length of square section into four, book matched them and glued them together .
Made a sled to run on the BS
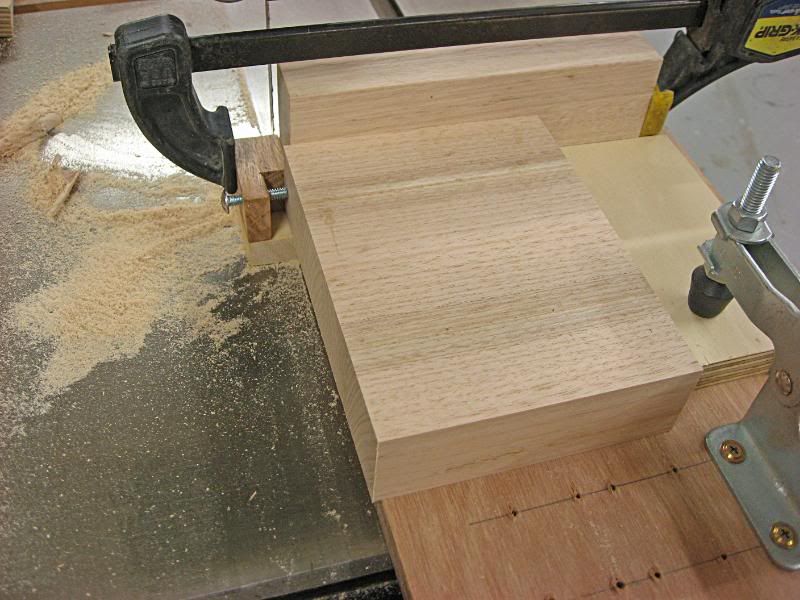
Cut strips
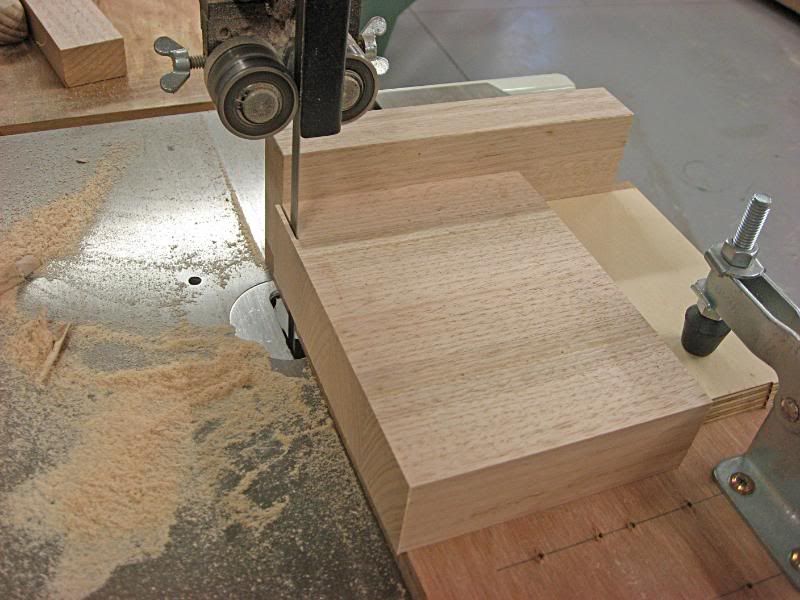
and then glued the strips ( tacked them with hot melt glue)to make the runner.
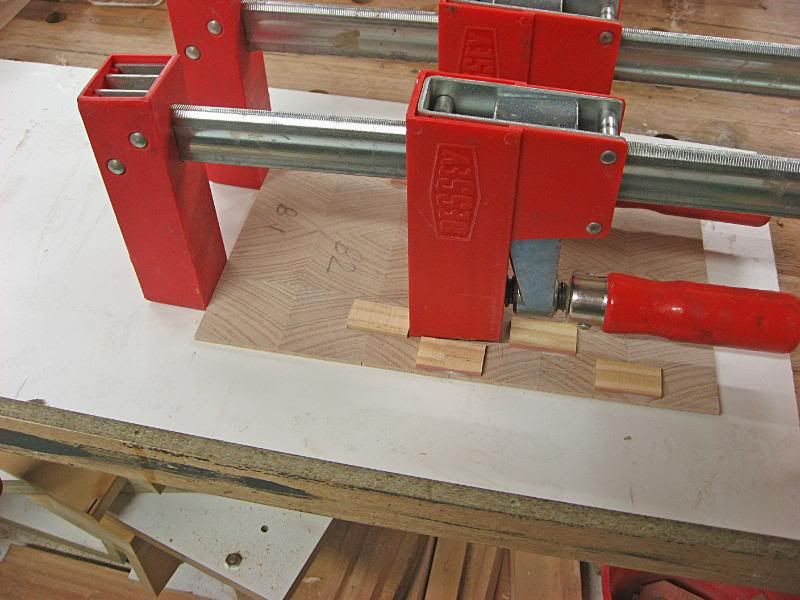
I now have the runner ready to finish
And no shrinkage gaps between the tiles and no bowing.
That is going to generate a few blisters with the end grain wood being saturated with epoxy .I've just become an optimist . Iv'e made a 25 year plan -oopps I've had a few birthdays - better make that a 20 year plan
-
20th February 2011, 04:27 PM #37
What... you mean it's not 1792?
- Join Date
- Oct 2006
- Location
- Melbourne
- Posts
- 5,271
Well done! That should hold the blighters down.
 .
.
I know you believe you understand what you think I wrote, but I'm not sure you realize that what you just read is not what I meant.
Regards, Woodwould.
-
20th February 2011, 06:18 PM #38
Lignum Vexator
- Join Date
- May 2007
- Location
- North of the coathanger, Sydney
- Age
- 68
- Posts
- 9,417
I was wondering what was happening
that looks very nice
it's great that you are persevering regards
Nick
veni, vidi, tornavi
Without wood it's just ...
-
21st February 2011, 08:58 PM #39
Mildly Moderate
- Join Date
- Nov 2007
- Location
- Albury Well Just Outside
- Posts
- 13,315
That a great result. Getting over one hurdle at a time.
-
23rd February 2011, 12:57 AM #40
GOLD MEMBER
- Join Date
- Nov 2006
- Location
- Rockhampton
- Age
- 63
- Posts
- 2,236
Good going with the tiles
,
I was looking at your sled u made up to cut the slices and specifically the depth stop, I'd be worried I would forget the clamp in a moment of brain failure and try and cut thru the clamp bar

 , I like to use a magnetic block on the table as a depth stop in those instances.
Pete
-
23rd February 2011, 09:11 AM #41
GOLD MEMBER
- Join Date
- Sep 2004
- Location
- Melbourne
- Age
- 87
- Posts
- 1,327
Everytime I reset the stock I said to myself " Peter don't forget to take off the clamp" Originally Posted by pjt


The magnet is a good idea as that could be left in place until all the tiles are cut . I have a magnetic base so I will rig up an adistable stop on that next time .I've just become an optimist . Iv'e made a 25 year plan -oopps I've had a few birthdays - better make that a 20 year plan
-
26th February 2011, 08:31 PM #42
GOLD MEMBER
- Join Date
- Sep 2004
- Location
- Melbourne
- Age
- 87
- Posts
- 1,327
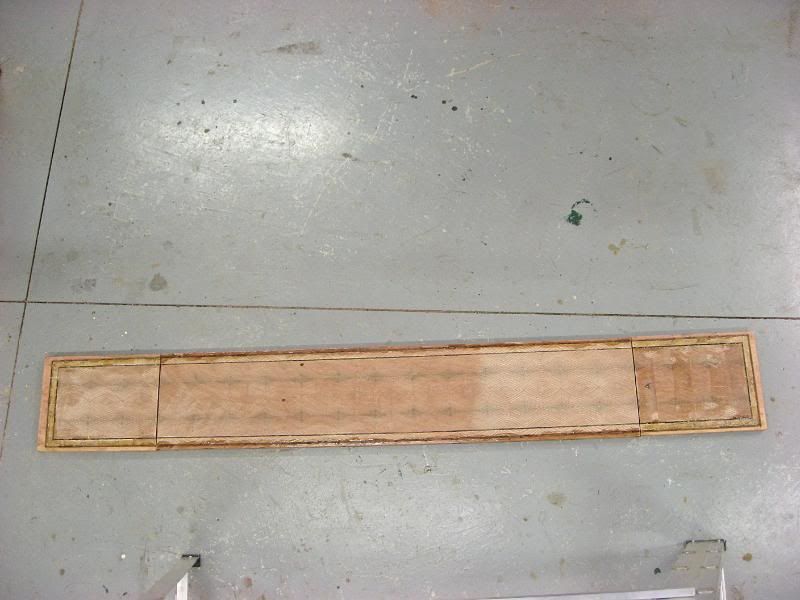
I believe I have crested the hill with the runner section of the table glued together.
I used horse sauce to glue the border and the wenge strips as this was a lot quicker .

Just need to do a bit of filling with 5 Min aradite where the wenge tore a bit and finish sanding which is hard work with the wood saturated with epoxy.
My original intention was to bleach the runner as I was hoping to have a whitish look . The ash when bleached was quite pale with the harder sections darker but applying a finish changed things .Decided to do three samples and apply sealing sander and one coat of WOP to each .
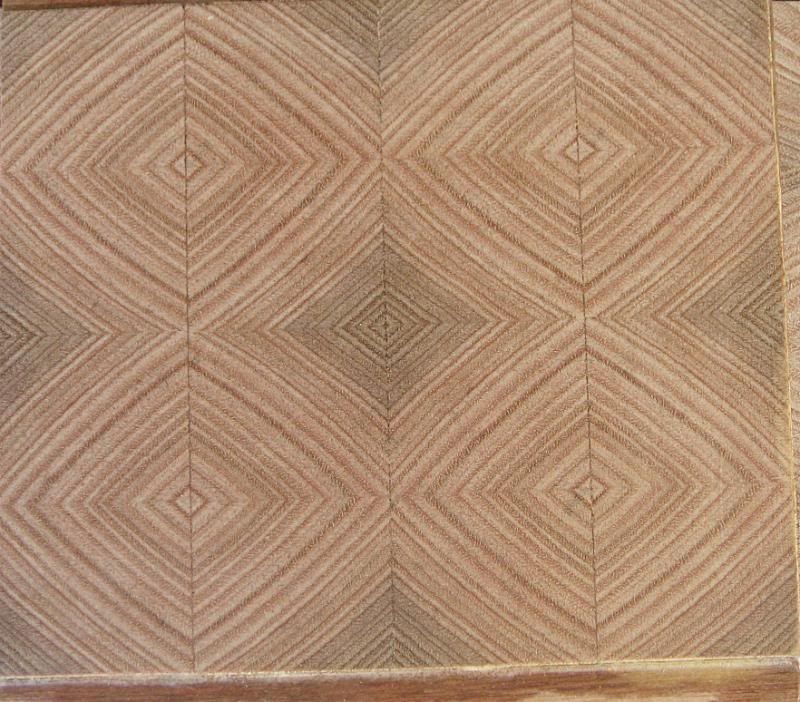
No bleach on this sample
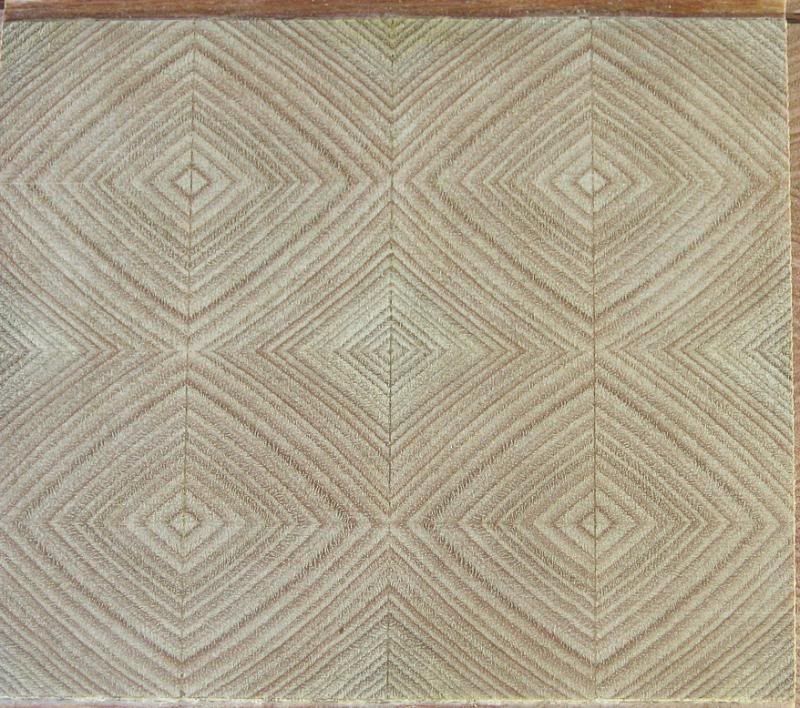
One application of bleach
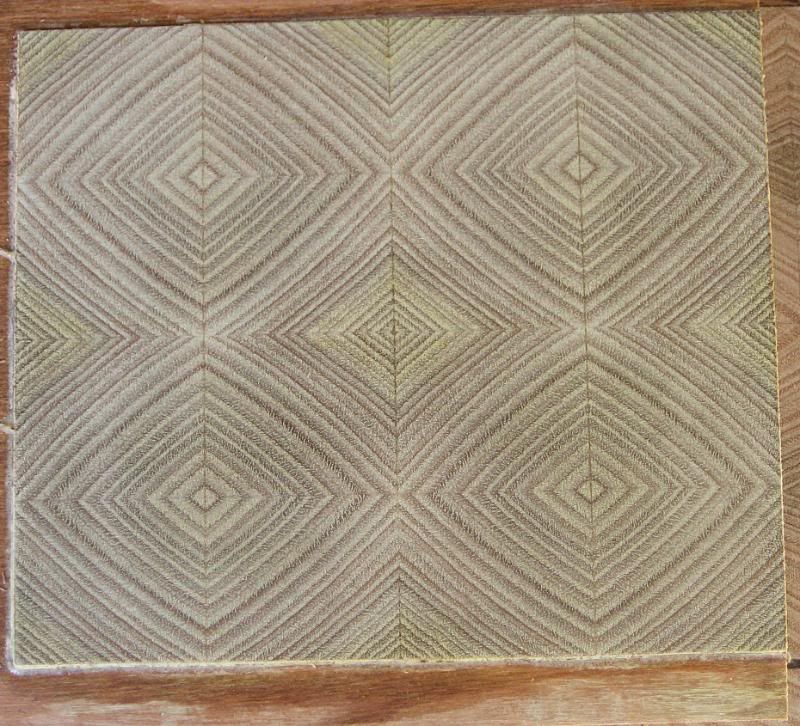
2 application of bleach
The LOML favours not using any bleach and I am inclined to agree but I would appreciate comments about this .
So now to finish the table top and at last get onto the rest of the table .I've just become an optimist . Iv'e made a 25 year plan -oopps I've had a few birthdays - better make that a 20 year plan
-
26th February 2011, 10:00 PM #43
Lignum Vexator
- Join Date
- May 2007
- Location
- North of the coathanger, Sydney
- Age
- 68
- Posts
- 9,417
a la naturale
regards
Nick
veni, vidi, tornavi
Without wood it's just ...
-
26th February 2011, 10:02 PM #44
gravity is my co-pilot
- Join Date
- Apr 2010
- Location
- Melbourne
- Posts
- 562
Peter, that's looking spectacular!
I'm for the unbleached tiles. You get the subtlety of the darker diamonds,that are lost with the bleached samples.
cheers,
B-D.
-
26th February 2011, 10:51 PM #45
What... you mean it's not 1792?
- Join Date
- Oct 2006
- Location
- Melbourne
- Posts
- 5,271
Un-bleached. Very nicely done!
.
I know you believe you understand what you think I wrote, but I'm not sure you realize that what you just read is not what I meant.
Regards, Woodwould.

 Reply With Quote


Similar Threads
-
hall table, wine table, water stone box
By driftit in forum WOODWORK - GENERALReplies: 6Last Post: 1st May 2009, 11:20 PM -
Red Gum Hall Table
By LGS in forum WOODWORK PICSReplies: 8Last Post: 2nd May 2008, 08:52 PM -
New Hall Table
By Auld Bassoon in forum WOODWORK - GENERALReplies: 13Last Post: 22nd May 2006, 01:12 AM -
Just Another Hall Table
By snow in forum WOODWORK PICSReplies: 18Last Post: 12th December 2005, 01:44 PM -
Hall Table
By Baz in forum WOODWORK PICSReplies: 12Last Post: 24th August 2005, 01:53 PM
