

 Thanks:
  Likes:
  Needs Pictures: 0
 Picture(s) thanks:
Results 1 to 13 of 13
Thread: Hidden bed bolts
-
28th November 2022, 02:10 AM #1
 Be inspired. Be creative. Be bold.


- Join Date
- Apr 2001
- Location
- Perth
- Posts
- 10,824
 Hidden bed bolts
The two beds are nearing completion of the joinery. The last report was making loose tenon using the Domino DF500 to create the mortices.
The rails are 125mm x 26mm. The mortice is 115mm x 10mm ...

These are the bed ends. It is relevant to note, as the tenons extend just 28mm into the end rails, they are not in danger of coming apart from the posts. The stresses (racking) will be on the side rails. In any event, the tenons will also be pinned.
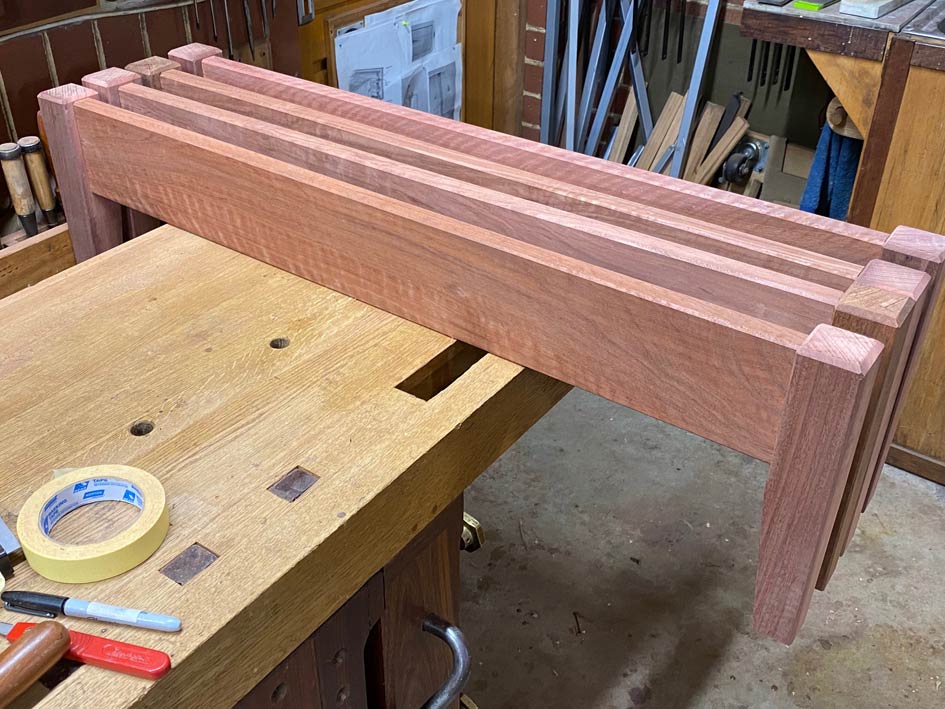
The challenge now is to hide the bed bolts which will connect the side rails. Generally, the bolts run through the post and terminate in the side rail. My aim was to retain the clean, uncluttered line of the tapered posts. There are mechanical fasteners available, but I have used these in the past and the lighter, single beds are vulnerable to racking in my experience.�
The end result needed to look like this ...

I began by adding double 40mm x 10mm wide x 12mm deep mortices in the posts ...

These were initially made with the Domino, and then the ends squared with a chisel. Why squared? Because I find it easier to fit tenons exactly when they are squared than when they are rounded.
The tenons were planned to be 10mm x 10 mm. These were made with a router and a simple fence ...

The fence is positioned by a depth stop (top left).

... flipped, set up, and routed again ...

Saw and chisel to a matching fit ...

The ground work is set for the bed bolt. Insert a dowel centre between the tenons ...

Insert the tenon end into the mortice end, and this will mark to position where the bolt will go ...

Drill and insert a steel thread (wet the wood to make tapping easier) ...
I am using a M8 stainless steel bolt (cut the head off) ..

A short pilot hole is drilled, using a Stanley #59 dowel guide ..

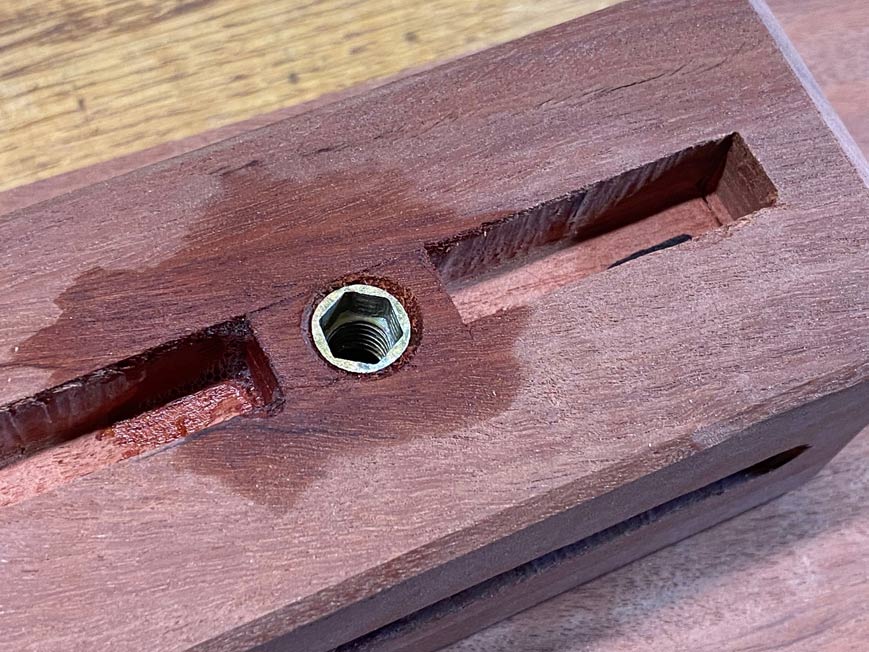
This is extended with a long 6mm drill bit, taking care to aim for a slight angle towards to inside face. The reason for the slight angle is to reduce the depth for the bolt. The bolt hole is widened to 9mm.
The bed bolt extends to the centre of these two forstner-made holes.

Smaller holes are added for a spanner, and the end is squared for a washer and nut.


Time to begin adding finish and glueing up the end rails.
Regards from Perth
Derek
Visit www.inthewoodshop.com for tutorials on constructing handtools, handtool reviews, and my trials and tribulations with furniture builds.
-
28th November 2022 02:10 AM # ADSGoogle Adsense Advertisement
- Join Date
- Always
- Location
- Advertising world
- Posts
- Many
-
28th November 2022, 06:30 AM #2
GOLD MEMBER
- Join Date
- Dec 2007
- Location
- Sydney
- Posts
- 2,210
Did similar myself about 40 years ago when building my workbench.
I�ll crawl under it for a photo when I get home from our bike ride in Tas.
I need to get the Richmond castor plates on it so I can move it back into the main shed to keep the council compliance commissar calm.
H.Jimcracks for the rich and/or wealthy. (aka GKB '88)
-
28th November 2022, 02:21 PM #3
Novice
- Join Date
- Sep 2008
- Location
- Yellowrock
- Posts
- 10
off topic
Dereck
I cant see how to send you a personal message, my apologies
i seem to remember you have a Hammer table saw
I have a Felder, and occasionally I have to rip a piece longer that the slider. Do I remember you made a sled?
Rgrds
Bob
-
28th November 2022, 02:34 PM #4
Be inspired. Be creative. Be bold.
- Join Date
- Apr 2001
- Location
- Perth
- Posts
- 10,824
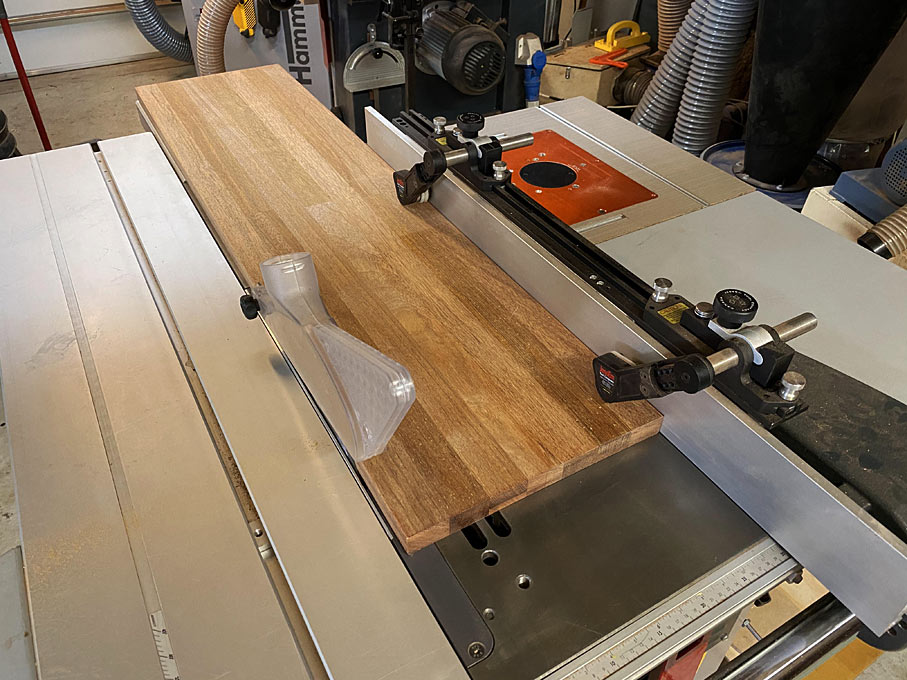
Bob, when the slider wagon is too short. I use the rip fence ... like a traditional table saw.
These long boards do not fit on my wagon ...

The JessEm guides make this safe and accurate ...
Regards from Perth
DerekVisit www.inthewoodshop.com for tutorials on constructing handtools, handtool reviews, and my trials and tribulations with furniture builds.
-
28th November 2022, 02:53 PM #5
 GOLD MEMBER
- Join Date
- Apr 2006
- Location
- Hobart
- Posts
- 5,125
Hello Bob; I have a different technique from Derek's which I have used on SCM, Altendorf and Minimax sliders - it should work equally well on Felders or Hammers. Originally Posted by frizza99

My method is as follows:
- Set fence foreward of saw blade,
- Align timber on slider and against fence, clamp in position with hold downs,
- Switch on saw and cut full length of slider movement,
- Switch off saw, move slider back half-way,
- Loosen hold downs and slide timber forward, blade still in kerf and timber against fence,
- Re-fasten hold downs,
- Gently move slider to confirm length of kerf is still fully aligned with saw blade,
- Switch on saw and complete cut.
It is easier to do than explain.
-
28th November 2022, 04:20 PM #6
Senior Member
- Join Date
- May 2016
- Location
- Perth
- Posts
- 409
Hi Derek,
The bed is looking good. Looking forward to seeing the finished thing.
Thanks for the tip on the hidden bolts. I'm sure that will come in handy for me on a future build or two.
Kind regards, Zac.
-
28th November 2022, 04:31 PM #7
Franklin Ferrier
- Join Date
- May 2007
- Location
- Gold Coast
- Age
- 70
- Posts
- 2,735
Here's a jig for trimming boards longer than the sliding carriage. It's like a full extension drawer runner that telescopes in the slider's mitre slot until you reach the point the slider can take over to carry the rest of the board through to the end of the cut.
No need for a good edge to be made first to run against the traditional rip fence.
SawDust : Sliding Table ExtensionFranklin
-
29th November 2022, 03:47 PM #8
Novice
- Join Date
- Sep 2008
- Location
- Yellowrock
- Posts
- 10
Off topic thankyou
Thanks to both Graeme and Derek. I will try the reclamp method
as always, a mine of information
My slider is 2500 and the bevelled piece for the back of a lounge for my daughter called for 3200mm , in a flimsy cross section
Rgrds
Bob
Originally Posted by GraemeCook
-
29th November 2022, 07:27 PM #9
Be inspired. Be creative. Be bold.
- Join Date
- Apr 2001
- Location
- Perth
- Posts
- 10,824
Here is a way to extend a slider wagon ...
Regards from Perth
DerekVisit www.inthewoodshop.com for tutorials on constructing handtools, handtool reviews, and my trials and tribulations with furniture builds.
-
30th November 2022, 01:43 PM #10
GOLD MEMBER
- Join Date
- Apr 2006
- Location
- Hobart
- Posts
- 5,125
Looks good, Derek, but where do you store a super-sled like that? Originally Posted by derekcohen
-
10th January 2023, 12:08 PM #11
Senior Member
- Join Date
- May 2016
- Location
- Perth
- Posts
- 409
Hi Derek,
Did you finish these beds? I'd be interested in how they came out.
Thanks, Zac.
-
10th January 2023, 06:09 PM #12
Be inspired. Be creative. Be bold.
- Join Date
- Apr 2001
- Location
- Perth
- Posts
- 10,824
Hi Zac
I did finish them ... but ...
I then discovered that there were 1 1/2" too wide and 2" too long! Aaaah!
I had a few other matters to attend to, but now am just about to get back to cutting them down. It is essentially rebuilding them, just not from scratch.
Beds being assembled ...

The cross supports are a T-construction. This adds stiffness and strength ..

And this is where I discovered the mattresses were small than usual (or is it the other way around?)

Regards from Perth
DerekVisit www.inthewoodshop.com for tutorials on constructing handtools, handtool reviews, and my trials and tribulations with furniture builds.
-
11th January 2023, 02:38 PM #13
Senior Member
- Join Date
- May 2016
- Location
- Perth
- Posts
- 409
Hi Derek,
I like the simple design and the way they came out.
I have found that 'standard' mattress sizes listed on various websites seem to be anything but standard. But it is better to have the frames too big than too small!
Thanks, Zac.


 Reply With Quote


Similar Threads
-
Book bolts/sex bolts/chicago bolts - Stainless
By Fumbler in forum WOODWORK - GENERALReplies: 16Last Post: 18th December 2017, 10:57 PM -
HIGH TENSILE BOLTS Vs MILD BOLTS.
By chambezio in forum METALWORK FORUMReplies: 13Last Post: 3rd January 2014, 08:25 PM -
Sex bolts, chicago screws, barrel bolts and binding post screw sets...
By JourneyMan in forum WOODWORK - GENERALReplies: 9Last Post: 6th March 2010, 11:34 AM -
Hidden Beauty
By BernieP in forum WOODTURNING - GENERALReplies: 7Last Post: 5th January 2008, 06:54 PM
