

 Thanks: 0
 Likes: 0
 Needs Pictures: 0
 Picture(s) thanks: 0
Results 16 to 30 of 46
Thread: Jarrah Slab Table
-
15th August 2009, 11:14 AM #16
 Dehydrated Hydrographer


- Join Date
- Jun 1999
- Location
- Westleigh, Sydney
- Age
- 77
- Posts
- 9,550
-
15th August 2009 11:14 AM # ADSGoogle Adsense Advertisement
- Join Date
- Always
- Location
- Advertising world
- Age
- 2010
- Posts
- Many
-
15th August 2009, 10:27 PM #17
Senior Member
- Join Date
- Jul 2007
- Location
- Perth
- Age
- 53
- Posts
- 158
 Thanks for the heads up Alex,
 Originally Posted by AlexS

I`ll definately try that on the next build, i did use some bluetack in some spots, but found it pretty damn messy to clean up.
-
15th August 2009, 10:34 PM #18
Senior Member
- Join Date
- Jul 2007
- Location
- Perth
- Age
- 53
- Posts
- 158
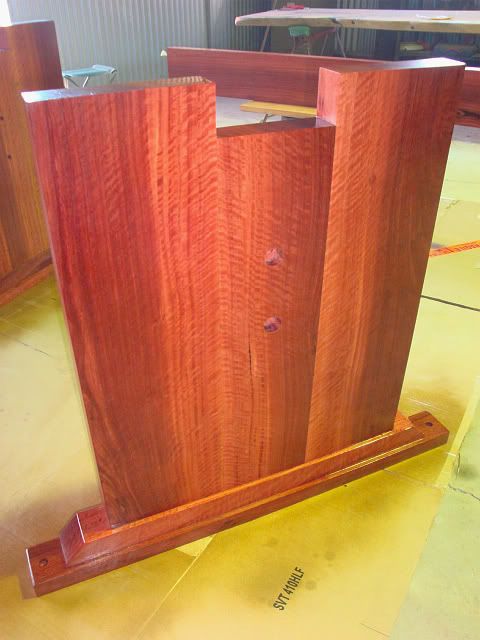
Started spraying the legs and middle beam late this afternoon.
I`m using a Protec 2 pack cat laquer, 40% gloss, thinned down 50% using a LVHP gun @ 50psi.
Really like this laquer, dries within about 10 minutes with a 20 minute re-coat time.
Will have more pics soon (the legs are upside down in the pic)
-
15th August 2009, 10:57 PM #19
Natural Edge
- Join Date
- Dec 2007
- Location
- perth wa
- Age
- 71
- Posts
- 149
Hi Gooma i use FR251 frequently and to seal off the bottom i have found that the aluminium tape works perfectly . As for filling the imperfections from the top i use a shringe and if i am realy fussy i will apply the tape arond the crack itself. peeling the tape off a few hours later before it hardens . I purchase the shringes from Timbecon the tape from bunnings . I use acetone to clean the shringe as i go ,you then get multiple use out of the shringe . To clean up the glue on the natural edge i use a nylon rotorary brush which is used in a drill again they can be purchased from bunnings . Hope this helps and look forward to seeing the finished product .

paul , k
-
16th August 2009, 01:49 PM #20
 Fossil Member
- Join Date
- Jan 2005
- Location
- Perth
- Posts
- 1,181
Hi Gooma,
Just love the figure in those legs. Yes please, we like photos.
Cheers
Pops
-
16th August 2009, 10:26 PM #21
Senior Member
- Join Date
- Jul 2007
- Location
- Perth
- Age
- 53
- Posts
- 158
Thats excellent info Paul, will definately try the aluminium tape on the next build. Originally Posted by paul k
The masking tape just didnt cut it on this one, the 251 really does come up great when everything is complete
-
16th August 2009, 10:29 PM #22
Senior Member
- Join Date
- Jul 2007
- Location
- Perth
- Age
- 53
- Posts
- 158
Cheers Pop`s, Originally Posted by Pops
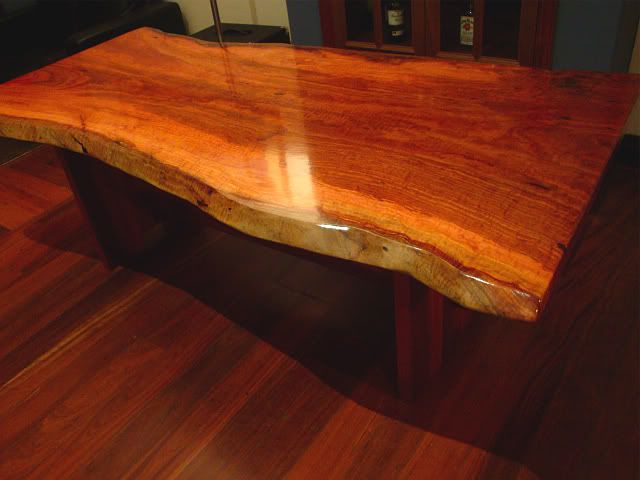
Finally got the whole lot assembled now, the laquer still needs to harden but it was dry enough to move the table into position anyway.
It`s tough to see the figure in the legs on these pics, the top has come up great.
Applied a few more coats than i intended to initially, the inderside had 6 coats and i got a little carried away with the top and applied 12 coats.
Here`s a few pics of the whole thing, just need to secure the top to the base and all is good.


-
16th August 2009, 10:44 PM #23
GOLD MEMBER
- Join Date
- Jul 2004
- Location
- Laurieton
- Posts
- 2,251
That is one nice table.
Bob
"If a man is after money, he's money mad; if he keeps it, he's a capitalist; if he spends it, he's a playboy; if he doesn't get it, he's a never-do-well; if he doesn't try to get it, he lacks ambition. If he gets it without working for it; he's a parasite; and if he accumulates it after a life time of hard work, people call him a fool who never got anything out of life."
- Vic Oliver
-
17th August 2009, 01:31 AM #24
Fossil Member
- Join Date
- Jan 2005
- Location
- Perth
- Posts
- 1,181
Hi Gooma,
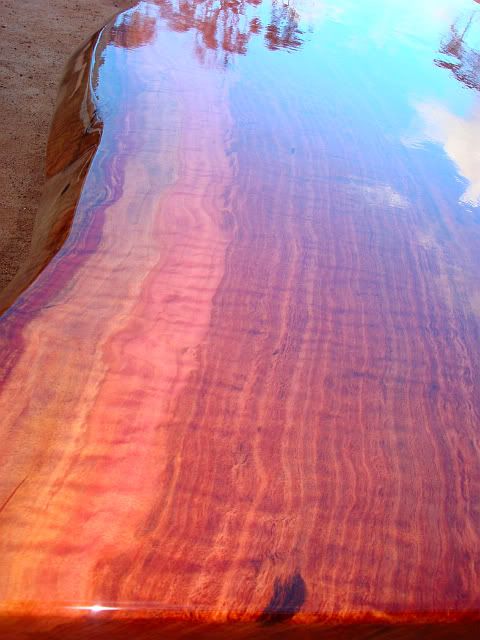
Well mate, that is simply a fantastic result. Beautiful grain in the top.
This may sound complimentary, but coming from a person (me) that generally is not a big fan of natural edge slab tables you can take this as big a compliment as I have ever made.
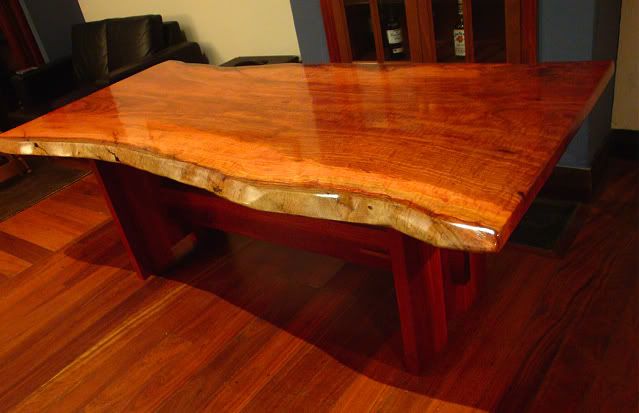
Thanks for the photos. It looks so good in that room too. I want one. I want that one !!!
Well done indeed.
Cheers
Pops
-
17th August 2009, 10:23 AM #25
 New Member
- Join Date
- Jun 2009
- Location
- sydney NSW
- Age
- 55
- Posts
- 4
love the way the beam goes thru the legs. You could have fooled me! Also that beam will make a nice footrest.
It will be quite heavy I guess? Is it for yourself?"Everything looks better when it's made out of wood."
-
17th August 2009, 10:29 AM #26
New Member
- Join Date
- Jun 2009
- Location
- sydney NSW
- Age
- 55
- Posts
- 4
Man! It looks fab! Great job on the finish. Your wife/partner shd be VERY happy
Wow I am going to look out for a slab
We have sydney spotted gum in our yard, Id be tempted to try and get a slab of that. Not that council would let me use our own trees. Ahem."Everything looks better when it's made out of wood."
-
17th August 2009, 10:52 AM #27
Senior Member
- Join Date
- Jul 2007
- Location
- Perth
- Age
- 53
- Posts
- 158
Cheers Bob Originally Posted by BobR
Thankyou Pop`s, i`m the same as yourself in that the natural edge isnt usually my thing, but i`m quite pleased with how it`s come up. Originally Posted by Pops
-
17th August 2009, 10:54 AM #28
Senior Member
- Join Date
- Jul 2007
- Location
- Perth
- Age
- 53
- Posts
- 158
Cheers mate, Originally Posted by hatchet
I`ll be offering this one for sale possibly, just have to figure out how much to put on it.
Hey, what the council doesnt know doesnt hurt them
-
17th August 2009, 11:40 AM #29
GOLD MEMBER
- Join Date
- Mar 2005
- Location
- In the shed, Melbourne
- Age
- 52
- Posts
- 6,883
Like Gooma, I used to use bluetack and it was a PITA to clean up, AlexS' tip of hot melt glue is how I'll now do it this time around. Originally Posted by AlexS
Table looks real beaut Gooma.
-
20th August 2009, 08:56 AM #30
Skwair2rownd
- Join Date
- Nov 2007
- Location
- Dundowran Beach
- Age
- 76
- Posts
- 19,922

gooma, that is a stunning table. Congratulations!1
I have question about the epoxy -Did it stain the areas where you used it?
I ask this because Epoxy was used on my Hoop Pine dining table and there are fingerprint sized stains where this was done.Last edited by artme; 4th April 2011 at 04:46 PM.


 Reply With Quote
Similar Threads
-
Jarrah Slab?
By corbs in forum TIMBERReplies: 4Last Post: 26th June 2005, 09:43 PM -
Jarrah slab
By AlexS in forum TIMBERReplies: 0Last Post: 23rd July 2002, 11:32 PM -
Jarrah slab dining table
By mikead in forum FINISHINGReplies: 2Last Post: 30th April 2002, 03:18 PM -
Jarrah Slab
By John Saxton in forum TIMBERReplies: 5Last Post: 10th September 2000, 04:45 PM
