

 Thanks:
  Likes:
  Needs Pictures: 0
 Picture(s) thanks:
Results 61 to 75 of 187
Thread: Lingerie Chest
-
13th July 2015, 10:52 AM #61
 Be inspired. Be creative. Be bold.


- Join Date
- Apr 2001
- Location
- Perth
- Posts
- 10,828

Hi Ian
I had better clarify.
I have already marked out the position of the drawer blades. I did this after rebuilding the sides. Both sides are marked, front and back. A square edge along these marks provides a precise positioning of the lower side of the drawer blades. This part is not a problem.
For reference, the drawer blades are going to be 19mm (3/4") thick (lingerie is heavy! ). The marks are for the lower side of the drawer blade. All I need to do is mark it a further 19mm to establish the position of the housing. Again, this is not a problem.
I do not have any difficulty establishing where each drawer blade must run. However, I need to build a guide to ensure that they run coplanar with each other in the horizontal. This is more complicated because the sides curve, and a housing needs to be planed/formed at a curve (and remain coplanar across the width of the carcase - not the depth of the carcase).
The dovetails will be single-sided, that is, be flat on one side. Straight side up or down? I have recommendations both ways.
Sliding dovetail at front and rear, and joined with a blade that is M&T into each.
Where the complication comes from is fitting the front sliding dovetail from the inside of the carcase. Fitting from the outside one one can hold the cross section of the drawer blade against the front and mark from it. But how does one do that from inside the carcase? Will the gap formed by the panel offer enough space? I think any if this would be impossible (no reference angles) if the sides were not linked.
Does tnis make sense?
Regards from Perth
DerekVisit www.inthewoodshop.com for tutorials on constructing handtools, handtool reviews, and my trials and tribulations with furniture builds.
-
13th July 2015 10:52 AM # ADSGoogle Adsense Advertisement
- Join Date
- Always
- Location
- Advertising world
- Posts
- Many
-
13th July 2015, 12:44 PM #62
GOLD MEMBER
- Join Date
- May 2007
- Location
- Sth Gippsland Vic
- Posts
- 4,412
They didn't do it this way in the past for a good reason , Or two . Originally Posted by derekcohen

why make the work hard for yourself
why make a mess of things . which trying to fit from the inside will do
But hey !! around here its not about being efficient with time, or so I keep hearing , It's time in the shed and time enjoying ones self.
so strange things do get done .
The two ways Ive mostly seen them fitted , and done the same way myself is , from the front .
The English liked to cover them later with more than just a veneer but a solid strip say 3 to 4mm thick
The 18th C US stuff Ive noticed made a feature of the join and left it to be seen with no cover sometimes.
I think German stuff at times showed the dovetails as well .
I did had a UK Walnut chest on chest here a year back and I think they were fitted from the inside as an attempt to save time not having to cover them later at the front, by the looks . A lovely piece from the outside but what a mess it was inside. It wasn't paneled so no step back which may help if there is enough room ?
Rob
-
13th July 2015, 04:05 PM #63
Be inspired. Be creative. Be bold.
- Join Date
- Apr 2001
- Location
- Perth
- Posts
- 10,828
Hi Rob
Yes, I know that the sliding dovetail is sawn/chiselled in from the outside of cabinets. I have done this myself for years.
It would make it so much easier to do it this way, but it is not what I want for this cabinet, where the aim is not to show the dovetail on the outside face of the legs.
On most cabinets, such as a bombe (with curved sides), the joinery is done from the face. This is the traditional method and there is no alternative since the sides are solid wood. On the cabinet I am building, the sides are not flush, since it is a frame-and-panel. The frame makes it possible - difficult but possible - to form the sliding dovetail from the inside of the frame, which will then hide any joinery. I reason that, if I can tilt and angle the front cross section into the "gap" at the panel (keeping the dovetail low), then it is possible to get it in. Once this is done, adding the blade and rear sliding dovetail is easy (since they fit from the rear). The trick will be to orientate the dovetail coplanar to the dovetail at the opposite side of the cabinet.
Nothing like a challenge!
To provide a little more perspective, the drawers will not have handles. The front of the chest will have flush drawers (no visible runners/drawer blades). They will be opened by pushing in (2mm is all that is needed), and popping out enough to grip them at the underside. I am using Blum Tip On mechanisms for this (the ones used for doors). The desire to avoid showing dovetails at the front is in keeping with this simple, unadorned look.
I hope that this is understandable - it's all in my head and I should draw it out.
Regards from Perth
DerekVisit www.inthewoodshop.com for tutorials on constructing handtools, handtool reviews, and my trials and tribulations with furniture builds.
-
13th July 2015, 07:08 PM #64
GOLD MEMBER
- Join Date
- May 2007
- Location
- Sth Gippsland Vic
- Posts
- 4,412
The way I would do it is saw 7mm of the front of the stiles, they need to be left over size at the beginning . join it all up so the top and bottom and drawer blades are sitting 4mm forward of the stiles , so when glued up the stile faces are now 4mm back from the rail or drawer dividing rails ( blades ) which are dovetailed in from the front. Then the 7mm strips are glued back on , leaving 3mm to clean off when dry . this way its as close as possible to invisible .
-
13th July 2015, 07:42 PM #65
GOLD MEMBER
- Join Date
- Mar 2004
- Location
- Brisbane (western suburbs)
- Age
- 77
- Posts
- 12,136
OK, I see, I thought you hadn't actually marked out the positions. Well, what's the problem? As long as your sides are symmetrical, all should be well if you work from those points, shouldn't it? As I said, I would have gone ahead & cut the trenches before glueing the sides up - you gotta believe your own setting out, sometimes.. Originally Posted by derekcohen
The biggest problem I see is scribing the ends of the dividers very carefully, so you get a very neat join with the stiles.
The few I've seen were straight side up, presumably because it's easier to keep the critical dimension straight & parallel withthe divider/runners above that way. So that's how I do mine, but I'm open to pursuasion if there's a better approach. Originally Posted by derekcohen

Yeah, well, we who are not trained in the traditional techniques do have to re-invent things quite often! I've gotten myself into hot water once or twice (maybe more than that! Originally Posted by derekcohen
) by not planning the joinery completely, and thinking I'll work out 'minor' details on the fly! I guess we can afford to do it that way when our livlihoods don't depend on it.
Since I don't know the actual dimensions of your construction & how much setback there is between the inside of the stile & the inside surface of the panel, I'm not 100% sure what the problem is. I've not used sliding d'tails on framed sides, only on solid-sided pieces. For those, I have used a coupe of different approaches, one being to insert the divider from the front, & cover later with a strip, as Rob mentioned. I think he's right, that seems to be the preferred British approach, as I've got an old English COD done that way. I've also seen uncovered d'tails on American CODs. I don't like either of those methods much, as I prefer to hide as much joinery as possible, so I prefer to insert the divider/runner asembly from the back. The easiest way is to simply run the d'tail trench right across the side, stopping it 10mm or so from the front. You don't see the trench once the dividers & runners are slid in place, because it's hidden by the runners. Trenches are typically quite shallow, at 6mm or a bit more, so they don't weaken the sides appreciably. The second method I've used is to use a wide divider and only put a dovetail on half of it
But in your case, the solution should be simple. As long as there is room between the inside of the stiles & the panels, the dovetails will clear the panel, so there should be no impediment to inserting the frames from the rear. In fact, the dovetail trench can't be any more than the depth of stile before the panel, or you would have to trench the panels, so I must be missing something as I can't see there is a problem....
Cheers,IW
-
13th July 2015, 08:14 PM #66
Be inspired. Be creative. Be bold.
- Join Date
- Apr 2001
- Location
- Perth
- Posts
- 10,828
Hi Rob Originally Posted by auscab
I can see that working. I would prefer not to add a veneer. Certainly, the thought of sawing away the front of the legs sends shivers up my spine! ....
....
Regards from Perth
DerekVisit www.inthewoodshop.com for tutorials on constructing handtools, handtool reviews, and my trials and tribulations with furniture builds.
-
13th July 2015, 08:23 PM #67
Be inspired. Be creative. Be bold.
- Join Date
- Apr 2001
- Location
- Perth
- Posts
- 10,828
Hi IanBut in your case, the solution should be simple. As long as there is room between the inside of the stiles & the panels, the dovetails will clear the panel, so there should be no impediment to inserting the frames from the rear. In fact, the dovetail trench can't be any more than the depth of stile before the panel, or you would have to trench the panels, so I must be missing something as I can't see there is a problem....
It is amazing how solutions slowly evolve. That is how it works for me. So I know that it will happen ... eventually. It just needs time to percolate in this remnant of a brain.
As you write, the trench is not deep. I plan for no more than 6mm, as I did with the other sliding dovetails ( .... I recall you writing earlier wondering how I would do the joinery for the rails with the M&T joints taking up space. What do you think of the solution?).
I spend a little time after work today playing with an idea for the joinery. I will only get back into the workshop this weekend, and by then it may mature into a viable method!
Still happy to hear the ideas of others.
Regards from Perth
DerekVisit www.inthewoodshop.com for tutorials on constructing handtools, handtool reviews, and my trials and tribulations with furniture builds.
-
13th July 2015, 09:26 PM #68
GOLD MEMBER
- Join Date
- Feb 2003
- Location
- back in Alberta for a while
- Age
- 68
- Posts
- 12,006
Derek
I think you are making life very hard for yourself.
If it were my design, I'd incorporate a web frame located around the centre of the curve to hold the curve shape top, bottom and middle.
The sides are frame and panel so the distance front to back of both sides will be a constant.
you are using Blum concealed drawer runners
because you don't have to allow for movement the drawer blades could be recessed into the frames and affixed with glue and screws -- Chris Schwarz would use cut nails.regards from Alberta, Canada
ian
-
14th July 2015, 12:49 AM #69
Be inspired. Be creative. Be bold.
- Join Date
- Apr 2001
- Location
- Perth
- Posts
- 10,828
Ian, I've ben known to do that a lot!I think you are making life very hard for yourself.
I am not sure if I follow you. What is a "web frame"? Do you mean a frame ala drawer blades? If so, that is what I am doing with each drawer. The reason for (slide) dovetailing them is to add rigidity to the carcase.If it were my design, I'd incorporate a web frame located around the centre of the curve to hold the curve shape top, bottom and middle.
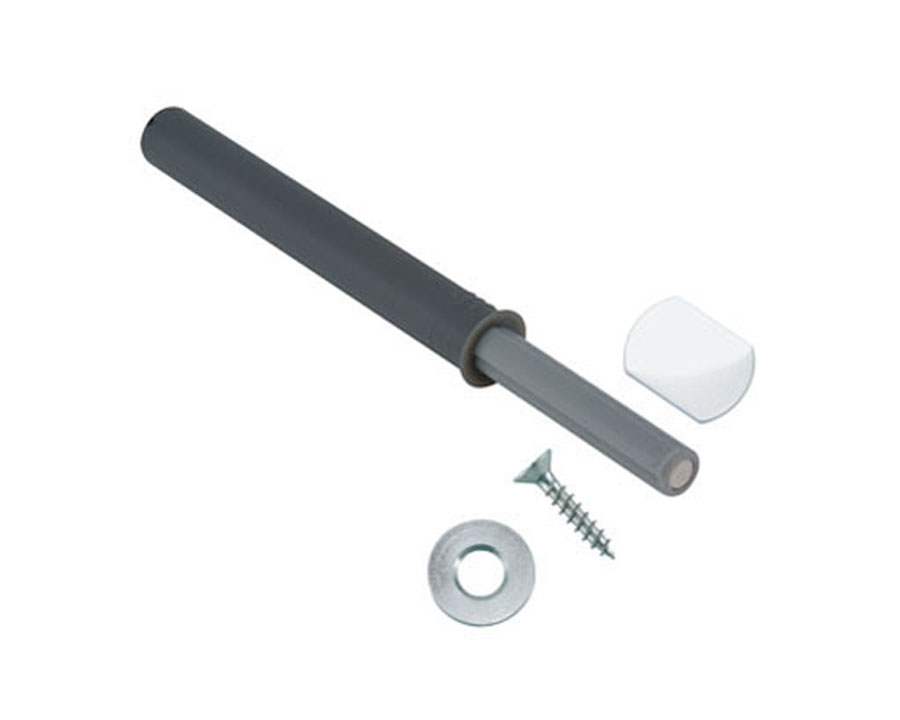
I am not using concealed Blum drawer runners. The drawers will run on the wooden drawer blades. This is a classic, traditional construction. Smoothness of sliding drawers will rely on accurate construction. The only Blum component is a Tip On mechanism the pushes the drawer out when the drawer is pushed in (by 2mm). This mechanism is recessed into the front of the web frame, to use your term (there are a confusing number of descriptions for the frame that holds the drawers).you are using Blum concealed drawer runners
because you don't have to allow for movement the drawer blades could be recessed into the frames and affixed with glue and screws -- Chris Schwarz would use cut nails.
Schwarz may use cut nails. I would not. He builds "furniture of necessity" - simple and quick, not particularly sophisticated.
Glue and screws into the frame is also not a method I am attracted to. Screws and glues loosen, and are not a constructional joint that will last. Sliding dovetails will never loosen.
The method may look a lot more work, but it is only so because I am looking at the added complexity of creating the sliding dovetail on the inside and not, as usual, on the outside of the carcase. Yes, I know that there are simpler, easier methods and that I am making a lot of hard work. Hey, but the exercise is interesting. Yes?
Regards from Perth
DerekVisit www.inthewoodshop.com for tutorials on constructing handtools, handtool reviews, and my trials and tribulations with furniture builds.
-
14th July 2015, 01:28 AM #70
GOLD MEMBER
- Join Date
- May 2007
- Location
- Sth Gippsland Vic
- Posts
- 4,412
Your right there Derek , Ive never heard of any drawer parts being described as blades ? Originally Posted by derekcohen
Is this a US term do you think ? Just interested
Yes there are simpler methods, so I guess we will be seeing your next post in six months ! Ha Ha Originally Posted by derekcohen
 .
.
Just kidding . Go for it . It sounds good. It will look good and be very strong.
Just start at the bottom so that they get better the higher up you go
That's something I kick myself for not remembering sometimes.
A while back I said I was looking forward as to how you were going to do this part . The two ways I imagined then were .
1 . fit frames ( screwed in ) that the drawers run on , but the fronts of the frames are recessed so there are no visible rails between drawer fronts , the drawer fronts hang over the frames.
2. Fit individual drawer runners left and right , no frame , screwed in . The drawer side is thicker with a channel / slot , that runs on the runner . Same as above as in no visible rails between the drawers.
Rob
-
14th July 2015, 01:48 AM #71
GOLD MEMBER
- Join Date
- Feb 2003
- Location
- back in Alberta for a while
- Age
- 68
- Posts
- 12,006
Hi Derek
agree that the naming of components is confusing
A web frame is a rectangular horizontal frame connecting the sides and back of a carcass.
in your case, the side-to-side components would be dovetailed into the side frame's styles -- you would cut the stopped dovetail sockets in the front style before assembling the frame and the rails (and the dovetail pins each end) would be sized after assembly of the case.
if you don't mind cutting through dovetail sockets in the rear styles -- which anyway would be hidden by the case's back, the web frame could be inserted from the rear.
Conventionally the drawer runners -- the front to front components -- are loose M&Ts one end and glued or dovetailed the other. However, in your case, the case sides are frame and panel so won't expand and contract as solid wood sides would, so the drawer runners could be glued both ends. If I have time tomorrow, I'll find the sketch I have on how to install the runners after the front and back rails of the web frame are installed.
BTW, Drawer blades are vertical members designed to prevent a drawer twisting as it is pulled in and out.regards from Alberta, Canada
ian
-
14th July 2015, 02:58 AM #72
Be inspired. Be creative. Be bold.
- Join Date
- Apr 2001
- Location
- Perth
- Posts
- 10,828
Originally Posted by ian
David Boeff refers to the horizontal frame as drawer blades:

One other link was this by Steve Shanesy of Pop Wood Mag...
"... from the bottom, the case side with drawer runners and drawer blades ..."
Drawer runners is the term used for the piece that runs along the side of the carcase, upon which the drawer runs. And drawer blade refers to the piece that connects the two sides in the horizontal.
Drawer blades as horizontal pieces are discussed here as well: http://www.robertpearlantiques.com/jamesgheen.html
The vertical piece is referred to as a "drawer divider".
Regards from Perth
DerekVisit www.inthewoodshop.com for tutorials on constructing handtools, handtool reviews, and my trials and tribulations with furniture builds.
-
14th July 2015, 03:03 AM #73
Be inspired. Be creative. Be bold.
- Join Date
- Apr 2001
- Location
- Perth
- Posts
- 10,828
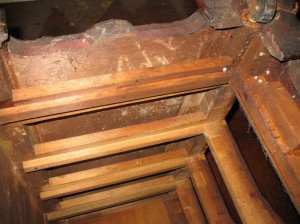
For reference, here is the inside of the chest. It is fairly easy to get to the frame for dovetailing ...
I think that dovetails are more important at the centre of the carcase since the upper and lower ends already are dovetailed together. I may be able to get away with stopped dados for some drawer blades. What do you think?
Regards from Perth
DerekVisit www.inthewoodshop.com for tutorials on constructing handtools, handtool reviews, and my trials and tribulations with furniture builds.
-
14th July 2015, 08:57 AM #74
GOLD MEMBER
- Join Date
- Mar 2004
- Location
- Brisbane (western suburbs)
- Age
- 77
- Posts
- 12,136
Dovetailing the centre two or three dividers would probably be enough to stabilise the frame, but pride would drive me to do the lot. Only you will know if you take a shortcut or two, but I doubt you'd be happy with that - 'specially on piece you are keeping around! Originally Posted by derekcohen
I'd forgotten about the re-inforcing strip down the middle of the panel - I hope that doesn't cause you problems when sliding in the frame by fouling the dovetails on the dividers...?
Yeah, different names for the same bits of a piece of furniture can be a pest - even within the one country some terms vary. I've lived in 3 different English-speaking countries, and had to learn 3 different terms (at least) for many things, not just furniture parts (which I now frequently confuse). Mostly it's amusing, but I got a very strange look from the office girl in England when I asked her if she had a spare rubber. When I asked a colleague why I'd got such a bleak look for such a simple request he nearly wet himself laughing. When he could finally speak, he explained what 'rubbers' usually means in that part of the world. I was very careful to call them 'erasers' after that.....
Cheers,IW
-
14th July 2015, 07:28 PM #75
Be inspired. Be creative. Be bold.
- Join Date
- Apr 2001
- Location
- Perth
- Posts
- 10,828
I would have liked to be a fly on the wall, Ian!
Yep, so many names. It is the fault of the Internet and the ease of visiting forums around the world at the click of a button. Terms become more international or, probably, increasingly influenced by the majority use, which is on the USA forums. I refuse to use the word "lumber" - it puts an ache in my back! Housings and dados, trenches and grooves ....
And, yes, I cannot see taking any shortcuts with the dovetails. Where would the fun be in that?
Regards from Perth
DerekVisit www.inthewoodshop.com for tutorials on constructing handtools, handtool reviews, and my trials and tribulations with furniture builds.


 Reply With Quote


Similar Threads
-
Lingerie Chest
By derekcohen in forum FURNITURE, JOINERY, CABINETMAKING - formerly BIG STUFFReplies: 17Last Post: 30th November 2014, 05:29 PM -
Sea Chest
By LR09WA in forum WOODWORK - GENERALReplies: 14Last Post: 11th June 2011, 08:00 PM -
Ice Chest
By rod1949 in forum Links to: TIMBER & HARDWARE SUPPPLIERSReplies: 1Last Post: 15th September 2004, 08:13 PM -
Chest
By GRS in forum WOODWORK PICSReplies: 8Last Post: 7th July 2004, 12:26 PM
