

 Thanks:
  Likes:
  Needs Pictures: 0
 Picture(s) thanks:
Results 1 to 15 of 187
Thread: Lingerie Chest
-
4th May 2015, 02:55 AM #1
 Be inspired. Be creative. Be bold.


- Join Date
- Apr 2001
- Location
- Perth
- Posts
- 10,820
 Lingerie Chest
Some of you may recall the lingerie chest I began to plan near the end of last year. I had to put the build on hold until recently, and in the last couple of weeks I have managed to get back to it, and actively begun the build.
Further on I have a question for you.
For a refresher, here is a very basic drawing of the front elevation (I have drawings of the details but nothing that will set your world on fire).
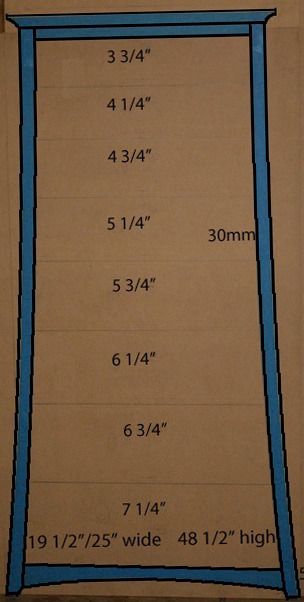
All bar the drawers will be Makore, with the drawers in figured Jarrah. They will bend together really well tonally.
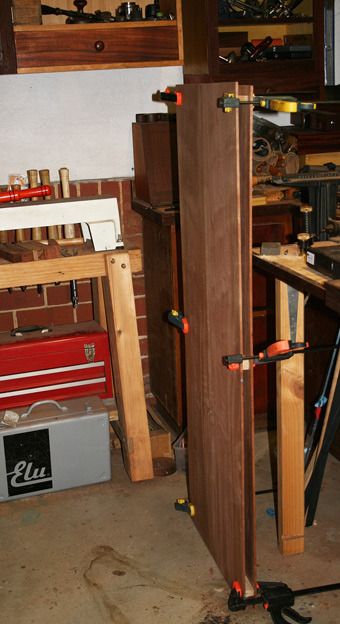
The work I have begun is on the sides.
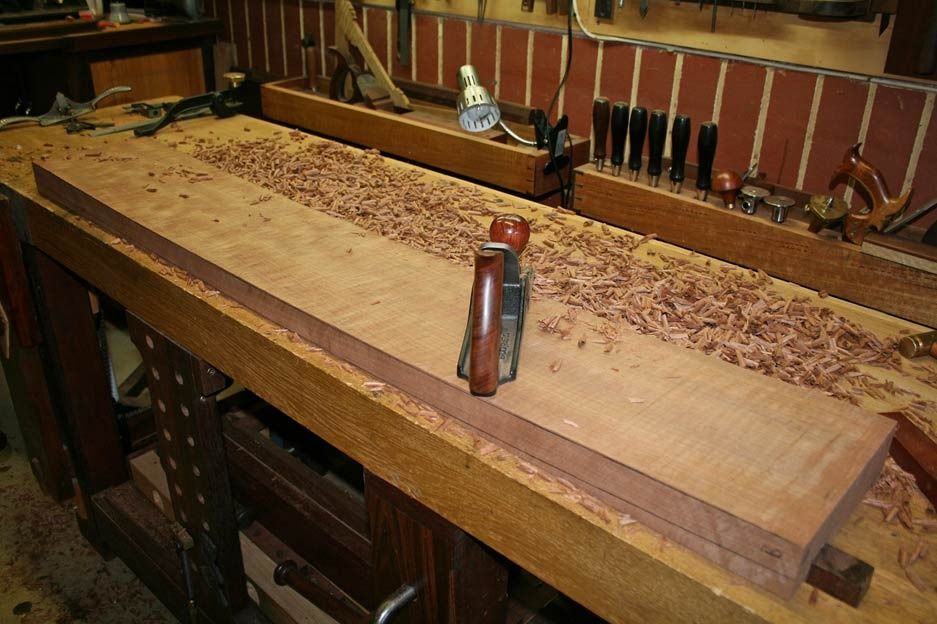
Shaping a curved board from which four stretchers will be sawn ...
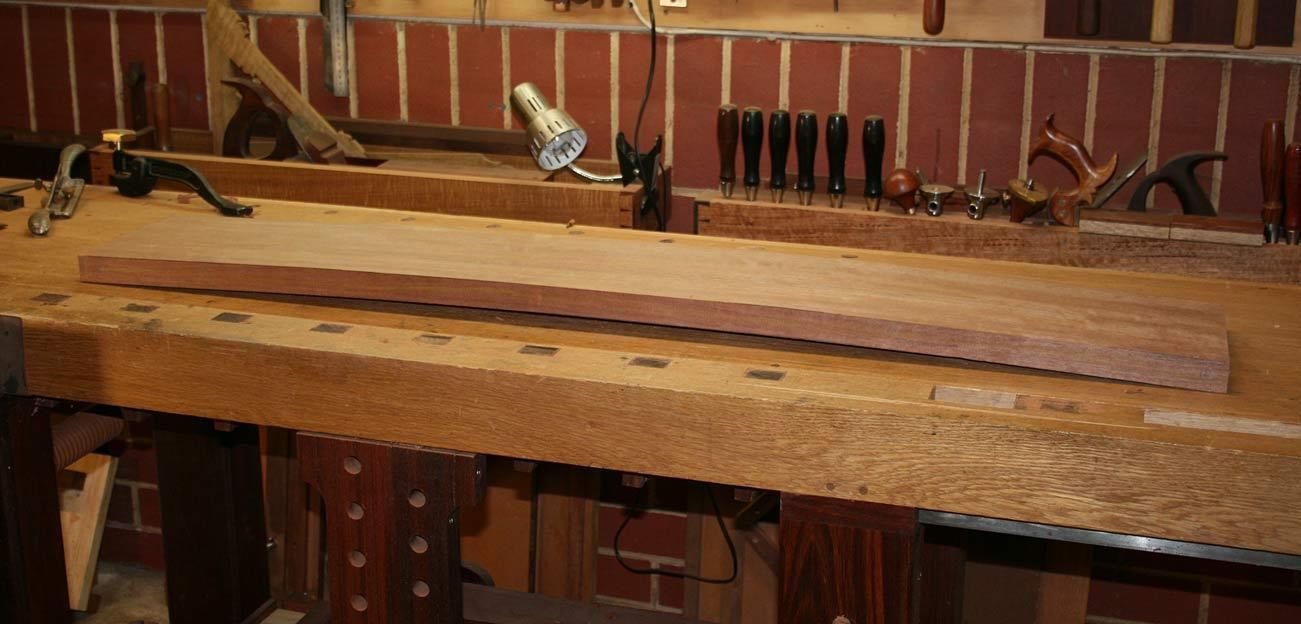
Side view of the curve ...
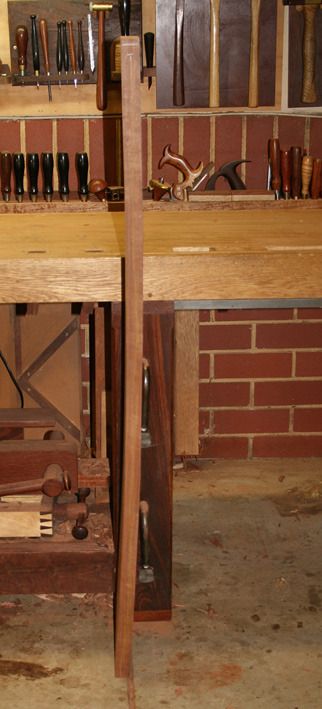
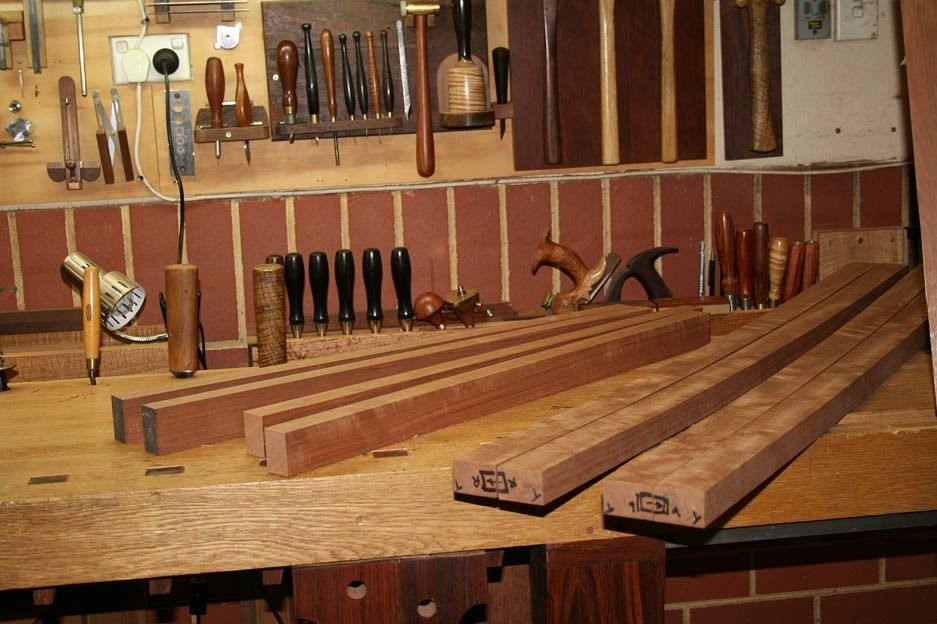
Four sawn and jointed stretchers...
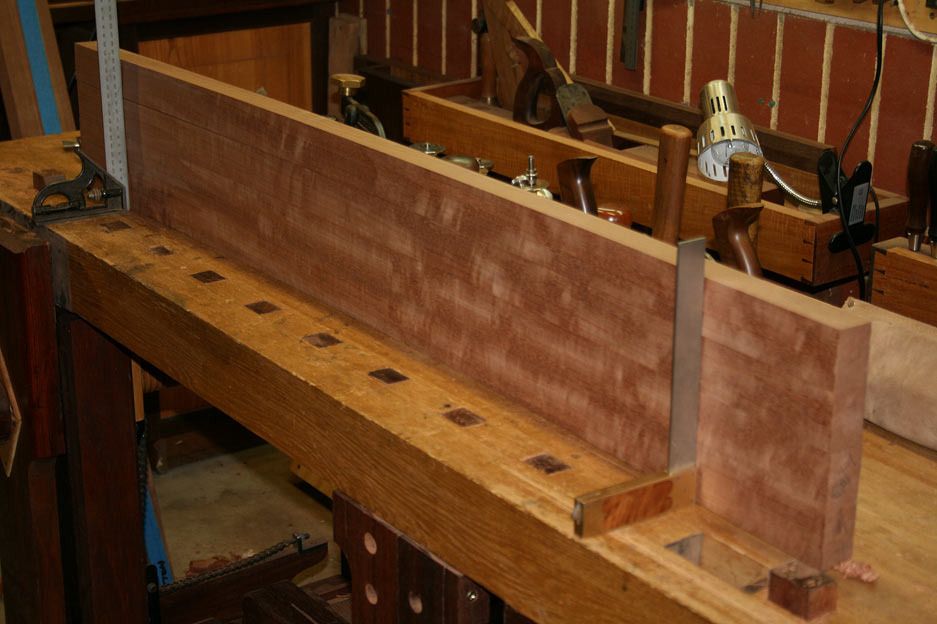
Stretchers are matched and marked, and with rails (not cut to length yet) ...
The panels for the frame-and-panel sides have been made. These are solid and 1/4" thick, and book matched. The reason for 1/4" is to ensure that the panels bend (inside the curved frame).
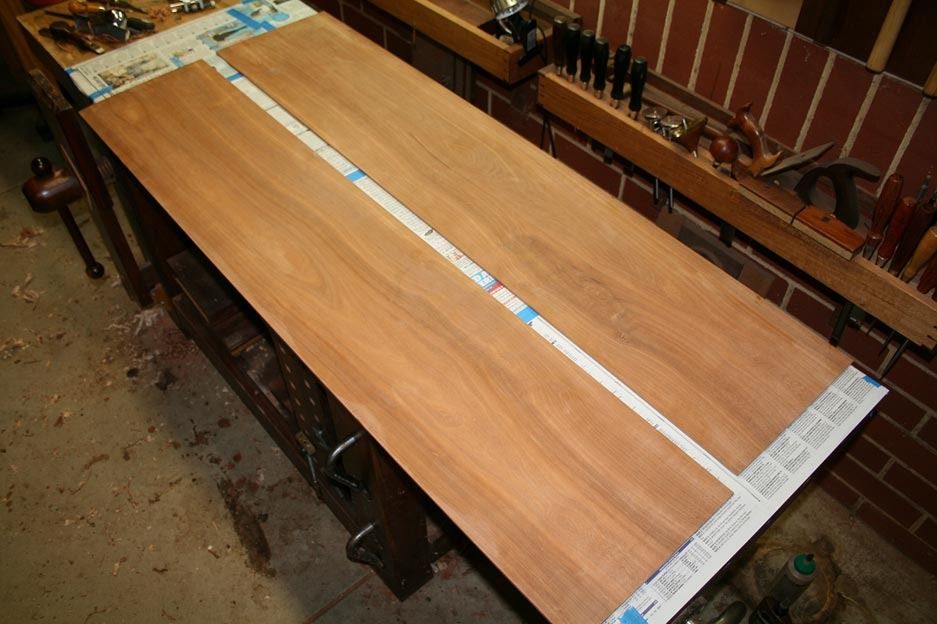
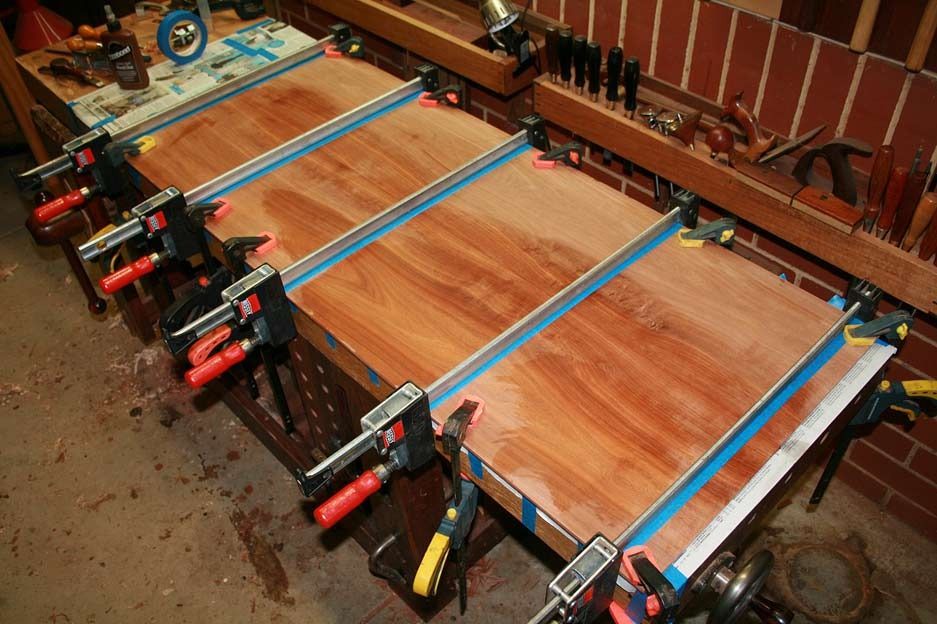
Both panels have been completed. Here they are stacked, faces inward ...
The boards for the back of the chest have also been dimensioned, but just mention this as work done and not post pictures at this time.
Now we are getting close to the question I have for you wastrels.
The design for the sides came down to a choice of these four ..
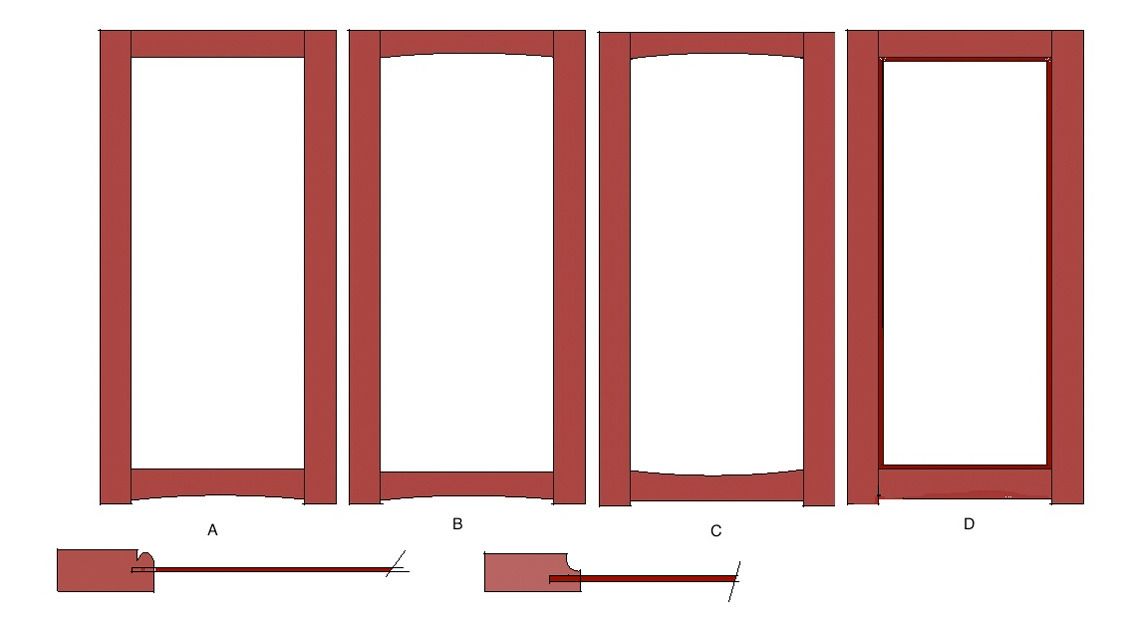
Originally I was going with "A". The lower section mimics the front. However I decided that the combination would end up with the chest looking like a tent on legs! Choices "B" and "C" were discarded as they introduced a different line. So it would be "D" - which looks plain here, except that you are not seeing it in 3D, where the sides curve outwards in the lower section.
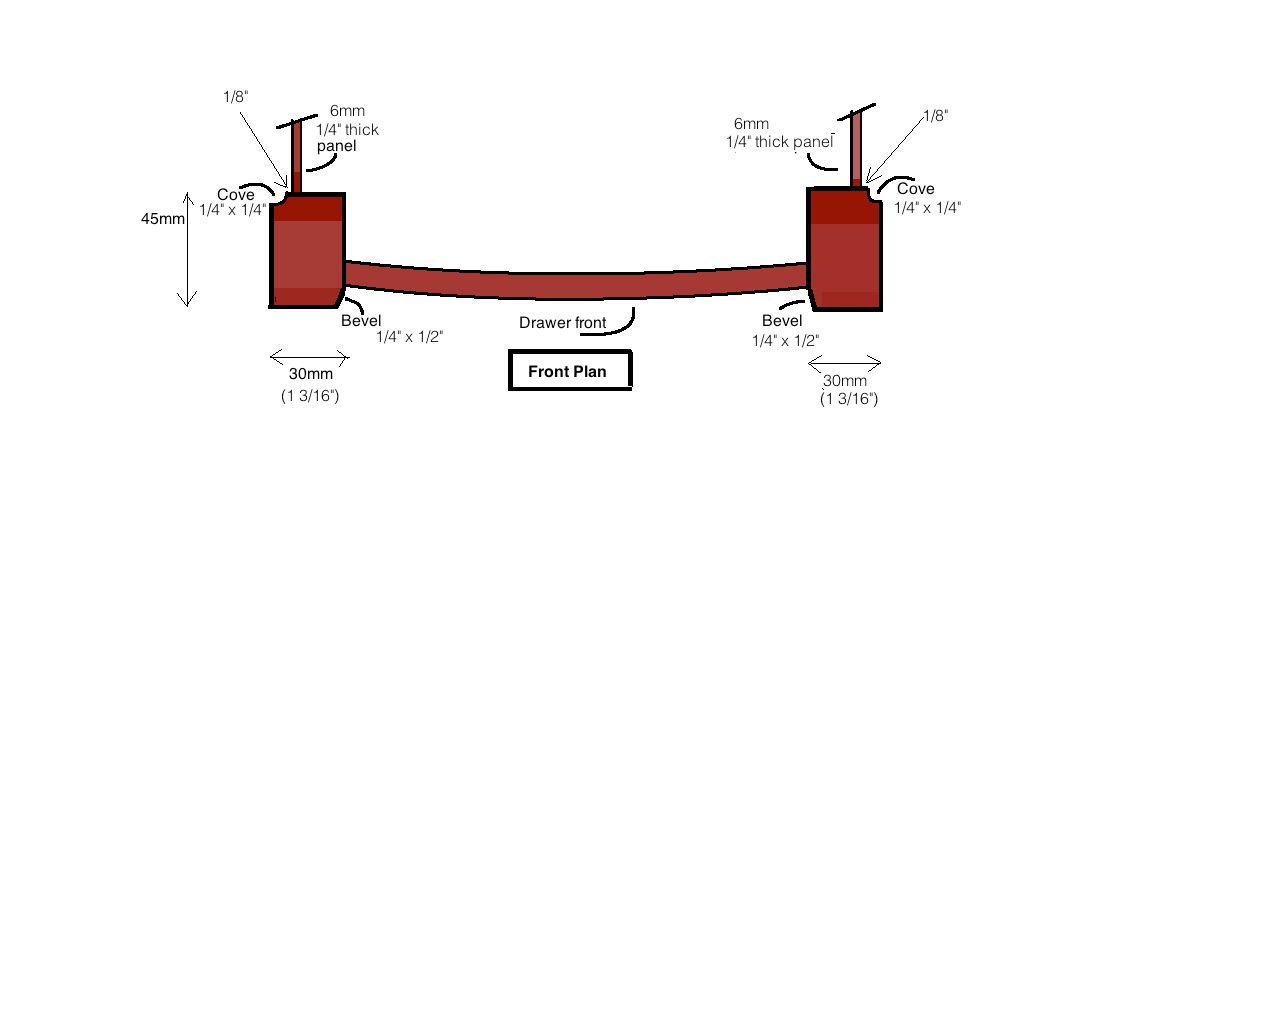
The stretchers are 45mm wide and 30mm thick. The design calls for a bevel on the inside face, which will link with the curved drawer fronts .
This drawing is not to scale, but one I drew up as a reminder for myself what I planned to do ..
Now the area in question is the frame and panel detail. The flat panel needs a transition to the frame. There were two choices: a bead or a cove (pictures above). I have done a number of doors and panels with integrated beads, and that would have been easier. An example is here: http://www.inthewoodshop.com/Furnitu...dtheframe.html
I decided that a cove would make a better transition, as well as link in with the shape of the drawers and, later, the moulding around the top.
So the question is "how would you go about making this cove - keeping in mind that the frame/stretcher are curved?". Together with this, "how do you make a groove for the panel, and how deep should it be?". No, you cannot use a plough plane - unless you have one that goes around corners. Handtools preferred, but I will entertain all thoughts.
I do have my own ideas, but I am interested in what others come up with.
The order of all these? Again, the scale is way out.
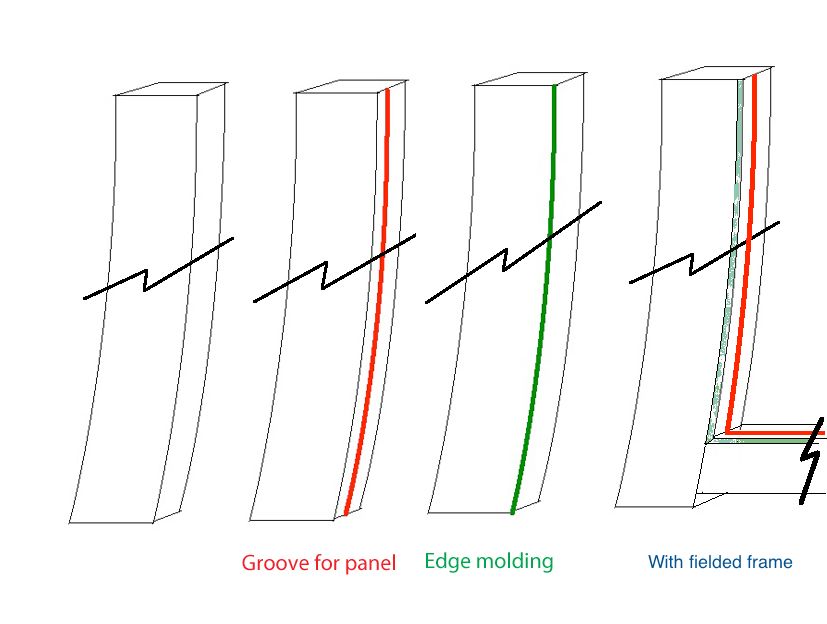
Your thoughts?
Regards from Perth
DerekVisit www.inthewoodshop.com for tutorials on constructing handtools, handtool reviews, and my trials and tribulations with furniture builds.
-
4th May 2015 02:55 AM # ADSGoogle Adsense Advertisement
- Join Date
- Always
- Location
- Advertising world
- Posts
- Many
-
5th May 2015, 04:37 PM #2
GOLD MEMBER
- Join Date
- May 2007
- Location
- Sth Gippsland Vic
- Posts
- 4,373
For the groove , a coachmakers Plow plane
https://www.google.com.au/search?q=c...ers+plow+plane
Or a scratch stock and a bit of patience , Or gauge some lines and chisel it out .
For the Cove , carve it , or scratch stock it . You see a lot of french provincial furniture that has mouldings all over it , the straight sections were done with planes and the curved bits with chisels . Its very well done and you cant so much pick the chisel work by sight but you can tell when you run your fingers along it.
Carry on
Rob
-
6th May 2015, 04:14 AM #3
Be inspired. Be creative. Be bold.
- Join Date
- Apr 2001
- Location
- Perth
- Posts
- 10,820
Interesting ideas, Rob.
The coach maker's plough ... can you lend me one? The groove is likely to end up being chiseled out and cleaned up with a router plane.
Carving ... uh .. no - there's a bit too much to do. The scratch stock I have been playing with. Rather more difficult than usual as the wood is brittle and interlocked. So far, the cove requires first cutting away the waste on a chamfer, and then scratching out the cove, per se.
Regards from Perth
DerekVisit www.inthewoodshop.com for tutorials on constructing handtools, handtool reviews, and my trials and tribulations with furniture builds.
-
6th May 2015, 01:23 PM #4
GOLD MEMBER
- Join Date
- May 2007
- Location
- Sth Gippsland Vic
- Posts
- 4,373
 Originally Posted by derekcohen

Well if I had one I would, Ive never been lucky enough to hold one . Not the fancy type with the flexible iron fence.
I did have a few tools ( Planes ) from a coachmaker once , not the same though, more a curved sole moulding plane . I did a silly thing and sold them .
Rob
-
8th May 2015, 01:12 AM #5
NotTheMama
- Join Date
- Feb 2012
- Location
- Chifley, ACT Australia
- Posts
- 313
Cove...
I am not a fan of fancy edge finishes... if it was me I would leave the edge as is with perhaps a light sand to round off the sharp edge and remove any splinters. That unit will look fantastic with or without the cove.
But what about a core box bit on a router? You could fix two dowels on the base of the router so that the base is a few mm over the piece and traces the contour of the curved posts at an even height.
cove.jpg
The cove COULD stop say 2" of the each corner...
 I don't know of a hand tool that would do this... I have seen magazine articles in which people have made custom hand made planes with specially shaped blades. One could be made to make something like this, but it would be as much effort to make the tool as the piece itself and not worthwhile unless you doing a lot of them.
May be a wooden rebate plane can be customised to take a curved corner blade and drilled through the sides to take two rods which can then ride over the curved timber at an even height. It's hard to explain this in words... the sort of plane that I am talking about is shown below, but the cutting edge will need to be curved, the base of the plane around the blade needs to be eliptical, and the plane needs to ride on two rods mounted at right angles to the plane... what's more, these rods need to be adjusted as the plane routs out the cove... Ugh! I'm getting tired just thinking about it!
images.jpg
-
8th May 2015, 01:17 AM #6
NotTheMama
- Join Date
- Feb 2012
- Location
- Chifley, ACT Australia
- Posts
- 313
IMG_4106.jpg
Here is what I was trying to describe before... Rob quite rightly called a "coach make's plough plane"
-
8th May 2015, 03:03 AM #7
Be inspired. Be creative. Be bold.
- Join Date
- Apr 2001
- Location
- Perth
- Posts
- 10,820
I think that modified Round would be very difficult to control - to maintain an even depth and height.
It is interesting what you say about preferring non-"fancy" finishes. The reason for the cove is not to make "fancy" but to create a continuity between the frame and the panel. I showed my wife (for whom this is being built) a few alternatives, and her preference was a simple chamfer . I have experimented with this and must admit that it is attractive. mmmm ... decisions ... decisions ...
Regards from Perth
DerekVisit www.inthewoodshop.com for tutorials on constructing handtools, handtool reviews, and my trials and tribulations with furniture builds.
-
8th May 2015, 08:44 AM #8
GOLD MEMBER
- Join Date
- Mar 2004
- Location
- Brisbane (western suburbs)
- Age
- 77
- Posts
- 12,117
Qui Derek?? In my house, there would be no further decisions to make. If the Umpire liked chamfer - it would be a chamfer! Originally Posted by derekcohen


I'm a little surprised the scratch stock isn't doing the job for you. This must be particularly difficult stuff you are working with - glad it's your project & not mine, old chap.
Cheers,IW
-
8th May 2015, 09:18 AM #9
NotTheMama
- Join Date
- Feb 2012
- Location
- Chifley, ACT Australia
- Posts
- 313
chamfer scraper shave...
Hi Derek, what about a chamfer scraper shave (sorry can't insert picturesat the moment) with a rounded blade for a cove or a flat blade for a chamfer There is a V shaped guide around the blade toguide your hand during the shave. They seem easy enough to make and there are plans for them in AU Woodsmith issue 89... which I can copy for you (not the issue, just the pages, lest I breach copyright or something). Originally Posted by derekcohen
-
8th May 2015, 03:05 PM #10
Be inspired. Be creative. Be bold.
- Join Date
- Apr 2001
- Location
- Perth
- Posts
- 10,820
Hi Ian
As a result of this project, it has dawned on me the importance of a Stanley #66 over a simple scratch stock ala Garrett Hack.
Here is Hack's scratch stock ..

Here is the #66 ...

The advantage of the #66 is that it has a depth stop (the body acts in this regard), and this is important for two reasons. Firstly, keeping the cove/bead at a uniform depth, which would otherwise stand out like a sore thumb with a panel below. And secondly, the depth stop enables very fine scrapes at the end - burnishing - and the final finish is smooth and reasonably polished (but not as good as planed).
Garcia, thanks for the ideas. It is important to remove the waste before using a #66 (or other). I mark out the boundary lines with a gauge, and then use a small block plane or spokeshave. I also have a Stanley #65 chamfer shave, which is the appropriate tool for curves ...

I found it less hassle to simply use an ordinary spokeshave for this task. I did attempt to fit a custom blade for the cove, but the side guides on the #65 are not reliable to keep the cove running true.
Chamfer or cove? Undecided .. a little more experimentation needed.
Regards from Perth
DerekVisit www.inthewoodshop.com for tutorials on constructing handtools, handtool reviews, and my trials and tribulations with furniture builds.
-
8th May 2015, 07:59 PM #11
NotTheMama
- Join Date
- Feb 2012
- Location
- Chifley, ACT Australia
- Posts
- 313
The "chamfer shave" that I was trying to decribe with plans in AU Woodsmith is a home made wooden version of the Stanley #65 that you have shown in your post. If you have one of these then there is no sense in making the other, except maybe to fit a curved shaving blade to carve out a cove.
As for asking the significant other for her opinion, I find that it helps not to ask unless you are pretty sure that you are going to like the answer one way or the other... In this case, it seems to me that the piece is for her... unless you have taken to wearing lingerie... (?) ... that she would prefer a chamfer, and that chamfers are easy to shave off compared to coves, so I am not exactly sure what the problem is... P
P
After all, why plane over a knot when you can work around it?
-
8th May 2015, 09:05 PM #12
Be inspired. Be creative. Be bold.
- Join Date
- Apr 2001
- Location
- Perth
- Posts
- 10,820
In this case, it seems to me that the piece is for her... unless you have taken to wearing lingerie... (?) ... that she would prefer a chamfer, and that chamfers are easy to shave off compared to coves, so I am not exactly sure what the problem is...P
The problem is that I have exquisite taste and a sense of proportion, and my wife has none!
Actually, jokes aside, that is partly true. She will look at the intersection of the frame and panel in isolation to the design of the chest as a whole. So she does not consider that the sides are curved, as are the drawers, and that the mouldings around the top are coves. Using a chamfer will make it the odd shape as the frame transitions to the panel.
What I think may work is a compromise - a shallow cove on a chamfer.
Regards from Perth
DerekVisit www.inthewoodshop.com for tutorials on constructing handtools, handtool reviews, and my trials and tribulations with furniture builds.
-
9th May 2015, 11:21 PM #13
GOLD MEMBER
- Join Date
- Feb 2003
- Location
- back in Alberta for a while
- Age
- 68
- Posts
- 12,006
High Derek
the "easy" way is a trim router (with edge guide) and 1/8" cutter and multiple passes
the cove could be done the same way -- take it close by routing a series of rebates (as per Matt Bickford) and finish with a core box bit
By hand, you'll need to build yourself a version of one of these and grind a couple of cutters to suit

3rd alternative
for the rebate, knife the edges using a mortice gauge set-up for working on a curved face add a curved fence to your router plane (or a false sole to your hinge mortice plane) and fit a 1/8" cutter
setting up TWO routers would be easiest -- that way you can switch between left and right handed use with ease
for the cove -- an electric trim router will be the easiest by far
by hand, I think you will need to make yourself a set of (left and right) curved sole rebate planes and a left and right pair of hollow planesregards from Alberta, Canada
ian
-
12th May 2015, 03:25 AM #14
Be inspired. Be creative. Be bold.
- Join Date
- Apr 2001
- Location
- Perth
- Posts
- 10,820
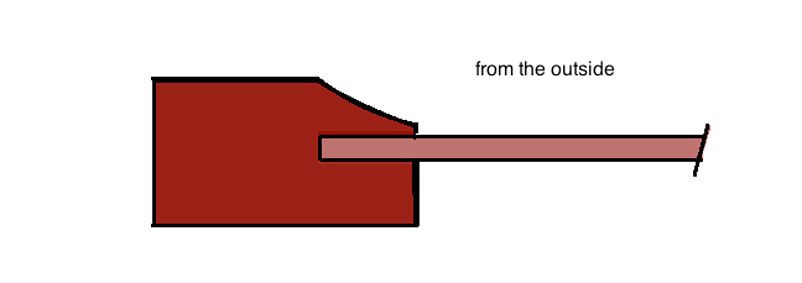
Shaping the Cove
Here are pictures of shaping the cove.
A couple of points first, I ran a revised cove past Lynndy, who gave her approval. Secondly, I reduced the thickness of the rails from 30mm to 25mm. I thought the original was too chunky once the pieces were shaped. So I bandsawed/planed away 5mm. This definitely looks better.
It was easier to test out the moulding process on the upper- and lower straight rails, so this is where I began.
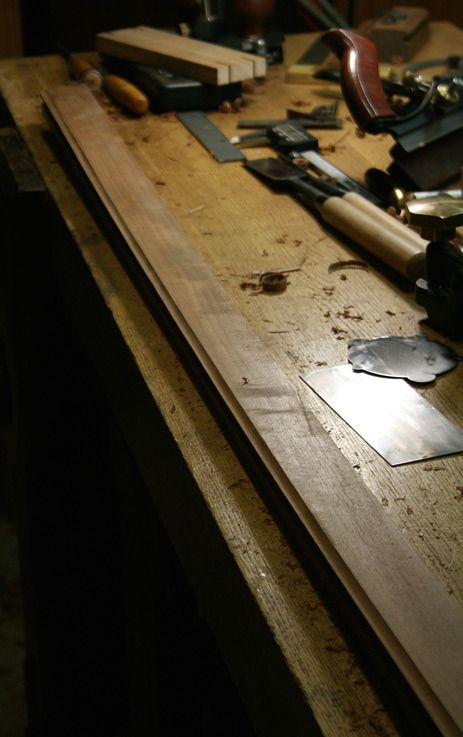
The first step was to mark out the groove for the panel. This was done with a knife gauge - even though I would be ploughing with the grain, I did not want any chip out at the shoulders.

The lines were chisels to remove material at the walls ..
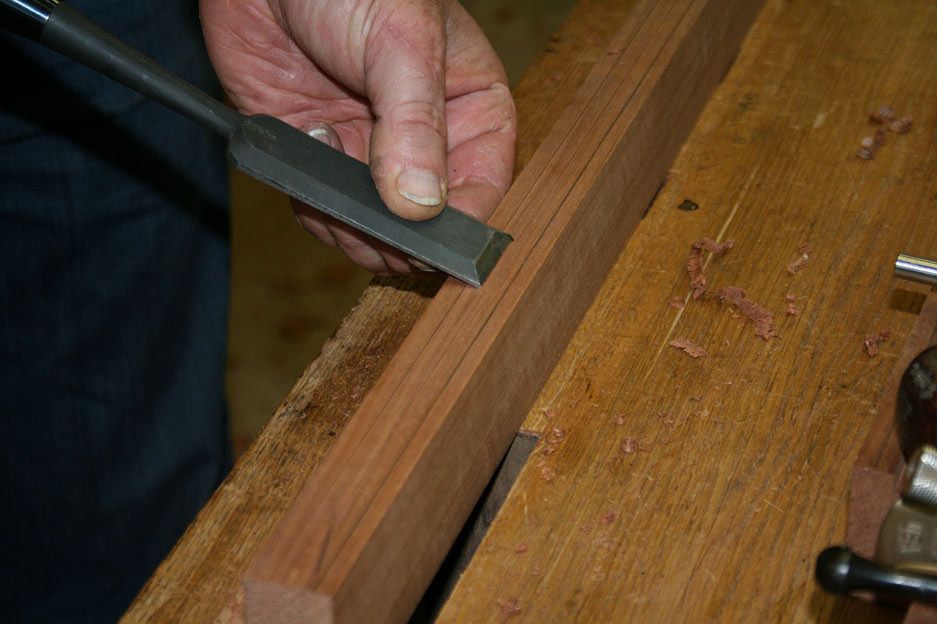
.. and then knifed again to remove the waste ...
It was then a simple matter of ploughing to the depth of 1/4".
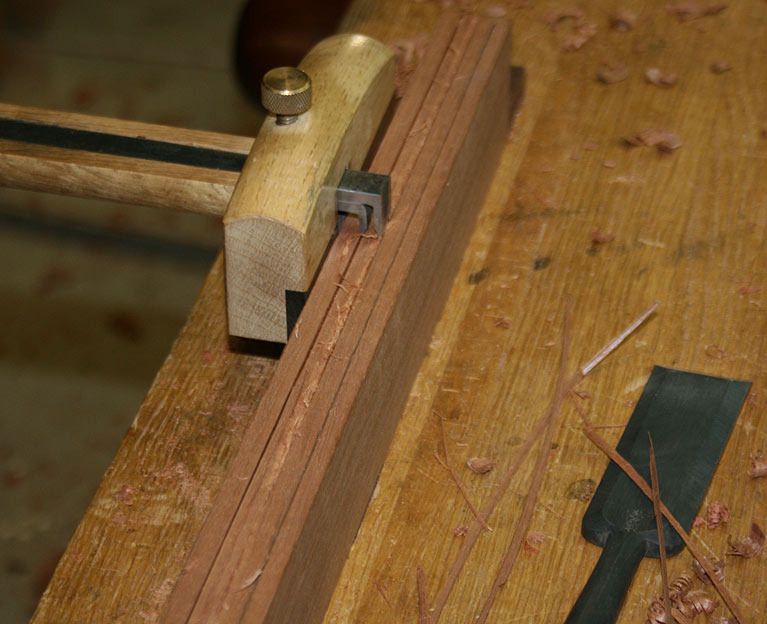
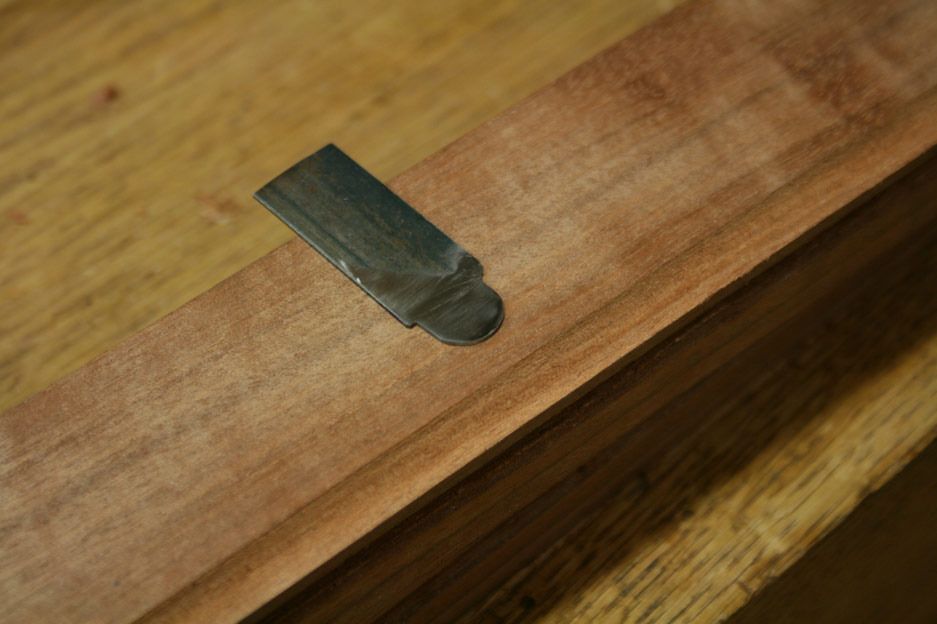
The boundaries of the cove were scored on each side with a cutting gauge, 1/4" wide on the upper side and 1/8" deep (which is half way to the groove). Then the waste was block planed away close to the lines. On the curved side rails it was easier to use a spokeshave to do this) ...
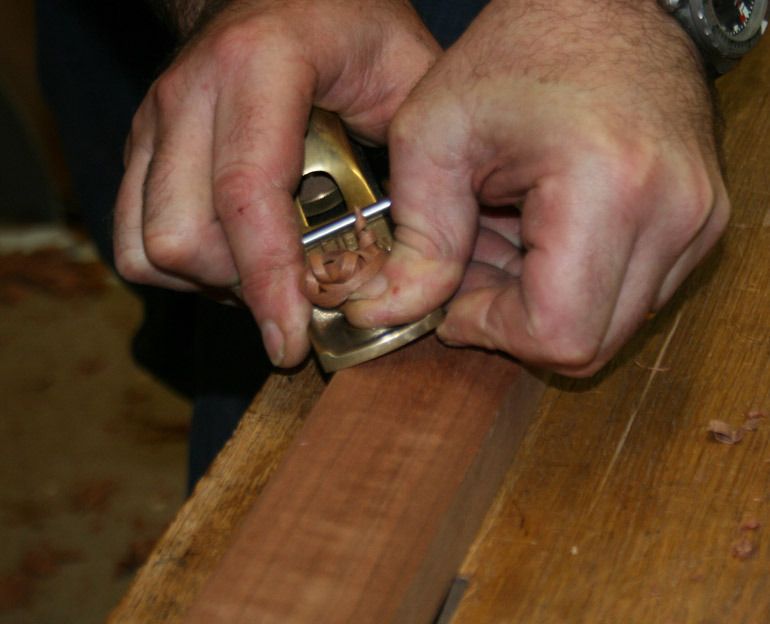

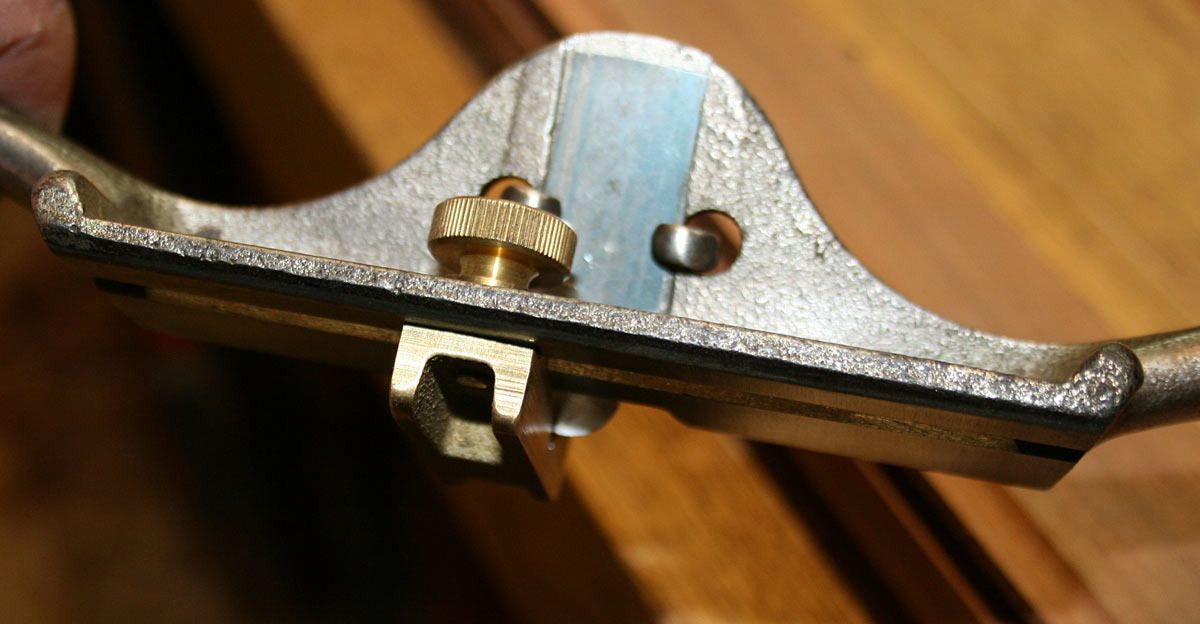
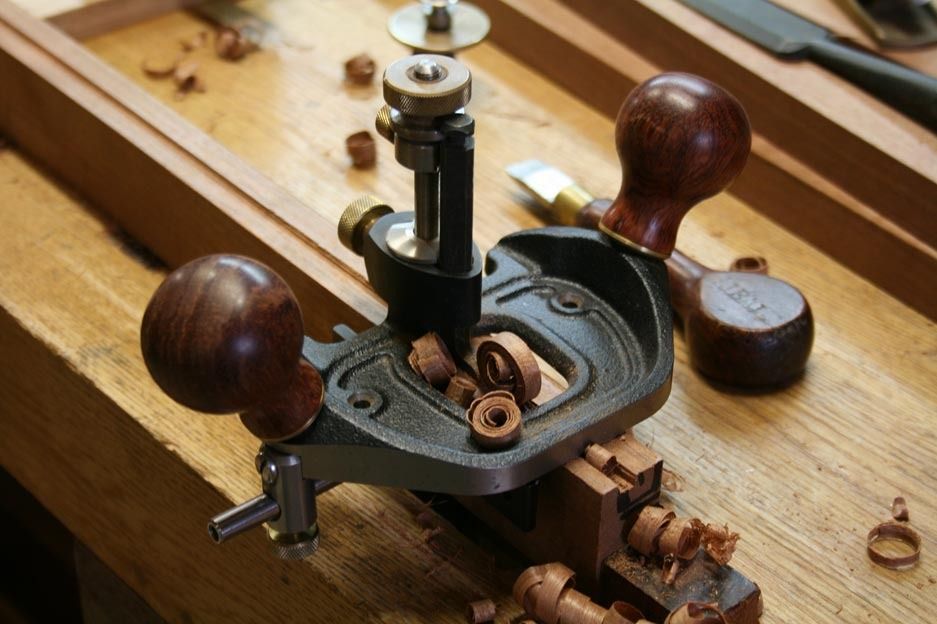
I shaped a scraper blade from a 3/4" wide scrap of bandsaw blade ...
This fitted so in a Stanley #66 hand header ...
Working to the lines ...
Shavings ...

The result on the straight sections (with some scrap fitted to the groove to show the transition) ..
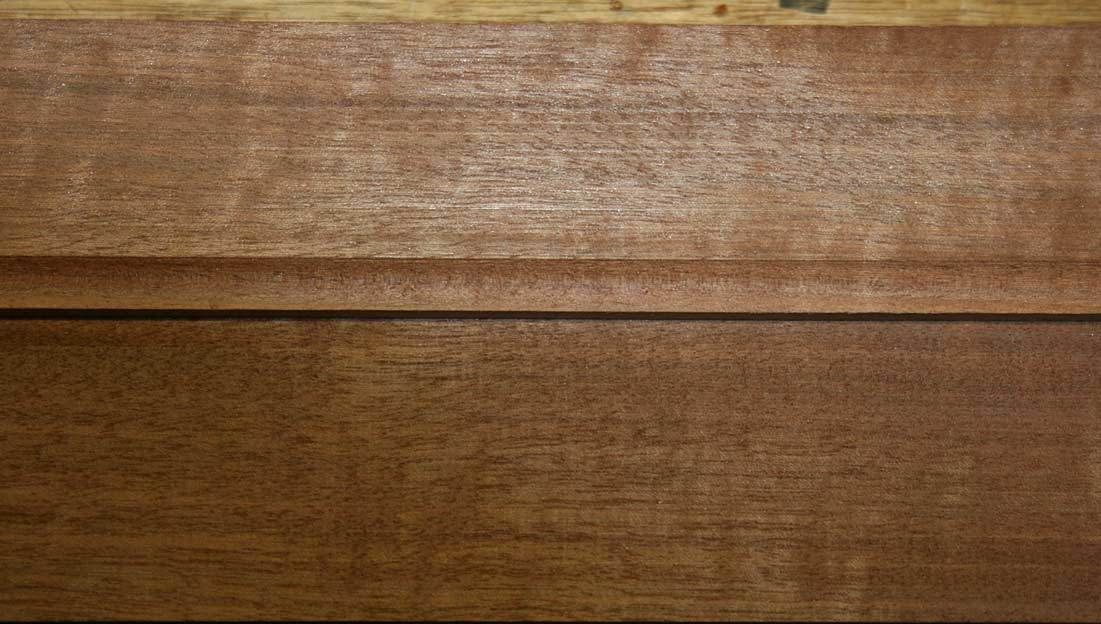 Visit www.inthewoodshop.com for tutorials on constructing handtools, handtool reviews, and my trials and tribulations with furniture builds.
-
12th May 2015, 03:26 AM #15
Be inspired. Be creative. Be bold.
- Join Date
- Apr 2001
- Location
- Perth
- Posts
- 10,820
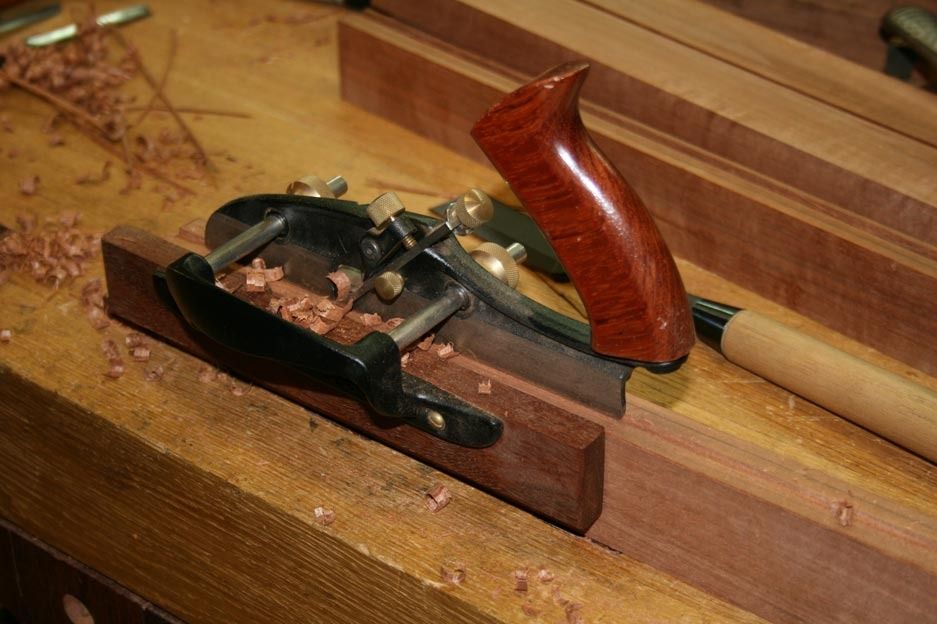
Differences when shaping the curved rails ...
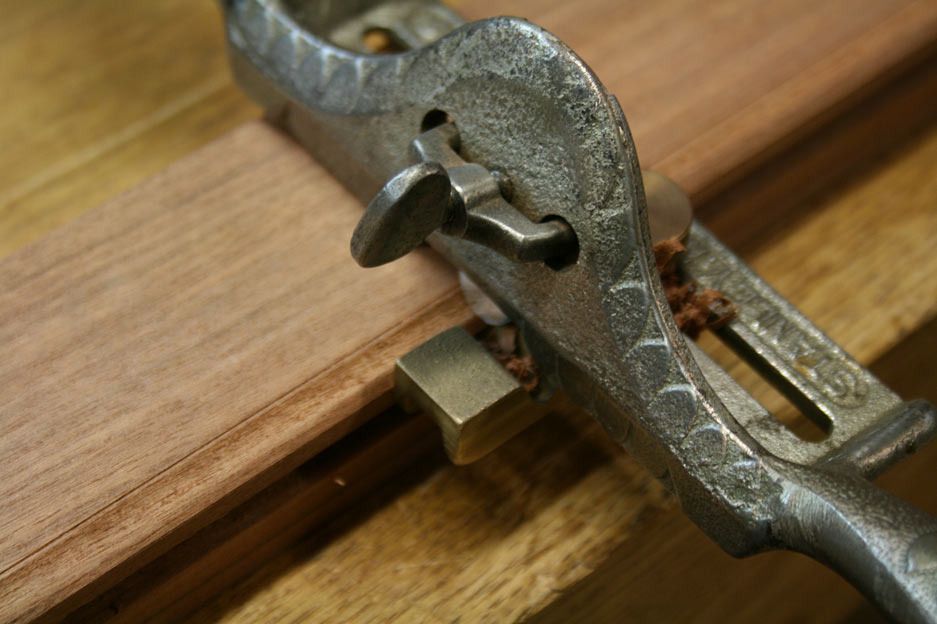
The first was to use a gauge with a small fence as it needed to run inside the curve ...

The other was to use a router plane (with fence) in place of the plough plane ...
The results were the same ...

Back next time after the side panels are completed.
Regards from Perth
DerekVisit www.inthewoodshop.com for tutorials on constructing handtools, handtool reviews, and my trials and tribulations with furniture builds.


 Reply With Quote


Similar Threads
-
Lingerie Chest
By derekcohen in forum FURNITURE, JOINERY, CABINETMAKING - formerly BIG STUFFReplies: 17Last Post: 30th November 2014, 05:29 PM -
Sea Chest
By LR09WA in forum WOODWORK - GENERALReplies: 14Last Post: 11th June 2011, 08:00 PM -
Ice Chest
By rod1949 in forum Links to: TIMBER & HARDWARE SUPPPLIERSReplies: 1Last Post: 15th September 2004, 08:13 PM -
Chest
By GRS in forum WOODWORK PICSReplies: 8Last Post: 7th July 2004, 12:26 PM
