

 Thanks:
  Likes:
  Needs Pictures:
  Picture(s) thanks:
Results 1 to 15 of 15
-
2nd October 2013, 03:27 PM #1
 Be inspired. Be creative. Be bold.


- Join Date
- Apr 2001
- Location
- Perth
- Posts
- 10,826
 Anyone in Perth own Wegner's "The Chair" ?
My current project is to build a copy of Wegner's "The Chair", also referred to by some as the "Round Chair". This is one of the most famous chair designs from this, now late, Danish designer. The original is (still) made by CNC machines. There are many very complex curves. My aim is to build one with hand tools.
With the kind help of a woodie in the USA, so far I have been collecting dimensions. I have begun making templates and planning the build method. Yet I have never seen an original The Chair in the flesh. I am hoping that someone in Perth has one and will contact me. Equally, I would love to hear from anyone in Oz who either owns one or has built one (even with machines). There are a few copies for sale on eBay, but I am not sure how close they come to the dimensions, construction techniques, or the many subtle curves.
Here is the chair ...
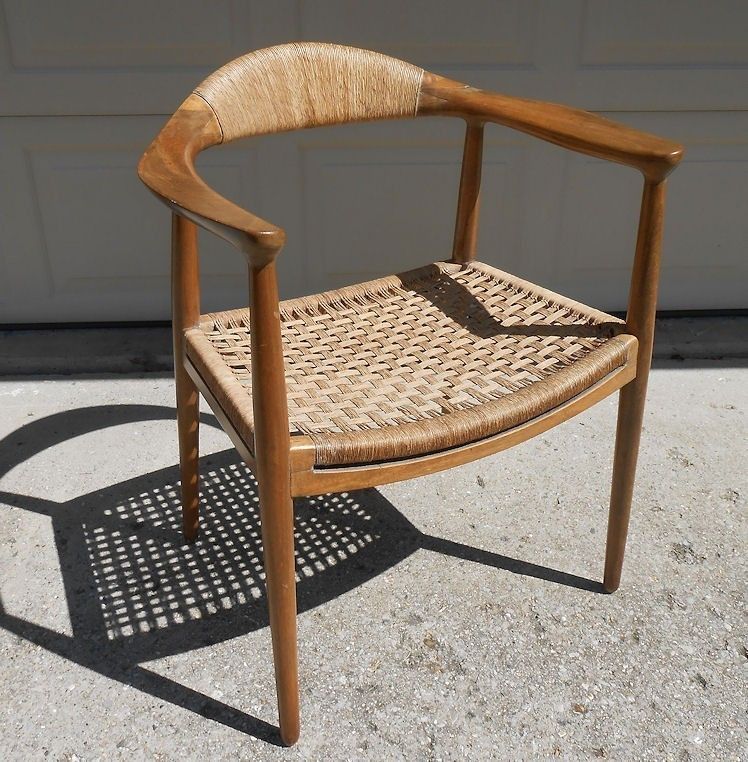
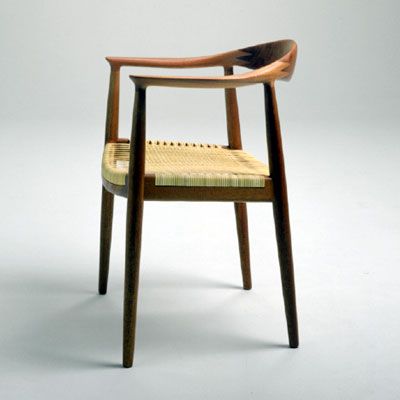
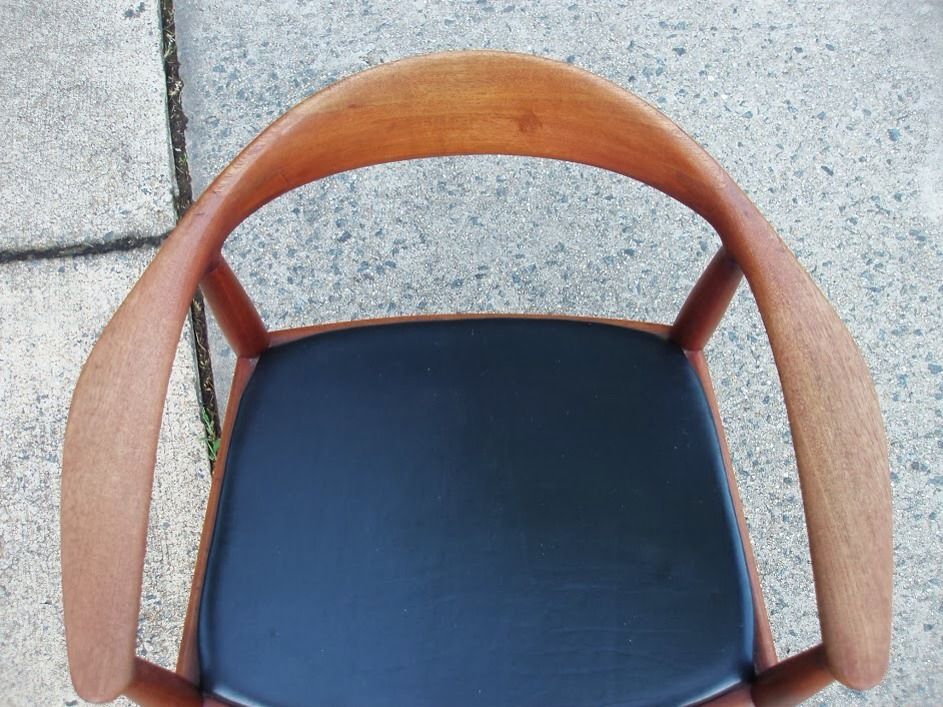
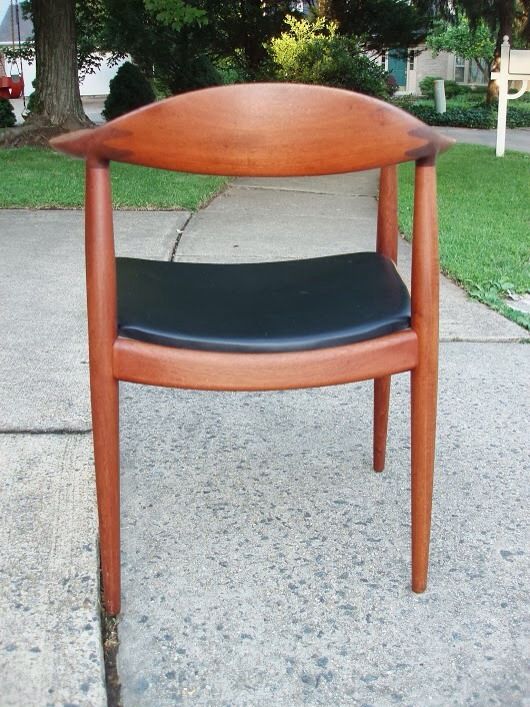
There are two versions, one with Danish Cord seat, and the other with a solid seat. I plan on weaving the corded seat.
Here is a video of the chair being constructed in the factory ...
PP MØBLER / GALLERY / VIDEO / PP503 - ENGLISH SUBTITLES
Regards from Perth
DerekVisit www.inthewoodshop.com for tutorials on constructing handtools, handtool reviews, and my trials and tribulations with furniture builds.
-
2nd October 2013 03:27 PM # ADSGoogle Adsense Advertisement
- Join Date
- Always
- Location
- Advertising world
- Posts
- Many
-
2nd October 2013, 06:57 PM #2
Banned
- Join Date
- Apr 2005
- Location
- kyogle N.S.W
- Age
- 50
- Posts
- 4,844
hi,
I've never built one. I can offer a few ideas on a copy with hand tools.
Do you mean ALL hand tools ? Is it cheating if you use, say, a lathe with a motor ?... ( those legs are begging to be made that way).
imo....the mortices for the seat stretchers (or whatever you call them) are kinda begging to be done with a plunge router. The tenons for that joint could be filed over though with a hand tool however. (krenov did them that way didn't he ?)
I'm just trying to say that I think the design has been chosen to facilitate a fast machine process. But I guess thats why its so challenging for you to do all entirely with hand tools.
-
2nd October 2013, 08:57 PM #3
Be inspired. Be creative. Be bold.
- Join Date
- Apr 2001
- Location
- Perth
- Posts
- 10,826
Hi Jake
Well I consider a lathe a hand tool since I am holding the chisel
I am also thinking of a router for the mortices but would prefer to use a mortice chisel. I'll decide that when the templates are completed and I am clearer on the angles involved. For example, if the legs need to be morticed before turning, a router would better preserve the squareness of mortice walls.
Much of the upper sections will be a combination of bandsaw, spokeshave and rasp - not unlike a Maloof chair (as a comparison).
The plan is to build the legs and stretchers first, then the arms, and finally fit the back. The back is the hard bit. It joins the arms with what were referred to as "dovetails" but are finger joints. I would feel more comfortable sawing these with a backsaw than a bandsaw. Getting the arm angles spot on is the tough bit. I need 6" x 6" timber for this as it is all solid wood - nothing is bent. I just about had a hernia lugging in Curly Jarrah posts!
The round mortices in the arms are straight forward. Lots of rasping and spokeshaving. Should be fun.
Any thoughts?
Regards from Perth
DerekVisit www.inthewoodshop.com for tutorials on constructing handtools, handtool reviews, and my trials and tribulations with furniture builds.
-
2nd October 2013, 10:40 PM #4
GOLD MEMBER
- Join Date
- Feb 2003
- Location
- back in Alberta for a while
- Age
- 68
- Posts
- 12,006
Hi Derek Originally Posted by derekcohen

I think you are over thinking the build
definitely turn the legs
I suggest you build a jig and mortice the legs after turning -- the bulk of the waste could be removed with a brace and bit, and whilst frowned upon by many, dowels would work (as would the black and green power tool)
arms and back
glue blanks together to make the rough outline of both arms and the back, band saw to approximate shape, attach the legs, and then do the rest of the shaping.
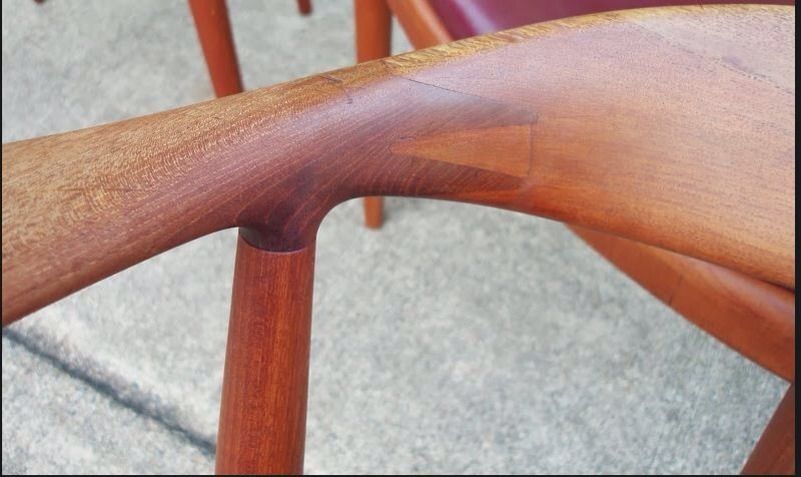
the detail where the arms curve down to meet the legs is pretty standard -- I've seen it covered in a number of places
The key I think is to focus on the fact that you are only making one -- production techniques don't need to be adopted.
BTW
are you using this project to test rasps?regards from Alberta, Canada
ian
-
2nd October 2013, 11:55 PM #5
Be inspired. Be creative. Be bold.
- Join Date
- Apr 2001
- Location
- Perth
- Posts
- 10,826
Hi Ianarms and back
glue blanks together to make the rough outline of both arms and the back, band saw to approximate shape, attach the legs, and then do the rest of the shaping.
the detail where the arms curve down to meet the legs is pretty standard -- I've seen it covered in a number of places
Thanks for the input.
My intention is to recreate the original as closely as possible. Glueing blanks together is not in the plan. It needs to be one section of timber shaped to fit. The factory bandsawed out the rough shape, then CNC-ed it on a lathe sander. In any event, I am working with Curly Jarrah (after my Kist I vowed to give up on curly timbers), which makes it even more difficult to glue sections together. It would end up looking like a confused Zebra!
I probably will do it this way (sort of - my preferred morticing method is here). Haven't decided - the mortice is quite complicated. It needs to make room for intersecting tenons. To do this, each mortice is split into two sections to receive haunched tenons. This would be much easier with a router. I am exploring traditional alternatives - that does not included dowels or other similar joinery.I suggest you build a jig and mortice the legs after turning -- the bulk of the waste could be removed with a brace and bit, and whilst frowned upon by many, dowels would work (as would the black and green power tool)
I am planning on two at this stage, one in dark Jarrah with a pale Danish cord seat, and another in a light wood with a dark cord seat.The key I think is to focus on the fact that you are only making one -- production techniques don't need to be adopted.
Regards from Perth
DerekVisit www.inthewoodshop.com for tutorials on constructing handtools, handtool reviews, and my trials and tribulations with furniture builds.
-
3rd October 2013, 07:39 AM #6
Banned
- Join Date
- Apr 2005
- Location
- kyogle N.S.W
- Age
- 50
- Posts
- 4,844
well... just gotta say a copys going to be painful without an example on the floor in front of you to begin with. Originally Posted by derekcohen
...to give you ruff initial process with just what you've given me now.. be something like this (just off the top of my head.) Probably change when all the details become available.
- Legs
***
- square up stock for the legs and dock to length. If the thickest the legs get is say 40mm diameter (?) then I'd square up about 44x44 stock to give you some meat for turning.
So end up with say ......4 @ 45x45x 600(?)
- Then I'd mortise the joints first. plunge rout with a upcut spiral bit. (probably 1/2"). Front legs be easy with a plunge router I'd say as everything looks very square. Back leg joints will need to be ramped which complicates things and suggests a counter bore type joint because the depth of cut will be limited. i.e.. you rout say 10mm in with say the wider 1/2" bit then change bits and rout deeper with say 3/8" spiral bit (at least for the front square cut legs)...back ones maybe do the 3/8" part by hand...as long as the wider diameter which is seen looks crisp)
- Then once all the jointing is done you can turn on the lathe. But you'll have to protect your nice accurate crisp mortises from tearout. So I'd make ruff 1/2" round ended slots that fit your mortises perfectly. Make them just long enough that when pushed home into the joints they protrude out a bit....countersink them and screw them in so they don't fly out when the lathe is on. you can cut/scrape/sand as much as you like now. Just pull them out when done and it'll look just like the machine made one") .
.
- Those legs are just cigar shaped so I'd make a template with sizing marks say every 3 inches or so along with diameter readings. Then simply size each mark and cut to the sizes then ruff sand with course to shape to 'look' right first then finish sand.
The tenon that goes into the arm can be just sized with a spanner and the shoulder can be layed out accurately from the end of the stock simply with a chisel (sharp line mark) . But I would skew the tenon shoulder while you've got them on the lathe (uno to take glue and compensate for errors)
But you probably know most of that already.
I reakon you'd do a great job of it with all that hand tool experience. good luck
-
3rd October 2013, 11:38 PM #7
GOLD MEMBER
- Join Date
- Feb 2003
- Location
- back in Alberta for a while
- Age
- 68
- Posts
- 12,006
Originally Posted by derekcohen
Derek, I'm not suggesting that you not produce a pair of faithful copies, what I was trying to say is that working with hand tools, you should not try and replicate the machine making processes.My intention is to recreate the original as closely as possible. Glueing blanks together is not in the plan. It needs to be one section of timber shaped to fit. The factory bandsawed out the rough shape, then CNC-ed it on a lathe sander. In any event, I am working with Curly Jarrah (after my Kist I vowed to give up on curly timbers), which makes it even more difficult to glue sections together. It would end up looking like a confused Zebra!
As I view the video, the machine process is:
1 -- the arms and crest rail are sawn oversize and then
2 -- shaped using a sander and copy lathe -- importantly the area where the arms and crest rail will be joined together is not machined at this stage
3 -- the finger joints are cut in each arm and each end of the crest rail, referenced off the square surfaces left in stage (2)
4 -- the arms and crest rail are glued together -- the square surfaces left in stage (2) make the clamping easy
5 -- the joined component is CNC machined to remove the extra material in the vicinity of the join and to create the stems for the legs
It's a bit hard to tell without an original, but it looks as though where the arms join to the crest rail, the arms are in the x-z plane and the crest rail in the x-y plane -- the join between the two is at 90° when viewed in the y-z plane and about 100° when viewed in the x-z plane. The observed angles of the arms and crest rail is achieved through the shaping process.
My suggestion for making the arm/crest rail component using hand tools is
1 -- use a band saw to get the timber blanks for the arms and crest rail to approximate shape -- be sure to leave the joint area square
2 -- cut the finger joints
3 -- glue and clamp the joints
4 -- shape the component using shaves, rasps, files, abrasive paper -- IMPORTANTLY leave the stems where the legs will attach oversize to be shaped after the legs are attached.
I can't see any way make this component and be sure that the curly Jarrah doesn't look like a Zebra !
The front and rear seat rails appear to be curved and the side rail square, making these is straight forward for you except for the tenons and their shoulders.
Apart from using carving chisels, I can't think of any way to get the concave curve needed on the shoulders.
The legs
(I was mostly joking when I suggested you use dowels or the black machine with green highlights)
Can I caution against cutting the mortices before you turn the legs.
Remember the mortices are not at 90° to each other -- and not necessarily at right angles to the axis of the legs.
Achieving the required angles on a square blank is IMO more than a major challenge.
Personally, I think it safest to cut the mortices after turning the legs. You can use a jig to hold the legs and position the router.
Again, I suggest you leave the top of the legs slightly oversize so that final shaping can be completed after the legs are attached to the crest-arm component.
Looking forward to the WIP thread and the story on your web site.regards from Alberta, Canada
ian
-
4th October 2013, 09:29 AM #8
Banned
- Join Date
- Apr 2005
- Location
- kyogle N.S.W
- Age
- 50
- Posts
- 4,844
IMO. Originally Posted by ian
I know as a fact its safe to fill the mortises with tight temporary pieces to retain a clean cut. I can say that because I've done such things a few times, and the most that can happen (and it happened once at the beginning) is it throws and bounces off you,,,,not ripps apart your heart,,,,,or implodes a finger,,,,or whatever.
Faced and edged stock conforms perfectly to pretty much everything modern woodwork relates too. 2 flat surfaces at 90 degrees to one another will fit your jigs or tools etc so much easier, leading to more accuracy (and safety) etc etc. Most shaping is done that way for that reason. You do your jointing first then shape after.
Even if the legs arn't perfectly 90 (even though I suspect the front legs are) your jig building is going to be far quicker and accurate than trying to jig freehand turned surfaces (inconsistant to one another), simply because 2 flat surfaces seem to sit better together. The only thing thats left consistent after freehand turned legs is the centre points. So you'd have to jig build from that
Your only doing one chair. You don't have access to dedicated milling machines. I would never abandon that one reliable accuracy (faced and edged stock), especially knowing that you can turn the legs safely AFTER jointing. I'm not reckless. I don't want to hurt myself..... If I felt it wasn't safe I'd agree to turning before.
imo.
Goodluck
-
4th October 2013, 05:08 PM #9
Be inspired. Be creative. Be bold.
- Join Date
- Apr 2001
- Location
- Perth
- Posts
- 10,826
Jake, what you describe is how I had thought to build from the beginning. I have done this before, so I know that success in avoiding blowing out a mortice when turning (done that as well) is the importance in filling in the mortice as tightly as possible. And that is why this method depends on using a router (straighter walls, reliable thickness). On the other hand, as Ian suggests, the mortices may be cut after the legs are turned - the advantage here is aligning the angles better, the disadvantage is losing the reference sides.
I am in the process of making templates, partly for building two dimensionally-matched chairs, and partly to be able to determine the angles involved.
Yes, not having a completed chair to look at is a bugger. Hence this thread. ANYONE OUT THERE WITH A REAL WEGNER "THE CHAIR"!!!
Regards from Perth
DerekVisit www.inthewoodshop.com for tutorials on constructing handtools, handtool reviews, and my trials and tribulations with furniture builds.
-
5th October 2013, 05:31 AM #10
Banned
- Join Date
- Apr 2005
- Location
- kyogle N.S.W
- Age
- 50
- Posts
- 4,844
fair enough. Maybe just forget trying for an identical copy.
Why not just make one similar using your own methods. ? your joinery will always kick industry joinery ####. Certainly doesn't really matter if the angles are a bit different here and there. The design really isn't that complicated. Just making it identical is what will slow things down. The front legs are 90/90 and the back legs are 90/10(?)....or is it 15... or is it 8....probably get close enough sticking a protractor on the monitor.
then you can call it the hand made Cohen interpretation of wegners churned out industry chair.....shape the arms in more interesting ways maybe. Maybe make the joinery more attractive. ....Stick a beer holder in one of the arms and casters on the legs and a umbrella holder....or a little 2 stroke motor under it, and a harmonica holder...Only the best chairs have harmonica and umbrella holders (thats an attempt at humour)
just on opinion. Don't mean to tell you something you already new about or will think about in the immediate or distance future. (thats a joke too. just in case its taken the wrong way. Not assuming you'd take it the wrong. Just some do, so a sweeping comment I hope will deal with it. uno.).
Look forward to seeing it finished. Really like the weaving.
-
5th October 2013, 01:10 PM #11
Be inspired. Be creative. Be bold.
- Join Date
- Apr 2001
- Location
- Perth
- Posts
- 10,826
Hi Jake
I have never built anything from a plan, ever. I doubt I ever will. So I asked myself why I have been attempting to follow the dimensions that Wegner uses. The answer lies in that I have never seen an original, only a reproduction (in which I had little faith), and photographs. I know that what will eventuate will still be Wegner-inspired, that it cannot be an exact copy, and that it will be an interpretation at best. I am OK with that.
Two factors inspire me to try and follow the original dimensions. The first is something that David Haig said to me when I asked him for guidance in building a desk he designed (which is just one of the most stunning, flowing designs I have seen - filled with complex curves. A future project). David asked that I make the desk as close as possible to his design since he had put in a great deal of thought into it, and felt that he wished to preserve the integrity of the design. The design was more important to him than the fact that I wanted to copy it. The curves on the Wegner chair will reflect how I believe a curve should flow, because I will be the one spokeshaving it, but the design does still need to be true to Wegner's original view since this is what I am paying homage to.
David's desk ...

The second factor is that this is a CNC-built chair, and therefore a challenge to build with handtools. Only one person (I recently discovered) has done this, and that is Jeremy Broun, a UK furniture maker and film maker. He built one at age 17 years (!), which is amazing for someone that young, but the result is a simplified design.
Hans Wegner - The Chair - YouTube
It is interesting to contrast what one would do with machinery and do with hand tools.
Regards from Perth
DerekVisit www.inthewoodshop.com for tutorials on constructing handtools, handtool reviews, and my trials and tribulations with furniture builds.
-
5th October 2013, 06:07 PM #12
Banned
- Join Date
- Apr 2005
- Location
- kyogle N.S.W
- Age
- 50
- Posts
- 4,844
yep, Originally Posted by derekcohen
for me , like most I'd say, a combination of both is used based on what leads to the best result, and what you have available. So, the contrast gets blurry, imo, or not even important.
What makes a chair special I think is not so much weather or not hand tools have been used exclusively, but more so in the individual focus in each piece and consequently the extra time needed on each. To the point you can develop seperation anxiety when it goes.
(imo) Most of the designs that have been grouped as the best, are all mass produceable. Full of efficiency concerns (which push the best methods aside). Which is kinda contradictory because their considered the best. So they tend to lean towards things like irriversable fast glues, and bolting , and heavy sanding which is loved (by the makers) because it gets fast result regardless of grain direction...
(imo) Its an interesting turn around that chairs designed with efficiency concerns are then considered great enough to copy by hand ?
(imo) But I think thats a great thing for you....because (excuse me if I'm wrong) Wegner would have had to drop many interesting design features before finalising because they couldn't be cut efficiently. So you'll have plenty of room for improvement. I would just find them, and better the design in your work.
But thats just my opinion. goodluck.
-
14th October 2013, 12:15 PM #13
New Member
- Join Date
- Sep 2013
- Location
- Missouri, USA
- Posts
- 7
May be of help
Derek, I have seen your post here and on another forum. I thought I may suggest some empirical design for your chair. By this I mean laying out the major points in plan view such as the lower and upper points of the legs, the front edge of the seat rail etc. this would allow you to see all of the components and plot the positions of your mortises and tenons and even the curves of the back rail from that perspective. I learned this from an old timer carpenter when constructing complicated roofs and have used it many times to help me see a project in 3d using squares plumb bobs and the like. I hope this suggestion is of some use. That is a very artistic undertaking you are planning. Looking forward to seeing it completed. I have seen some pictures of your other projects all are very nicely done.
-
14th October 2013, 03:53 PM #14
Be inspired. Be creative. Be bold.
- Join Date
- Apr 2001
- Location
- Perth
- Posts
- 10,826
Thanks OO
That is exactly what I have done. See here: https://www.woodworkforums.com/f187/j...6/#post1706426
Regards from Perth
DerekVisit www.inthewoodshop.com for tutorials on constructing handtools, handtool reviews, and my trials and tribulations with furniture builds.
-
21st February 2014, 02:30 PM #15
Novice
- Join Date
- Feb 2009
- Location
- Flaxton
- Posts
- 13
Yawn


 Reply With Quote

Similar Threads
-
Plastic "Bung Taps" - I want to "click" a garden hose onto the end of one...?
By Batpig in forum NOTHING AT ALL TO DO WITH WOODWORKReplies: 4Last Post: 7th May 2017, 04:05 PM -
Why do so many "private" eBay sellers only offer "local pickup"?...
By Batpig in forum NOTHING AT ALL TO DO WITH WOODWORKReplies: 27Last Post: 16th July 2016, 08:57 PM -
What does "supa砥石" and "njuseramikusu" mean on a whetstone?
By Russell Cook in forum SHARPENINGReplies: 12Last Post: 26th December 2012, 02:51 PM -
eBay: How long can you "Save" the "Draft"-listing of an item you want to sell?...
By Batpig in forum NOTHING AT ALL TO DO WITH WOODWORKReplies: 0Last Post: 22nd January 2011, 06:04 PM
