

 Thanks:
  Likes:
  Needs Pictures: 0
 Picture(s) thanks: 0
Results 31 to 42 of 42
-
29th December 2023, 09:04 PM #31
 GOLD MEMBER


- Join Date
- Nov 2004
- Location
- Redlands area, Brisbane
- Posts
- 1,490
 I have the spindle moulder equivalent I bought from Aliexpress. It is amazing!
 Originally Posted by Pat

-
29th December 2023 09:04 PM # ADSGoogle Adsense Advertisement
- Join Date
- Always
- Location
- Advertising world
- Posts
- Many
-
30th December 2023, 03:59 AM #32
GOLD MEMBER
- Join Date
- Feb 2003
- Location
- back in Alberta for a while
- Age
- 68
- Posts
- 12,006
Hi Derek Originally Posted by derekcohen
I think trying to create tapered ellipses (above the seat mortice, below the seat mortice) by trying to convert a quarter round into an ellipse is asking for trouble.
FWIW, my approach would be
start with a flat leg blank;
mark the centre-line on the tapered faces of the leg;
cut the mortices for the seat;
taper the section above the seat mortice -- you'll need two planner sleds to do this so that the taper is even on both the top and bottom faces of the leg;
taper the section below the seat mortice -- again you'll need two planner sleds;
mark the centre-line on the now tapered faces of the leg blank;
mark out the ellipses on the end grain top and bottom of each leg;
"connect the dots" by marking the edges of the fillets that will need planning off -- these fillets should be constant in cross-section;
plane off the fillets using one of your block planes to remove the bulk of the waste;
finish to final profile with a flat sole spoke shave -- the chair you posted earlier appears to have soft enough curves to complete them using a short sole spoke shave.regards from Alberta, Canada
ian
-
30th December 2023, 06:23 AM #33
Butcher of wood
- Join Date
- Jun 2010
- Location
- Bundaberg
- Age
- 54
- Posts
- 3,428
Rather than a quarter-round would a thumbnail moulding work for the roughing out?
IMG_0801.jpegNothing succeeds like a budgie without a beak.
-
30th December 2023, 12:27 PM #34
Be inspired. Be creative. Be bold.
- Join Date
- Apr 2001
- Location
- Perth
- Posts
- 10,826
Thanks for the input on shaping the legs. I have concluded that an elliptical or oval leg profile is not practical. This is a shape constructed with CNC machinery. The shape was my wife's choice, not mine - I prefer rounded, tapered legs, ala the Wegner The Chair style. So back to the drawing board.
For interest, I had drawn up and mocked out the chair. I still like the overall design, but the top section needs some more tweeking. It is too high to rest arms on and fit under the table top ...
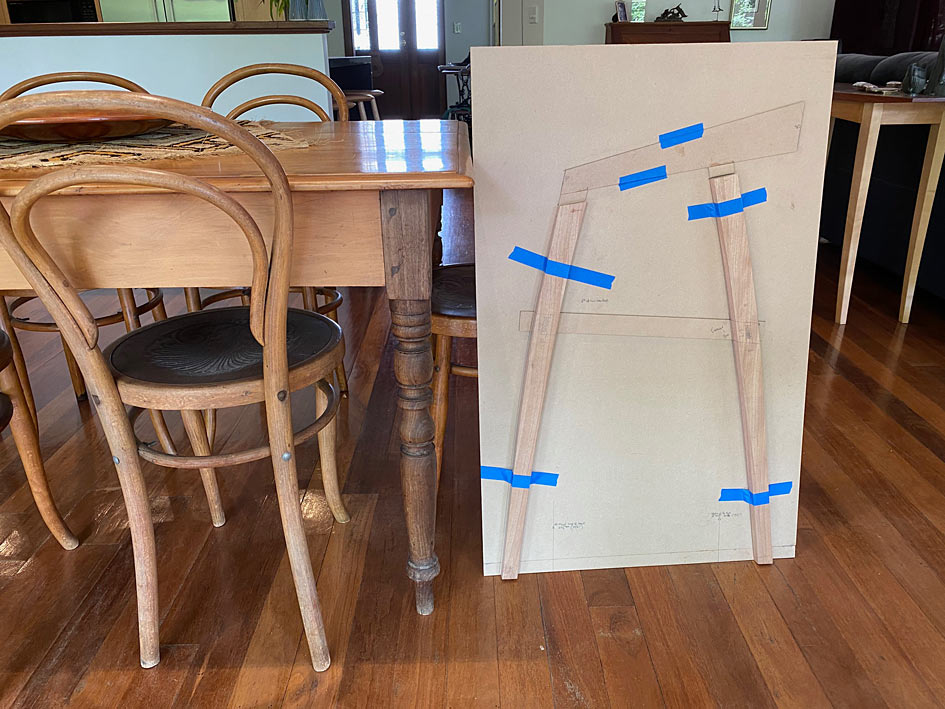
The design of the chair needs to compliment the bentwood chairs here, which are original early 1900s. The table is to be replaced with a longer, wider one.
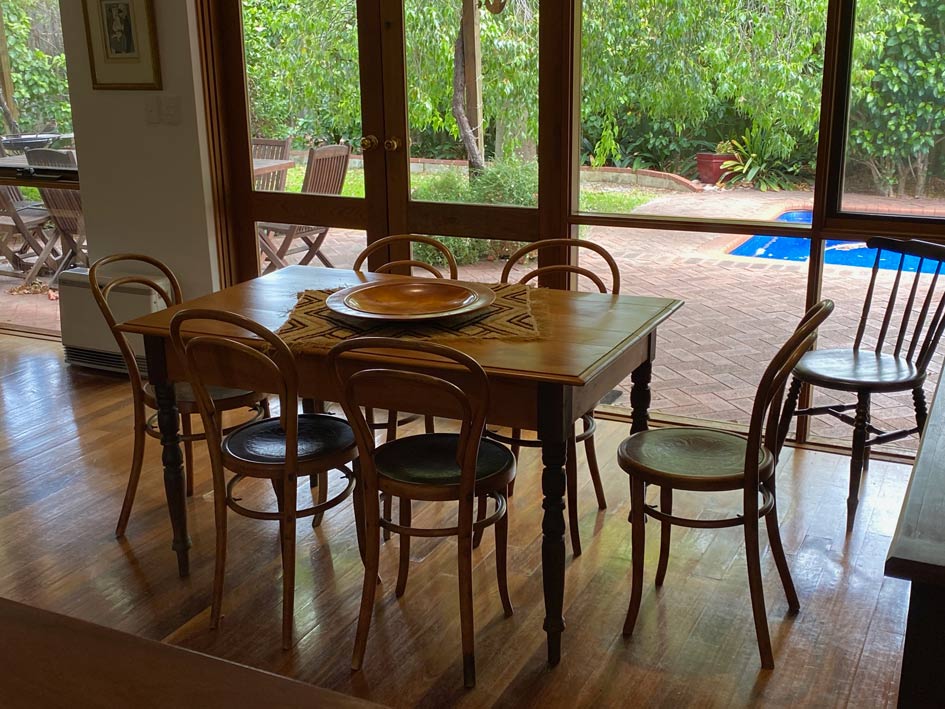
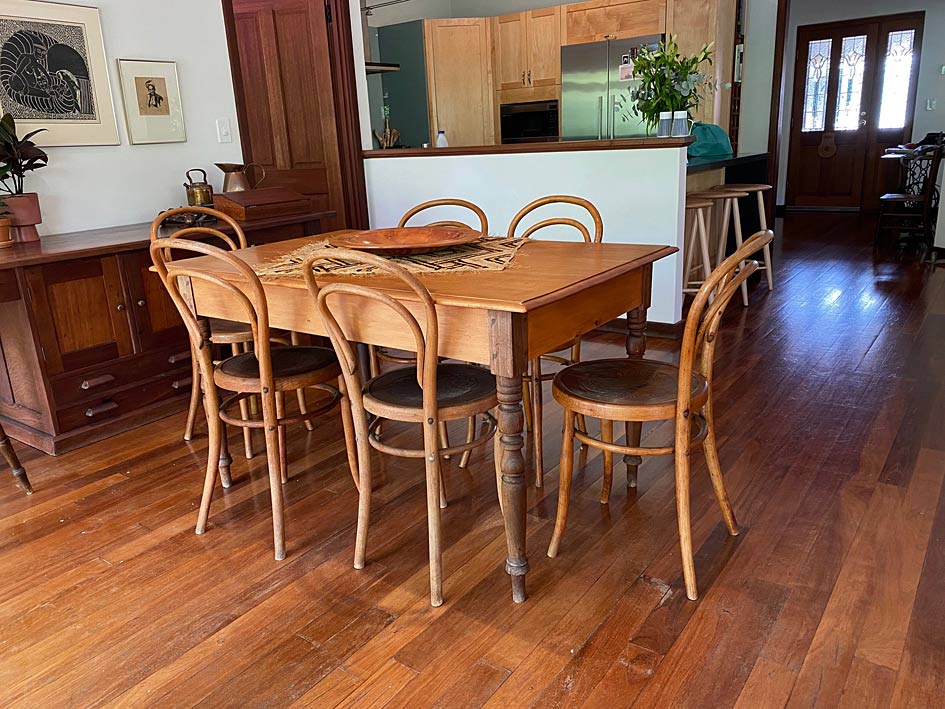
This table is over 200 years old, and has great sentimental value. It is built of Yellow Wood (top) and Stinkwood (legs). We bought this after getting married. Now, 42 years later, Lynndy wants a larger table. The plan is a top in Rock Maple and round, parallel legs in Jarrah. Mid Century modern, and the aim is to blend two modern Mid Century carvers with the bentwood chairs. Consequently, a lighter look for the carvers is needed.
Regards from Perth
DerekVisit www.inthewoodshop.com for tutorials on constructing handtools, handtool reviews, and my trials and tribulations with furniture builds.
-
30th December 2023, 05:11 PM #35
Be inspired. Be creative. Be bold.
- Join Date
- Apr 2001
- Location
- Perth
- Posts
- 10,826
Here is the re-design.
The legs have been made thinner, with 25mm top and bottom, and 32mm around the seat area. The 35mm thick seat will be attached with mortice-and-tenons (not sure yet whether integral or loose tenons). These will be 25x10mm.
The curve has been retained in the legs ... since this is a desired feature to soften the look and also link with the bentwood chairs. The legs will now be round and not oval. The complication, in shaping, is that there is a taper and a curve.
The height of the top section has been reduced significantly. It is possible to see the original design below the new design ...

All-in-all much slimmed down.
Then there are finer details being worked out, such as the curve at the rear of the backrest and seat to link with the roundness of the bentwood chairs. The transition from the legs to the arm rest is borrowed from Hans Wegner ...
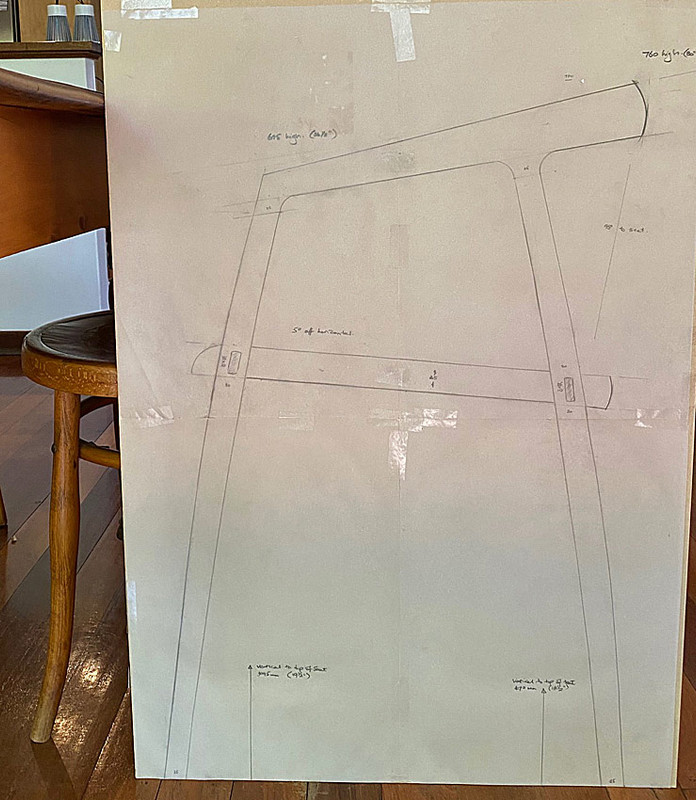
The plan shape for the arm- and back rest will come later.
Thoughts?
Regards from Perth
DerekVisit www.inthewoodshop.com for tutorials on constructing handtools, handtool reviews, and my trials and tribulations with furniture builds.
-
30th December 2023, 05:59 PM #36
Good Wood Ruined!
- Join Date
- Jan 2004
- Location
- Towradgi
- Posts
- 4,839
Hello Derek, I got the Spindle Moulder out from the naughty corner.
RM01A.jpg I found a scrap of Rock (Hard) Maple, with saw marks etc
RM02A.jpg I set up the Segmented Pattern Bit
RM04A.jpg Spindle Moulder set fully . . .
RM05A.jpg After 2 passes, as I didn't believe how smooth the first past was . . .
The distance between the bearings is 50mm, the scrap was about 51/52.
Something to consider.Pat
Work is a necessary evil to be avoided. Mark Twain
-
30th December 2023, 06:07 PM #37
GOLD MEMBER

- Join Date
- Nov 2011
- Location
- Melbourne
- Posts
- 7,013
Derek,
I would think maybe , the transition between the Back rest an the legs, that radius should be equivalent to the thickness of the area, does that make sense.
Cheers Matt.
-
30th December 2023, 07:16 PM #38
Be inspired. Be creative. Be bold.
- Join Date
- Apr 2001
- Location
- Perth
- Posts
- 10,826
Originally Posted by Simplicity
Hi Matt
Can you explain what you mean ... say more. This sounds interesting.
Regards from Perth
DerekVisit www.inthewoodshop.com for tutorials on constructing handtools, handtool reviews, and my trials and tribulations with furniture builds.
-
30th December 2023, 07:18 PM #39
Be inspired. Be creative. Be bold.
- Join Date
- Apr 2001
- Location
- Perth
- Posts
- 10,826
Originally Posted by Pat
Thanks Pat. I have now ordered one!
Regards from Perth
DerekVisit www.inthewoodshop.com for tutorials on constructing handtools, handtool reviews, and my trials and tribulations with furniture builds.
-
30th December 2023, 07:55 PM #40
GOLD MEMBER
- Join Date
- Nov 2011
- Location
- Melbourne
- Posts
- 7,013
Derek,
The area circled in black, that radius should be larger, an match the thickness of the back of the Backrest circled in Red.
Ie, if the back rest has a thickness of say 50 mm at the rear make the radius in black 50 mm, too tie the two elements together, hope that helps.
Cheers Matt.

-
31st December 2023, 12:30 AM #41
Be inspired. Be creative. Be bold.
- Join Date
- Apr 2001
- Location
- Perth
- Posts
- 10,826
Thanks Matt.
I have not finalised these details. The rounds I show are simply for effect. The whole arm rest/back has yet to be designed. This can only be done once the legs and seat have been completed.
My thought at this stage is that the rounds may not be critical, but attention to detail is good.
Regards from Perth
DerekVisit www.inthewoodshop.com for tutorials on constructing handtools, handtool reviews, and my trials and tribulations with furniture builds.
-
31st December 2023, 10:16 AM #42
 Bowl Turner
- Join Date
- Apr 2007
- Location
- Adelaide Hills, South Australia
- Posts
- 4,337
Derek
Not sure how relevant the following is to your project.
I have a Sydney Blue Gum hall table made by Richard Vaughan that has lots of curved sections and joins...
He has also made chairs with similar construction...
Leonardo Chair
I have no idea about his construction techniques or how relevant they are to your project, but he may be prepared to share that with you.Stay sharp and stay safe!
Neil


 Reply With Quote


Similar Threads
-
How to make curved and rebated box legs?
By Dengue in forum BOX MAKINGReplies: 5Last Post: 24th January 2013, 07:52 PM -
Shaping chair seats
By zelk in forum WOODWORK - GENERALReplies: 152Last Post: 2nd August 2012, 12:01 PM -
Best wood for spokeshave curved coffee table legs?
By dave_in_gva in forum WOODWORK - GENERALReplies: 6Last Post: 5th July 2009, 12:51 PM -
Chair Making and shaping tools
By spongebrain in forum WOODWORK - GENERALReplies: 3Last Post: 4th July 2009, 06:19 PM -
Jarrah round table, laminated curved legs
By Redgy in forum WOODWORK PICSReplies: 14Last Post: 26th October 2008, 08:48 PM
