

 Thanks:
  Likes:
  Needs Pictures:
  Picture(s) thanks:
Results 46 to 60 of 252
Thread: First stages in drawer building.
-
7th September 2011, 12:46 AM #46
 GOLD MEMBER


- Join Date
- Feb 2003
- Location
- back in Alberta for a while
- Age
- 68
- Posts
- 12,006
 as already suggested pop the drawers in their openings while they dry.
 Originally Posted by derekcohen

The bottoms can then be made and fitted individually
I'd square them before installation and flatten that portion of the back which will bear in the mortice -- which I assume you'' trim with a router plane Originally Posted by derekcohen
Derek, personally I think you need to use pins that are 2 to 3 times thicker than those you have shown. Originally Posted by derekcohen
Campaign chests were intended for use in tents, barns and other decrepit buildings and the drawer details should reflect this. If you scored the manor house as your bivouac, you would have access to the house's furniture. A lady's writing desk would be an appropriate place to display a maker's high level skill (i.e. London pattern), while a campaign chest should tend more towards a "construction" dovetail.
As to spacing, my preference, for hand work, is to lay them out by eye -- there should be some variation drawer to drawer, and depending on your method side to side of the same drawer
lastly, my sincere thanks for your earlier praiseregards from Alberta, Canada
ian
-
7th September 2011 12:46 AM # ADSGoogle Adsense Advertisement
- Join Date
- Always
- Location
- Advertising world
- Age
- 2010
- Posts
- Many
-
7th September 2011, 02:29 AM #47
Be inspired. Be creative. Be bold.
- Join Date
- Apr 2001
- Location
- Perth
- Posts
- 10,872
Hi Ian
Your drawer earned high praise - it was really well made.
Thanks for the comments. This handle issue has been a non-stop saga. Every where I have looked the quality seems to be crappy. Ironically, the ones I ended up buying appeared better finished - across the face - but the non-rounded pull section slipped under the radar. Now they will not be used.
A while back you posted a link to a retailer in NSW. I looked at the handles there, they looked like every version I had seen before. The price was good, but I decided against them because, on the basis of the picture, the brass appeared dubbed from sanding.

Today I looked at the same version via one of WW's linked to a UK firm and ... well, you tell me if you see a difference ...

Australian price: $11.95
UK price: £12.62 (and still to add the more costly postage).
One more UK offering:

Price: £10.58
None of these made me say "I WANT it!" They are all so bloody mediocre. All exactly the same (or use the same photo).
Since I have a bunch already, I may work on them and get the look I want. Here is another that looks good at first ... I like the antique finish ... however on closer inspection they look like the ones I have, but with some rounding of the pulls ..

Price: $17.16
I don't want to spend more, but I will if I have to to get a decent quality handle. Any recommendations? Anyone?
Regards from Perth
DerekVisit www.inthewoodshop.com for tutorials on constructing handtools, handtool reviews, and my trials and tribulations with furniture builds.
-
7th September 2011, 09:30 AM #48
SENIOR MEMBER
- Join Date
- Jan 2008
- Location
- NSW southern Highlands
- Posts
- 548
Derek
I suspect that there is a very limited market for these things, and they are probably all made in the same factory in India, to a price.
Trying to gauge the quality from various sources by Photo's is at best difficult & if you are seeking "fine" quality for a high end piece, I suspect that at the end of the day you will be disappointed.
The comment from WW that those he has seen are sanded all over after the handles are fitted, also indicates to me that even back then they simply took the castings roughly dressed them, accepted them for what they were, and sanded over to improve the look. Probably no different to today's military where the focus is on functionality rather than Style.
As I see it you have several options:
1/ Follow the original procedure outlined by WW.
2/ Aim for an improved look by dressing the sides of the handles so they sit nicely in a recess, but very slightly proud ( maybe 0.5 - 0.75mm ) to disguise the uneven front surface, which could be aged / distressed. You could relieve the shoulder in the recess in order to get the front face reasonably level if you felt it necessary.
3/ Go the whole hog & dress both front & back so they sit in the recess flush with the wood surface.
As you appear to be producing something in the style of a campaign chest rather than a reproduction then I agree with WW that it really does not matter what you choose.
Whichever option you choose i think it would be in your own interest to follow the handle selection, already laid down by the Style Director
Regards
-
7th September 2011, 11:41 AM #49
What... you mean it's not 1792?
- Join Date
- Oct 2006
- Location
- Melbourne
- Posts
- 5,271
Basilg offers good advice. Further to his advice, I wouldn't touch the backs of the handles as ultimately, you will be fitting each one individually and not using some sort of unforgiving router template... won't you!
I would take each handle in turn and flatten its face on a belt sander down to, say, 120 grit. Then I'd install the handles and sand the whole drawer front to 180 grit. I wouldn't sand them to a higher grit otherwise they'll take on that hideous 'satin' look (a marketing ploy by hardware companies in an attempt to cut corners in the finishing department). The handles really do want to look sanded.
If you want to sand the drawer fronts finer than 180 grit, I would remove the handles temporarily, but reinstall them prior to finishing the chests..
I know you believe you understand what you think I wrote, but I'm not sure you realize that what you just read is not what I meant.
Regards, Woodwould.
-
7th September 2011, 11:56 AM #50
 Fossil Member
- Join Date
- Jan 2005
- Location
- Perth
- Posts
- 1,181
Hi Derek,
For what it is worth, I prefer the A version of dovetails. Just my eye. I guess that as these chests are 'Military Style' and won't be doing any battle soon, the finer dovetails are perfectly fine strength wise and as it is your chest you can have the look you like.
Good thread by the way. And thanks to all the major contributors making it so, WW, Ian, Basilg to mention just a few.
Cheers
Pops
-
7th September 2011, 04:54 PM #51
Be inspired. Be creative. Be bold.
- Join Date
- Apr 2001
- Location
- Perth
- Posts
- 10,872
Hi Basil and WW
Your advice is good and I can relate to much of it.
I suspect that the quality of the hardware is the much the same the world over, that is, it probably comes from the same Indian factory. I know that higher quality hardware exists - for example, Philip Marcou - who now makes handplanes - used to specialise in Military furniture and told me that he used hardware made in Italy. Unfortunately, that contact has passed into time.
Before I buy from another source, I will try and refinish the handles I have. Beltsanding them flush is the first step. Straightening the edges/perimeter is another (as they need to sit flush with the drawer fronts). The third step will be to add a chamfer to the edges of the pulls - rounding them is too difficult, and an even bevel can look attractive. I need to make the pulls usable. In their present state they are uncomfortable to hold. The edges are sharp.
The way I plan to install them in the drawer from uses a combination of power- and handtools. The handles will be fitted individually. A power router can remove the waste from the centre, and then chisels and a router plane to work to the edges of the mortice.
All this should be fairly straightforward. Have I forgotten something, or would you suggest a different method?
Regards from Perth
DerekVisit www.inthewoodshop.com for tutorials on constructing handtools, handtool reviews, and my trials and tribulations with furniture builds.
-
7th September 2011, 06:23 PM #52
SENIOR MEMBER
- Join Date
- Jan 2008
- Location
- NSW southern Highlands
- Posts
- 548
Derek
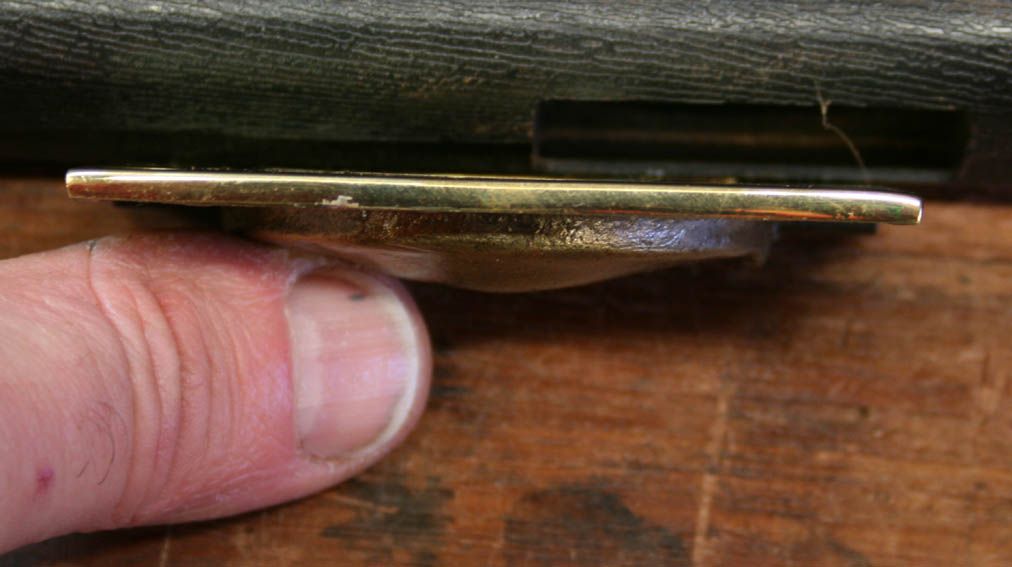
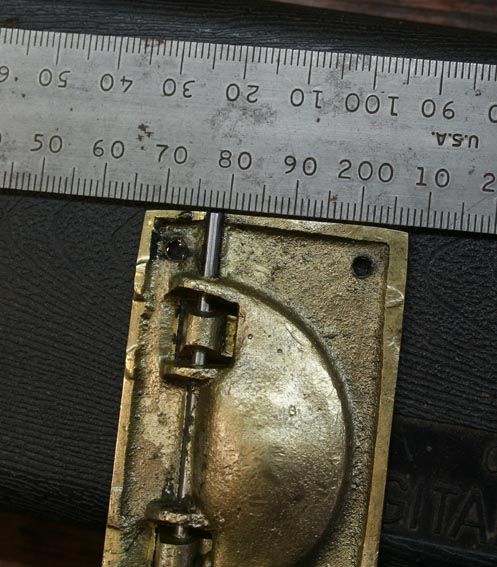
I think your plan to bring the handles you already have to an acceptable condition is a good one. Before starting I would recommend taking some measurements of the thickness of the front, and by how much out of a flat plane it is. Then you can see how much material you will need to remove until you can get a nice surface to fit flush to the wood. Looking at the photo's It appears to me that those handles have been cut back on a linisher to remove the dags and voids left after casting, without any thought to keeping a flat surface. If that is the case you may find you will have to remove so much material that you will have handles similar to those noted by WW and have very little left of the countersink for the screws and have another problem to resolve.
I would do the perimeter of the handles first, as this will remove some of the dubbing on the edged and hopefully reduce the amount of material you need to take off the front to get a flat surface.
Getting the handles flush and nicely fitted will I believe give you the best result, but it looks to me that you may need to remove so much material from those handles it may not be possible, which was one reason I suggested option 2 in an earlier post.
I hope it works out satisfactorily for you
Regards
-
7th September 2011, 06:30 PM #53
Be inspired. Be creative. Be bold.
- Join Date
- Apr 2001
- Location
- Perth
- Posts
- 10,872
Thanks Basil.
The "positive" (!) factor about these handles is that they are reasonably flat, at least more so than others I saw (and the reason I chose them). I will do the sides first as this will reduce the amount that needs to come off the top. If the countersinks are lowered I can always renew them. That is the easy part. The reminder to measure the thickness is a good one as I do not want to end up with something lopsided!
Regards from Perth
DerekVisit www.inthewoodshop.com for tutorials on constructing handtools, handtool reviews, and my trials and tribulations with furniture builds.
-
8th September 2011, 12:45 AM #54
GOLD MEMBER
- Join Date
- Feb 2003
- Location
- back in Alberta for a while
- Age
- 68
- Posts
- 12,006
Hi Derek
there is another option, which none of us has suggested.
you could use a strap handle

or plate pull,

but install them in a recess deep enough so that your chests would slide inside one of WW's transport casesregards from Alberta, Canada
ian
-
8th September 2011, 08:56 AM #55
Skwair2rownd
- Join Date
- Nov 2007
- Location
- Dundowran Beach
- Age
- 76
- Posts
- 19,922

This is a great thread!
I have been following it with interest as I had never before realized that such an apparently prosaic object as a drawer could be the result of so much contention.
Thanks to all for the contributions. Next time I make drawers I will do them properly!
-
8th September 2011, 11:24 AM #56
GOLD MEMBER
- Join Date
- Mar 2005
- Location
- In the shed, Melbourne
- Age
- 53
- Posts
- 6,883
-
9th September 2011, 09:59 AM #57
Lignum Vexator
- Join Date
- May 2007
- Location
- North of the coathanger, Sydney
- Age
- 68
- Posts
- 9,417
yeah interesting debate
Derek, Your attention to detail is awesome.
You probably know some medical jargon to best describe it
regards
Nick
veni, vidi, tornavi
Without wood it's just ...
-
9th September 2011, 11:38 AM #58
What... you mean it's not 1792?
- Join Date
- Oct 2006
- Location
- Melbourne
- Posts
- 5,271
If he doesn't, I do! Originally Posted by Sawdust Maker
.
I know you believe you understand what you think I wrote, but I'm not sure you realize that what you just read is not what I meant.
Regards, Woodwould.
-
9th September 2011, 12:29 PM #59
Be inspired. Be creative. Be bold.
- Join Date
- Apr 2001
- Location
- Perth
- Posts
- 10,872
Hell WW, I know a whole lot of descriptions that could apply to each and every one of us here!

Regards from Perth
DerekVisit www.inthewoodshop.com for tutorials on constructing handtools, handtool reviews, and my trials and tribulations with furniture builds.
-
9th September 2011, 01:49 PM #60
What... you mean it's not 1792?
- Join Date
- Oct 2006
- Location
- Melbourne
- Posts
- 5,271
That sounds like a topic for a new thread, though please try and contain it all within the one thread. Originally Posted by derekcohen
.
I know you believe you understand what you think I wrote, but I'm not sure you realize that what you just read is not what I meant.
Regards, Woodwould.


 Reply With Quote


Similar Threads
-
Finished building a tallboy / drawer chest
By chubs in forum WOODWORK - GENERALReplies: 32Last Post: 4th July 2009, 12:55 PM -
4 stages
By wheelinround in forum WOODIES JOKESReplies: 2Last Post: 25th August 2007, 03:26 PM -
My dream shed...the planning stages.....
By bulldog in forum WOODWORK - GENERALReplies: 17Last Post: 17th May 2007, 01:08 AM -
Basic stages of Finishing
By Shane Watson in forum FINISHINGReplies: 0Last Post: 24th June 2001, 12:41 PM
