

 Thanks:
  Likes:
  Needs Pictures:
  Picture(s) thanks:
Results 76 to 90 of 252
Thread: First stages in drawer building.
-
13th September 2011, 09:47 AM #76
 Novice


- Join Date
- May 2009
- Location
- Perth
- Age
- 69
- Posts
- 13
 Ian,
Ian, Originally Posted by ian

I have the smaller, LN 49, and yes, of course, without the ability to scribe the shoulders it will leave a rough edge corner, but one would have other tools - this can quickly be done prior to cutting with a cutting gauge. Of course, not my prefered method, as I have a furniture business and a house with a mortgage, so I need to get quality work done within time frames, thus the router set up, which is far quicker and delivers a better result.
I think, at this point, I shall leave this discussion - I'm sure you can sort it out!
All the best,
Neil Erasmus.
-
13th September 2011 09:47 AM # ADSGoogle Adsense Advertisement
- Join Date
- Always
- Location
- Advertising world
- Age
- 2010
- Posts
- Many
-
22nd September 2011, 05:03 PM #77
Any timber colour but red!
- Join Date
- Jul 2008
- Location
- Huon Valley, TAS
- Posts
- 263
I just picked up the Veritas/Lee Valley skew angle rabbet planes and they have a very effective nicker that delivers super crisp rabbets both with and across the grain. Originally Posted by neiler
Shine on you crazy diamond!
-
22nd September 2011, 05:31 PM #78
Novice
- Join Date
- May 2009
- Location
- Perth
- Age
- 69
- Posts
- 13
I think the point I was trying to make regarding the excellent LN 48/49 planes is that they are particularly good at planing matching tongue-and-groove joints, perfectly suited to the kind of drawer slips (tongue) and bases (groove) that I talk about in my recent article. A rebating plane, whatever configuration it may come in, can't do the job. I also think that something has been missed, in the belief that the Lie Nielsen is held with its blade running across the grain - this is not the case. Its blade attacks the end grain of the drawer base directly, cutting it remarkably well, without the need for nickers. I did, however, find that I needed to add a small spacer to the swivel fence on my LN49 to enable the planing of thin slips and bases. Originally Posted by waveink
-
22nd September 2011, 10:01 PM #79
GOLD MEMBER
- Join Date
- Feb 2003
- Location
- back in Alberta for a while
- Age
- 68
- Posts
- 12,006
Originally Posted by neiler
Neil Originally Posted by neiler
thank you for returning to this discussion and clarifying how the #48 or #49 would be used. I admit that I forgot the match planes would be working the end grain Good idea with the cutting gauge though.
and I appreciate your other point
best wishesI have a furniture business and a house with a mortgage, so I need to get quality work done within time frames, thus the router set up, which is far quicker and delivers a better result.regards from Alberta, Canada
ian
-
22nd September 2011, 11:19 PM #80
Novice
- Join Date
- May 2009
- Location
- Perth
- Age
- 69
- Posts
- 13
Thanks, Ian - a good discussion! Originally Posted by ian
-
25th September 2011, 02:11 AM #81
Be inspired. Be creative. Be bold.
- Join Date
- Apr 2001
- Location
- Perth
- Posts
- 10,832
UPdate: halfblind dovetails in Jarrah
I thought I'd try something new (to me) when dovetailing the drawers.
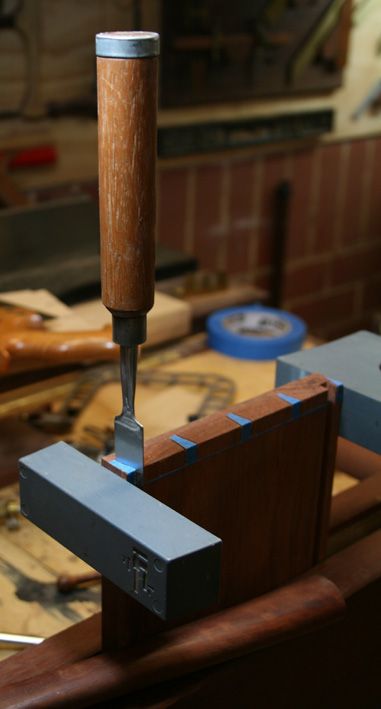
First of all, here is my dovetailing bench. I set up a moxon vise on an extension table. It is higher than my bench and easier to direct light over the work.
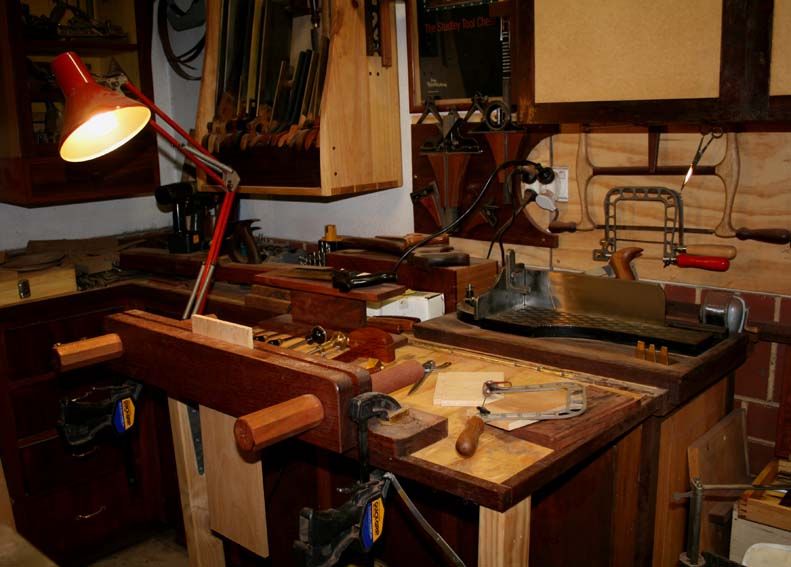
There are 12 drawers in all. All have dark Jarrah fronts. Even with extra directed light, it is difficult to see the lines transfered from the tail board to the dark endgrain of the Jarrah. Jarrah endgrain is hard enough to chop away. Struggling to see the lines makes it hell. 24 sides to do ...
I recalled reading a tip about a year ago that involved using blue tape. I do not recall the name of the individual (my apologies), nor the details of his method - for all I know he was marking through dovetails. Anyway, I thought I would give it a go on the first drawer, and would use it for the others if it helped.
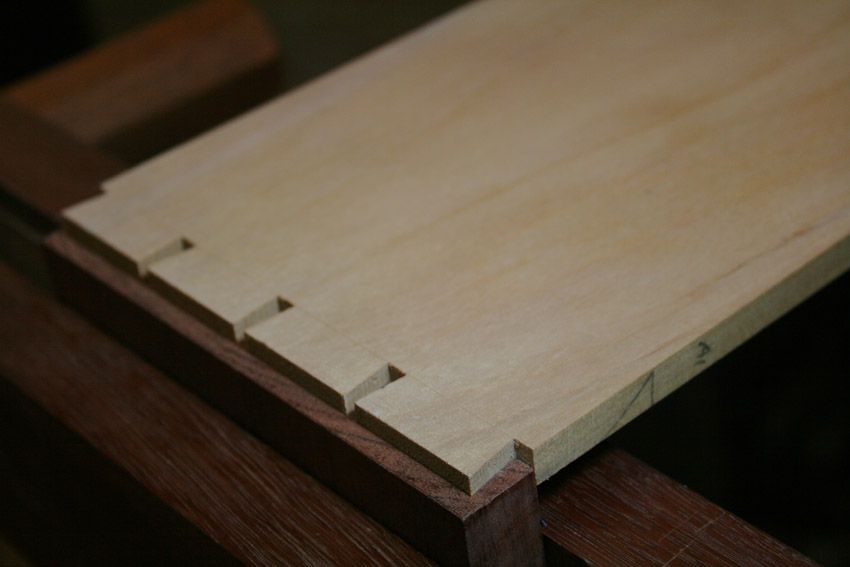
The pin boards were sawn and chiseled in the usual manner. Then it was time to transfer the marks to the pin board.
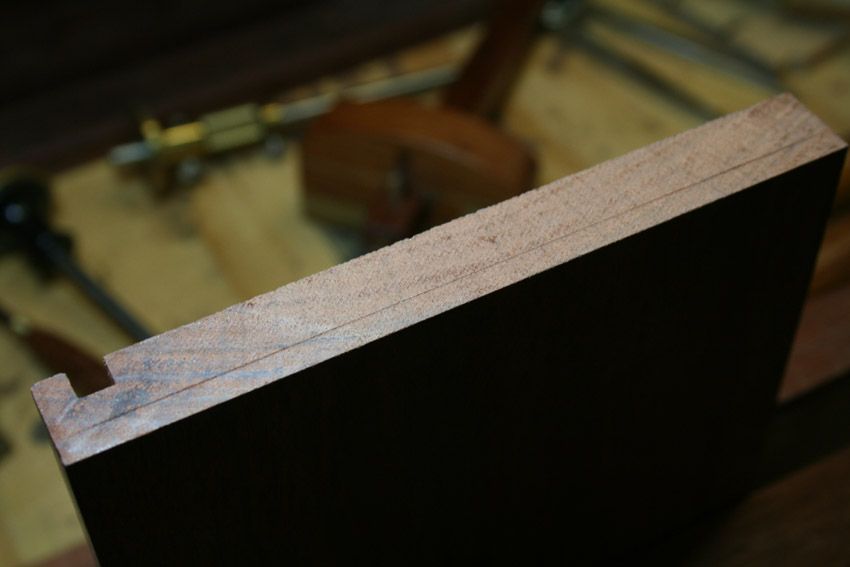
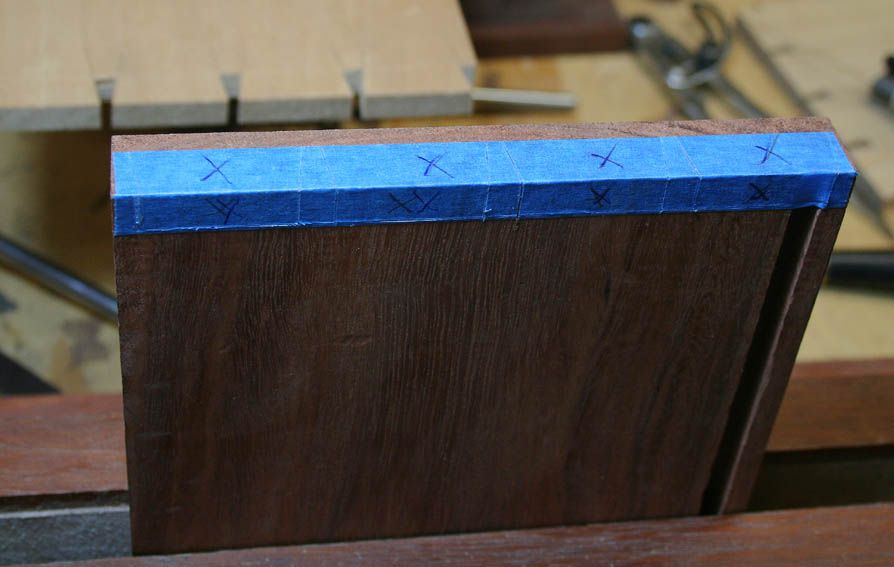
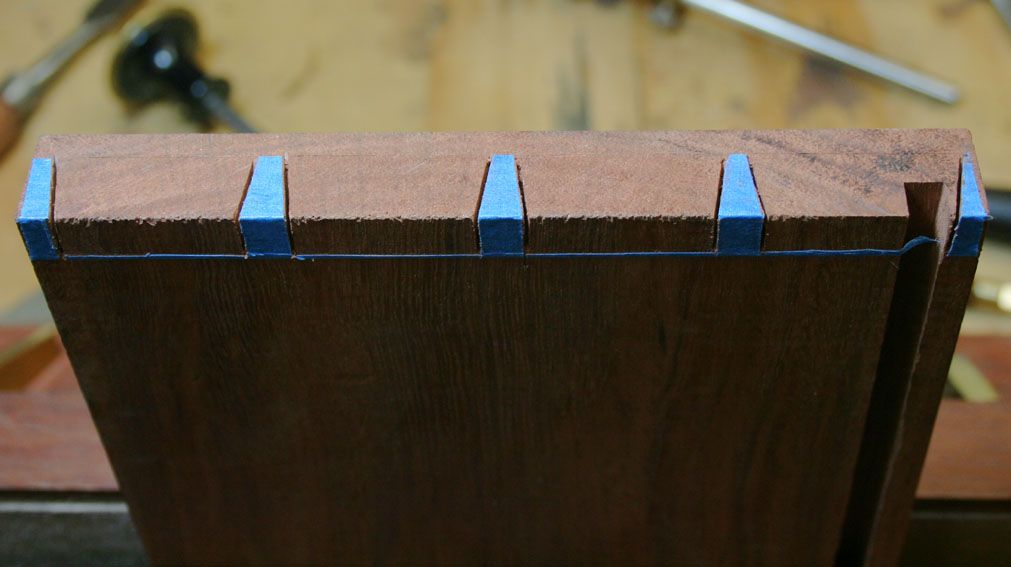
The pin board was clamped in the vise. As seen, it has a scribe mark to denote the depth of the pins ...
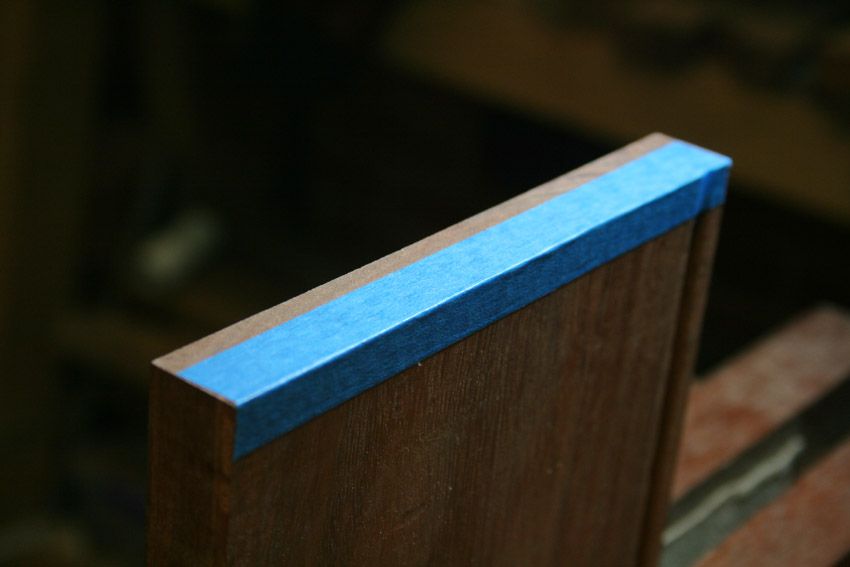
The blue tape is added, running between the two boundaries. Cut it away from the sides as the edges will later be needed for registering the tail board.
Now you can place the tail board over the pin board to transfer marks ...
Remember to use a Vesper knife!!!
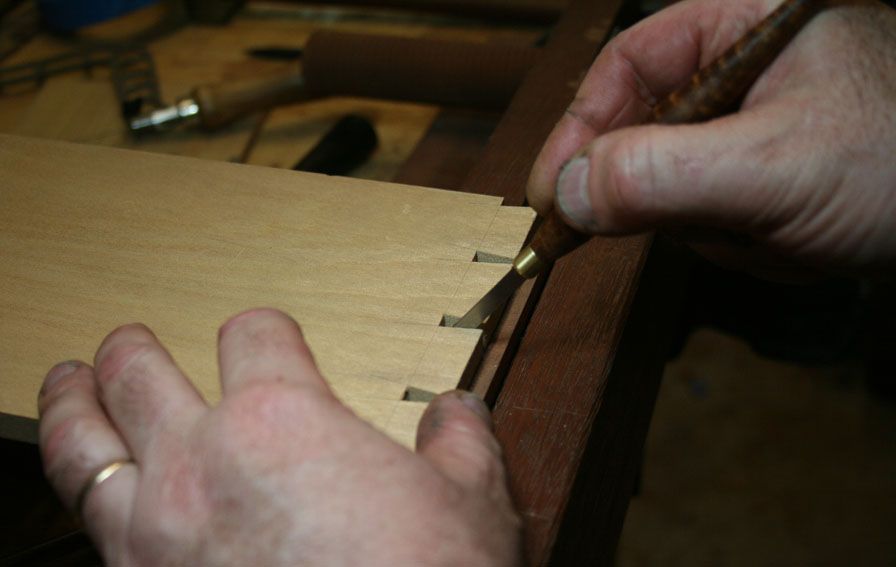
It is not easy to see the cut lines ...
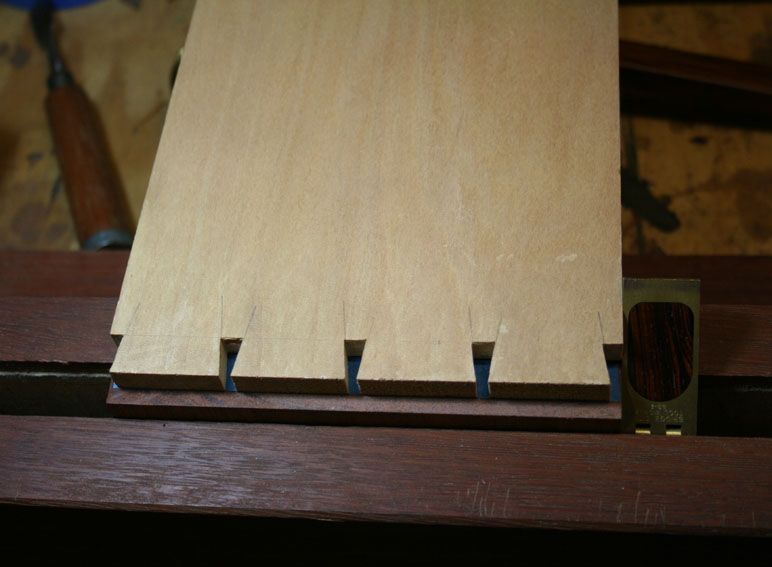
... until you peel away the waste areas ..
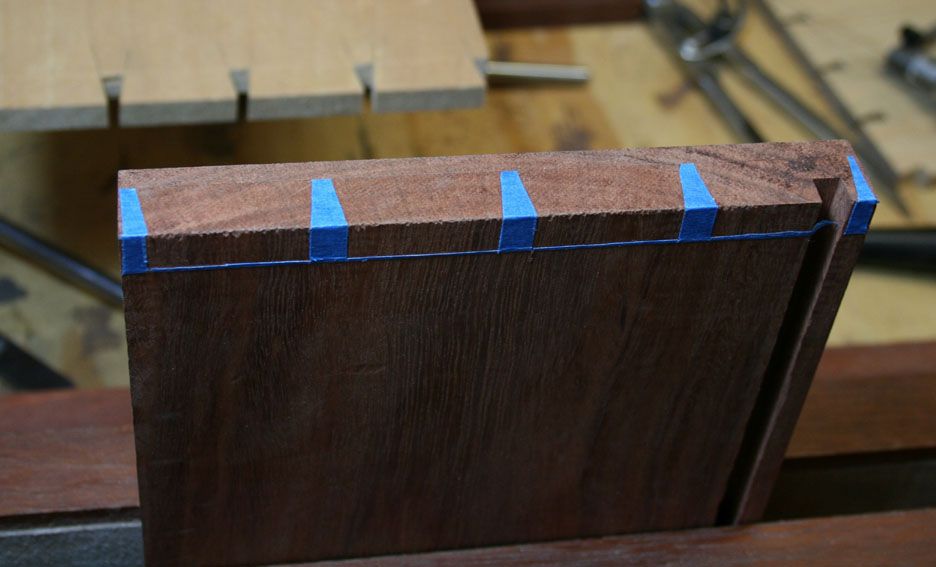
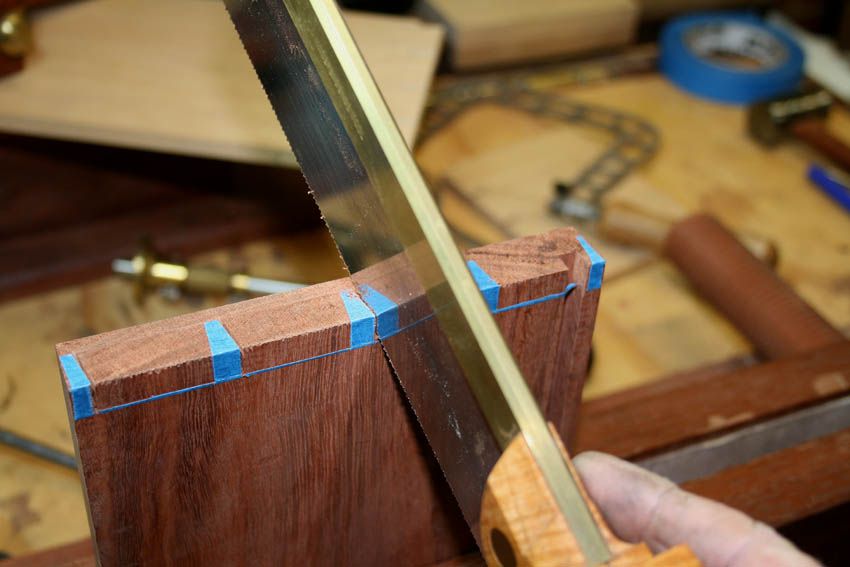
The lines stood out so clearly that sawing to the lines was really easy.
Here you can see how close to the lines I managed to get ..
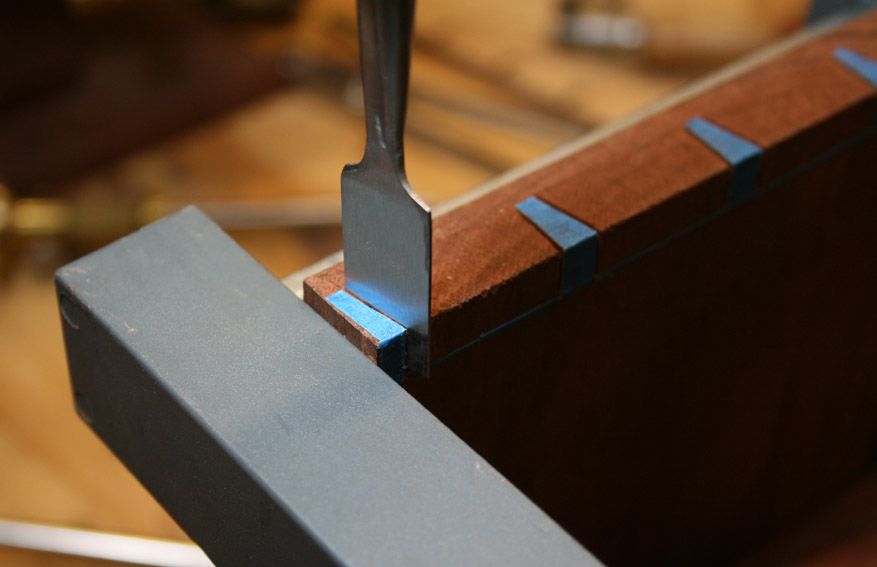
I've posted this before but I'll show it again. Several years ago, influenced by Tage Frid, I made a "kerf chisel" to deepen the kerf on the half-sawn pins. This has a blade the same thickness the saw. The end of the blade is square to prevent splitting the grain. As a precaution I add clamps to prevent any blow out.
 Visit www.inthewoodshop.com for tutorials on constructing handtools, handtool reviews, and my trials and tribulations with furniture builds.
-
25th September 2011, 02:12 AM #82
Be inspired. Be creative. Be bold.
- Join Date
- Apr 2001
- Location
- Perth
- Posts
- 10,832
The pins were chopped out ...
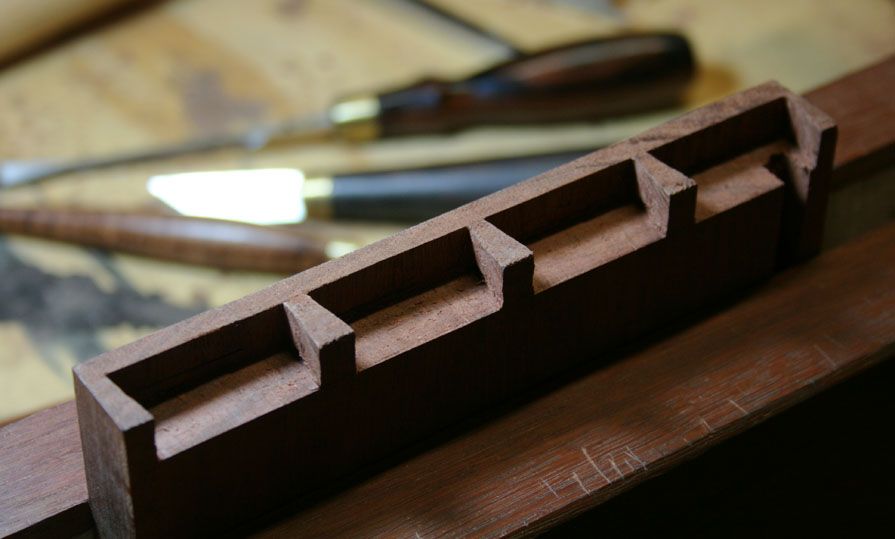
... and the tail board given a trial fit ...
That is a nice fit! No adjustments required. Easy peasy.
Regards from Perth
DerekVisit www.inthewoodshop.com for tutorials on constructing handtools, handtool reviews, and my trials and tribulations with furniture builds.
-
25th September 2011, 03:00 AM #83
.
- Join Date
- Jul 2005
- Location
- Victoria
- Posts
- 5,215
-
25th September 2011, 03:40 AM #84
Be inspired. Be creative. Be bold.
- Join Date
- Apr 2001
- Location
- Perth
- Posts
- 10,832
Hi Lignum
I recalled after I wrote this piece that Neil uses this method as well. I've not seen him do it, but he did give me a strip of the sticky paper he uses. He wasn't the person who mentioned it to me first, however. I'm sure the idea has been around a while.
Regards from Perth
DerekVisit www.inthewoodshop.com for tutorials on constructing handtools, handtool reviews, and my trials and tribulations with furniture builds.
-
25th September 2011, 08:22 AM #85
What... you mean it's not 1792?
- Join Date
- Oct 2006
- Location
- Melbourne
- Posts
- 5,271
Don't you mean the sockets were chopped out? When making mortice and tennon joints, you don't chop out the stiles, you chop out the mortices. These joints necessitate male and female elements – not two male elements. Originally Posted by derekcohen
Even with glasses on, I can rarely see a knife mark in any wood in any light these days, so I use an HB pencil on light woods and a white or yellow chinagraph pencil on dark woods and then cut on the waste side as per normal. It's not the marking that's critical, but the cutting.
I think you make matters difficult for yourself sometimes Derek. I know if I faff around with stuff like this, accuracy actually suffers rather than increases. I find quick, decisive actions pay dividends with accuracy.
With your extraordinarily high internet profile, I fear your tutorials and instructions must have the effect of dulling the abilities of a great number of talented individuals..
I know you believe you understand what you think I wrote, but I'm not sure you realize that what you just read is not what I meant.
Regards, Woodwould.
-
25th September 2011, 11:14 AM #86
SENIOR MEMBER
- Join Date
- Jan 2008
- Location
- NSW southern Highlands
- Posts
- 548
WW
I do have some sympathy with your point of view, with regards to simplification of the process. However, I think the topic is not all that simple & in order to avoid a hijack have started another thread
https://www.woodworkforums.com/f152/f...1/#post1378661
Regards
-
25th September 2011, 01:48 PM #87
Be inspired. Be creative. Be bold.
- Join Date
- Apr 2001
- Location
- Perth
- Posts
- 10,832
WW
I use white and yellow pencils when marking on dark wood. I gather Rob Cosman (of DVD and dovetail fame) advocates using a red ink pen. Now this is fine when it is the initial laying out marks, such as the tails (if you go tails-first, as I do). However, you then cannot mark the pins from the tails using a pencil. Even a fine pencil/ink mark is wider than desired, and there would be too little space to fit a pencil if the tail was narrow to begin. A marking knife is the best solution in this situation. Another alternative is, of course, to mark the pins first (I bet that will bring you out Neil! .
.
Keep in mind here that the post was about seeing scribed lines on dark, hard endgrain.
I have experimented with wiping powdered chalk into the scribed line. It does make the lines clearer. The reason I decided to try something else here is that the Jarrah endgrain is so hard that even repeated knife strokes (way more than I would want to use as too many just widen the line) are very shallow. I also find that the scored lines start to close up very rapidly. That is a nightmare then - you just do not want to try and redo markings by starting all over again, and you do not want to guess where the lines are! One of the reasons I make a big deal out of sawing the tails straight and getting the angles spot on (for most it would not matter as the tails become the master template for the pins), is that if necessary I can use the marking gauge to guide a reinforcing cut line, that is, go over the old line and deepen it afterwards.
Edit to add: the time it takes to use the blue tape is inconsequential. It added about 30 seconds. Even if it added 1 minute or 5 minutes, the dividends in the visiable lines that make this joint making easy are clearly demonstrated here.
By the way, I refer to it as the "pin board" as I am making pins - half-blind pins. This is no doubt excessly influenced by the US. Why not call them "sockets"? That sounds as good to me as anything. Then again, I do not have a problem using "half-lapped" for half blind, or "lapped" for through dovetails. Just semantics.
Lastly, I like experimenting and do all this for fun. The tutorials record my efforts and are aimed at those who are looking at woodworking the same way. Those that are clear as to the way they prefer to build - not necessary the only way or even the correct way - are unlikely to pay my articles any attention.
Regards from Perth
DerekVisit www.inthewoodshop.com for tutorials on constructing handtools, handtool reviews, and my trials and tribulations with furniture builds.
-
25th September 2011, 02:06 PM #88
.
- Join Date
- Jul 2005
- Location
- Victoria
- Posts
- 5,215
-
25th September 2011, 03:01 PM #89
What... you mean it's not 1792?
- Join Date
- Oct 2006
- Location
- Melbourne
- Posts
- 5,271
I haven't heard of Cosman; is his red pen for light or dark wood? I'm a tails first type and I use a pared-down pencil for marking the sockets even for the narrow ones you call "London dovetails". Originally Posted by derekcohen
.
I know you believe you understand what you think I wrote, but I'm not sure you realize that what you just read is not what I meant.
Regards, Woodwould.
-
25th September 2011, 03:02 PM #90
What... you mean it's not 1792?
- Join Date
- Oct 2006
- Location
- Melbourne
- Posts
- 5,271
I wouldn't like to be stuck in the seventeenth-century either. Now the eighteenth-century; that's a whole different sort of paradise! Originally Posted by Lignum
.
I know you believe you understand what you think I wrote, but I'm not sure you realize that what you just read is not what I meant.
Regards, Woodwould.

 Reply With Quote


Similar Threads
-
Finished building a tallboy / drawer chest
By chubs in forum WOODWORK - GENERALReplies: 32Last Post: 4th July 2009, 12:55 PM -
4 stages
By wheelinround in forum WOODIES JOKESReplies: 2Last Post: 25th August 2007, 03:26 PM -
My dream shed...the planning stages.....
By bulldog in forum WOODWORK - GENERALReplies: 17Last Post: 17th May 2007, 01:08 AM -
Basic stages of Finishing
By Shane Watson in forum FINISHINGReplies: 0Last Post: 24th June 2001, 12:41 PM
