

 Thanks:
  Likes:
  Needs Pictures:
  Picture(s) thanks:
Results 91 to 105 of 252
Thread: First stages in drawer building.
-
25th September 2011, 06:47 PM #91
 Novice


- Join Date
- May 2009
- Location
- Perth
- Age
- 69
- Posts
- 13

Not too sure exactly what size you have in mind for 'London pins', WW, but I would find it hard to fit anything bigger than a fine knife in between fine pin sockets when marking the pins. Typically, my pins are a saw kerf wide at the base, and fan out to about 3/16" (4-5mm).This is just one of the many reasons I cut my pins first, firstly as I don't like using a knife, and secondly, as plenty of room is provided when transfering these to the tails board, something I do with a needlesharp pencil. I do agree with your comment earlier, that without relatively quick and confident spontaneity in the making process, one's work can begin to look 'overworked' - kind of 'fussed-over' too much. Makers of old didn't have the time to fuss, they had a lot of work to get done and they had to get on with it, so they fast became bloody skilled at furniture making and very quick at it too!
-
25th September 2011 06:47 PM # ADSGoogle Adsense Advertisement
- Join Date
- Always
- Location
- Advertising world
- Age
- 2010
- Posts
- Many
-
25th September 2011, 07:41 PM #92
What... you mean it's not 1792?
- Join Date
- Oct 2006
- Location
- Melbourne
- Posts
- 5,271
As mentioned earlier, I cut the tails first and I do use a pencil for marking the sockets even on the occasions when they're just a sawblade apart (so-called "London dovetails"). I used to pare a pencil down on an upturned block plane, but these days I simply use a belt sander. I thin the pencil down to about the same thickness as a typical marking knife and if the stock is nicely planed prior to marking out, the pencil seldom breaks. Originally Posted by neiler

An aside: If anything, the very fine dovetails should be called 'Dublin dovetails' as, arguably, the finest 'English' furniture made in the eighteenth-century was actually produced in Ireland (at the time, Dublin was the second largest city in the British Empire)..
I know you believe you understand what you think I wrote, but I'm not sure you realize that what you just read is not what I meant.
Regards, Woodwould.
-
26th September 2011, 01:02 AM #93
Be inspired. Be creative. Be bold.
- Join Date
- Apr 2001
- Location
- Perth
- Posts
- 10,827
Pictures at an Exhibition
Well not quite Emerson Lake and Palmer, but this is music to me.

I've got a long way to go, and I did not get much time this and last weekend. I have the afternoon free tomorrow. Perhaps I will get one or two done, now that the first is completed and the pattern is there.
A while ago I asked advice about dovetail number and sizes. Now you will see what I plan ...
The drawer is complete save for the base. I will do these all later.
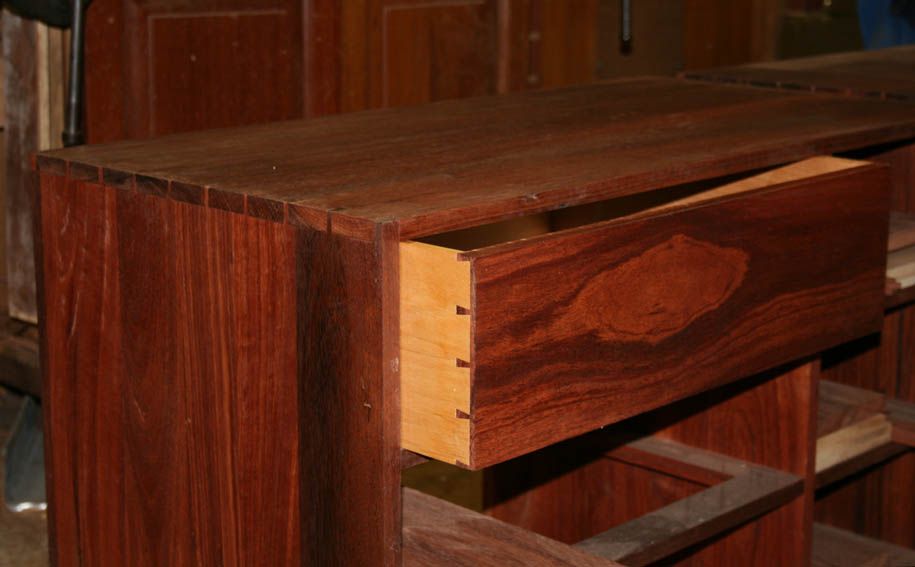
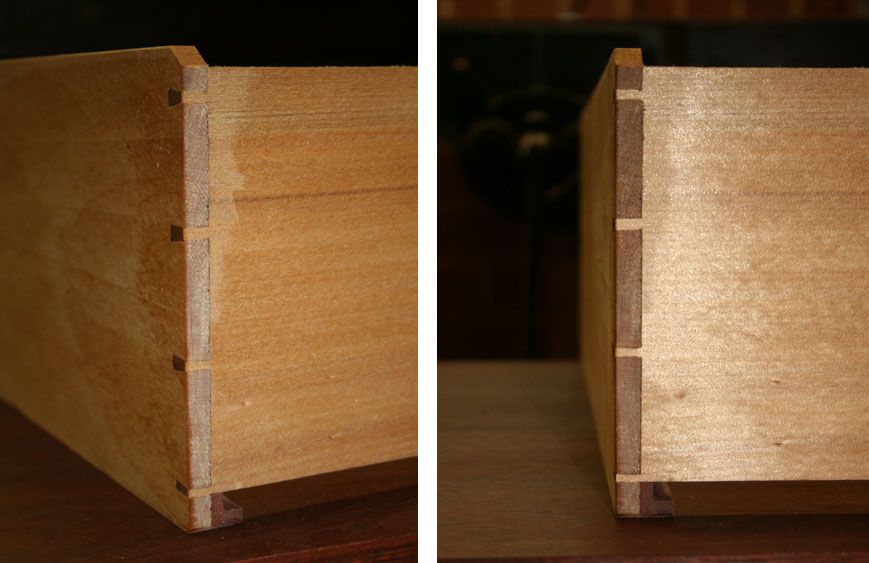
A front ...
... and a rear ...
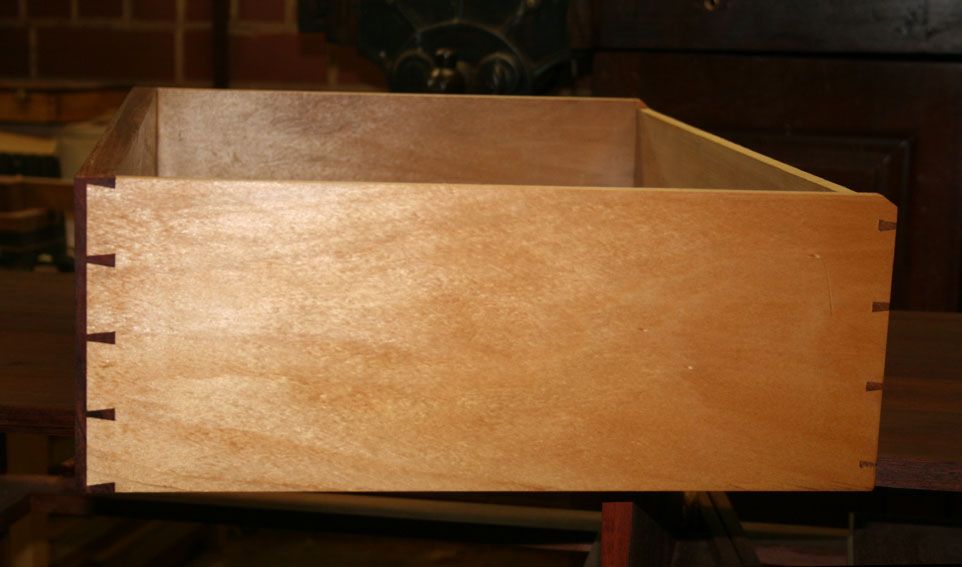
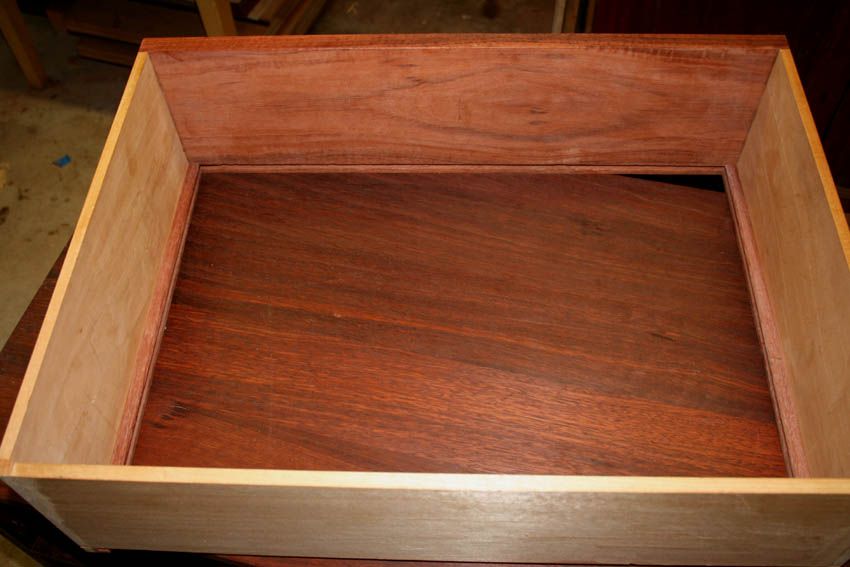
Here are images of the slips:
From the rear ...
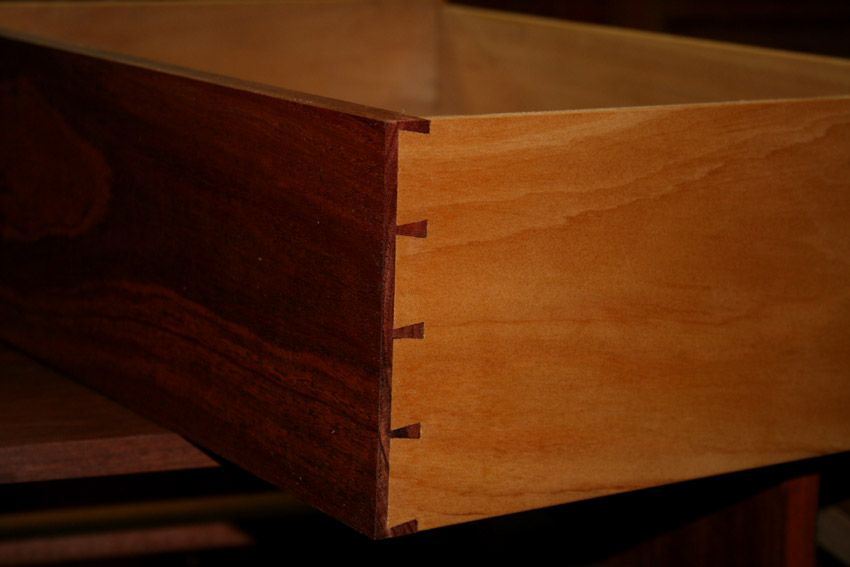
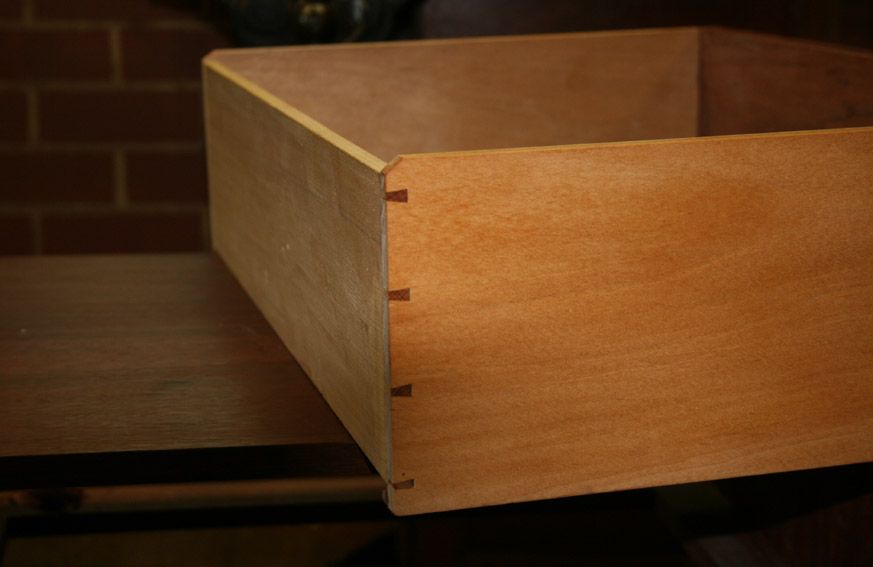
Through the drawer ...
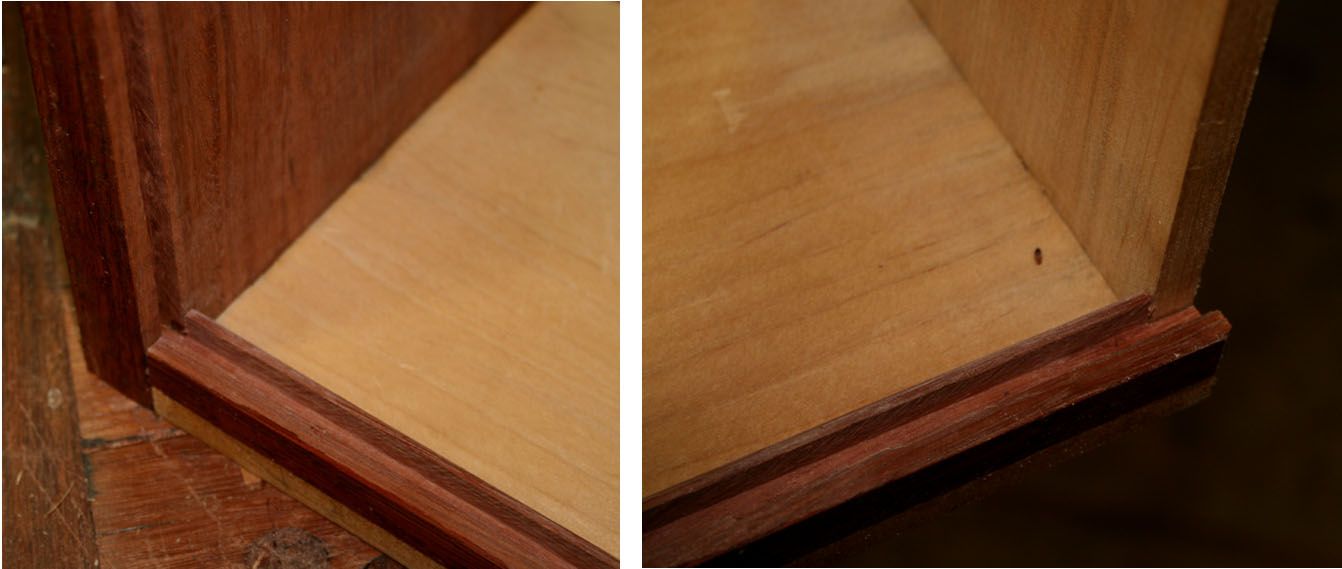
.. and internal details (note that the ends are tenoned into the front groove) .. front (on lefty) and rear (at right)...
One last item, a jig I used. I had planned to use the drawer opening to square the drawer as the glue dried. However the sides did need a little planing, so I turned to this jig that I got from Andrew Crawford, when I went on a box-making course with him.
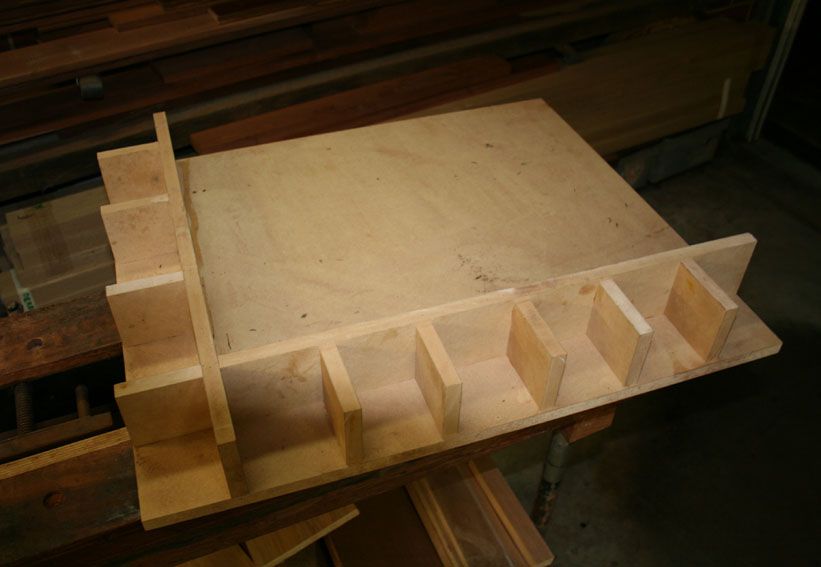
Just clamp two sides and all four must end up square ..
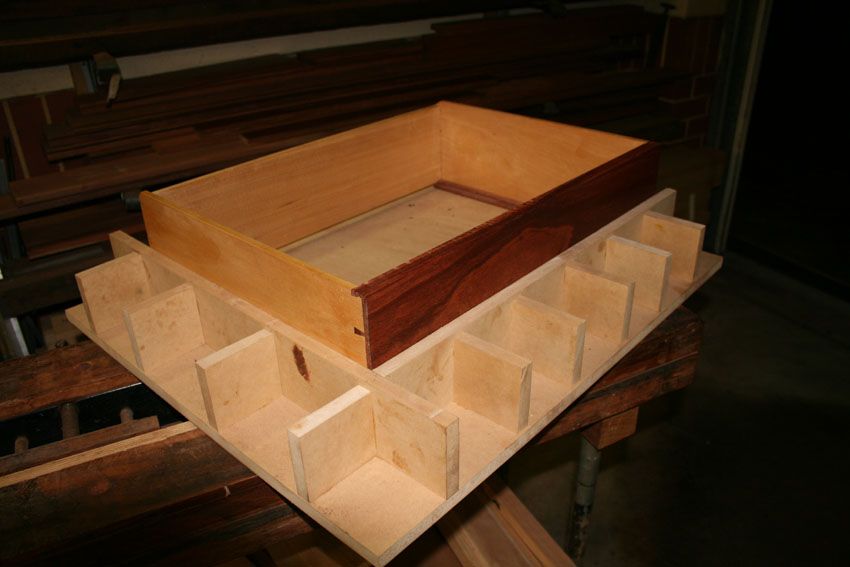
Regards from Perth
DerekVisit www.inthewoodshop.com for tutorials on constructing handtools, handtool reviews, and my trials and tribulations with furniture builds.
-
26th September 2011, 11:36 AM #94
Lignum Vexator
- Join Date
- May 2007
- Location
- North of the coathanger, Sydney
- Age
- 68
- Posts
- 9,417
Nice
Mussorgsky might have said as pretty as a picture regards
Nick
veni, vidi, tornavi
Without wood it's just ...
-
26th September 2011, 11:41 AM #95
What... you mean it's not 1792?
- Join Date
- Oct 2006
- Location
- Melbourne
- Posts
- 5,271
That's an inordinate square even by your standards Derek!
.
I know you believe you understand what you think I wrote, but I'm not sure you realize that what you just read is not what I meant.
Regards, Woodwould.
-
26th September 2011, 09:39 PM #96
gravity is my co-pilot
- Join Date
- Apr 2010
- Location
- Melbourne
- Posts
- 562
And I thought that a 'Dublin dovetail' was when pins looked like doves, and tails fitted strangely!An aside: If anything, the very fine dovetails should be called 'Dublin dovetails' as, arguably, the finest 'English' furniture made in the eighteenth-century was actually produced in Ireland (at the time, Dublin was the second largest city in the British Empire)
ps as an aside, aside, I checked the population figures for Dublin at the turn of the eighteenth century, and it was quadruple that of York, and well ahead of New York for quite a while longer!
-
27th September 2011, 10:49 AM #97
Jim
- Join Date
- Feb 2008
- Location
- Victoria
- Posts
- 3,191
The drawer is complete save for the base. I will do these all later.
One last item, a jig I used. I had planned to use the drawer opening to square the drawer as the glue dried. However the sides did need a little planing, so I turned to this jig that I got from Andrew Crawford, when I went on a box-making course with him.
Just clamp two sides and all four must end up square
Just a couple of comments (not criticisms)
Wouldn't it be easier to square using the base if you can't get in to the drawer opening?
The jig method depends on complete exactitude. Any differences or mistakes in making the drawer will mean that it is asymmetrical.
Cheers,
Jim
-
27th September 2011, 11:11 AM #98
What... you mean it's not 1792?
- Join Date
- Oct 2006
- Location
- Melbourne
- Posts
- 5,271
That is precisely the point I was making back in post #35. I'm a great believer in taking direct measurements (rather than using rulers) and using carcases to jig other components such as drawers. Originally Posted by jimbur
Earlier this morning I dovetailed together the frame for the cornice of my current cabinet on chest. All board ends have been planed 'square' on my shooting board (which I trust is still square). I don't normally check the results because it's irrelevant and time consuming.
I glued up the cornice frame and simply set it on top of the cabinet where it will eventually reside and ensured it aligned with the edges. At the end of the day, that's all that matters.
Out of curiosity, I just went out and checked and according to my 12" square, the cabinet and cornice frame are square – though to what accuracy I neither know nor care..
I know you believe you understand what you think I wrote, but I'm not sure you realize that what you just read is not what I meant.
Regards, Woodwould.
-
27th September 2011, 11:56 AM #99
Be inspired. Be creative. Be bold.
- Join Date
- Apr 2001
- Location
- Perth
- Posts
- 10,827
Hi Jim Originally Posted by jimbur
I've done that in the past, and it works well. However in this situation, with 12 drawers to make, I have attempted to create a sort of production line - not so much that I am making one item at a time, but hoping to speed up the work with as much repetition as possible. I am also wary of the pieces I have prepared - sides, back and front - warping. Taking more time at this stage to create the drawer bottoms would be, I feel, adding to the risk. I wasnt to get the drawers into their positions as quickly as possible.
Hi WWThat is precisely the point I was making back in post #35. I'm a great believer in taking direct measurements (rather than using rulers) and using carcases to jig other components such as drawers.
I do not use rules or numbers to measure things up. I transfer from a few master marking gauges (hence "can't have enough marking gauges"), story sticks, and dividers.
The use of the squaring jig was, as I mentioned, temporary. The drawer front was fitted carefully, and the drawer back was measured and cut from this. Adding the sides then can make it difficult to fit a drawer if they are slightly proud. They need to be planed back to fit the drawer space. The squaring jig was used until the glue was dry, and then the final tweeking done.
In the service of speeding up the work, I tried a technique shown me by Neil (Erasmus) using a powered router and a 1/8" (?) carbide router bit to remove waste from the pins/sockets. I tried it out yesterday, and it worked superbly. Cut the time down by at least 1 1/2 hours. I will post pictures next time I use it.
Regards from Perth
DerekVisit www.inthewoodshop.com for tutorials on constructing handtools, handtool reviews, and my trials and tribulations with furniture builds.
-
27th September 2011, 04:35 PM #100
gravity is my co-pilot
- Join Date
- Apr 2010
- Location
- Melbourne
- Posts
- 562
Have you tried LV's Story Tape? Saves a lot of space, aside from having clusters of sticks falling one's ears when searching the shed, they look very well labeled and stacked in a drawer. The inventor must have had quite a thing for neatness!I do not use rules or numbers to measure things up. I transfer from a few master marking gauges (hence "can't have enough marking gauges"), story sticks, and dividers.
.In the service of speeding up the work, I tried a technique shown me by Neil (Erasmus) using a powered router and a 1/8" (?) carbide router bit to remove waste from the pins/sockets. I tried it out yesterday, and it worked superbly
This isn't called a dovetail router jig, perchance? Please post photos (there must be a few drawers left to photograph it in use), I'm rather curious!
cheers,
B-D
-
27th September 2011, 11:58 PM #101
Be inspired. Be creative. Be bold.
- Join Date
- Apr 2001
- Location
- Perth
- Posts
- 10,827
Hi BD
I remember that Lee Valley April Fool Tool. I wonder if they ever went on sale?
I'll post pictures of using the router this weekend.
Regards from Perth
DerekVisit www.inthewoodshop.com for tutorials on constructing handtools, handtool reviews, and my trials and tribulations with furniture builds.
-
28th September 2011, 10:28 PM #102
gravity is my co-pilot
- Join Date
- Apr 2010
- Location
- Melbourne
- Posts
- 562
I think that they're the only AFTool that is on sale as well. I've heard that they are popular (and once saw a chap with a box full too), and why not! Originally Posted by derekcohen
cheers,
B-D
-
28th September 2011, 11:27 PM #103
GOLD MEMBER
- Join Date
- Feb 2003
- Location
- back in Alberta for a while
- Age
- 68
- Posts
- 12,006
They did, Item # 99W78.50 Originally Posted by derekcohen

http://www.leevalley.com/US/wood/page.aspx?p=65359&cat=1,43513regards from Alberta, Canada
ian
-
29th September 2011, 12:27 AM #104
What... you mean it's not 1792?
- Join Date
- Oct 2006
- Location
- Melbourne
- Posts
- 5,271
You could walk into a museum with twenty of those clipped to your belt, quietly measure up twenty top pieces of furniture and slip out again.
.
I know you believe you understand what you think I wrote, but I'm not sure you realize that what you just read is not what I meant.
Regards, Woodwould.
-
29th September 2011, 10:29 PM #105
GOLD MEMBER
- Join Date
- Feb 2003
- Location
- back in Alberta for a while
- Age
- 68
- Posts
- 12,006
like your thinking WW Originally Posted by Woodwould
regards from Alberta, Canada
ian

 Reply With Quote


Similar Threads
-
Finished building a tallboy / drawer chest
By chubs in forum WOODWORK - GENERALReplies: 32Last Post: 4th July 2009, 12:55 PM -
4 stages
By wheelinround in forum WOODIES JOKESReplies: 2Last Post: 25th August 2007, 03:26 PM -
My dream shed...the planning stages.....
By bulldog in forum WOODWORK - GENERALReplies: 17Last Post: 17th May 2007, 01:08 AM -
Basic stages of Finishing
By Shane Watson in forum FINISHINGReplies: 0Last Post: 24th June 2001, 12:41 PM
