

 Thanks:
  Likes:
  Needs Pictures:
  Picture(s) thanks:
Results 106 to 120 of 252
Thread: First stages in drawer building.
-
29th September 2011, 10:49 PM #106
 Be inspired. Be creative. Be bold.


- Join Date
- Apr 2001
- Location
- Perth
- Posts
- 10,863

You could hang them from this tool belt from LV ...


Not only is this belt attractive - it attracts!
The Veritas Pouchless Tool Belt (PTB) is a flexible and configurable belt system for use in the home, garden, or any other place where it's an advantage to keep metal objects close at hand.
One of the problems with many tool belts is that fixed pocket sizes constrain the carrying capacity. Some manufacturers have addressed this by providing a wide range of sizes and styles, but the dazzling array of options actually makes selection more difficult, and ultimately makes the product more expensive, through diminished economies of scale. Henry Ford had it right when he offered only one model - why, the increase in the number of models and options has driven car prices from $800 in Henry's day to over $20,000 today!
Just as Henry did, we're keeping our offering simple and affordable. You can have any color of PTB you want, as long as it's black. At 60" long, one size fits all (under 60"). If you need more than 60", two belts can be joined together to virtually double capacity.
The Pouchless Tool Belt is supplied with six belt pucks (additional pucks available separately). Each puck is 2-3/8" in diameter, and is precisely turned from 3/8" thick Japanese white sword-steel. Corinthian leather belt loops are a generous 1-1/2" wide, and are made from sustainably harvested and certified BSE-free sources. Loops are securely bolted to the pucks and reinforced with a 1-1/4" diameter backing plate.
Each puck has a central 1" diameter rare-earth magnet, surrounded by six 1/2" rare-earth magnets. The face-centered hexagonal close packing (a principle discovered in 1611 by Johannes Kepler) gives the maximum flux density while still providing the necessary buffer material between magnets. Each puck face is covered with a rayon fabric-backed, silicone rubber-coated, high-friction tape.
Note that when a magnet is placed in a ferromagnetic cup, the cup further magnifies the effect by eliminating the air gap (air is a poor conductor of magnetic fields) and brings both poles of the magnet to grip on the same surface. This is similar in principle to a horseshoe magnet. A rare-earth magnet in a steel cup provides four times the strength of a bare magnet. A cup provides a disc magnet the optimal magnetic flux focus into the smallest gap area.
Each of our belt pucks contains seven cups, yielding an effective pull strength in excess of 84 pounds per puck. A total of six pucks gives 42 magnets in cups, with a tool-holding capacity of just over 500 pounds.
Veritas® Pouchless Tool Belt - Lee Valley Tools
Regards from Perth
DerekVisit www.inthewoodshop.com for tutorials on constructing handtools, handtool reviews, and my trials and tribulations with furniture builds.
-
29th September 2011 10:49 PM # ADSGoogle Adsense Advertisement
- Join Date
- Always
- Location
- Advertising world
- Posts
- Many
-
30th September 2011, 12:56 AM #107
.
- Join Date
- Jul 2005
- Location
- Victoria
- Posts
- 5,215
-
30th September 2011, 02:30 AM #108
GOLD MEMBER
- Join Date
- Feb 2003
- Location
- back in Alberta for a while
- Age
- 68
- Posts
- 12,006
Yes, they're $5.90 each
click on the link and have your credit card handy regards from Alberta, Canada
ian
-
30th September 2011, 09:02 AM #109
Lignum Vexator
- Join Date
- May 2007
- Location
- North of the coathanger, Sydney
- Age
- 68
- Posts
- 9,417
I like the disclaimer on the tool belt
Does not improve blood flow, automobile mileage, or the taste of food.regards
Nick
veni, vidi, tornavi
Without wood it's just ...
-
30th September 2011, 03:59 PM #110
gravity is my co-pilot
- Join Date
- Apr 2010
- Location
- Melbourne
- Posts
- 562
With that tool belt, one could carry twenty tapes into the aforementioned museum!
-
30th September 2011, 04:11 PM #111
What... you mean it's not 1792?
- Join Date
- Oct 2006
- Location
- Melbourne
- Posts
- 5,271
With that tool belt, one mightn't make it out past the eighteenth-century anvil! Originally Posted by Blue-deviled
 .
.
I know you believe you understand what you think I wrote, but I'm not sure you realize that what you just read is not what I meant.
Regards, Woodwould.
-
30th September 2011, 04:24 PM #112
GOLD MEMBER
- Join Date
- Aug 2010
- Location
- ACT
- Age
- 84
- Posts
- 2,581
As I weigh about half the rated capacity of that belt I have visions of my self dangling from one of the angle iron girders in my shed and would be worried about everyone else as the average is about half that again.
RegardsHugh
Enough is enough, more than enough is too much.
-
30th September 2011, 06:19 PM #113
Jim
- Join Date
- Feb 2008
- Location
- Victoria
- Posts
- 3,191
It only works on one day in April Originally Posted by A Duke
Cheers,
Jim
-
30th September 2011, 08:28 PM #114
Lignum Vexator
- Join Date
- May 2007
- Location
- North of the coathanger, Sydney
- Age
- 68
- Posts
- 9,417

Not sure I've seen a better thread jack regards
Nick
veni, vidi, tornavi
Without wood it's just ...
-
1st October 2011, 06:41 AM #115
Novice
- Join Date
- Jul 2006
- Location
- Leeds, UK
- Posts
- 21
No, not a jig, but probably a fairly standard routing technique. Illustrated here it's being used to clear waste between both pins and tails in through dovetails, but essentially the same technique is used for clearing waste between pins in lap dovetails. Slight apologies for the quality of the images-- they must be from about fifteen years ago, or thereabouts. Slainte. Originally Posted by Blue-deviled


-
3rd October 2011, 01:50 AM #116
Be inspired. Be creative. Be bold.
- Join Date
- Apr 2001
- Location
- Perth
- Posts
- 10,863
Against the Clock
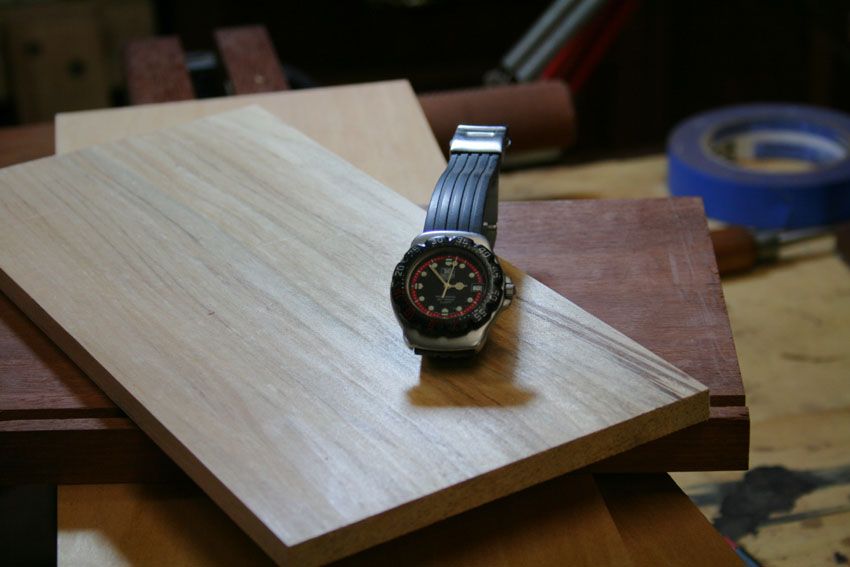
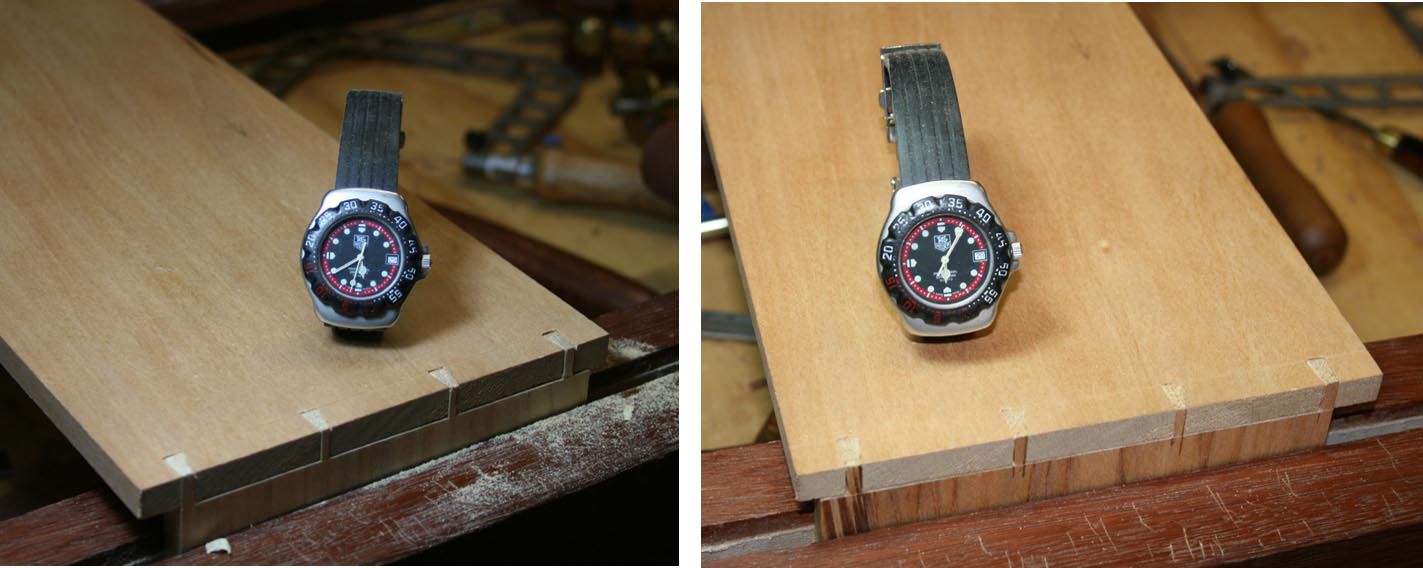
I am curious about the speed at which the pros work. One reference I had was 6 1/2 hours to make a high end drawer. I consider the style of drawers I am currently building to be high-end drawers - that does not imply that I can build them at the level of the pros (I do not), but one measure of improving skills is the efficiency with which one completes these tasks. In other words, could I build a drawer with reasonable speed?
6 1/2 hours includes, I assume, all preparations: thicknessing and dimensioning of boards, finishing and installation of handles. The first two were done earlier. The last will come later.
So I set the target at 4 hours. Not the 20 minutes that Frank Klausz gives himself. Not the 3 minutes which he can dovetail an end. Fours hours because it is about 3:00 p.m. Saturday afternoon, and I have until 7:00 p.m. before I must shut up the shop and get ready to join friends for dinner. Later than that and my wife will have a few choice words for me!
There are about 25 pictures here. I hope the documentation is interesting rather than pedantic. Well, you can always skip to the end!
The start. 2:54 p.m. Fresh boards.
15 minutes to mark and saw the tails ..
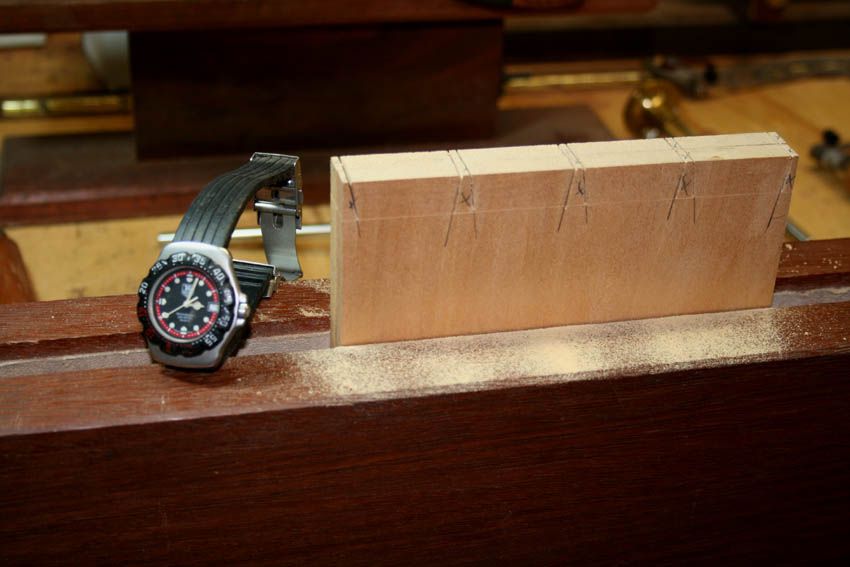
The shortcuts involve doubling up where ever possible. Gang sawing boards and ditto clearing the waste ...
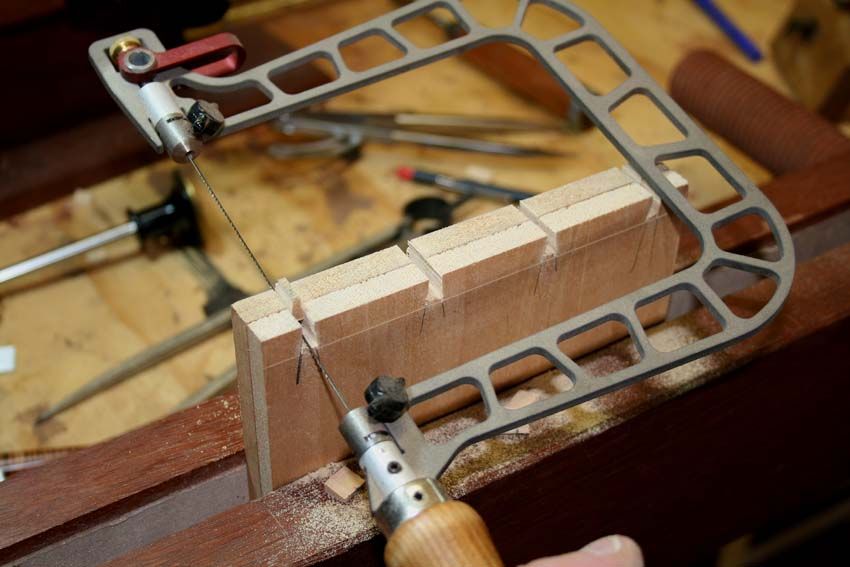
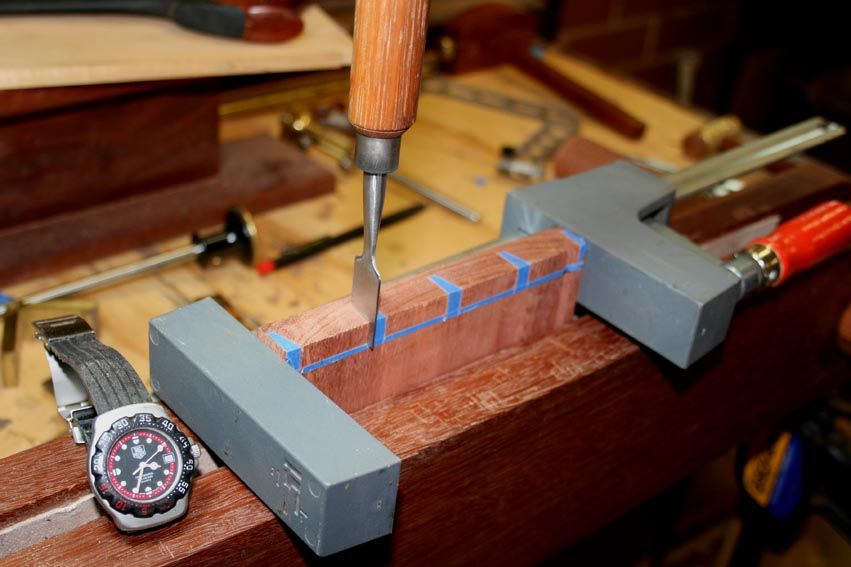
10 minutes to chisel the waste ..

3:17 p.m. and time to start the half-blind tails.
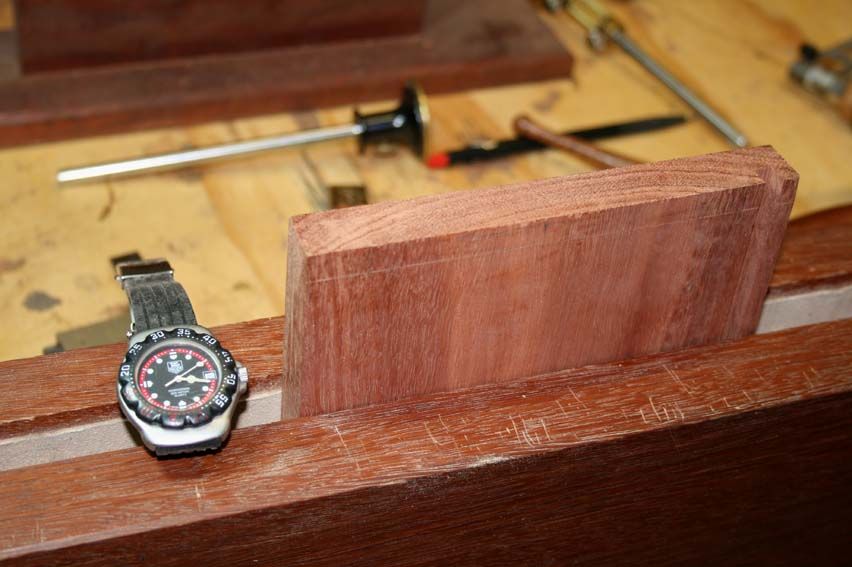
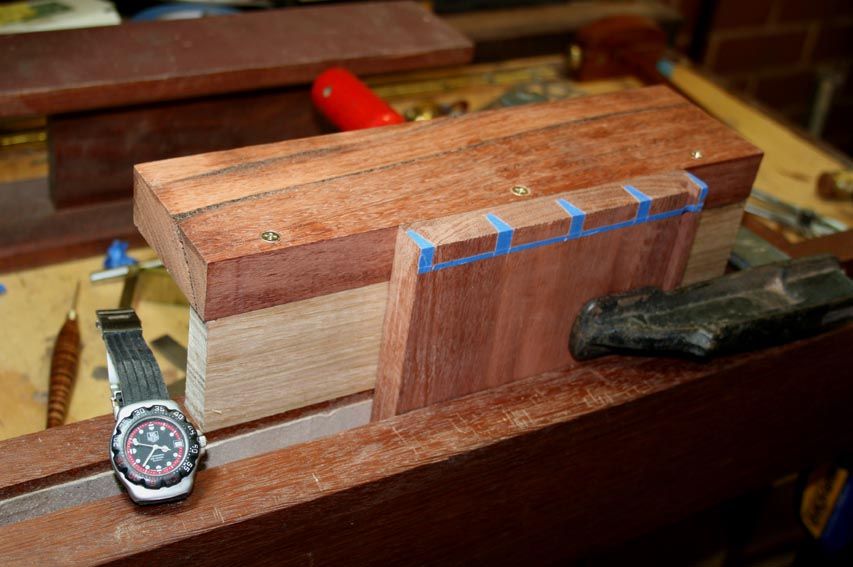
How long does it take to mark out with the blue tape? Including applying the tape, transfering the tails to the pin board, and removing the excess blue tape .. 10 minutes ..
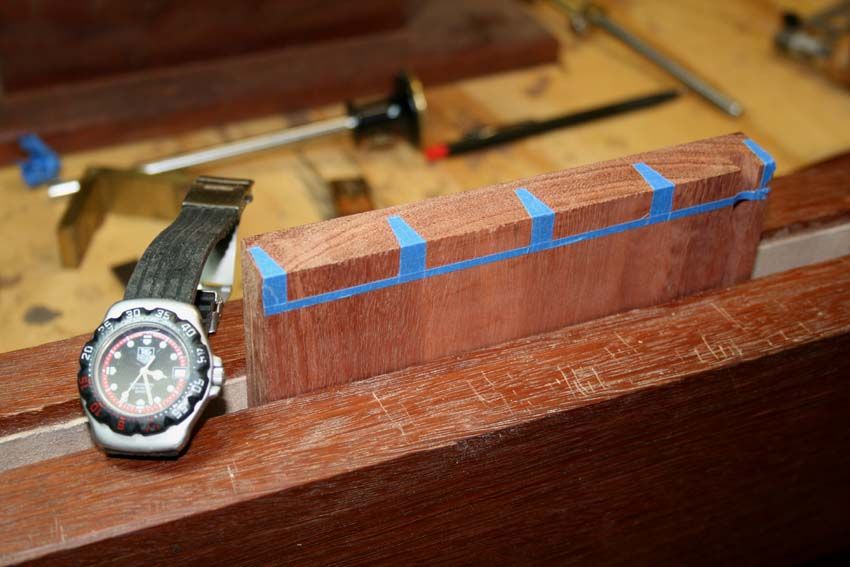
Sawing the pins ..
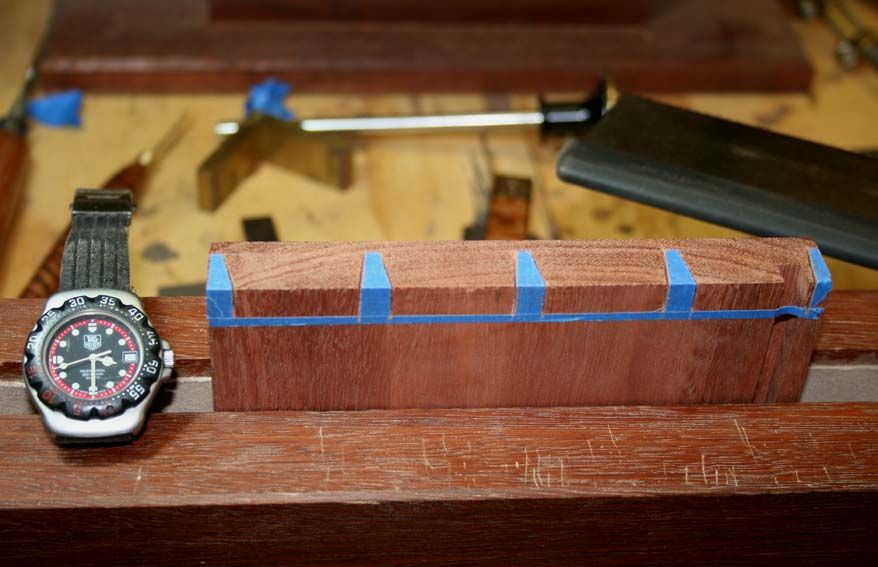
Using the kerf chisel ..
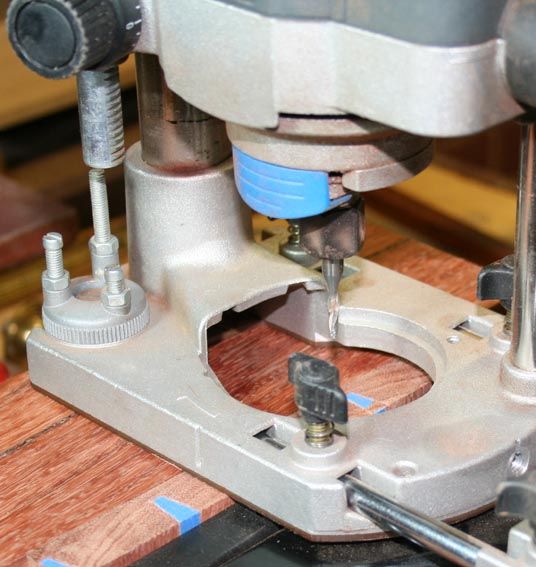
OK, now for something completely different (on a hand tools forum) ... using a power router to remove waste. I was shown this method a year ago by Niel Erasmus. Simply, it is just an extended platform for the router ...
.. and the use if a 1/8" carbide bit ...
 Visit www.inthewoodshop.com for tutorials on constructing handtools, handtool reviews, and my trials and tribulations with furniture builds.
-
3rd October 2011, 01:51 AM #117
Be inspired. Be creative. Be bold.
- Join Date
- Apr 2001
- Location
- Perth
- Posts
- 10,863
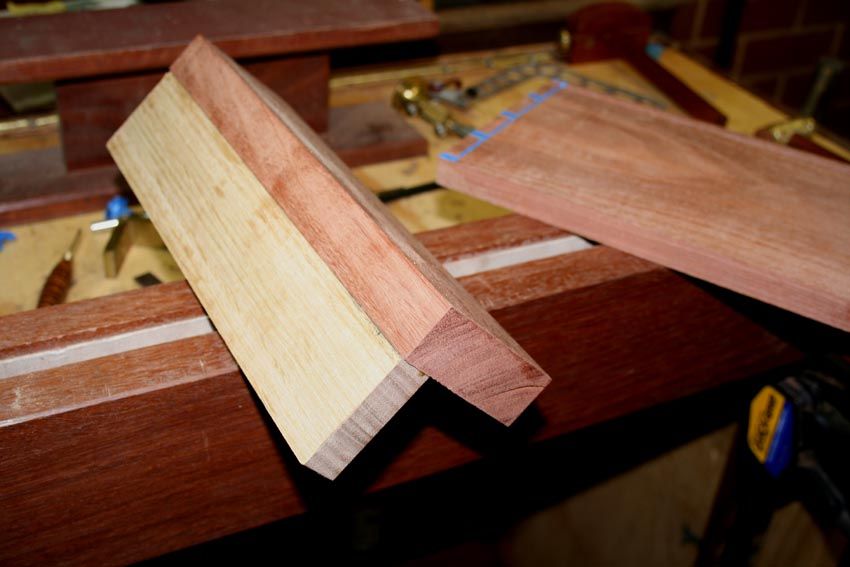
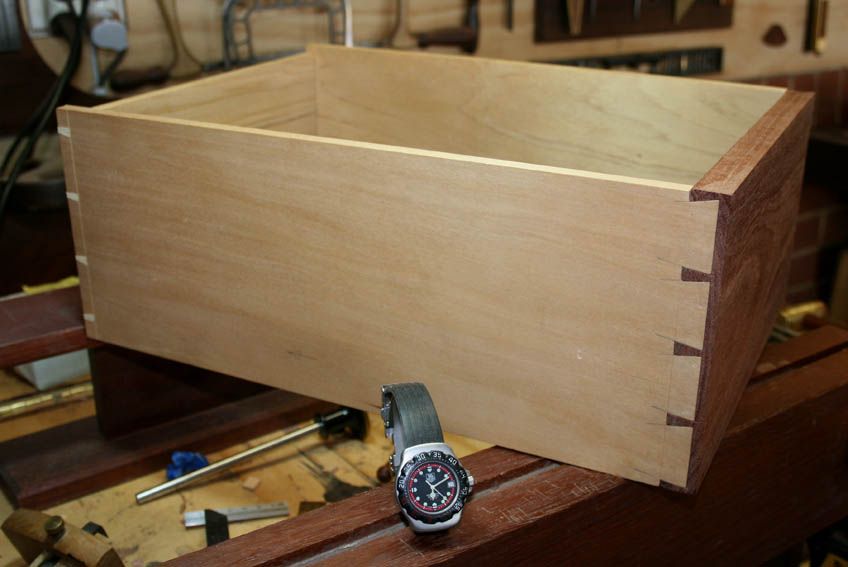
I could have set the fence to run against the boundary of the pins, but decided to end a 1/32" short and finish with chisels ...

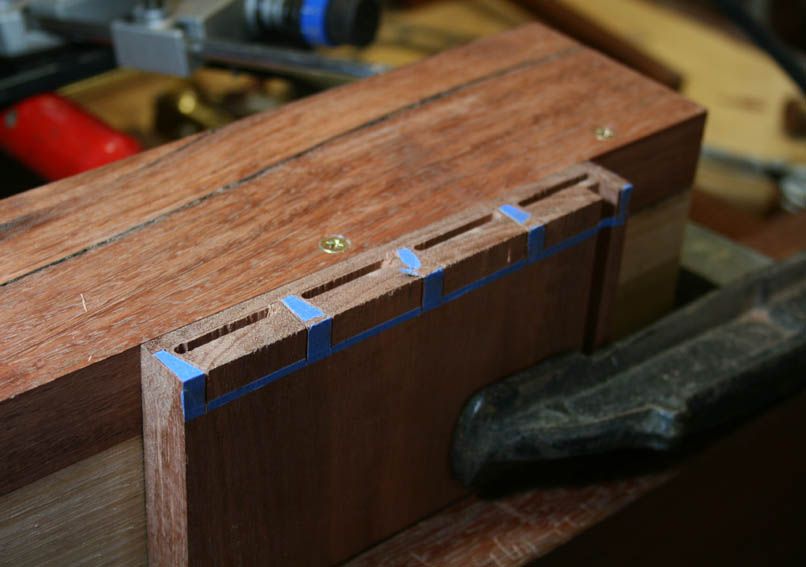
The remainder of the waste was removed ...
This took 12 minutes.
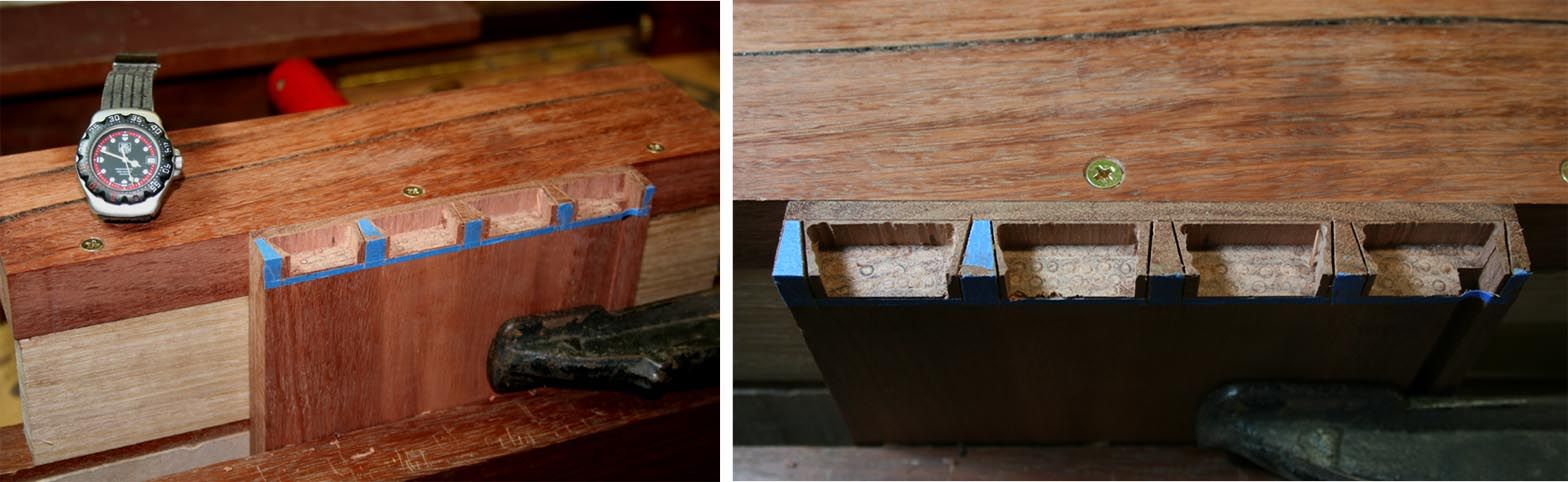
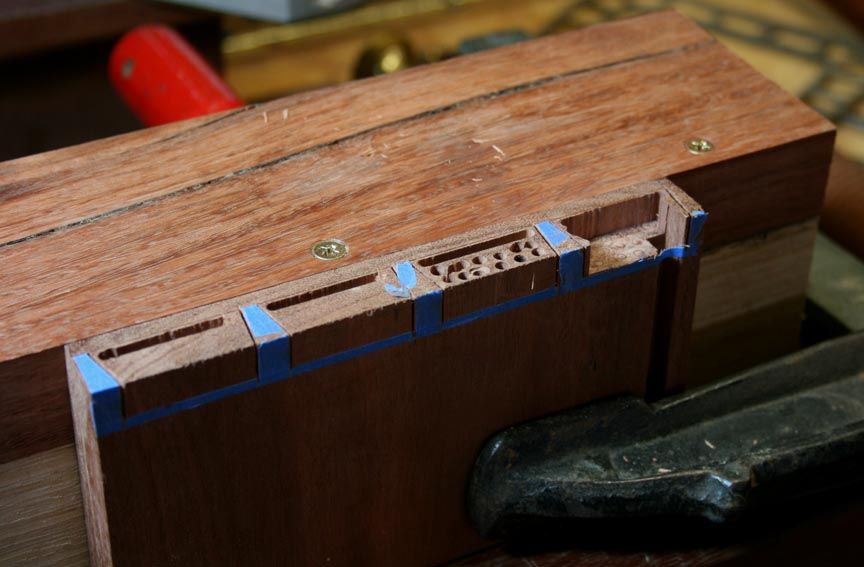
The remainder of the waste was removed with chisels ..
So, 23 minutes to remove all the waste from the pin board. I would estimate that this required about 1 1/2 hours with a chisel (emphasizing that I am referring to removing hard, brittle Jarrah).
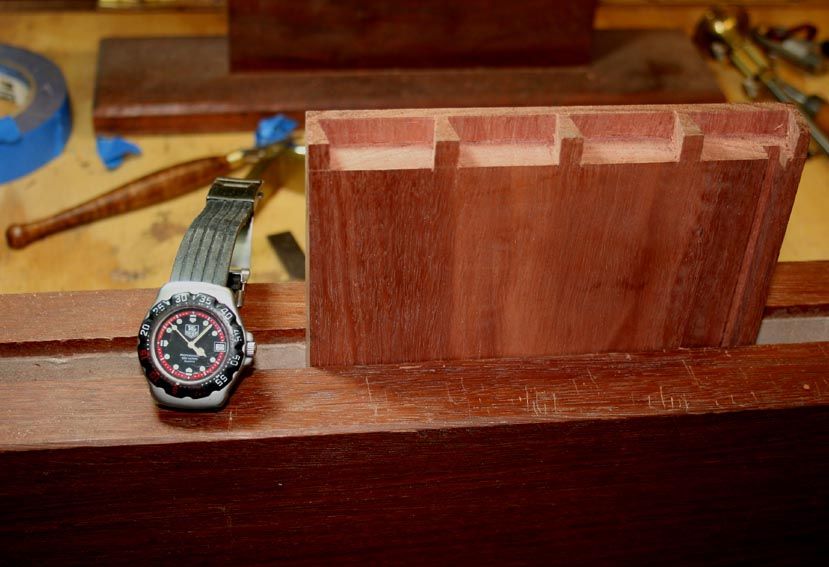
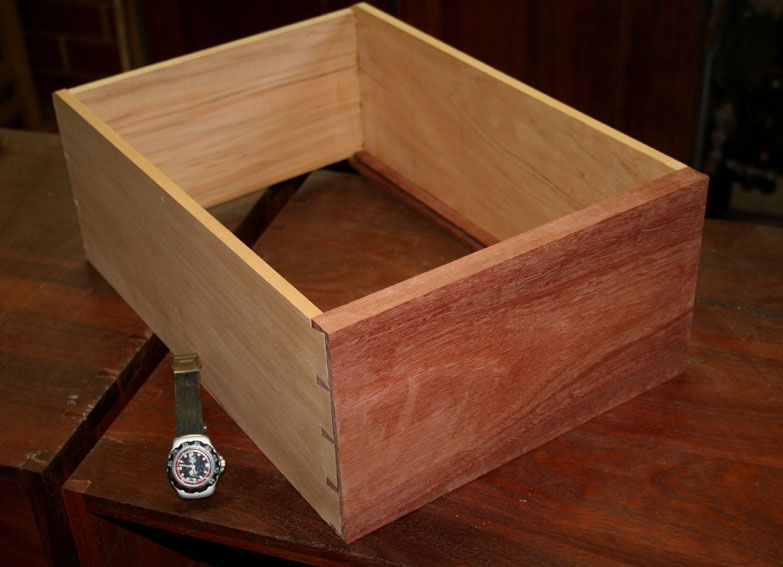
The tail board goes on without any need for fine tuning ...

Note: Ian asked whether I bevel the tails before fitting. Bevels are cut on both the insides and the ends of the tails to avoid maring the straight edges of the pins.
The second side is repeated - I will spare all the detail here - and this takes about the same time as gthe other side ...

Now the front end of the drawer is complete. It's taken about 2 hours so far. Time for the other end.
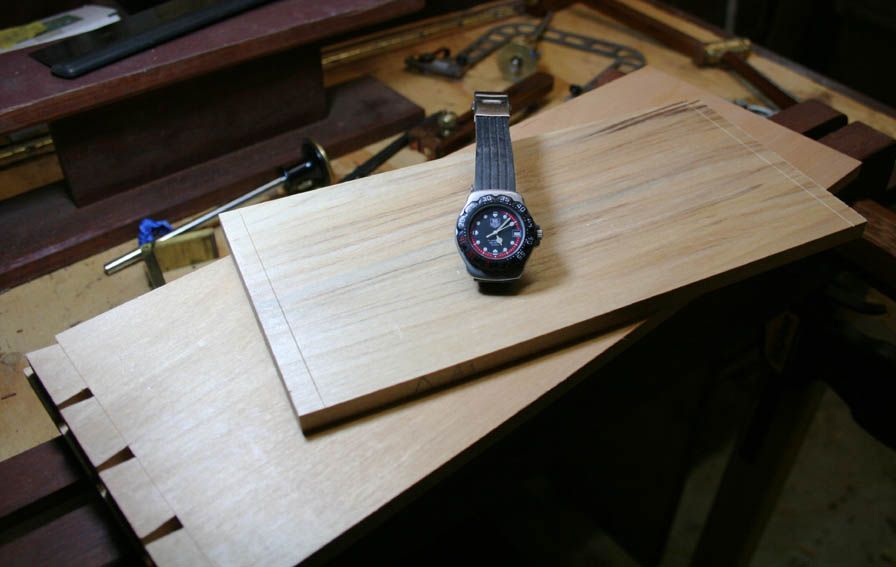
19 minutes to mark, saw and clear the waste from the tails ...
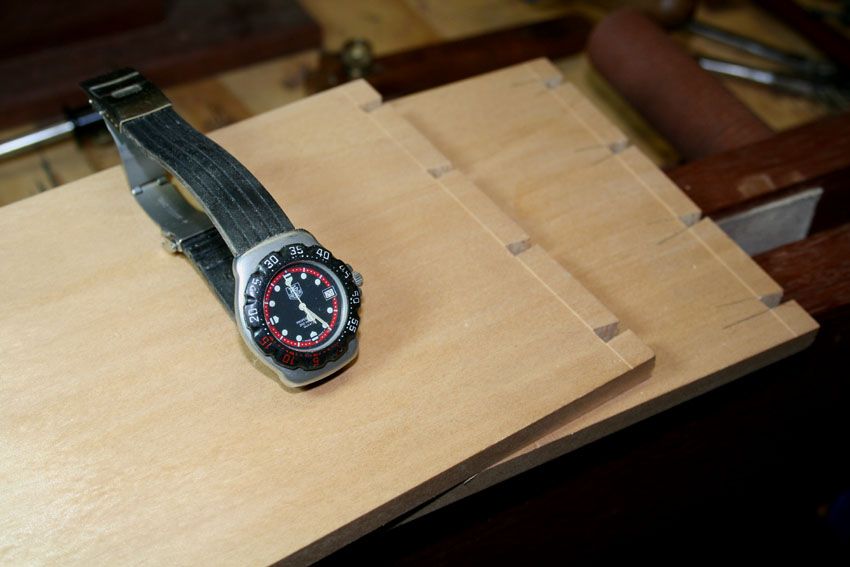
15 minutes to transfer the tails to the pin board, saw and chisel. And then about 30 minutes for the other side (both boards shown here) ...
It takes a couple of minutes to test the fit of all four sides ...
 Visit www.inthewoodshop.com for tutorials on constructing handtools, handtool reviews, and my trials and tribulations with furniture builds.
-
3rd October 2011, 01:53 AM #118
Be inspired. Be creative. Be bold.
- Join Date
- Apr 2001
- Location
- Perth
- Posts
- 10,863
A test fit of the drawer into the drawer space reveals that some tuning it needed.
It was very close but I decided to glue it up as before (in the squaring jig), then tune it once the glue dried after 25 minutes ...
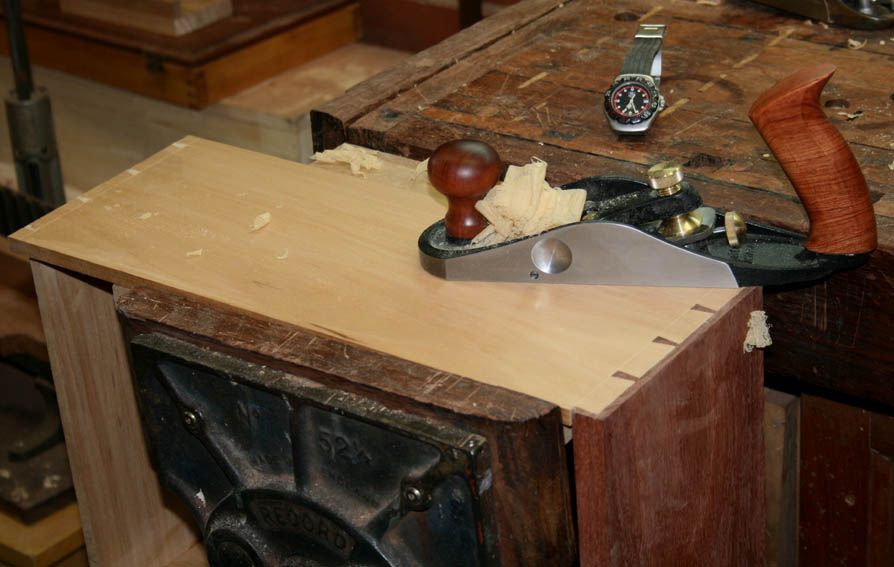
I will write a review of this new small Veritas BU smoother. It is exceptional.
The drawer fits perfectly ...
... but the slips now need to be added (gad, we are cutting it fine for time - Lynndy will kill me if I am late) ...
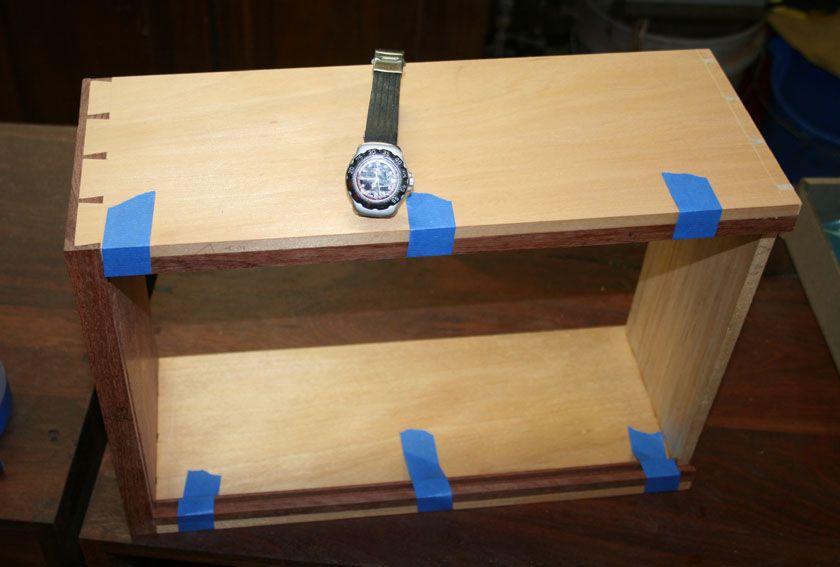
The slips attach quickly with rubbing, and we are done!
Installed with one coat of Danish Oil on the exterior ..
I am off for a few beers, and never do I want to work at this pace again!
Regards from Perth
DerekVisit www.inthewoodshop.com for tutorials on constructing handtools, handtool reviews, and my trials and tribulations with furniture builds.
-
3rd October 2011, 05:59 AM #119
Novice
- Join Date
- Jul 2006
- Location
- Leeds, UK
- Posts
- 21
Derek, I suspect your figure of 6-1/2 hours per drawer may have come from an estimating system I've devised and written about. If that's the case the time allowed in that estimating process does not include basic machining of wood square and true in the drawer making process. Basic machining is a separate process and estimated that way for all the wood in a project, ie, every cubic foot of rough sawn wood has a time allocated for machining prior to any joinery or other processes. Originally Posted by derekcohen
Therefore the 6-1/2 hours for a single drawer means you start with wood that's already been trued up. Following that it's a case of cutting the parts to the right length and going from there. This time also allows for making up solid wood drawer bottoms. Typically in a drawer made to very tight tolerances the procedure goes something like as follows.
- The bottom edge of the dawer carcase parts, ie, the front, the two sides and the back should be checked for straightness, and if they're not straight they are made straight.
- The sides are cut slightly wider than the drawer opening height, perhaps a half mm oversized and they are trimmed to a slight taper front to back allowing them to nearly, but not quite, go home.
- The drawer front is made just a hair too long and wide for the opening-- 1/2 mm or so.
- The back of the top edge is bevelled about 1° or 2° so that it jams in the opening leaving about an 1/8 of the thickness protruding.
- The ends of the front have a similar bevel worked on them.
- At installation these slight bevels are removed during the final shooting in with hand planes.
- Then the ends of the drawer sides and the drawer back are shot square, and traditionally this is done on a shooting board.
- Long lengths of slip material are moulded and grooved.
- With the groove cutting tool already set up a matching groove is worked in the drawer front to carry the drawer bottom (although this can be tweaked a quarter of a millimetre if desired to ensure the slip sits just slightly below the bottom edge of the sides).
- Marking and cutting the dovetails follows.
- Later the slips are cut to length, a tenon worked at the front end of the slip and a notch worked at the back, and these are installed.
- The drawer base is cut to size, the bottom face bevelled (or some other suitable profile, eg a tongue) to suit the groove and slipped in.
I can make drawers significantly faster than the 6-1/2 hour figure, but I 'cheat' quite a bit by using machines when I can, eg, I square the ends of parts on a sliding table saw, I've been known to gang as many as eight drawer sides together and cut the rake of the tails, assuming the sides are all the same width. I sometimes use a router to hack out waste between both tails and pins, etc, although with softer woods a single whack of a mallet on a chisel of the right size works faster.
Finally, it's seldom worth the effort of doing all that pernickety tapering of the sides, and bevelling of the ends and top edge of the drawer front to achieve a really tight fit of the drawer into the opening: one years worth of seasonal changes in relative humidity means your drawers will get jammed in the opening at some point. It's generally easier to just make the parts square and include a bit more tolerance. Not only that being a consideration, but probably at least 95% of customers can't tell a really top quality drawer from something that's only good, or even just average. As long as it works satisfactorily, and they can point out some dovetails to their friends and family that's usually about all they recognise. Most furniture buyers don't even really notice if the drawer is mounted on metal slides and made out of plywood, or if it's traditionally constructed and running on wooden slips. Evidence of superb craft skills whizzes right over the heads of most furniture buyers, but they will buy 'style', and if it looks good to them they mostly assume the item is also well 'crafted', which is hopefully the case, but I suppose it isn't always. Slainte.
-
3rd October 2011, 08:06 AM #120
What... you mean it's not 1792?
- Join Date
- Oct 2006
- Location
- Melbourne
- Posts
- 5,271
Derek, 6-1/2 hours seems excessive, though I wouldn't count material preparation as part of the actual drawer-making either.
I don't buy the whole "hard, brittle Jarrah" bit; English oak, ash and elm can be every bit as tough and don't require any special treatment other than determined use of the mallet.
But all right, you want to use a router to remove the waste; however, your method of removing it seems clumsy and time consuming. Viz. you have to set up that little platform to support the router and then all you do is make a cut along the front of the socket and use the router to 'drill' a series of holes and you still have to chisel across the grain to remove the waste!
If you're going to use a router to remove the socket waste, wouldn't it make more sense to lay the drawer front face down and then route round the three sides of the socket to sever the fibres? Once that's done, all you'd have to do is clamp the drawer front in the vice, take a chisel and pop the waste out with the grain.
Even so, using a router seems like an awful lot of faffing about when a few chops with a 1/4" chisel would have the majority of the waste removed in a matter of seconds..
I know you believe you understand what you think I wrote, but I'm not sure you realize that what you just read is not what I meant.
Regards, Woodwould.


 Reply With Quote


Similar Threads
-
Finished building a tallboy / drawer chest
By chubs in forum WOODWORK - GENERALReplies: 32Last Post: 4th July 2009, 12:55 PM -
4 stages
By wheelinround in forum WOODIES JOKESReplies: 2Last Post: 25th August 2007, 03:26 PM -
My dream shed...the planning stages.....
By bulldog in forum WOODWORK - GENERALReplies: 17Last Post: 17th May 2007, 01:08 AM -
Basic stages of Finishing
By Shane Watson in forum FINISHINGReplies: 0Last Post: 24th June 2001, 12:41 PM
