

 Thanks: 0
 Likes:
  Needs Pictures: 0
 Picture(s) thanks: 0
Results 16 to 27 of 27
Thread: Update on Kist.
-
8th July 2013, 12:09 PM #16
 GOLD MEMBER


- Join Date
- Aug 2009
- Location
- Armadale Perth WA
- Age
- 55
- Posts
- 4,524
 You mean these ... ?
 Originally Posted by derekcohen


Yep ... that sounds easier
-
8th July 2013 12:09 PM # ADSGoogle Adsense Advertisement
- Join Date
- Always
- Location
- Advertising world
- Age
- 2010
- Posts
- Many
-
23rd July 2013, 01:12 AM #17
Be inspired. Be creative. Be bold.
- Join Date
- Apr 2001
- Location
- Perth
- Posts
- 10,826
Here is the final chapter for the few who are watching
 ..
..
Returning from Cape Town, with my wife staying on for an extra week with her folks, I had the whole weekend to myself in the shop. This was doubly helpful as the kist was to be a birthday present, and she is due home tomorrow, Tuesday (today being Monday).
I needed to ..
1. Fit the drawer
2. Fit the mouldings (already made with rounds and scrapers)
3. Round all edges
4. Oil and de-nib
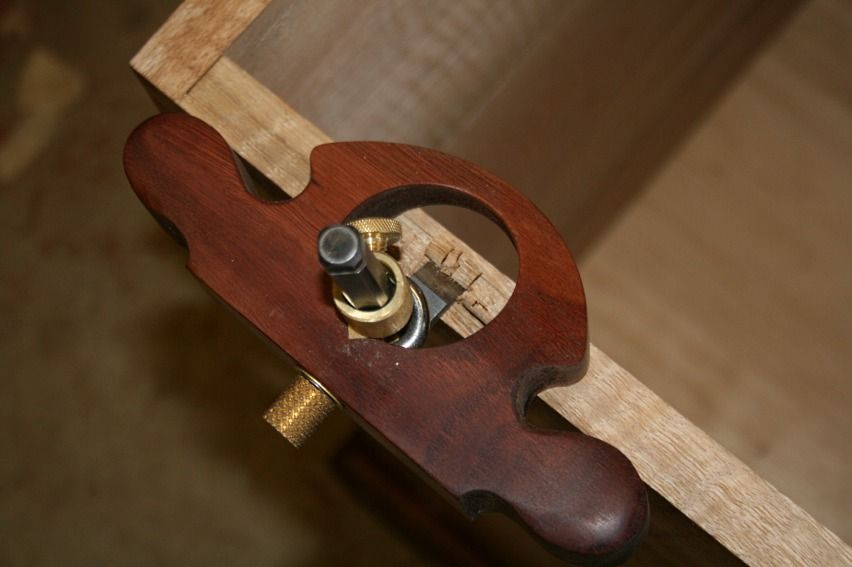
5. Install the hinges in the carcase and lid
6. Complete the lid (fine tune the breadboard ends, trim to size, glue and peg the breadboard sections - I chose not to drawbore these as I did not want the pegs to extend through the lid and show at the outside)
7. Oil and de-nib again
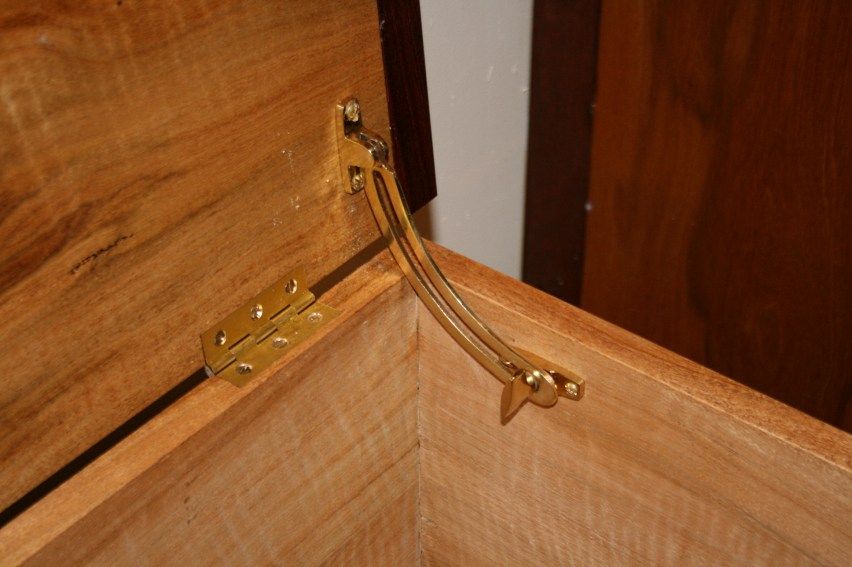
8. Install the lid stays (I'd never used these before, and I already had a headache trying to work out how to with a template or manual)
9. Oil and de-nib
10. Wax
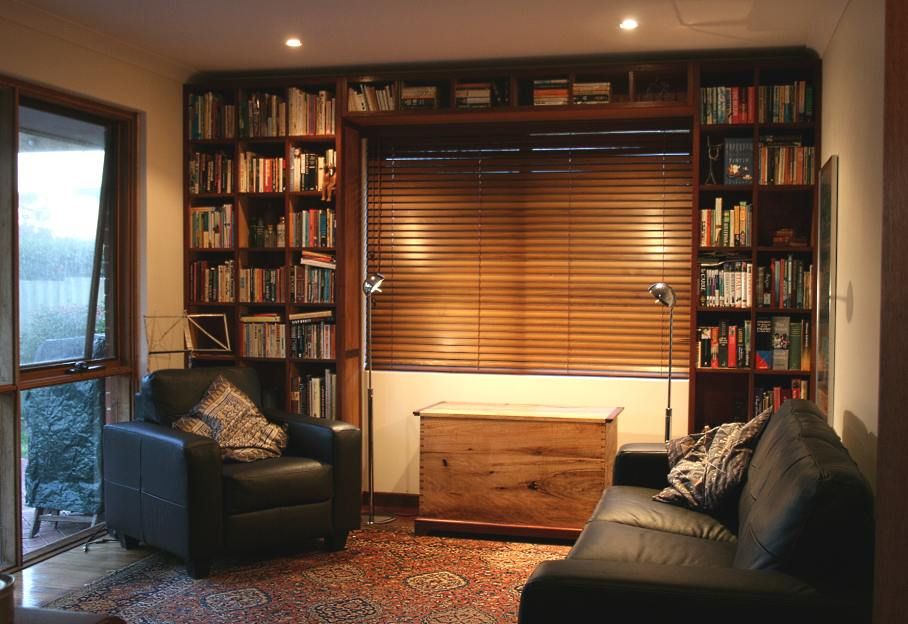
11. Lug the thing into the family room, stand back and - hopefully - admire my hand work. Hopefully.
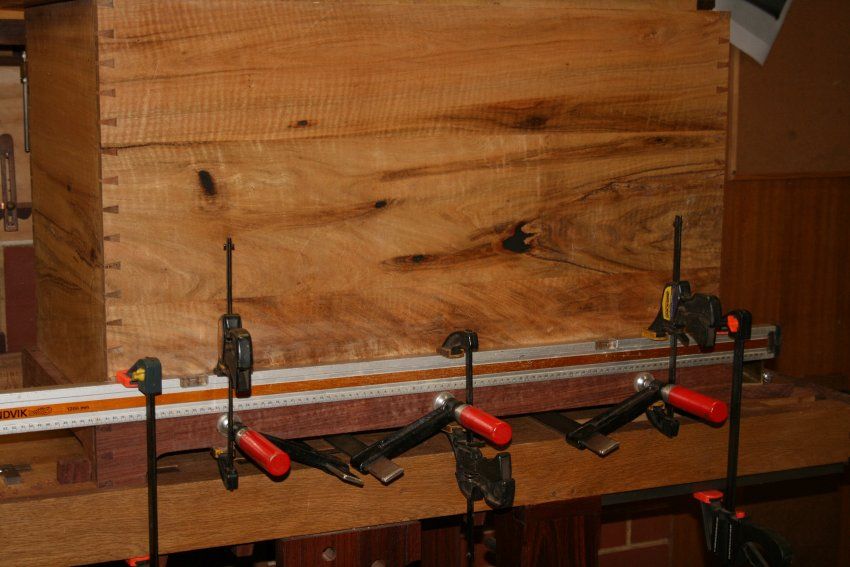
Before I left on holiday I needed to work out a method of hanging the drawer. I had considered running it along a groove with the idea that it would aid in preventing it tipping as it was extended. In expectation I had planed a rebate for the tongue. Here is the drawer resting on the tongue ...
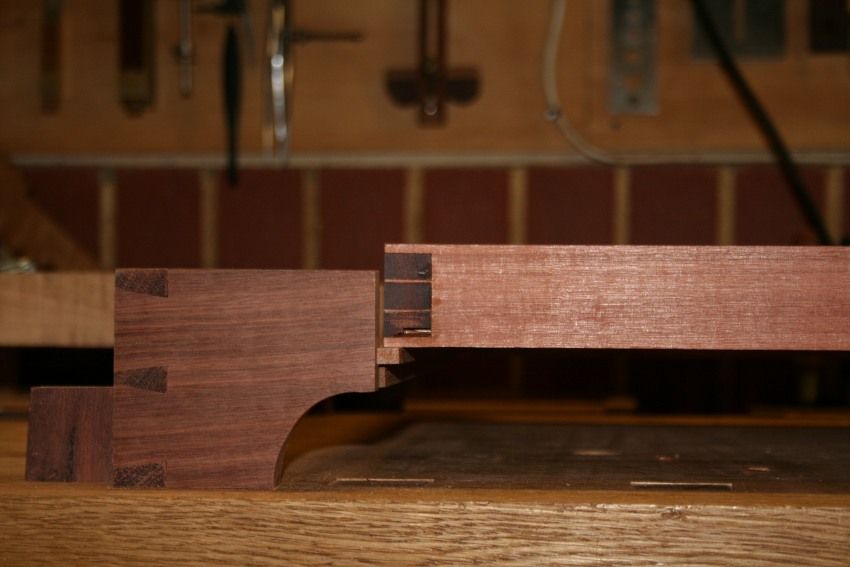
Bill made me see sense and, consequently, I removed the tongue, planed a rebate, and glued and screwed a filet to the runner. The drawer would run in the filet. The reason for planing the rebate was to raise the height of the filet (and drawer) ...
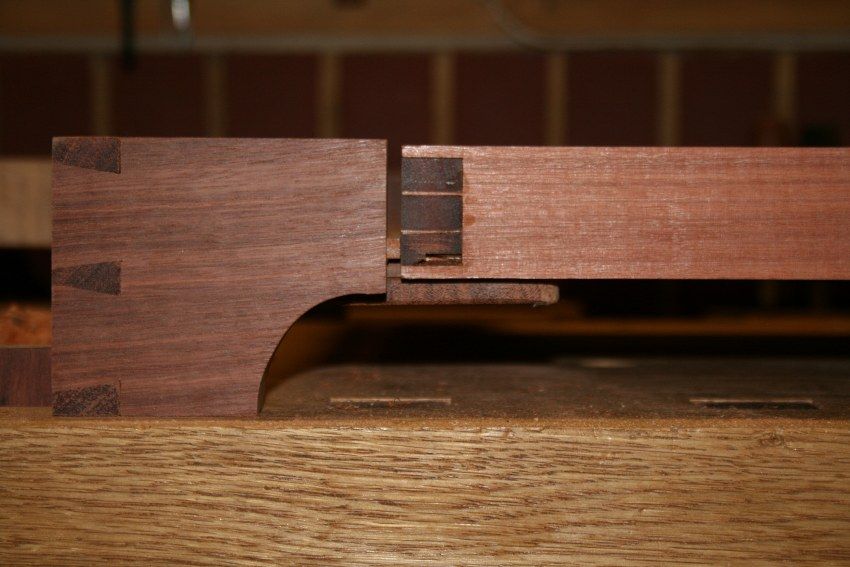
To ensure that the drawer would move square to the carcase, the drawer was aligned with the front of the carcase, then one runner was glued in place ...
The drawer was then removed, the other runner slid into its mortices, the drawer returned, and the second runner butted against its side. Easy-peasy alignment ...
The applied drawer front could now be attached ...
The moulding were installed with the use of a MF Langdon mitre box and saw and shooting board. I decided that the mitre box is totally overkill for small mouldings - the 28" saw is cumbersome and the 11 ppi teeth too coarse, although freshly sharp. My next project will be to build my own mitre box for use with a smaller saw. Later ... Of coarse I totally forgot to take pictures of the mouldings at this stage.
I imagine that a butt mortice plane is used in a similar manner for hinges ...
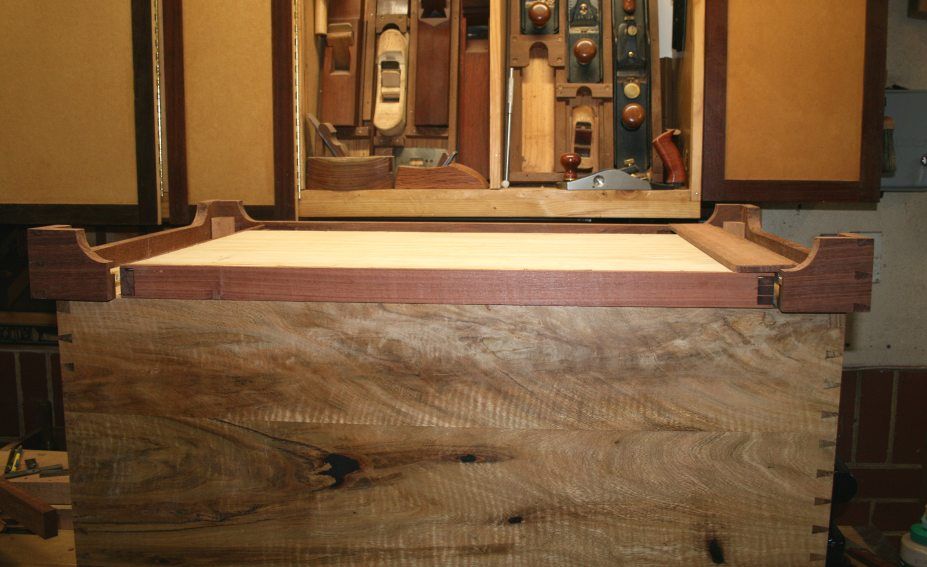
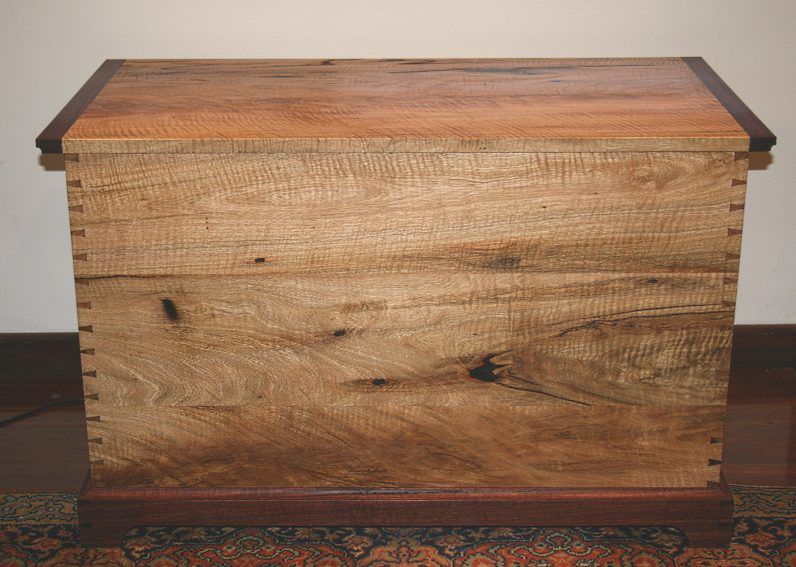
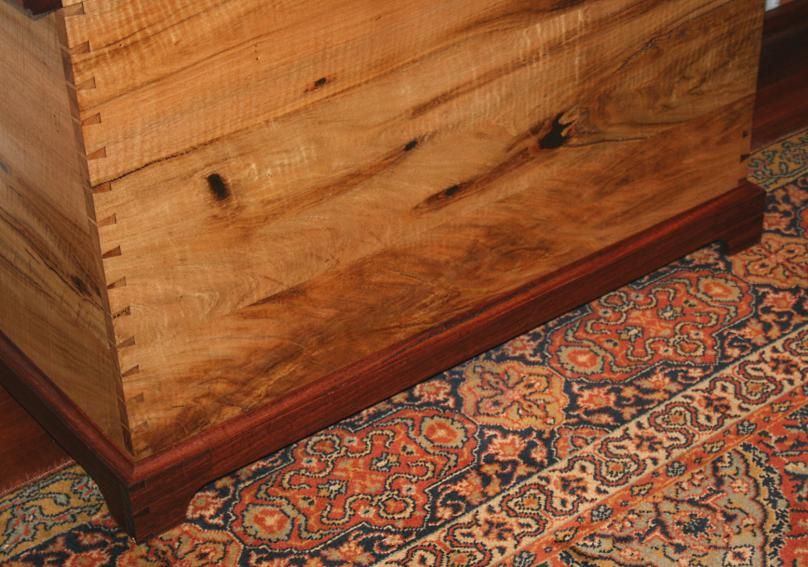
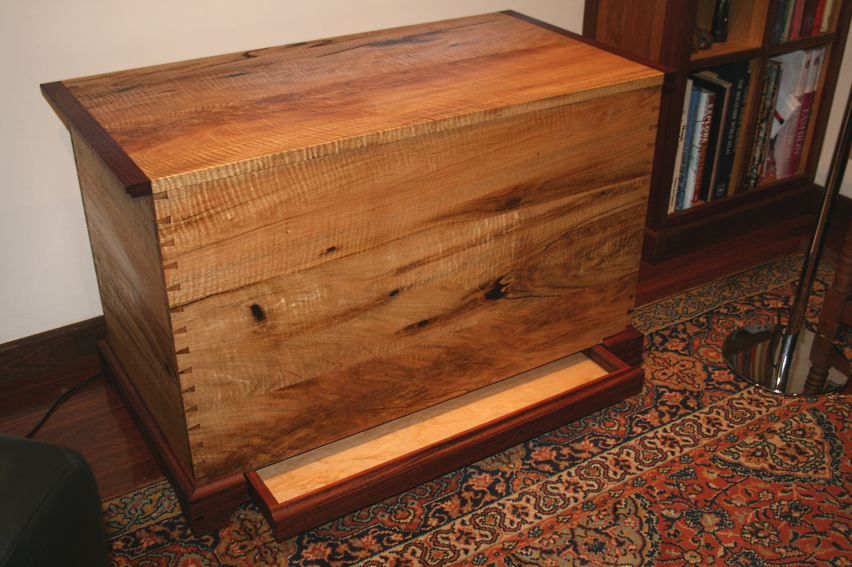
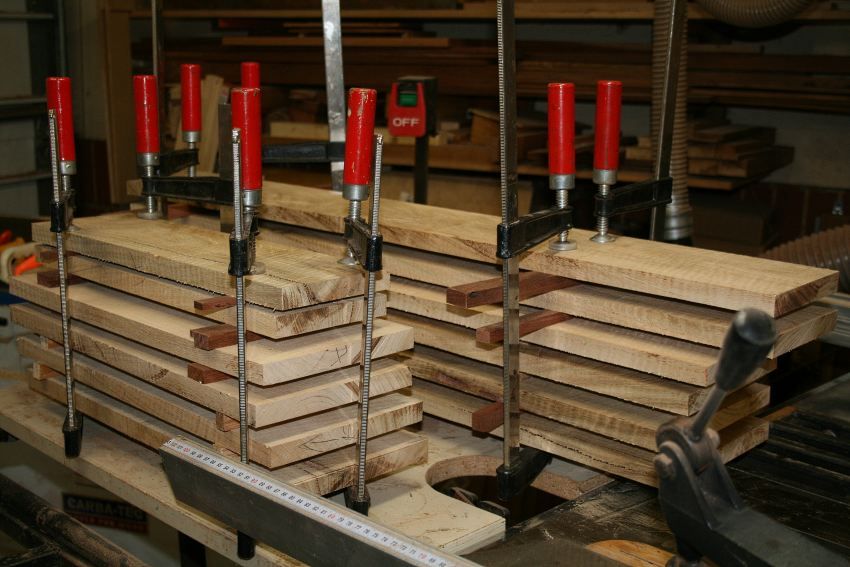
Anyway, it was all done, and I'll spare you pictures of the mundane. Instead we can skip to the end result. I will apologise in advance for these photos. It was late in the day, the sun was down, and the light came instead from two side lamps in the family room as well as a somewhat pathetic flash.
Dimensions: 3'0" (900mm) long x 1'8" (500mm) wide x 2'0" (600mm) high)

 Visit www.inthewoodshop.com for tutorials on constructing handtools, handtool reviews, and my trials and tribulations with furniture builds.
-
23rd July 2013, 01:13 AM #18
Be inspired. Be creative. Be bold.
- Join Date
- Apr 2001
- Location
- Perth
- Posts
- 10,826
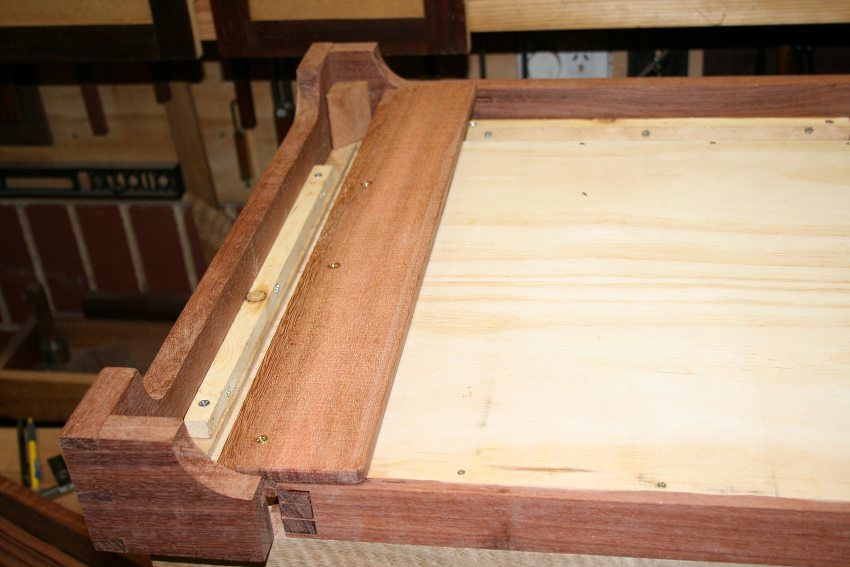
This project continues my interest in hidden drawers ...
The drawer has 1 1/4" (30mm) of internal depth. This should be plenty for a thick book or several magazines.
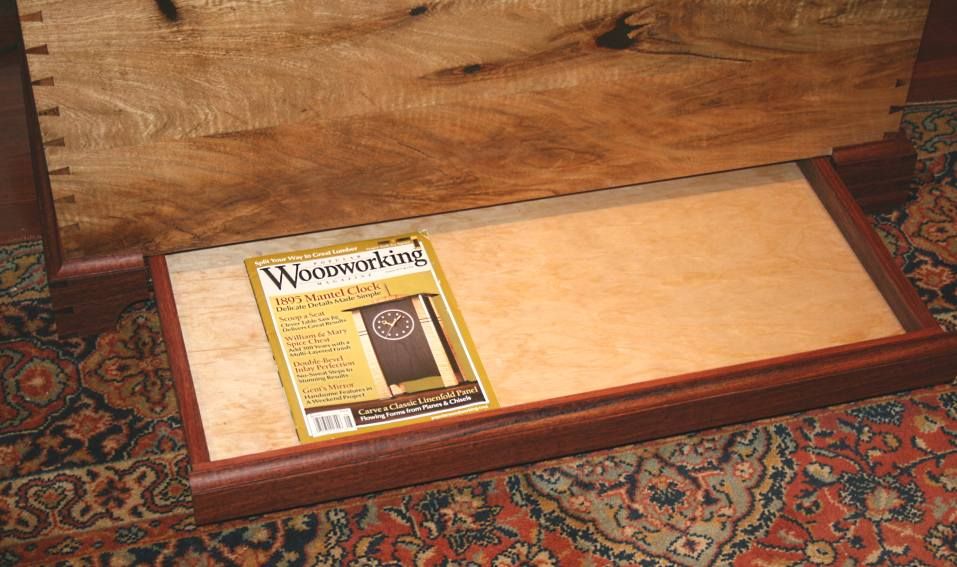
The moulding is attached to the drawer and acts as a stop.
Here is an earlier picture of the drawer with applied front to attach ..
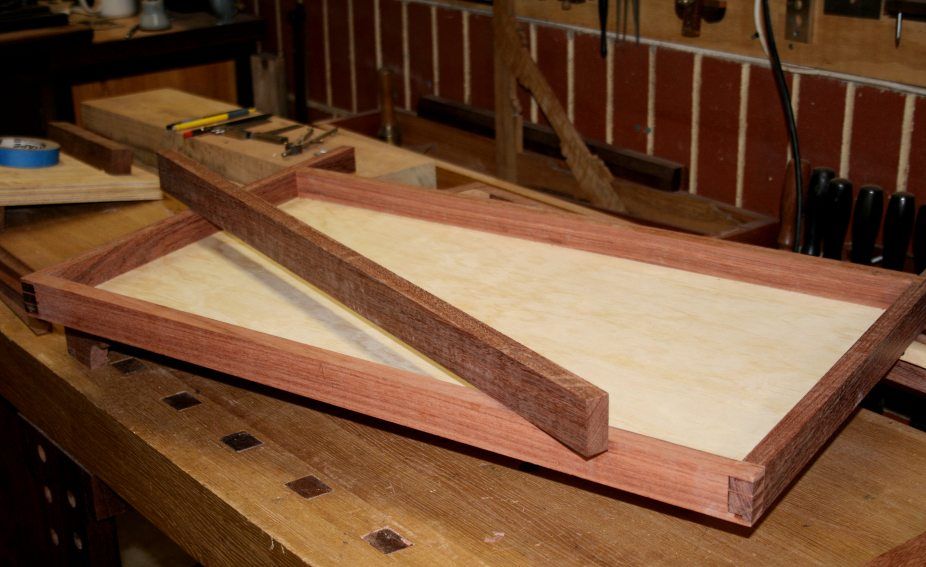
The front was standard through dovetails (here you can also see the applied front and moulding in cross section) ...
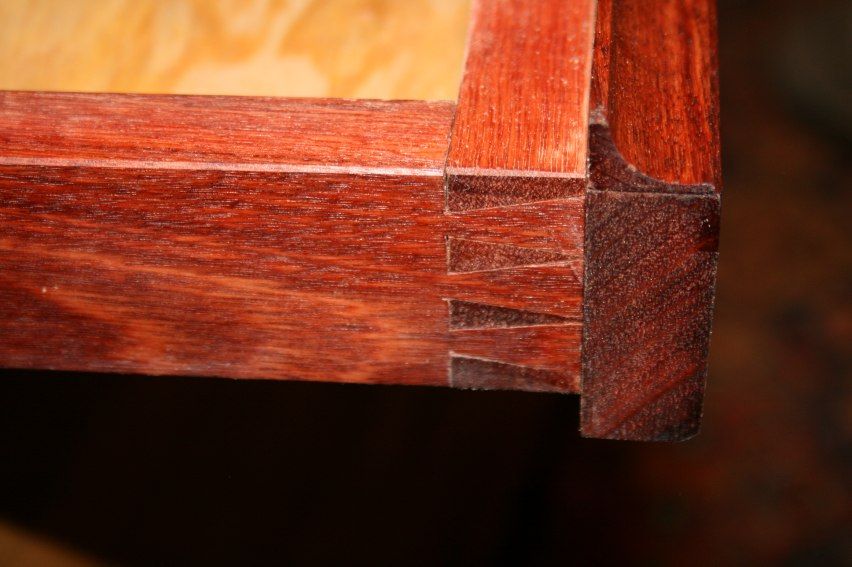
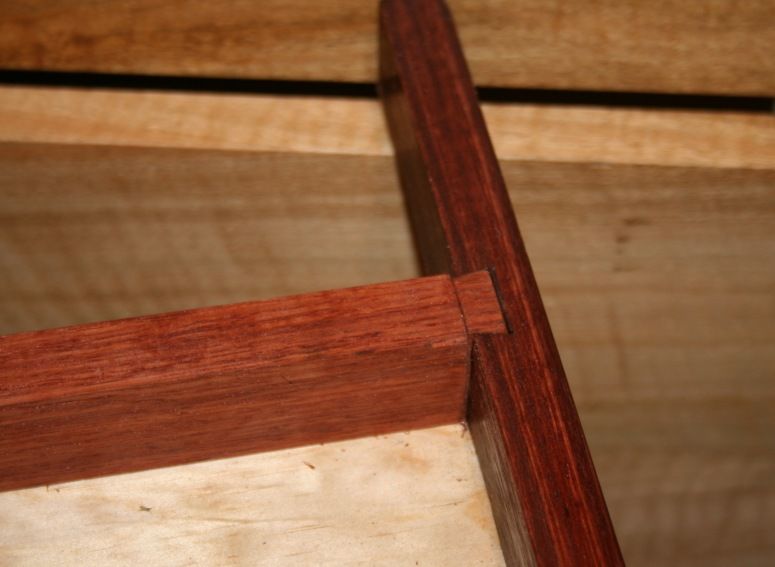
The rear was a sliding dovetail (to allow longer sides to stabilise the drawer as it reached full extension ...
Context - for use as storage and a place to rest a mug or glass ...
This was not a particularly complicated or difficult build. It was, however, one of the most frustrating I have experienced owing to the extreme difficulty in working with Curly Marri. Near the start I came close to just burning the wood. Several times I asked myself why did I choose to continue. I purchased the wood because I thought it was striking. I think I was right. The real beauty of this timber can only be appreciated in reality, not in photos. It has chatoyance and amazing figure. It is Devil Wood nevertheless and should not be worked with hand tools, or by anyone sane.
Thanks for persevering.
Regards from Perth
DerekVisit www.inthewoodshop.com for tutorials on constructing handtools, handtool reviews, and my trials and tribulations with furniture builds.
-
23rd July 2013, 01:30 AM #19
GOLD MEMBER
- Join Date
- Jan 2009
- Location
- Brisbane
- Posts
- 1,770
Stunning and well executed.
There ain't no devil, it's just god when he's drunk!!
Tom Waits
-
23rd July 2013, 03:28 AM #20
Banned
- Join Date
- Jul 2013
- Location
- Perth
- Posts
- 665
Interesting Derek
Interesting work Derek... and looks lovely.
I'm only a new chum here so didn't chip in earlier, coz I wasn't around.
The finished product looks fine.
I am a little worried about the Jarrah bread board ends across the two Marri boards in the lid.
I have 20 years experience working in solid timber furniture in WA's southwest - and the most common timbers were Jarrah, Marri, W.A. Blackbutt, and Coastal Sheoke.
My concerns are this.
The variation in shrinkage and expansion rate of the jarrah bread board ends, in longitudinal grain....compared to the expansion shrinkage rate of the tangential grain in the curly Marri boards.
I'd encourage you to do some study of the physical properties of timbers when you want to mix and match them in solid furniture.
I was a forester for about 8 years with (then) CALM (later DEC and now Parks and Something) followed by 20 years in the timber game with a mill kiln and manufacturing workshop in the states southwest.
When you dry fresh milled boards from green in a kiln - (we used to cut ours with a lewisaw with a 7mm kerf and 10mm allowance for kerf so 3mm oversize green) you get a first hand appreciation for the shrinkage rates - because you know what settings you cut them at - and when you pull them out of the kiln 3 months later to work with them - they are way smaller than when you put them in green and you start to work out (and memorize) the different shrinkage rates between species but even between same species boards cut radial or tangential!
Typically a 200 (+3) wide board cut with grain tangential (as opposed to radial) in Jarrah would end up only 188 wide when dried to a EMC (equilibrium moisture content) of 10 -11% and allowed to re absorb up to 12%
Roughly speaking the loss of 15mm in 200 mm is about 7.5% shrinkage green to dry.
Marri is somewhat similar (density's are similar) but its longer grain structure means it shrinks a little less.
Longitudinal shrinkage in Jarrah for example is something around only 1.XYZ % from memory...
The rates of shrinkage green to dry are good indicators of how much the dry timber will move between seasons once seasoned.
Where you have large variations between rates of shrinkage - its not usually a good idea to join different species of timbers with different rates of shrinkage & expansion...with long grain operating against cross grain, with a joint that doesn't allow for a lot of difference in movement.
Just the variation between radial and tangential grain in the same species of wood when saw milling will affect the finished boards individual rates of expansion and shrinkage..
If you understand these timber properties, and the varying rates - you can "select your boards" based on how they are milled (back sawn, quarter sawn etc or radial / tangential grain) and take into account these differences when both designing your furniture and selecting which boards to use and what joints would be most appropriate for each part.
An example that's always interested me is the fascination with slab jarrah & marri Tables etc (and I've made more than a few in my 20 years).
If you think about it - a single slab MUST of necessity contain both radial and tangential grain. Each have different shrinkage and expansion rates...(even when dry to 12% EMC) as a result - the slab has a natural tendency to cup and warp between summer and winter.
Ive seen guys use coach bolts from underneath (& big tek screws) to try and hold these slab tops down to massive undercarriages... to prevent them warping and cupping - and all that happens is the slab tears a great split in from each end for about 300 - 500 mm between summer and winter - then you see the butterflys come out and clamps and epoxy by the gallon to try and tame the beast.
Its all about understanding the timbers inherent properties and designing to take these into account.
I'll try for some rough diagrams in MS paint to demonstrate my point....and I'll goggle the exact shrinkage rates for the various species for you. Sheoke is one of the most stable with somewhere around 1% because although about 2/3 as dense as Jarrah and Marri its actually a softwood (reproduces from cones and spores not flowers & nuts or angiosperm V gymnosperm). As a softwood it has 2 grain directions because of its medullary rays.
I've done some parquetry work in sheoke because I know the minimal shrinkage expansion rates will let me get away with it without it tearing itself apart.
Lastly for box work (in design) I'd encourage you to research golden mean ratios (1:2 as 2:3) for your proportioning. It doesn't always suit our modern homes...(because we no longer build in palatial proportions based on golden mean ratio (for many good reasons), BUT it can make for some stunning proportions if displayed in the right proportioned room.
I'll see if I can get some factual data and diagrams for you.
More soon.Last edited by Timless Timber; 23rd July 2013 at 03:31 AM. Reason: additional data
-
23rd July 2013, 04:29 AM #21
Banned
- Join Date
- Jul 2013
- Location
- Perth
- Posts
- 665
See if this helps explain.
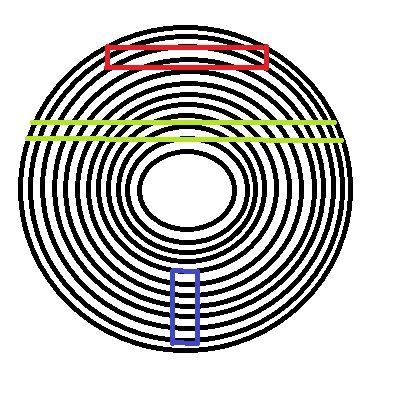
Consider the above diagram to be the butt end of a hardwood Jarrah (or Marri) Log.
The red sawn board at the top of the log - has grain largely tangential to the widest axis of the sawn board (headed towards quarter sawn at the edges).
The Blue board sawn at the bottom of the log has all cross grain (radial) in relation to the widest axis of the board.
These two boards sawn from the same species and individual saw log, will have 2 slightly different rates of expansion and contraction due to grain direction.
The shrinkage rate lengthwise is different yet again (somewhere around 1% in Jarrah from memory).
When you look at a single slab tho (best cut somewhere above the heart) (outlined in yellow) the one board contains both radial and tangential direction grain - radial out near the edges and tangential near the middle of the board.
Now when we look at the published shrinkage & expansion rates figures for Jarrah lets say,
Forest Products Commission - developing the sustainable use of the States plantation and native forest resources in Western Australia
So you can see that two boards sawn even from the same log, won't necessarily have the same shrinkage and expansion rates when used in furniture manufacture - it all depends on the grain direction within the board when it was sawn from the log.Tangential and radial shrinkage before reconditioning are 7.5 and 5.0 per cent respectively, and after reconditioning 6.7 per cent and 4.6 per cent respectively.
When we then look at these figures in other species (Marri in this case).
Forest Products Commission - developing the sustainable use of the States plantation and native forest resources in Western Australia
Lengthwise shrinkage is minimal in these two timbers and around 1% from memory.Tangential and radial shrinkage before reconditioning are 6.5 and 3.5 per cent respectively, and after reconditioning 5.6 and 3.4 per cent respectively.
From what I could see of the end grain in the two marri boards used for the lid, they were tangential grain so from the above quotes likely to shrink expand with normal seasonal movement...5.6%
Match this against the maybe 1% longitudinal shrinkage expansion rate of the two Jarrah bread board ends.
I think the box lid is what, 500 wide or something?
So those two boards should move a total of 500mm x 5.6% or 28.o mm!
While the 500 long Jarrah board will shrink expand only 1% or ~5mm longitudinally.
What allowance is there...in the peg joints between the ends of the 2 Marri boards of the lid and the longitudinal jarrah bread board ends (a total of 23 mm) to accommodate this difference in the rates of shrinkage and expansion between seasons?.
I see bread board ends are very popular in tables etc made in WA of local hardwoods and I shudder every time I see it... it can ONLY end in tears...
The difference if the joint doesn't allow for the large movement between summer and winter can ONLY end in one piece of timber (Jarrah) warping/cupping (and thus splitting the joint) of the two marri boards.
Placing it under the window where sunlight heat and UV rays can get at it will only hasten this process between summer and winter.
When working with WA Native hardwoods - an understanding of timber technology is important in making your design decisions, it shouldn't be about what joint tests you most or which joint is most fashionable or you like the look of most - it SHOULD be all about what joint will allow the individual timbers to do their natural god given thing.... and shrink or expand as they were made to do...without tearing the construction method apart between summer and winter.
I hope that makes some sense & I didn't lose anyone along the way.
The way that a softwood box is traditionally made shouldn't & won't work often in native hardwoods because the physical properties of the wood are far different.
To use WA hardwoods successfully - you have to study understand and remember their physical properties and take this into account in your timber selection, and selection of suitable joints and construction of the actual piece.
In your case with limited availability of boards - it's next to impossible to do this, you did what you could with what you had.
In my own case with a mill and kiln and stockpile of boards - I had the ability once (not now) to select the right piece of wood for the job.
I still had to compete in the market place with so called fine furniture makers / craftsmen - who put bread boards across the end of WA hardwood dining tables - a design feature from the northern hemisphere suitable for softwood tables but a recipe for disaster in our hardwoods.
The average furniture buyer knows dick about WA hardwoods and making fine furniture at the end of the day.
In many cases one follows another latest fashion / fad, and it's really just the blind leading the blind.
Real fine furniture makers study their craft and apply the known sciences to traditional methods to come up with designs and joints etc that take into account the properties of the timbers they are working with.
One way to learn it is by trial and error.
Its easy to wax lyrical about it now after 20 years of trial and error - but the few years of actual timber technology study, and saw milling / kiln drying etc - I learned more than all my years taking to other manufacturers.
There is a way to make a slab table without the mix of radial and tangential grain and thus different expansion rates - but not sure I should give away all my secrets just yet.
Instead I'll let the members tease them out one by one.
Last edited by Timless Timber; 23rd July 2013 at 04:33 AM. Reason: Correct my figures
-
23rd July 2013, 09:07 AM #22
SENIOR MEMBER
- Join Date
- Jun 2007
- Location
- Blue Mountains
- Posts
- 817
You're certainly not wasting your time, from my point of view. I think most of us are just in awe at your skill and speed of work, and don't really feel we can contribute anything meaningful. I really admire your craftsmanship, and I hope you keep posting your excellent WIP projects. I learn a lot from them. Originally Posted by derekcohen
Cheers,
ajw
-
23rd July 2013, 05:15 PM #23
Be inspired. Be creative. Be bold.
- Join Date
- Apr 2001
- Location
- Perth
- Posts
- 10,826
Hi TTI am a little worried about the Jarrah bread board ends across the two Marri boards in the lid ..... I see bread board ends are very popular in tables etc made in WA of local hardwoods and I shudder every time I see it... it can ONLY end in tears ...
Many thanks for your input here. Very valuable insights.
In my mind there were only two viable choices for the lid of the chest when using solid wood. To prevent warping, either build a frame-and-panel, or use breadboard ends.
The frame-and-panel was rejected as it would be too busy looking. I was after something Shaker-ish - simple lines without much adornment.
So it had to be breadboard ends.
The design here includes glue and pinning in the centre third only. The outer thirds of the ends are free to move.
The wood is dry. I am not sure what the moisture content is as I do not have a meter (! ..... I know, must get one). My workshop is in a brick garage, and the wood, especially the Jarrah, is stored there for a long time before being used. The Jarrah is often ex-roofing timber I salvage. If it is not dry now it will never be! The Curly Marri was purchased about 18 months ago. It appeared dry when I got it. It felt very dry when using it. It was roughly thicknessed and left to dry further before final dimensioning ...
The room where the kist will live is sunny and never damp. So we shall see ...
Any insights to offer about breadboard design?
Regards from Perth
DerekVisit www.inthewoodshop.com for tutorials on constructing handtools, handtool reviews, and my trials and tribulations with furniture builds.
-
23rd July 2013, 08:12 PM #24
Banned
- Join Date
- Jul 2013
- Location
- Perth
- Posts
- 665
Yep
Yes - only do it in stable timbers with minute shinkage & expansion rates (softwoods principally) if you don't want the marri boards sticking out past the Jarrah bread board end by half an inch each side, when it swells more sideways in winter, than the Jarrah does in winter.Any insights to offer about breadboard design?
I understand your design rationale - with the clean lines, and that availability of an alternative (to the Jarrah) was an issue for you.
Once I milled and kiln dried my own stocks of timber, that limitation was never again an issue for me...and I understand that not everyone has that luxury these days.
My own personal philosophy was always to do what the timber properties demanded and try to use good design to make it look good & not vice versa - somehow make timber properties conform to my design requirements.
Timbers a live product with a mind of it's own and sometimes unforgiving, life gets easier when you go with what the wood wants to do naturally.
I could go into lengthy posts about drying West Australian eucalyptus sp, if you want - the 3 types of moisture, sap, intra cellular & inter cellular moisture and the necessity to remove the sap initially slowly enough to prevent structural collapse and how you have to heat the wood once the saps removed slowly, to turn the inter and intra cellular moisture into a gaseous form so it can diffuse out thru the lumens in the cell walls...and finally removing the intra cellular moisture from the actual cell wall itself and what the EMC's should be for various areas of Australia and their varying relative humidity & how 24/7 refrigerated air con typical in sky scrapers - requires a lower EMC but without a non destructive moisture meter, & kiln you couldn't achieve it anyway, so it would be a moot point possibly.
-
23rd July 2013, 11:00 PM #25
Skwair2rownd
- Join Date
- Nov 2007
- Location
- Dundowran Beach
- Age
- 76
- Posts
- 19,922

Derek, I think we are all in awe of your skills, hence the apparent lack of response.
I remember being so absorbed in a lecture at uni one time the only thing I wrote down was
the word "alometry". Don't even know if I spelled it correctly!!!
The point is the lecture was so interesting it was almost impossible to think of anything to write or say
Much the same with your work.
The input by our new friend, Timeless Timber, is a valuable lesson to us all. So on that note alone your thread is not pointless.
By the way, many years ago I read a novel based in the historic area of the Scottish border mining towns.
The central characters were a family of miners who were determined not to be "doonie toonies" ( down towners, or poor people ).
They had a Kist into whic all their cash was deposited. Siller in the kist. Just like money in the bank.
-
25th July 2013, 09:44 AM #26
Luddite Lite
- Join Date
- Jan 2009
- Location
- Brisbane
- Posts
- 800
TT, Originally Posted by Timless Timber
You most definitely should write those lengthy posts, all info is greedily consumed by the hive, but I would perhaps suggest starting a new thread in the Small Milling Section.
Derek, lovely work as always and you certainly set the benchmark for project doccumentation.
Cheers,
Matt...I'll just make the other bits smaller.
-
25th July 2013, 10:51 AM #27
SENIOR MEMBER
- Join Date
- Jan 2010
- Location
- Range View, Australia
- Posts
- 656
alternative breadboard
This alternative breadboard goes against the sound practice of allowing for expansion and contraction.
An antique dealer, whom I have done a lot of work for, had a Dutch desk with a fall front writing surface
constructed this way. He wanted a dresser and a chest built this way. We both were prepared for possible
movement and splits, these are antiques after all and you get a bit of that. We both thought it was worth the
risk because it looks so cool.
The Bunya box is made from one board 25mm th. x 550mm, no movement after 8 years and I would never sell It. The Oak table is
440mmP1010001 (770x800).jpgP1010003 (800x579).jpgP1010004 (800x650).jpgP1010005 (800x558).jpg and a similar age.Cheers, Bill


 Reply With Quote


Similar Threads
-
Update of where I'm up to
By bassbuilderman in forum MUSICAL INSTRUMENTSReplies: 27Last Post: 4th August 2010, 08:28 PM -
DVR XP update
By rsser in forum WOODTURNING - GENERALReplies: 9Last Post: 15th November 2009, 04:17 PM -
Update on No 11
By ptc in forum BANDSAWN BOXESReplies: 2Last Post: 11th April 2006, 10:12 AM
