

 Thanks: 0
 Likes:
  Needs Pictures: 0
 Picture(s) thanks: 0
Results 1 to 15 of 27
Thread: Update on Kist.
-
9th June 2013, 11:01 PM #1
 Be inspired. Be creative. Be bold.


- Join Date
- Apr 2001
- Location
- Perth
- Posts
- 10,826
 Update on Kist.
Here is an update on the kist, or blanket chest.
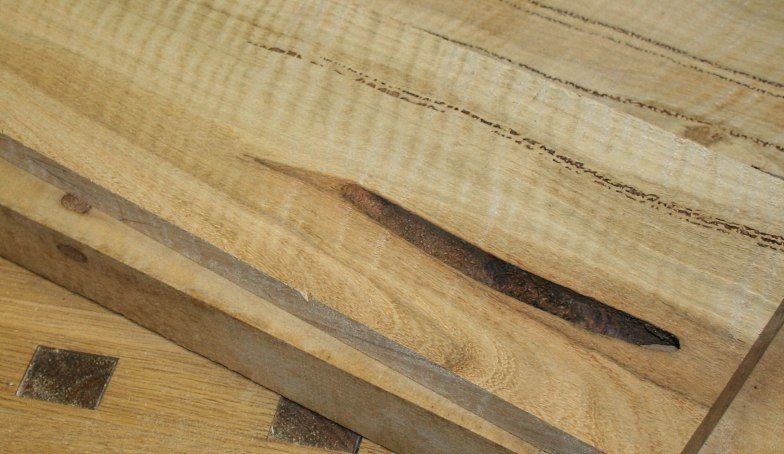
One of the issues that I faced when building from Curly (or Fiddleback) Marri was that it is far from being clear wood. It is filled with veins where resin has dried and fallen out. These need to be filled with black-tinted epoxy. However, too many of these would make the wood look like a Dalmatian.")
Here is an example. This goes all the way through the 3/4" board ...
I had started with 10" wide boards. By the time I had cut around these, some were only 4" wide. It was going to be necessary to join boards to reach the 20" panel width I required.
Joining boards is complex enough when there is figure to match, but here this was further complicated by the fiddleback in the boards - having this run in any direction but with each other would made the combination untidy and accentuate the fact that several boards were used. I think most of us try to make joined boards look like a single, wide board.
I am curious what others do to match boards - go through lots of stock to find the widest, best matches? Tint/stain boards to hide colour changes? What do you do when there is just enough for the piece one is building?
I really only had just enough for four sides and the lid, and spent quite a bit of time moving around boards to create an integrated, interesting combination. For three panels - the front and the two sides - I managed to use three boards each. The rear panel, which will go against a wall, has four boards. I think it epitomises what I wanted to avoid (but just could not with the limited stock available - and, yes, I did try and obtain more).
To obtain the best match, the grain of each board does not all flow in the same direction. This should make planing a little more complex, however the grain switches direction all the time, so who is to say in which direction the grain actually lay. There was a lot more scraping done than just planing.
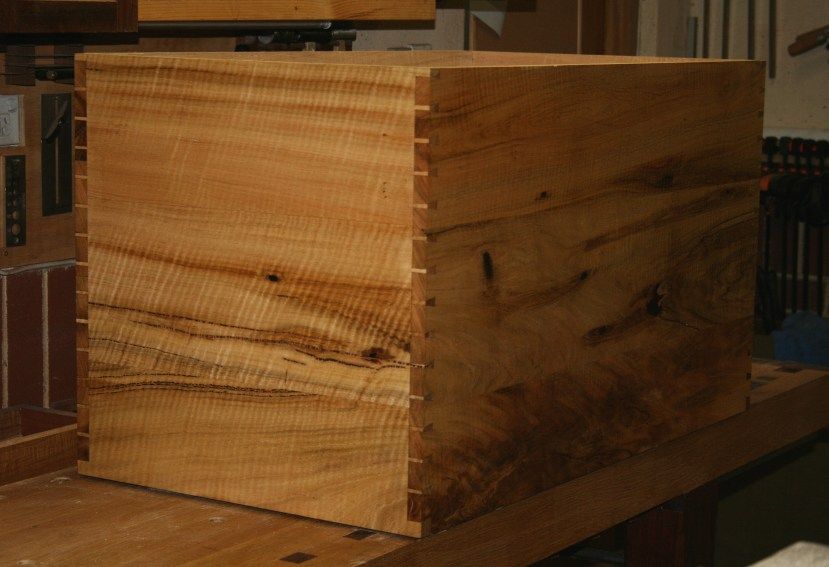
Yesterday I glued the panels together along with the base, which floats in a dado.
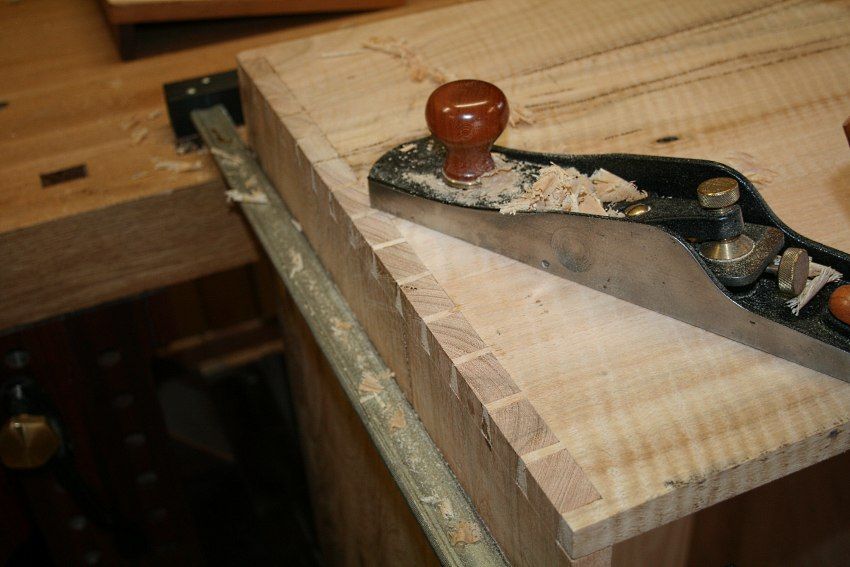
Today I planed down the sides.
I do love it when the first plane strokes uncover the details that lie below ...
All sides were given a final scraping.
Then came a couple of coats of Danish Oil - the fiddleback will respond best to oil.
First, the worst - the rear panel - fortunately it will be hidden! ...
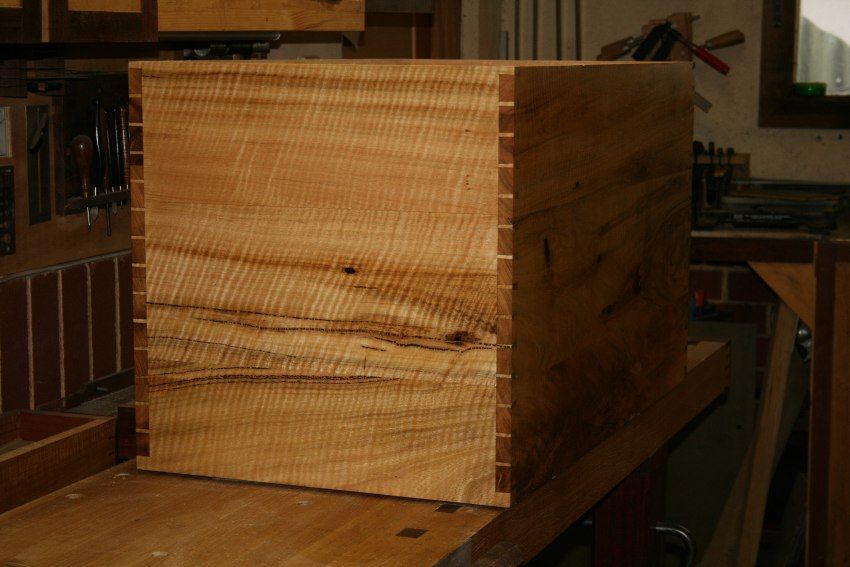
Here is the front panel ...

From one side ...
... and the other ...

Unfortunately the fiddleback figure was not clear in some of these picture. It is really striking ...
That gets me about one third of the way through this project. The remainder promises to be more fun.
Regards from Perth
DerekVisit www.inthewoodshop.com for tutorials on constructing handtools, handtool reviews, and my trials and tribulations with furniture builds.
-
9th June 2013 11:01 PM # ADSGoogle Adsense Advertisement
- Join Date
- Always
- Location
- Advertising world
- Posts
- Many
-
10th June 2013, 10:43 AM #2
GOLD MEMBER
- Join Date
- Jul 2004
- Location
- Laurieton
- Posts
- 2,251
Coming along nicely Derek. I think you have made the best of a difficult situation.
Bob
"If a man is after money, he's money mad; if he keeps it, he's a capitalist; if he spends it, he's a playboy; if he doesn't get it, he's a never-do-well; if he doesn't try to get it, he lacks ambition. If he gets it without working for it; he's a parasite; and if he accumulates it after a life time of hard work, people call him a fool who never got anything out of life."
- Vic Oliver
-
10th June 2013, 11:33 AM #3
GOLD MEMBER
- Join Date
- Jan 2010
- Location
- Melbourne
- Posts
- 2,636
Beautiful work Derek.
-Scott
-
10th June 2013, 11:48 AM #4
SENIOR MEMBER
- Join Date
- Jan 2010
- Location
- Range View, Australia
- Posts
- 656
Tidy dovetails and a nicely proportioned box. I would have used another timber and set the spectacular Marri aside for a much smaller job.
Cheers, Bill
-
10th June 2013, 01:50 PM #5
 GOLD MEMBER
- Join Date
- Apr 2006
- Location
- Hobart
- Posts
- 5,130
 Originally Posted by derekcohen

Lovely work, Derek. Will enjoy watching the progress.
Another approach to filling the voids, resin pockets, cracks, etc would be to use what the shipwrights call a dutchman. Just chisel or route out the 'anomoly' and glue in a fillet. If you carefully match the grain & colour then the dutchman is hard to see. Or you can use a contrasting timber to make it a design feature.
Fair Winds
Graeme
-
10th June 2013, 03:53 PM #6
50 and counting
- Join Date
- Jan 2008
- Location
- Mentone victoria
- Posts
- 112
Nice work Derek. Hard wood to match but you did a good job. The Kist looks great with a difficult wood. Will look good when it is finished with the oil.
Success is getting what you want.
Happiness is wanting what you get. Dale Carnegie
-
15th June 2013, 11:07 PM #7
GOLD MEMBER
- Join Date
- Aug 2009
- Location
- Armadale Perth WA
- Age
- 55
- Posts
- 4,524
Someone else feeling some of your pain, Derek ...
Accidental Woodworker: planing oak.......
Cheers,
Paul
-
18th June 2013, 04:55 PM #8
Be inspired. Be creative. Be bold.
- Join Date
- Apr 2001
- Location
- Perth
- Posts
- 10,826
Painting in Wood
By way of another update, I include below a copy of a reply I made to Ellis Walentine at Wood Central, who described the difficulties in matching boards with curly figure. Bill Tindall suggested getting around this with bookmatching.
Thanks Ellis and Bill.
Ellis, I am sure that others, like I, first think of Jim Krenov when it comes to deciding what to build from a specific piece of wood .. letting the wood decide. Alternatively - and Warren made this point earlier - that one should choose the wood to match a project. He would not have selected Curly Marri for a project where a single board could have avoided the clashing of joined panels, or he would have gone with a wide panel that included all the faults. Bill, you suggested something similar (actually, you suggested spending more on wood! It might therefore surprise you to know that these Curly Marri boards in their rough sawn state cost me $450. Not cheap!).
The decision to cut away many (not all) the faults in the boards was partly because the faults were not attractive. While I am not a fan of 99% of live edge furniture, I do enjoy the natural faults that occur in most woods. Often I choose these deliberately and emphasise the fault as a feature. Mostly these involve a few faults that blend in with the surrounding figure. Curly marri is not like that. The faults are not attractive. They are just holes in the wood ...

Large, small ... lots of them.
So why use the wood at all? Because it is beautiful. It has potential just waiting to be unleashed. Curly Marri is quite rare. There is not much around here in Western Australia, where it grows. There is a fair amount of Marri, but Marri has the colouring without the charm, the warmth, and the figure. Marri is not expensive and is used a lot by local furniture makers. With all the voids filled in with black tinted epoxy, this furniture tends to look like a spotty Dalmation. The epoxy takes the place of figure.
What I wanted to do was try and join up the best of the wood and create boards that flowed together as naturally as possible. This is what we all try and do, so it is not an unusual factor. What it was, however, was an exercise in creativity. That is why I termed it 'painting in wood'.
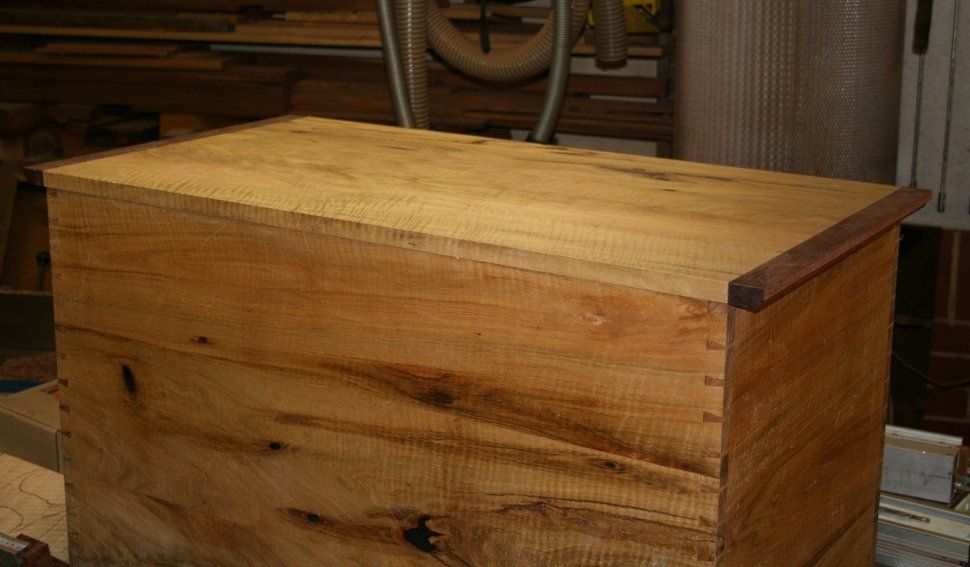
I have essentially completed the lid, and I will show this shortly (try to avert your gaze!). There was enough to fashion the top out of two long boards, and I played around with these to get the best out of them. One option would have been to bookmatch one. I did not want to do so. The aim was to avoid too much symmetry in the wood as the design itself is very symmetrical.
What I have below is incomplete. I have not yet decided on proportions. The kist has been placed in an alcove (between built-in bookcases and in front of a large window). It will be storage and side table between two black leather seats. What I have to decide on is the width of the breadboard ends - do I make them narrower?
The Jarrah breadboard ends will link with a Jarrah base. How high I can make the base will determine whether I go ahead with my original design, or modify it. The plan is to build a base that sits proud of the outside and into the front of which I can build (hide) two drawers alongside one another. If you noticed before (or now) that the pins are different widths at the corners, this was so that there is support for a section around the base so that the dovetails are symmetrical along their length after the base is fitted. I'll leave the design of this to your imagination for now! Got to keep something back to surprise you later
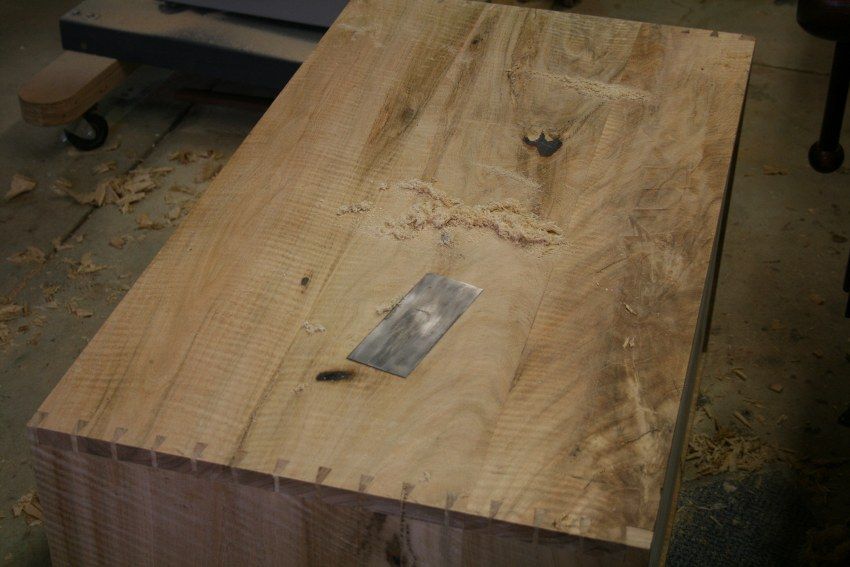
Here is the top (at this stage) ...
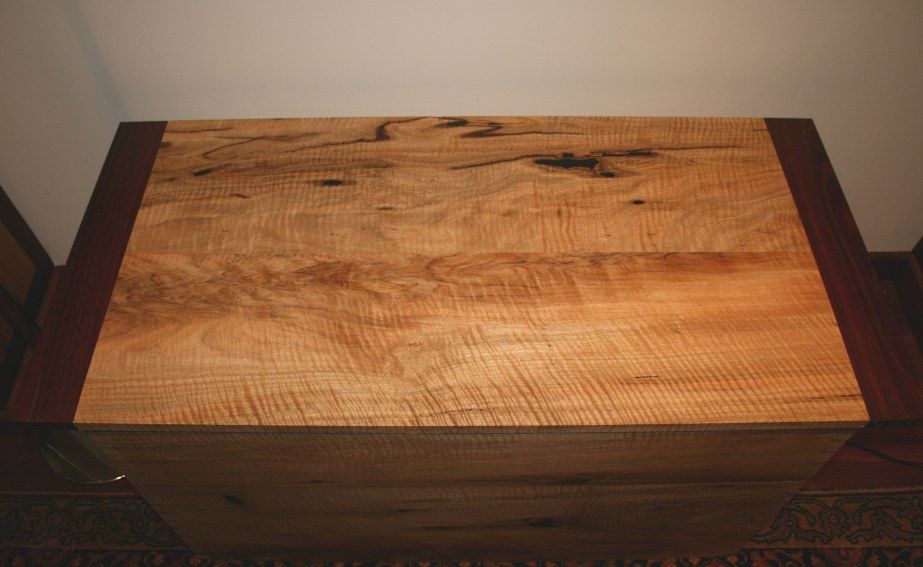
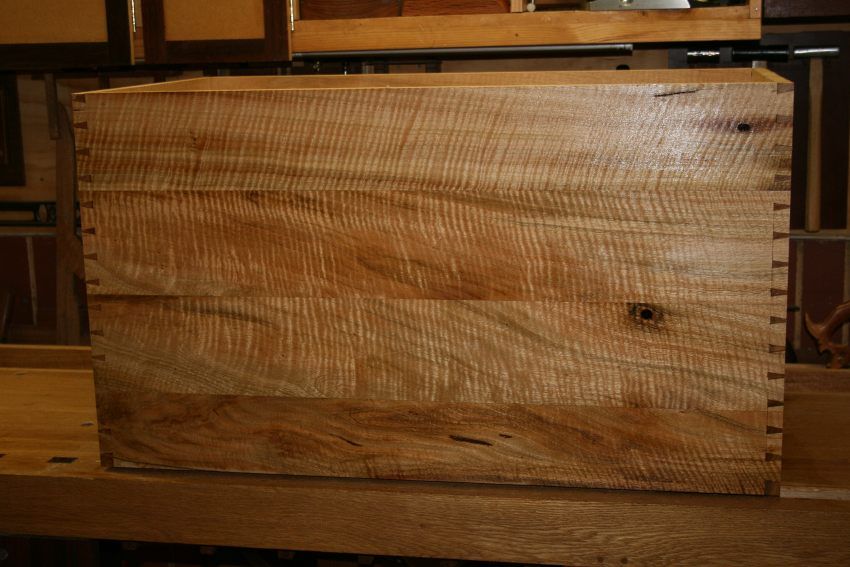
And here is the front view - minus the base. The point here is to show the blending of the three boards ...
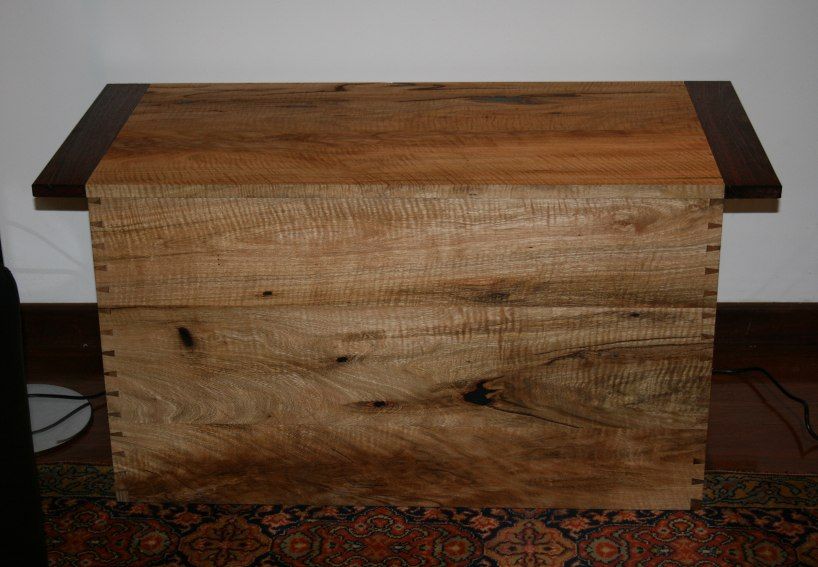
All comments and criticisms welcomed.
Regards from Perth
DerekVisit www.inthewoodshop.com for tutorials on constructing handtools, handtool reviews, and my trials and tribulations with furniture builds.
-
1st July 2013, 03:24 AM #9
Be inspired. Be creative. Be bold.
- Join Date
- Apr 2001
- Location
- Perth
- Posts
- 10,826
Designing the base
When we left off last time, the lid had been largely completed. The breadboard here is unfinished. It is not yet attached and will be made narrower and shaped with a curve on the underside (more on that later).
I had a little time over the weekend to begin the base. This is the interesting part of the build as it will contain a drawer(s) built into the base, itself. Building it this way was to conceal the drawer(s), so as to create an uncluttered face.
Some of you will have a problem with the way I design and build. I rarely draw up any plans, and basically wing it with just a idea and a mental image. I do try and think it through, attempting to plan in as much as I can. However here I only had a rudimentary idea of the way in which I would build the drawer(s), and I had reached this point where it was time to make it work.
I was not sure whether I would build one large single drawer or split this into two drawers. The advantage of a single drawer was that there would be fewer breaks at the front, and it would be easier to make the drawer "disappear". The downside is that one wide drawer is likely to rack and the drawer bottom would have to be thick to avoid flexing, even with a munton.
I would like some input here. The drawer opening is 30" wide. The depth available is 20" (It is not planned to use the full depth since that would make it difficult to reach the rear of the drawer). Anyone build a 30" wide drawer that does not rack?
The other feature of the drawer that complicates is that it will be very shallow as it must fit within the base (the drawer is to house a magazine or a remote control, or something else that is slim - why build it when it is this shallow? I liked the challenge). There is a total depth of about 2" available. To maximise the internal drawer height the drawer bottom may be attached to the underside of the drawer sides (screwed/nailed in a rebate) and not in a side groove.
The drawer will not run along a runner, as the runner takes up depth. Instead it will have to hang from, and run along, side rails.
What I love about hand tools is that they allow one to change horses in mid gallop - when a base is dovetailed together, it is still possible to chop grooves/mortices for a runner.
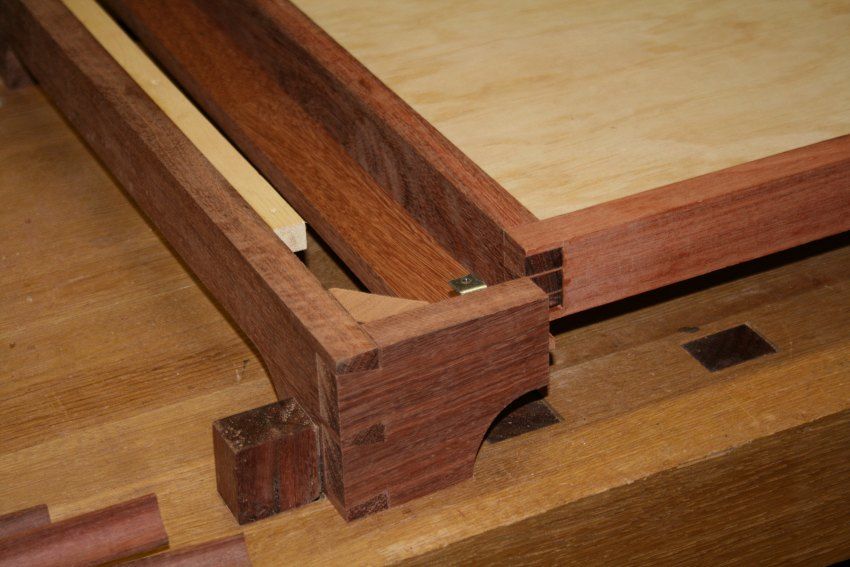
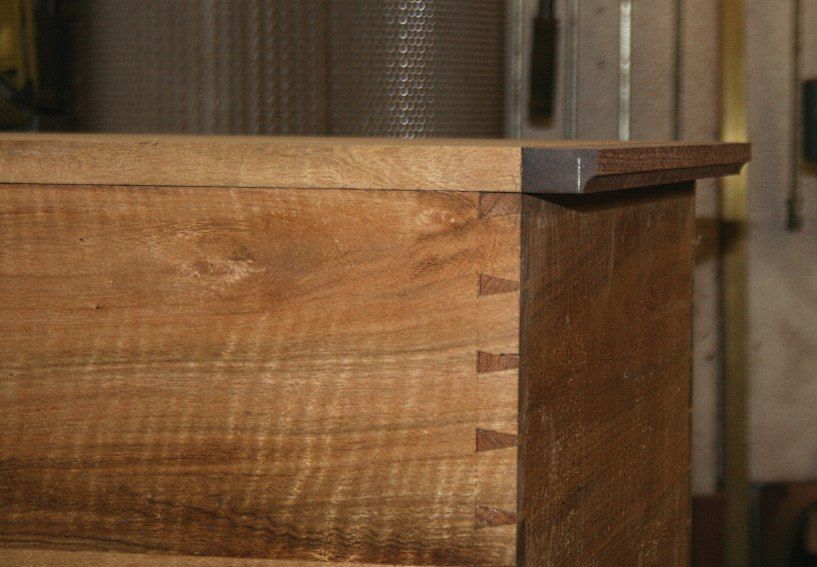
Here is the Jarrah dovetailed base. The box will sit on top. The opening at the front is for the drawer. Actually, that is likely to be drawers as I am leaning towards building two smaller ones rather than one large one.
With the box upside down, the base is attached ...
If you look carefully at the rear cornes you may make out the mortices I chopped for the rails. Below is a picture of one rail. Note that this is a dry fit as the rail will be narrower than it is here.

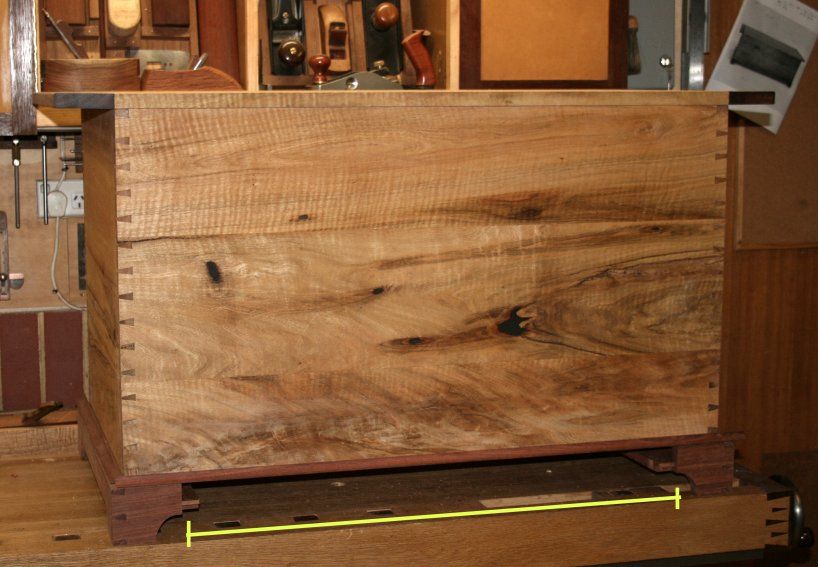
And here was a photo of the kist plus base. in this guise it could take a single drawer hanging from the rails. Alternately, I could add a centre rail and hang two drawers. (The picture also includes the mouldings I made. These have not been attached).
Regards from Perth
DerekVisit www.inthewoodshop.com for tutorials on constructing handtools, handtool reviews, and my trials and tribulations with furniture builds.
-
6th July 2013, 07:59 AM #10
Mildly Moderate
- Join Date
- Nov 2007
- Location
- Albury Well Just Outside
- Posts
- 13,315
I am tending to think two draws then one single draw.
what did you decide in the end?
-
6th July 2013, 11:06 AM #11
Be inspired. Be creative. Be bold.
- Join Date
- Apr 2001
- Location
- Perth
- Posts
- 10,826
Hi Graeme Originally Posted by GraemeCook
I see that I did not reply earlier. My apology.
It would be nearly impossible to use a Dutchman here (I'm trying to avoid making a silly remark ). The curl in the timber would have to match as well as the grain. Think of playing 3D chess.
I could use contrasting wood, but the end result would look like something from a skip.
Regards from Perth
DerekVisit www.inthewoodshop.com for tutorials on constructing handtools, handtool reviews, and my trials and tribulations with furniture builds.
-
6th July 2013, 11:14 AM #12
Be inspired. Be creative. Be bold.
- Join Date
- Apr 2001
- Location
- Perth
- Posts
- 10,826
Hi Christos Originally Posted by Christos
I will be back to the kist this weekend - not sure how much I can do as we fly overseas on Monday. I am going to try for a single drawer. There are a few options available to keep it stiff and minimize racking. A single drawer will be easier to hide than two.
Regards from Perth
DerekVisit www.inthewoodshop.com for tutorials on constructing handtools, handtool reviews, and my trials and tribulations with furniture builds.
-
8th July 2013, 12:25 AM #13
Be inspired. Be creative. Be bold.
- Join Date
- Apr 2001
- Location
- Perth
- Posts
- 10,826
A drawer for the kist
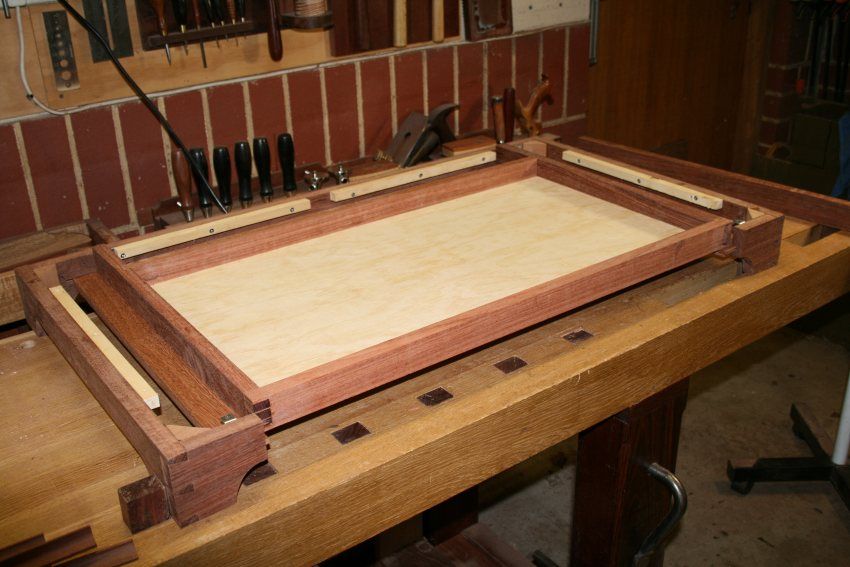
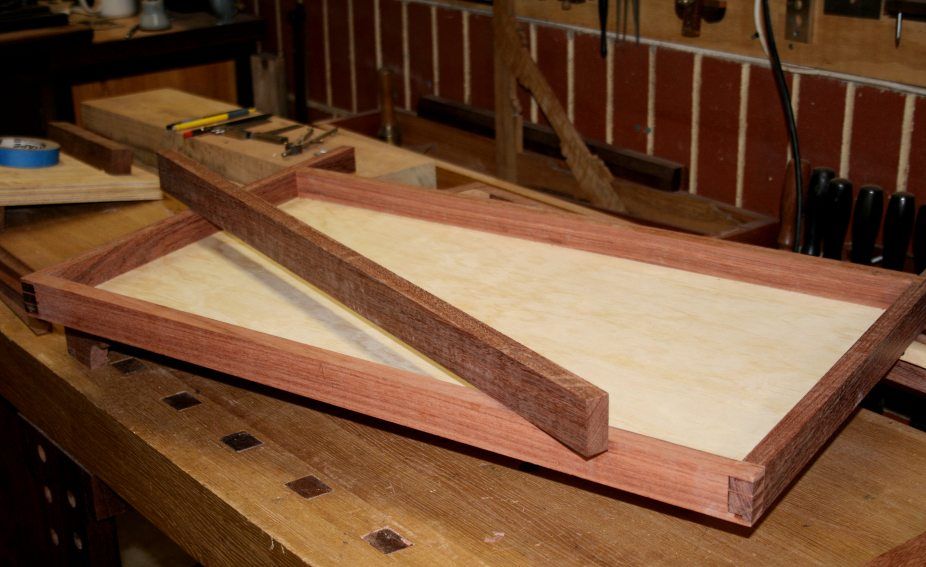
When we left off last time the base had been constructed in preparation for the drawer. The question I asked was whether there would be any reason why one wide drawer was a bad idea (since it would look better - be easier to hide in the base - than two drawers). I decided to go ahead with one drawer. This is where it will be fitted ...
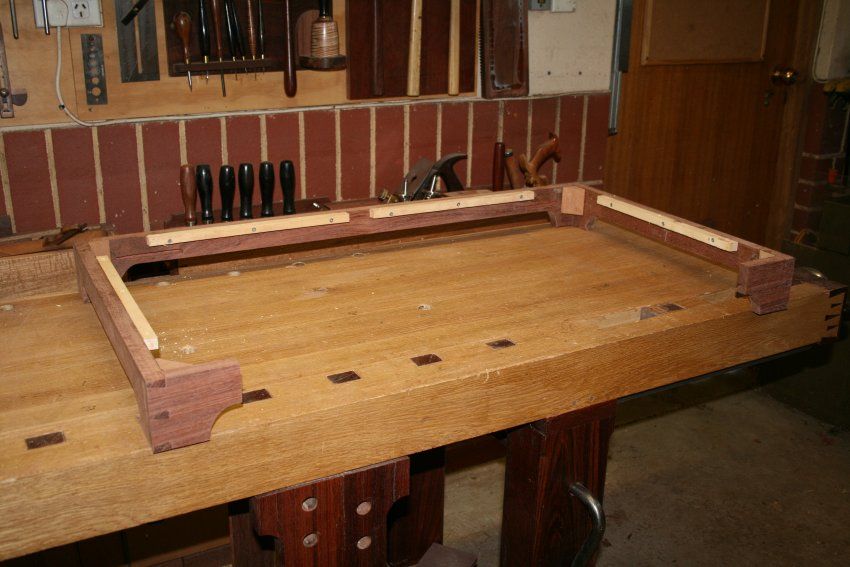
The base looks like this ...
... and the plan was to use these stretchers as a guide for the drawer ...
I have since sawn them to about half that width and added a rebate to create a 1/4" tongue along the inside length at each side. The idea is to groove the side of the drawer and run the drawer along the tongues.
What I would like to get opinion on is whether there is a better way, such as a mechanical (extension) slide. Again, the concern is to minimise any potential racking in a wide drawer.
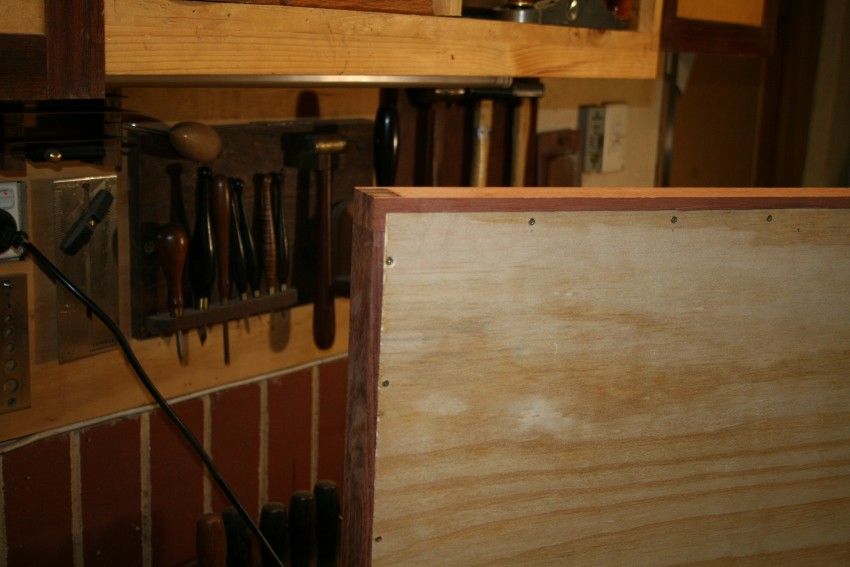
I have completed the drawer, done today. The design of the drawer takes it out of the traditional as I have used plywood for the base. The reason for this is was the need to maximise the internal space in this shallow drawer (about 2" high) by screwing the base into a lower rebate rather than floating a panel in a groove (which would have to be situated higher). My reasoning was that ply would be stable and not need to deal with the expansion issue of solid wood. Your thoughts? Would you have designed the drawer differently?
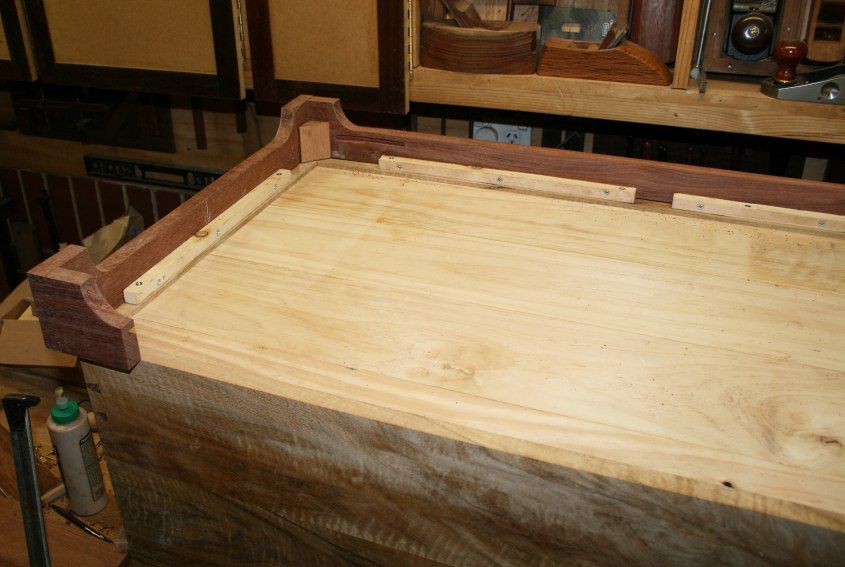
Here is the drawer resting on the side stretchers. The drawer has not yet been grooved to slide on the tongues. I can change the design if there is a convincing argument for something else.
This is the tongue (that the drawer is resting upon).
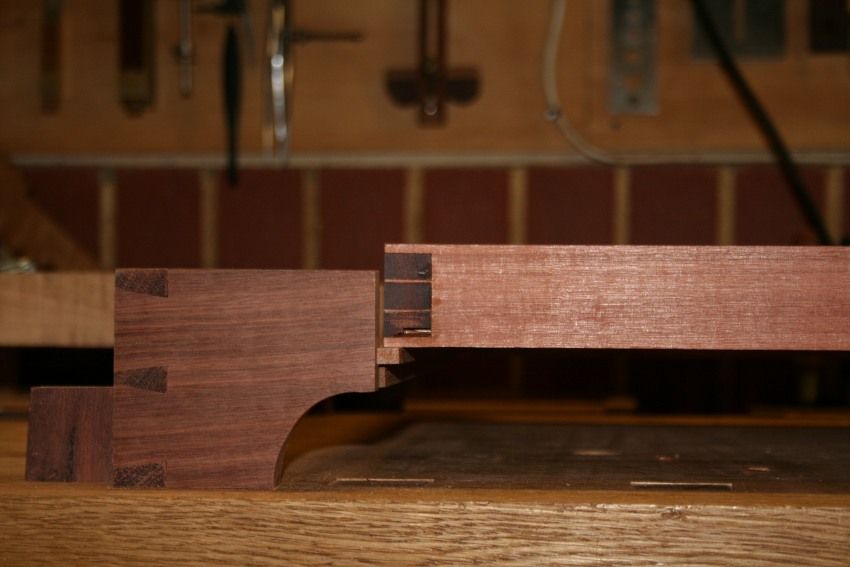
Two features here: the first is the drawer features through dovetails at the front and a cross piece that is attached with sliding dovetails. A section from the base will be attached to the front of the drawer (and blend in with the remainder of the base). The drawer does not extend to the rear, although the sides do (to support it when extended).
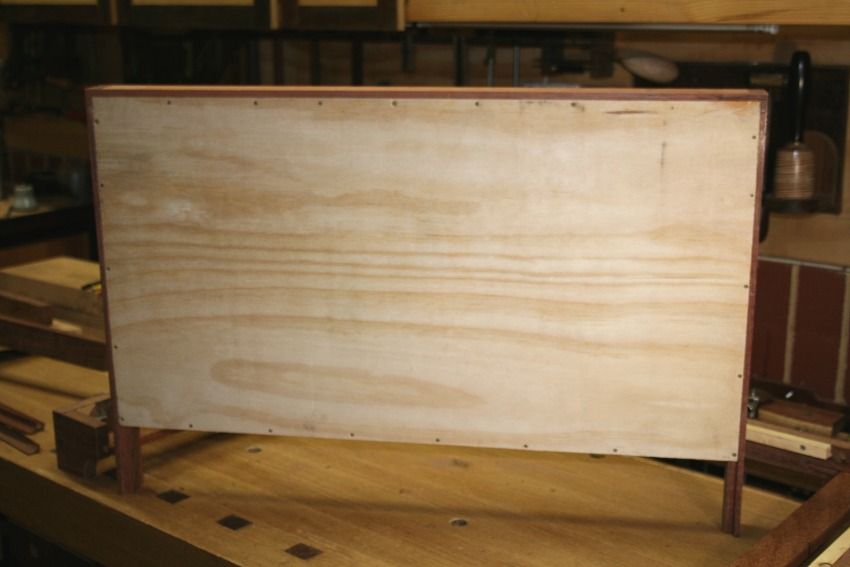
This is the ply base screwed into a rebate that runs fully around the drawer. The 1/4" ply is very stiff and there was no need for a munton. No glue. I considered expansion slots, but believe that there is no need.
The wide breadboard ends on the top have been cut down (by more than half). Inside there is a 3/4" tenon. The underside has been given a small moulding (to pick up the theme of the base). This is a dry fit.
That's it for now. I am away (visiting parents in Cape Town) for 10 days. No building in this time. I look forward to any comments.
Regards from Perth
Derek
p.s. Am I wasting my energy posting these entries? - there seems no interest in answering my questions or raising issues of design or construction. It all seems a bit pointless.Visit www.inthewoodshop.com for tutorials on constructing handtools, handtool reviews, and my trials and tribulations with furniture builds.
-
8th July 2013, 01:30 AM #14
GOLD MEMBER
- Join Date
- Aug 2009
- Location
- Armadale Perth WA
- Age
- 55
- Posts
- 4,524
Derek, I think those of us without the experience to give any sort of reasonable opinion are just watching the build. I know for me, I don't have anything to offer in the design and construction department ... I have enough trouble starting a project and am close to allergic to finishing them.
I did want to ask about the drawer and the racking. What are the potential sources of racking?
Is it the rectangular drawer distorting a little out of square? or is it the drawer as a whole skewing slightly in between the runners?
If it is the second, then I had a thought that may or may not be unhelpful. I was thinking of articles about setting up a tablesaw or bandsaw. They say to ensure that the mitre fence runs in the slot with a minimum of movement, and suggest peening the runner in a few places to fit it exactly to the slot.
Assuming that racking would be the result of slight tolerances between the drawer runners and the drawer itself, Ii thought you might be able to do something a bit similar to take up any side to side movement. Not peening, obviously. I first thought some small (or otherwise) sections of a hard wood could be made to project through the side of the drawer, inside the groove, and be made adjustable to allow the side-to-side tolerances to be 'dialled up'.
I was first imagining just a drilled hole with say a bamboo skewer inserted, and a screw down from the top to lock it at a given projection ... but then I wondered if you couldn't just drill a hole and tap it and insert a threaded blunt screw (wood? metal?) that could be adjusted with just a screwdriver.
Maybe it is completely impractical ... I'm good at impractical.
I'm sure the roller drawer slides would do the job ... even if your dovetails would tease them and call them names.
Cheers,
Paul
-
8th July 2013, 02:42 AM #15
Be inspired. Be creative. Be bold.
- Join Date
- Apr 2001
- Location
- Perth
- Posts
- 10,826
Hi PaulWhat are the potential sources of racking?
Is it the rectangular drawer distorting a little out of square? or is it the drawer as a whole skewing slightly in between the runners?
Racking is more likely when a drawer is wider than its length. That is why I contemplated building two narrower drawers instead. For aesthetic reasons I have chosen one. Now I have to build very precisely to ensure it is square and runs without catching somewhere.
I'm not sure about this, Paul. Fortunately, the rails-with-tongues that run in the drawer grooves are adjustable for small amounts of play, so hopefully I should be able to dial it in.Assuming that racking would be the result of slight tolerances between the drawer runners and the drawer itself, Ii thought you might be able to do something a bit similar to take up any side to side movement. Not peening, obviously. I first thought some small (or otherwise) sections of a hard wood could be made to project through the side of the drawer, inside the groove, and be made adjustable to allow the side-to-side tolerances to be 'dialled up'.
I was first imagining just a drilled hole with say a bamboo skewer inserted, and a screw down from the top to lock it at a given projection ... but then I wondered if you couldn't just drill a hole and tap it and insert a threaded blunt screw (wood? metal?) that could be adjusted with just a screwdriver.
Regards from Perth
DerekVisit www.inthewoodshop.com for tutorials on constructing handtools, handtool reviews, and my trials and tribulations with furniture builds.


 Reply With Quote


Similar Threads
-
Update of where I'm up to
By bassbuilderman in forum MUSICAL INSTRUMENTSReplies: 27Last Post: 4th August 2010, 08:28 PM -
DVR XP update
By rsser in forum WOODTURNING - GENERALReplies: 9Last Post: 15th November 2009, 04:17 PM -
Update on No 11
By ptc in forum BANDSAWN BOXESReplies: 2Last Post: 11th April 2006, 10:12 AM
