

 Thanks: 0
 Likes: 0
 Needs Pictures: 0
 Picture(s) thanks: 0
Results 1 to 15 of 53
Thread: Veneered hall table top
-
24th September 2011, 06:22 PM #1
 Golden Member


- Join Date
- Oct 2006
- Location
- Dandenong Ranges
- Age
- 47
- Posts
- 816
 Veneered hall table top
Hi folks,
Through a friend I've acquired some very nice huon pine birdseye featured veneers. I've been reading all I can on veneering but have a few questions before I get stuck into a design. The image shows three rough thought on how I might use this sheet of veneer on a hall table top. My main concern at the moment is wood movement.
Attachment 182493
1. If I frame around the veneered section, what issues will I need to take care of when thinking about wood movement? Should I attach the veneer to a man made substrate like plywood to assist? Should I use a particular type of joint to attach the outer frame to the centre piece?
2. If I start with a solid piece of timber, cut a rebate into the top and place the veneer piece into that, what issues might I experience? Is it possible for the veneer itself to expand/contract at a separate rate to the underlying timber causing a gap?
3. The simplest way to go forward I think. My challenge here though is how to treat the edges. Any thoughts on what I might do there or is it a matter of selecting a decent looking piece of timber for the veneer to sit on?
I know some of these are pretty basic questions but it's my first time tackling any type of veneering so I'm somewhat nervous.
Thanks,
Af.___________________________________________________________
"The things I make may be for others, but how I make them is for me."
-
24th September 2011 06:22 PM # ADSGoogle Adsense Advertisement
- Join Date
- Always
- Location
- Advertising world
- Age
- 2010
- Posts
- Many
-
24th September 2011, 09:46 PM #2
GOLD MEMBER
- Join Date
- Nov 2006
- Location
- Rockhampton
- Age
- 62
- Posts
- 2,236
A good quality plywood, I'd go for one with thinner plys and more of them rather than say thicker plys and less number of plys (plies) and say 19mm thick at a minimum, if you want to go thicker you could get a thicker plywood, I prefer to make up a torsion box when going thicker (I have a couple of threads were I show my process). The plywood allows you to make up a edgeing of long grain timber on all 4 sides without the worry of timber movement so you can do a mitered frame.
As far as gluing onto the edge look at ways of increasing the glued surface area, if you use plywood half? (odd number) the plies are end grain so a tounge or rebate or at 45° all increase glue area, Wouldwood has done a piece some time back where he put edging on at 45° to increase glue area, worth a re read, WW also has done a few threads showing his veneering process.
If you glue to a solid piece give consideration to the MC of veneer and that of the substrate, I'd look at the veneer being drier than the ground, sounds like a fair bit of work tho to rebate the top then apply the veneer (if I understand what u r thinking)
Might it be easier to make up the layon with a veneer edge of the same timber as the ground and then just glue the lot onto the solid and probably best to look at timbers that have similliar % movement as Huon for the ground, I have had the case where I made up a layon (and of course it had been raining for some weeks) (was also in a hurry ) the finished item spent a day in a hot dry shed and guess what happened GAPS arrghhh so make sure your veneer is dry
Hope this helps,
Pete
PS Daren Oates has done a few articles in Wood Review showing his veneering process for coffee tables with a wide edge which would be pretty close to what you are looking at
-
25th September 2011, 08:31 PM #3
Golden Member
- Join Date
- Oct 2006
- Location
- Dandenong Ranges
- Age
- 47
- Posts
- 816
Thanks Pete. Lots of great info there to keep me thinking. I have the Darren Oates articles and completely forgot all about them so I'll give 'em a good re-reading this week.
I'm still contemplating the actual design. Today I'm thinking of just veneering the draw fronts, but tomorrow I might be thinking otherwise.
Will post more details as it progresses.
Cheers,
Af.___________________________________________________________
"The things I make may be for others, but how I make them is for me."
-
26th September 2011, 01:02 AM #4
GOLD MEMBER
- Join Date
- Nov 2006
- Location
- Rockhampton
- Age
- 62
- Posts
- 2,236
How thick is the veneer, 0.6mm sliced or bandsawn?
A drawer front shouldn't present too many probs, altho depends on the type of glue, WW uses horse sauce for his veneering, pva will work but be aware of the moisture from the glue. a wipe with a damp rag on the nonveneered side, backing timber and lots of clamping
Pete
-
27th September 2011, 12:50 PM #5
Golden Member
- Join Date
- Oct 2006
- Location
- Dandenong Ranges
- Age
- 47
- Posts
- 816
Hi Pete. It's 0.6 sliced so should be pretty easy to work with in that respect. I'm leaning towards hide glue (horse sauce) if for nothing else except the experience of trying it out.
So, I'm working on a few designs and will post some in the next couple days as I get things moving.
Thanks,
Af.___________________________________________________________
"The things I make may be for others, but how I make them is for me."
-
27th September 2011, 06:18 PM #6
GOLD MEMBER
- Join Date
- Mar 2009
- Location
- Sydney
- Age
- 37
- Posts
- 2,711
AB,
I hope you post pics of your table. I really liked your first hall table that you did at ideal tools.
Andy
-
27th September 2011, 08:57 PM #7
Golden Member
- Join Date
- Oct 2006
- Location
- Dandenong Ranges
- Age
- 47
- Posts
- 816
Thanks for that mate. Originally Posted by groeneaj

 Yeah, I'll definitely be posting pics as I build it.
  ___________________________________________________________
"The things I make may be for others, but how I make them is for me."
-
30th September 2011, 08:07 PM #8
Golden Member
- Join Date
- Oct 2006
- Location
- Dandenong Ranges
- Age
- 47
- Posts
- 816
Design is starting to take shape. Here are some options I'm thinking of. They're based from a hall table I saw on Lumber Jocks. If I can find it again I'll be sure to credit the original designer ...
Dovetailed option
Attachment 183194
Mitred tenon option
Attachment 183195
I don't think either option could have the dovetail/tenon go all the way down. Doing so might weaken the inside corner too much. Dunno?
The top itself will be huon pine veneered onto 19mm ply substrate. I'm not sure how I will attach this top to the rest of the frame yet. Any thoughts?
Cheers,
Af.___________________________________________________________
"The things I make may be for others, but how I make them is for me."
-
30th September 2011, 08:19 PM #9
GOLD MEMBER
- Join Date
- Mar 2009
- Location
- Sydney
- Age
- 37
- Posts
- 2,711
Do you own a domino? I know you used it on your last hall table but not sure if you ended up getting one.
Because it's going to be a veneered top you could domino the front and side rails to the ply/huon veneer which will make everything flush.
I also like the dovetail joinery for the rails into the legs!
Andy
-
1st October 2011, 08:29 PM #10
GOLD MEMBER
- Join Date
- Nov 2006
- Location
- Rockhampton
- Age
- 62
- Posts
- 2,236
With this design it looks like you will make up the long and short apron/leg assembly then fit the top down into until flush, I'd be looking at a few options like say a 3 to 5mm deep rebate into which the top could sit, alternatively a few blocks screwed to the aprons then into the top, it could be a bit fiddly getting a good fit though, it would be a case of take a few shavings with the plane and test.
With the join maybe two longer thinner dovetails/tenons with the dovetail/tenon being the full depth of the apron on the outside of the leg then make the inner one say half the depth of the apron, another option might be the two dovetail/tenon in the long apron and then a mortice and tenon in the short apron, (unseen) I'd look at offsetting towards the outside in this case to give some room for the dovetails,
Add a corner block at each inside corner as well.
A few options.....
Pete
-
2nd October 2011, 01:10 AM #11
Golden Member
- Join Date
- Oct 2006
- Location
- Dandenong Ranges
- Age
- 47
- Posts
- 816
I was thinking something similar. I could then change the top as the mood suits me! Originally Posted by pjt
 Although, Andy's Domino idea is a comfortable one for me too. The accuracy is key here and certainly achievable with the doms.
Not 100% sure what you mean here by "outside of the leg"With the join maybe two longer thinner dovetails/tenons with the dovetail/tenon being the full depth of the apron on the outside of the leg then make the inner one say half the depth of the apron,
That's a great idea. I hadn't considered just showing off one set of joints and burying the other.another option might be the two dovetail/tenon in the long apron and then a mortice and tenon in the short apron, (unseen)
Thanks for the thoughts. It definitely helps to hear other people's ideas at this stage of the process.
Cheers,
Af.___________________________________________________________
"The things I make may be for others, but how I make them is for me."
-
2nd October 2011, 09:58 PM #12
GOLD MEMBER
- Join Date
- Nov 2006
- Location
- Rockhampton
- Age
- 62
- Posts
- 2,236
What I mean is the outside "side" of the leg....meaning the dovetail on the outside side of the leg to be full width of the apron and the inner dovetail half the width of the apron (if you do the two option) and then if you do that you could also maybe do a dowel to come in under the short dovetail aswell as the tenon in the short apron.... Originally Posted by Afro Boy
Pete
-
10th October 2011, 05:38 PM #13
Golden Member
- Join Date
- Oct 2006
- Location
- Dandenong Ranges
- Age
- 47
- Posts
- 816
I took 5 days off work with the intention of getting a whole lot of this piece done. This is what happened ...
Pre Day 1: Cleaned out the workshop, cut the timber down to rough size, cleaned up the backyard, visited Carbatec a couple times.
Day 1: Slept most of the day.
Day 2: Dropped into Woodfest to pick up a new router fence. Finished building my leg tapering jig.
Day 3: Picked up my new router table and went to Ikea with the wife. Almost ended in a divorce! That place is the 7th circle of hell.
Day 4: Installed the router fence and table. Discovered that the hardware kit was incorrect so didn't get much further.
Day 5: Picked up the correct hardware kit for the fence. Installed it and finally started building.
Will post some pics and details in a sec.
Cheers,
Af.___________________________________________________________
"The things I make may be for others, but how I make them is for me."
-
10th October 2011, 05:51 PM #14
Golden Member
- Join Date
- Oct 2006
- Location
- Dandenong Ranges
- Age
- 47
- Posts
- 816
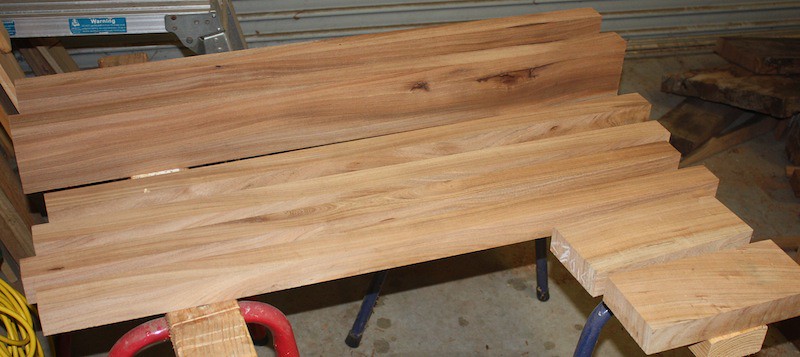
Rough cut timber
I'm using some English Elm I have had lying about for ages. Here are the aprons and legs. I haven't cut the top veneer or substrate yet and will leave that until the frame is all put together and can be accurately measured.
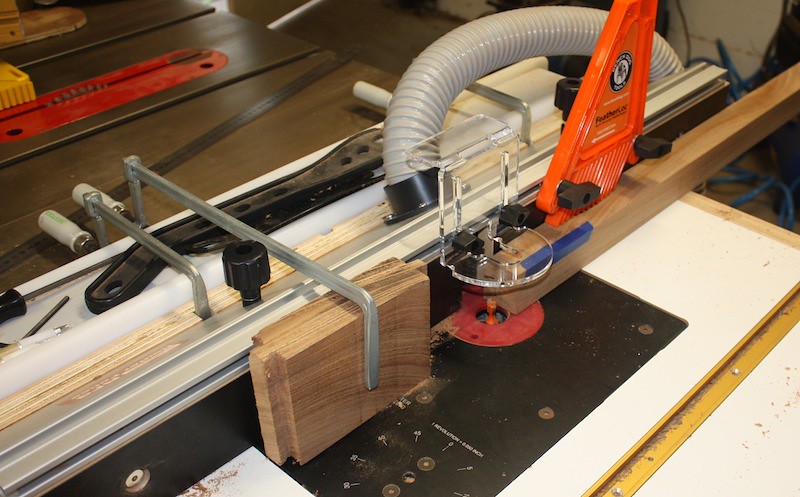
Routing the dovetail housing into the legs
This took a few shots on some practice pieces to get the measurements correct. The new router fence makes a big difference - routing now actually feels safe which is nice.
Cutting the tails
I tested it first on the router table but it tore up the end grain like nothing else leaving a big mess. So I moved to testing on the tablesaw which produced a much nicer result. This is a rough fitting so I still need to plane things down so it all smooths out nicely.

Sliding dovetail problem
Thankfully you can't see it inside the housing but I had to pare A LOT to get them to fit nicely. As I slid them on, they jammed up towards the middle. Strange thing is this ... The top of the tails fit the housing nicely (I didn't pare all the way to the end). Any thoughts on why this might be?
Also any general pointers for making sliding dovetails would be much appreciated. I'm sure there is an easier/better way than I did them.
One of them unfortunately I ended up cutting too narrow. Any thoughts on how I might repair this?
Attachment 184104
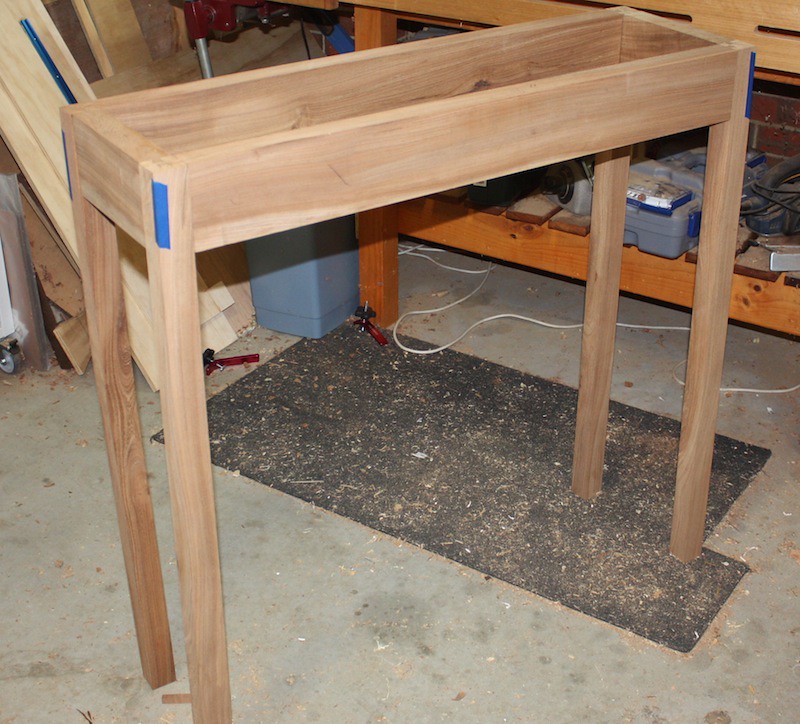
Dry fit
Looks quite stocky because I haven't tapered the legs yet. I might also add a curve or something to the aprons to lighten the feel. I'm not 100% convinced of the exposed dovetail joinery though, I may end up covering it in a mitred frame or something yet.
Cheers,
Af.___________________________________________________________
"The things I make may be for others, but how I make them is for me."
-
10th October 2011, 05:59 PM #15
GOLD MEMBER
- Join Date
- Mar 2007
- Location
- Munruben, Qld
- Age
- 83
- Posts
- 10,027
Looking good.
 Reality is no background music.
Cheers John

 Reply With Quote

Similar Threads
-
hall table
By burnabybear in forum FINISHINGReplies: 0Last Post: 5th August 2010, 07:21 AM -
hall table, wine table, water stone box
By driftit in forum WOODWORK - GENERALReplies: 6Last Post: 1st May 2009, 11:20 PM -
Planning to trim edges of an oak veneered dining table.
By osso in forum ROUTING FORUMReplies: 5Last Post: 14th January 2009, 11:46 PM -
Hall Table
By LGS in forum WOODWORK PICSReplies: 3Last Post: 28th August 2007, 09:10 PM -
Hall Table
By Dirty Den in forum WOODWORK PICSReplies: 4Last Post: 6th April 2004, 01:26 AM
