

 Thanks:
  Likes:
  Needs Pictures: 0
 Picture(s) thanks:
Results 16 to 30 of 50
Thread: WIP Chest of drawers
-
23rd November 2018, 04:42 PM #16
 SENIOR MEMBER


- Join Date
- Aug 2017
- Location
- Mt Kembla
- Age
- 62
- Posts
- 256

Just made up a template for the outside curve that I am happy with.It goes in 10mm about one third of the way up from the bottom and tapers up to 3mm at the top.The bottom of the curve is offset from the middle and the top is narrower than the bottom.Hope that makes sense.
I have marked every 25mm the amout of material to be removed.I will then put the 2 sides together on the table saw and make cuts across the outside face.These will be registration marks for removing the waste.If all goes to plan I am modifying a wooden plane into a radius plane and hopefully once the bulk of the waste is removed I can finish off with the plane.20181123_153524.jpg
cheers....Roy
-
23rd November 2018 04:42 PM # ADSGoogle Adsense Advertisement
- Join Date
- Always
- Location
- Advertising world
- Age
- 2010
- Posts
- Many
-
27th November 2018, 09:23 PM #17
SENIOR MEMBER
- Join Date
- Aug 2017
- Location
- Mt Kembla
- Age
- 62
- Posts
- 256
Today I got to do the reference cuts on the outside of the chest.Only 80 cuts all different depths to match the curve on the panel saw.20181127_142607.jpg
I then used what I would call a coopers plane to go across the grain and start shaping the curve down to the cuts.This will be followed by a wooden plane I was given and modified to match the curve.With all the rain predicted I should be able to get a bit more done.20181127_153520.jpg
-
9th December 2018, 01:56 PM #18
SENIOR MEMBER
- Join Date
- Aug 2017
- Location
- Mt Kembla
- Age
- 62
- Posts
- 256
Just a few quick photos.Pretty hard to show the curve on the outside as it's quite subtle.Happy with how it has turned out.I have added some finish to the inside that will be seen just so I don't have to fiddle around later.Glue up tomorrow so fingers crossed it all works out.20181209_133959.jpgTwo inside surfaces
20181209_134138.jpg
And the ouside curve.
cheers....Roy
-
11th December 2018, 04:51 PM #19
SENIOR MEMBER
- Join Date
- Aug 2017
- Location
- Mt Kembla
- Age
- 62
- Posts
- 256
Got the glueup happening yesterday and pretty happy with how things turned out.It was an epoxy job as there were a few mortices and stub tenons to get wet.
Plenty of clamps were used to pull it all together.
20181211_151751.jpg
Now all it needs are some drawers. 8 in fact. I already have the sides and backs roughed out will go for final thickness hopefully tomorrow.Going to be interesting as once again everything has to be 3 degrees for the taper.These were resawn from some 42mm vic ash.
20181211_153632.jpg
I found some of this spalted timber in a pile and resawn enough so I can veneer it onto something else when I can find it for the drawer fronts.There was a bit of critter activity so I will have to fill the holes with some epoxy before I attach them.Should be fun another learning experience.
20181211_153734.jpg
cheers....Roy
-
19th December 2018, 05:51 PM #20
SENIOR MEMBER
- Join Date
- Aug 2017
- Location
- Mt Kembla
- Age
- 62
- Posts
- 256
Been fiddling around with the drawer components to try and get my head around things.Started with a practice drawer but stopped and thought I will just have a go and see what happens.There's 8 so I have to get at least 1 right.I fitted all the backs firstly with a shooting plane to get the height and then cut the sides on the panel saw.Be doing the same with the fronts when I get around to it.I have also been attaching the veneers to the drawer fronts.Here's my twin 12 volt battery powered vacumn press in operation.
20181217_134840.jpg
I have also cut all the sides using my panel saw with the fritz and fran jig.Just set the blade to 3 degrees cut the sides to about a millimetre over then fit to size with a handplane.
20181219_161138.jpg
Here's all the sides fitted just have to wait till all the fronts are veneered till I can start making drawers.
20181219_161313.jpg
Photo fell over again
cheers....Roy
-
19th December 2018, 06:14 PM #21
 GOLD MEMBER
- Join Date
- Mar 2018
- Location
- Sydney
- Posts
- 1,166
lucky the photo fell over, not the carcass.
Was tehre ever a build thread on your dual 12v battery powered vacuum table? That looks something about the skill level I have that I could tackle !
-
19th December 2018, 09:39 PM #22
SENIOR MEMBER
- Join Date
- Aug 2017
- Location
- Mt Kembla
- Age
- 62
- Posts
- 256
I decided to bite the bullet and go off grid.Definitely a cheap unit to run. Originally Posted by poundy


-
20th December 2018, 05:01 AM #23
GOLD MEMBER
- Join Date
- Feb 2003
- Location
- back in Alberta for a while
- Age
- 68
- Posts
- 12,006
Just a suggestion... Originally Posted by royflatmate
if the last 25-30 mm of the sides are 5 mm narrower than the rest of the side, fitting the drawers into their openings is much easier.
also, with dovetailed, or finger jointed drawers, the drawer back is conventionally much narrower than the drawer sides. Not only do you have the 5 mm mentioned above, but the drawer bottom usually passes under the drawer back.regards from Alberta, Canada
ian
-
20th December 2018, 11:51 AM #24
SENIOR MEMBER
- Join Date
- Aug 2017
- Location
- Mt Kembla
- Age
- 62
- Posts
- 256
G'day Ian
So as they way I understand what you are saying is that there is a slight taper running from front to back on the drawer sides.And that the drawer back is slightly smaller than the drawer front so that you don't end up with a perfect square.
Forgive my ignorance as I am new to furniture building and am learning as I go along.
cheers....Roy
-
20th December 2018, 04:17 PM #25
GOLD MEMBER
- Join Date
- Feb 2003
- Location
- back in Alberta for a while
- Age
- 68
- Posts
- 12,006
Hi Roy
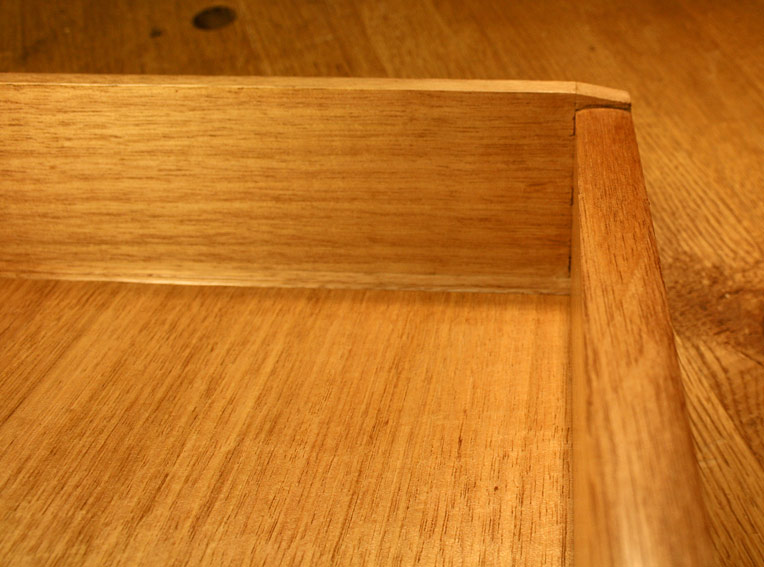
I don't have a good picture to hand, so have "borrowed" a couple from one of Derek's projects.
This one shows how the back of the drawer is narrow enough hat the bottom can slide underneath.
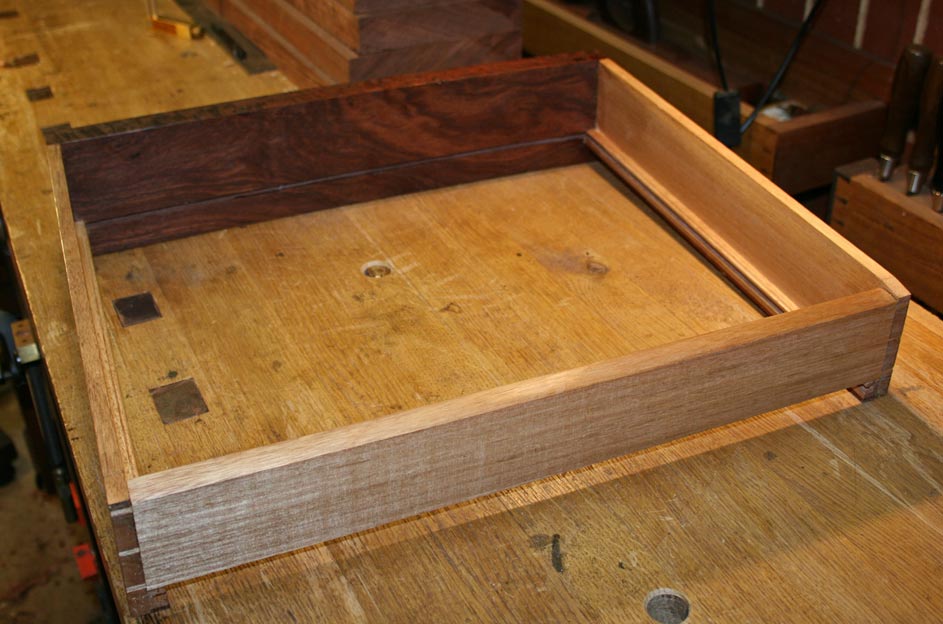
and this one shows how Derek has tapered the very end of the drawer side. My own preference is to run that taper over about 30 mm
 regards from Alberta, Canada
ian
-
20th December 2018, 04:32 PM #26
SENIOR MEMBER
- Join Date
- Aug 2017
- Location
- Mt Kembla
- Age
- 62
- Posts
- 256
Understand now.I will be doing drawer slips and muntons as the drawers are probably to wide for a 1 piece bottom. Originally Posted by ian
cheers....Roy
-
20th January 2019, 03:54 PM #27
SENIOR MEMBER
- Join Date
- Aug 2017
- Location
- Mt Kembla
- Age
- 62
- Posts
- 256
Unfortunately haven't been able to get much done since Xmas.But managed to sneak out and assemble the drawer carcasses and have a go at fitting them.
They are now fitting into the cabinet but the bottoms need to be shaved so they fit over the tops.Will be starting from the bottom and working my way up.2019-01-20 15.46.56.jpg
cheers....Roy
-
21st January 2019, 04:53 PM #28
SENIOR MEMBER
- Join Date
- Aug 2017
- Location
- Mt Kembla
- Age
- 62
- Posts
- 256
Managed to fit all the drawers into their respective spots today.Lots of fine shavings and checking and more checking.Still some more finessing to do.
Have to make a decision on drawer handles soon.2019-01-21 15.41.16.jpg
cheers....Roy
-
21st January 2019, 06:01 PM #29
GOLD MEMBER
- Join Date
- Feb 2003
- Location
- back in Alberta for a while
- Age
- 68
- Posts
- 12,006
nice work
What do you plan on using for drawer pulls?regards from Alberta, Canada
ian
-
21st January 2019, 09:22 PM #30
SENIOR MEMBER
- Join Date
- Aug 2017
- Location
- Mt Kembla
- Age
- 62
- Posts
- 256
Thank you Ian. Originally Posted by ian
Originally my plan was to do 22mm finger holes if that makes sense.Got rejected by my Daughter in Law.
Thought about turning some handles in ebony or something similiar but not to keen on the idea at this time.I want something minimal that blends in.
I am going to a metal supplier and see if I can get some 70 x 50 tube and cut 10mm lengths and insert them into the drawer fronts
by cutting a groove into the top of the drawer.There will be 2 for each drawer.
Still have to sort out drawer bottoms and slips and maybe muntons plus a back and top.
Going fishing tomorrow so it's a problem for another day.
cheers....Roy

 Reply With Quote
Similar Threads
-
Chest of Drawers - WIP
By BobR in forum FURNITURE, JOINERY, CABINETMAKING - formerly BIG STUFFReplies: 51Last Post: 10th July 2011, 09:35 PM -
Old chest of drawers
By leafysuburbs in forum RESTORATIONReplies: 2Last Post: 19th November 2009, 05:05 PM -
Chest of drawers
By AlexS in forum FURNITURE, JOINERY, CABINETMAKING - formerly BIG STUFFReplies: 24Last Post: 16th October 2008, 02:06 AM -
WIP - Chest of drawers
By MikeK in forum WOODWORK - GENERALReplies: 21Last Post: 24th October 2006, 05:46 PM
