

 Thanks: 0
 Likes: 0
 Needs Pictures: 0
 Picture(s) thanks: 0
Results 1 to 15 of 36
-
16th August 2011, 09:56 PM #1
 Cba
Cba


- Join Date
- Aug 2007
- Location
- Melbourne
- Age
- 68
- Posts
- 1,417
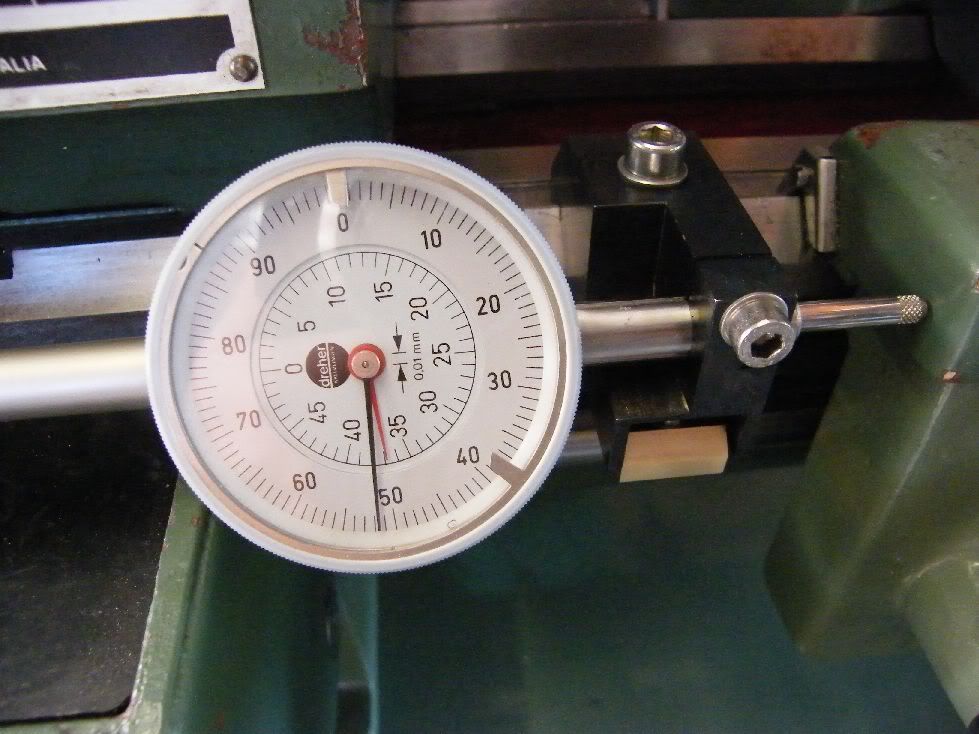
 A Combination Saddle Stop for the 260
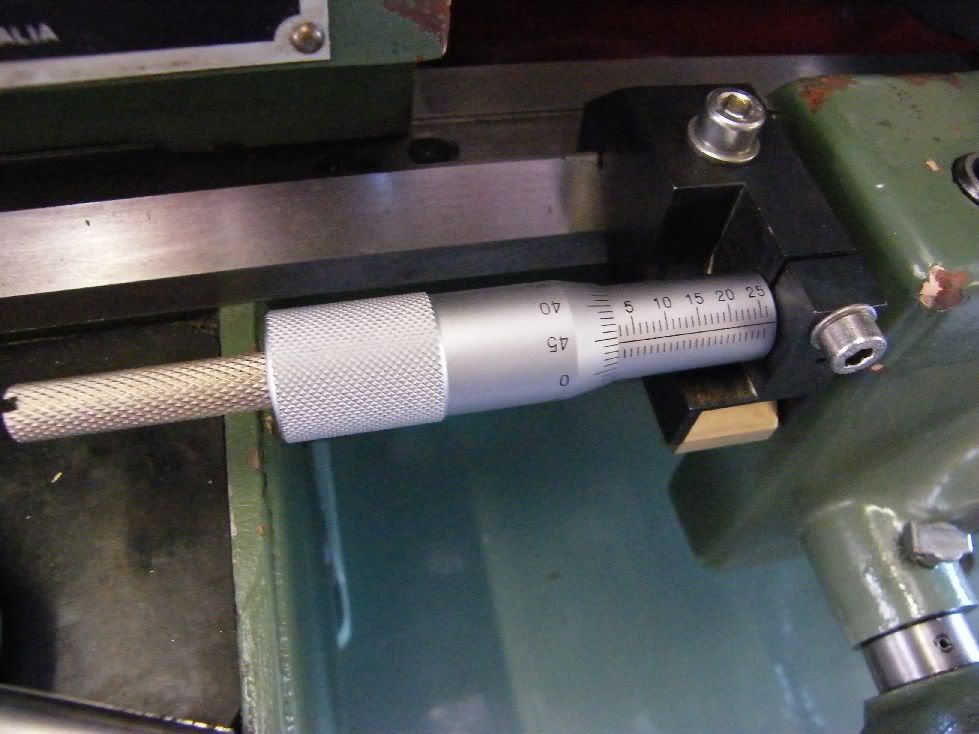
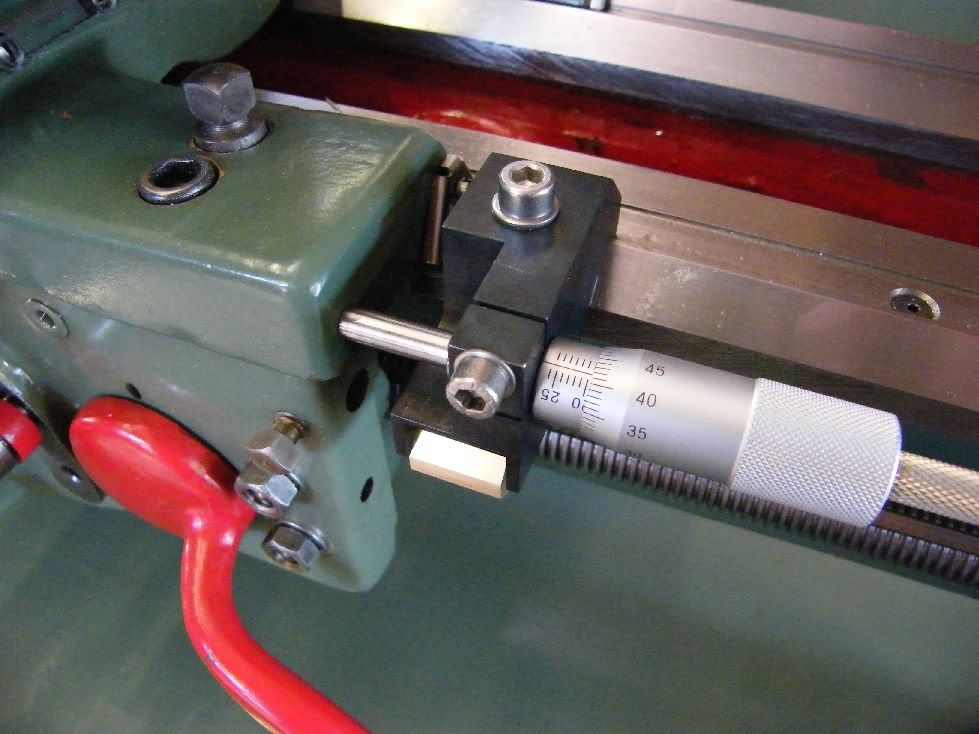
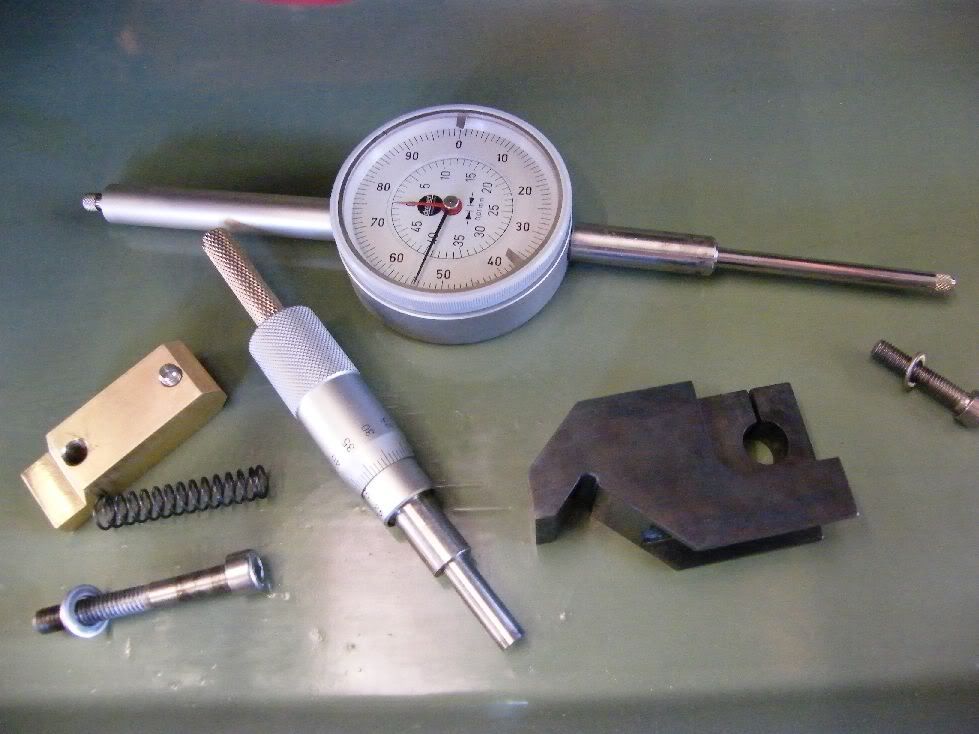
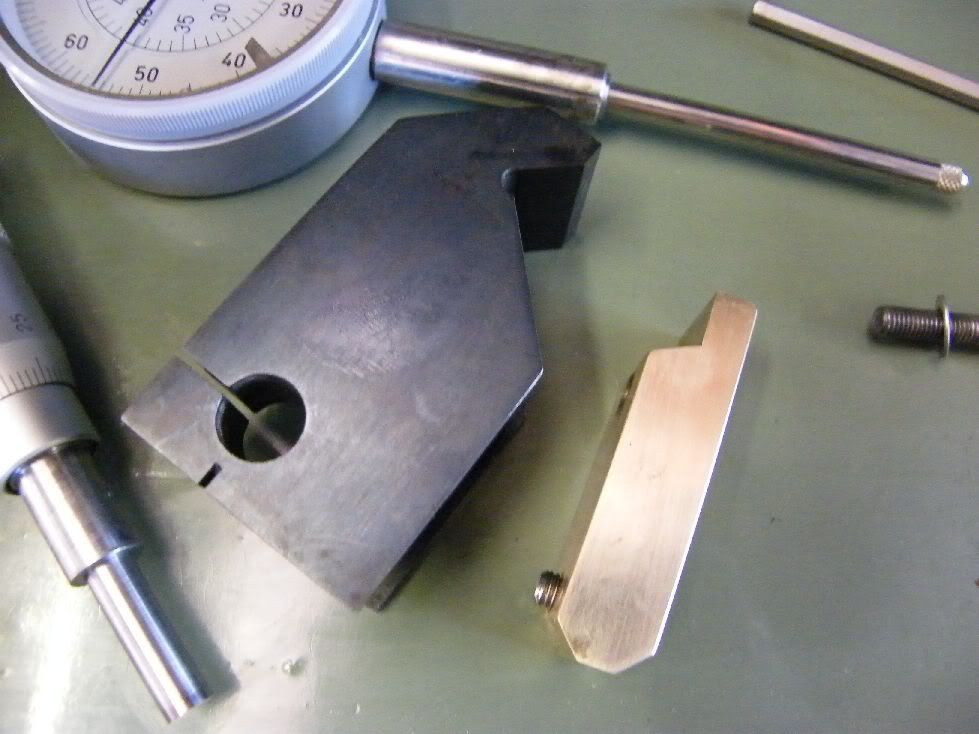
I used the head of a 25mm Mitutoyo micrometer (simply because I had two such heads left over from an earlier project). Instead of the ratchet I attached a knurled shaft. That makes it easy to spin the barrel between two fingers to quickly set a distance.
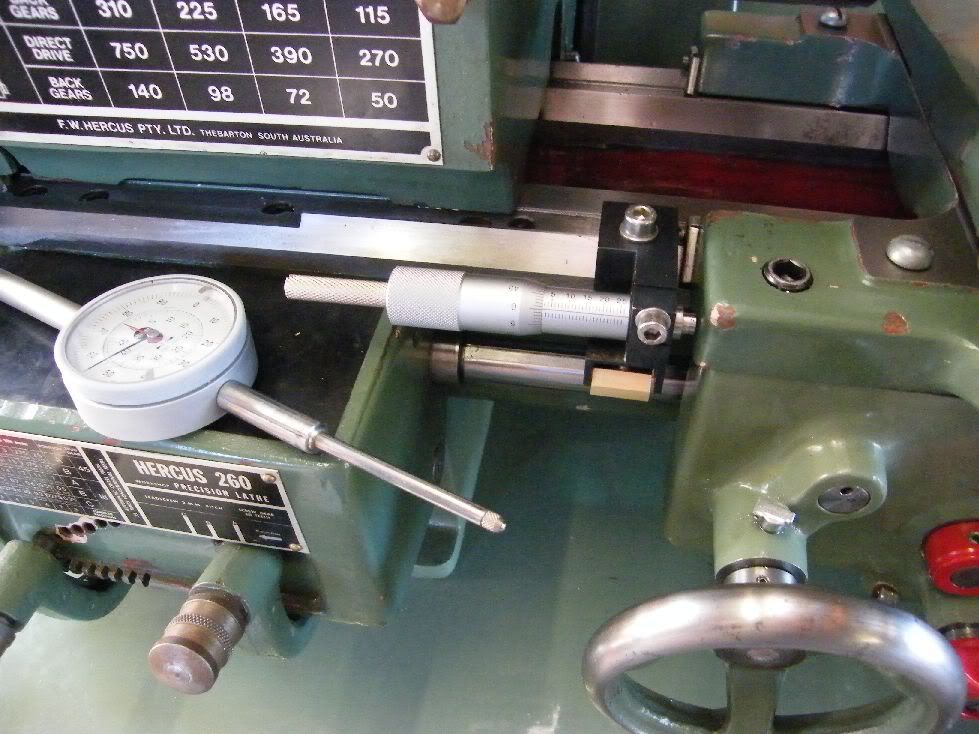
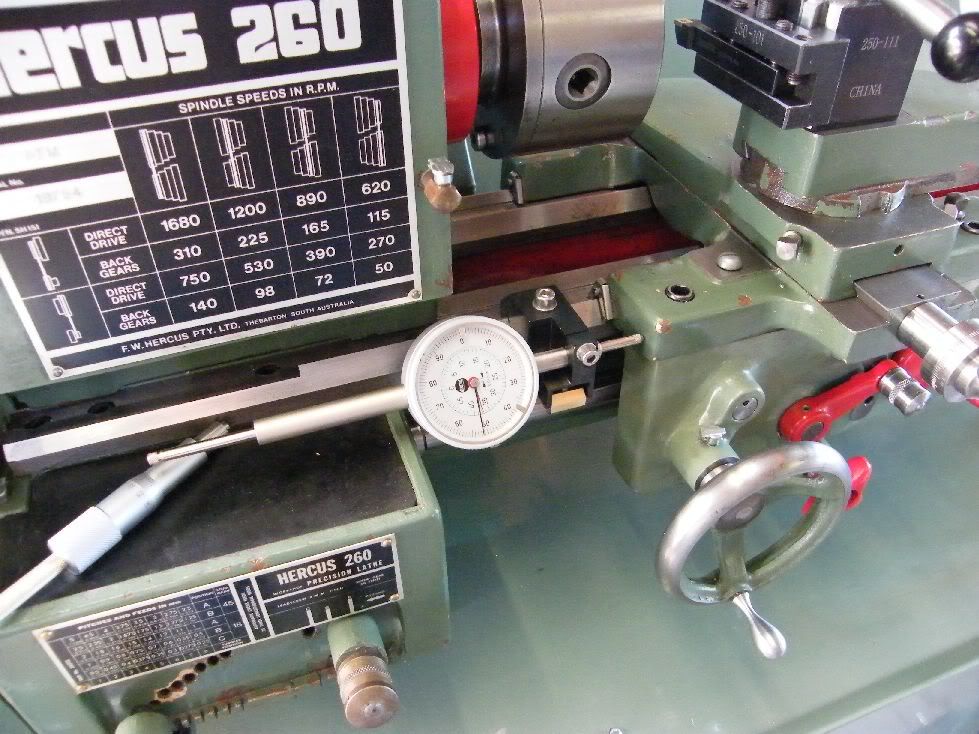
This Saddle stop doubles as a dial indicator holder. I had this DI left over from another project 30 years ago.... not much used since because it is so big. It has 50mm travel.
Initially I wanted to have both micrometer and DI permanently attached, but the quick change gearbox does not leave the necessary space to do this. So it is either or, both were modofied to fit the same10mm hole.
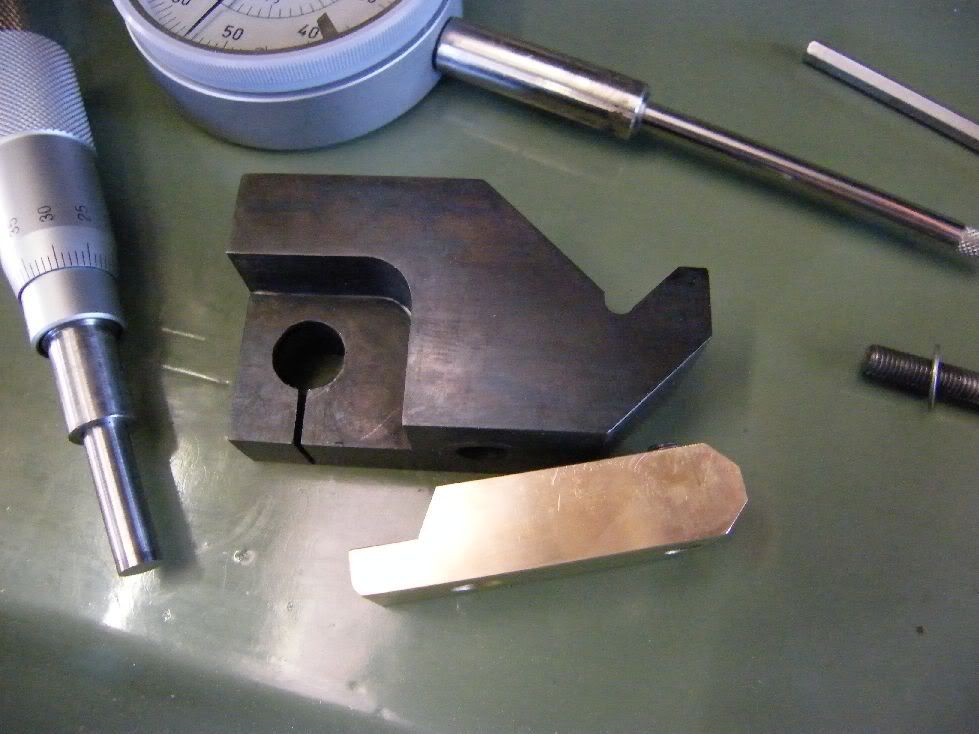
The main body is mild steel. I polished it and blackened with Birch Casey gun blue. The clamp is a piece of brass. The little grub screw is to adjust the tongue to be parallel with the underside of the Vee way - saves having to mill the part too accurately. Maybe one day I replace the allen screws with knows or handles.... for now I am happy to use allen keys.
Oh yes, why make it if it can be bought new? Firstly I thought the original South Bend saddle stop sold on eBay was a bit pricy for what it is. Second, I had made a similar saddle stop loong ago for my smaller lathe and found it very useful.
I hope someone gets some inspiration to make his own looking at the pics. No I have no plans, not even a sketch. I made a little cardboard template which I kept cutting until it fit both the lathe and a steel chunk from the scrap box. I then milled the V for the way, checked the fit on the lathe, milled a bit more, check the fit.... until all came together. Plan was only in my brain and changed all the time.....
-
16th August 2011 09:56 PM # ADSGoogle Adsense Advertisement
- Join Date
- Always
- Location
- Advertising world
- Age
- 2010
- Posts
- Many
-
16th August 2011, 11:37 PM #2
GOLD MEMBER

- Join Date
- Mar 2011
- Location
- Dural NSW
- Age
- 82
- Posts
- 1,120
Saddle Stop for Hercus 260 lathe
cba
Thanks so much for your ingenious design.
I also was thinking of purchasing the South Bend stop from the USA,but figured I could make something along the lines of the one you have shown.
Yes, I will go ahead & make one soon.I will have to get hold of a 0 to 1 inch micrometer head.I still work in inches.
regards
Bruce
ABRATOOL
-
16th August 2011, 11:55 PM #3
 GOLD MEMBER
- Join Date
- Jul 2008
- Location
- near Warragul, Victoria
- Posts
- 2,500
neat
this guy sells a similar thing on EPAY
eBay Australia: Buy new & used fashion, electronics & home d�r
And this , a variation on the same theme
http://www.practicalmachinist.com/vb...-lathe-206477/
-
17th August 2011, 12:18 AM #4
.
- Join Date
- Nov 2008
- Location
- Perth WA
- Age
- 71
- Posts
- 5,650
I am impressed ! Beautiful work Chris.
BT
-
17th August 2011, 03:29 PM #5
GOLD MEMBER
- Join Date
- Jul 2008
- Location
- near Warragul, Victoria
- Posts
- 2,500
NEAT job
Chris
That's a intricate piece of work Many angles in there .... and a nice finish on it
We can only hope to achive that level
Can I ask: how did you mill the V shape ..did you use a special cutter ?
MIKE
-
17th August 2011, 04:13 PM #6
GOLD MEMBER
- Join Date
- Jul 2008
- Location
- near Warragul, Victoria
- Posts
- 2,500
G clamp
This was my first novice attempt at using a milling machine at TAFE . I actually wanted to make a micrometer stop like yours..I showed the plans to the teachers ( plans found on pop mechanics or smiliar ) but the V way shape stumped them.
This is the one http://www.kinzers.com/don/MachineTo...erstop1949.jpg
-
17th August 2011, 07:43 PM #7
Cba
- Join Date
- Aug 2007
- Location
- Melbourne
- Age
- 68
- Posts
- 1,417
 Originally Posted by morrisman

Thanks for the flowers
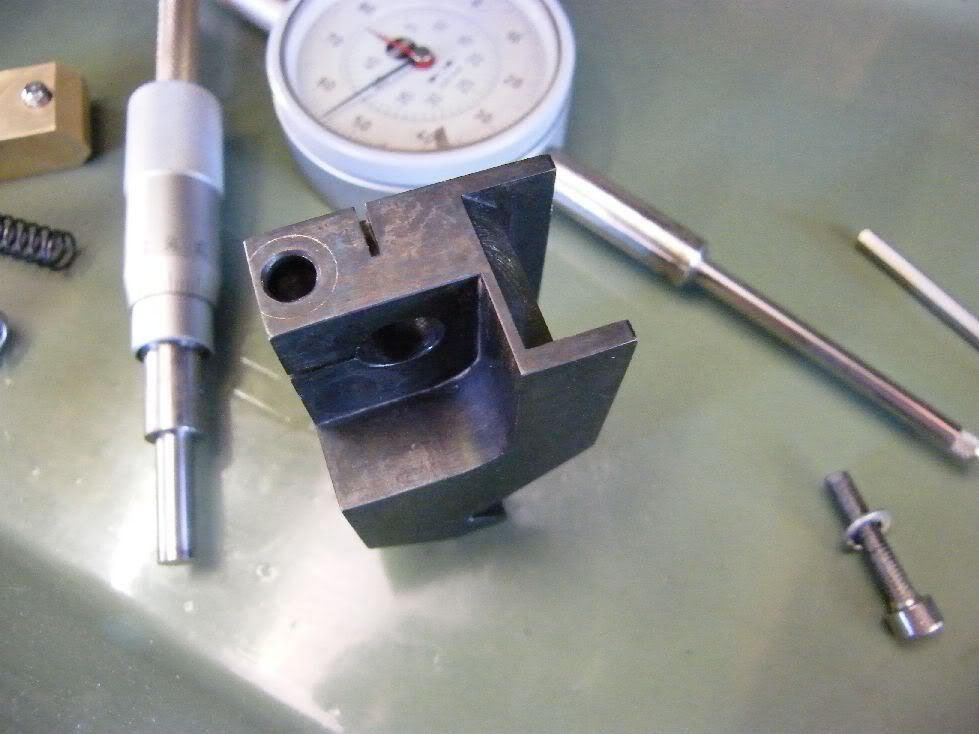
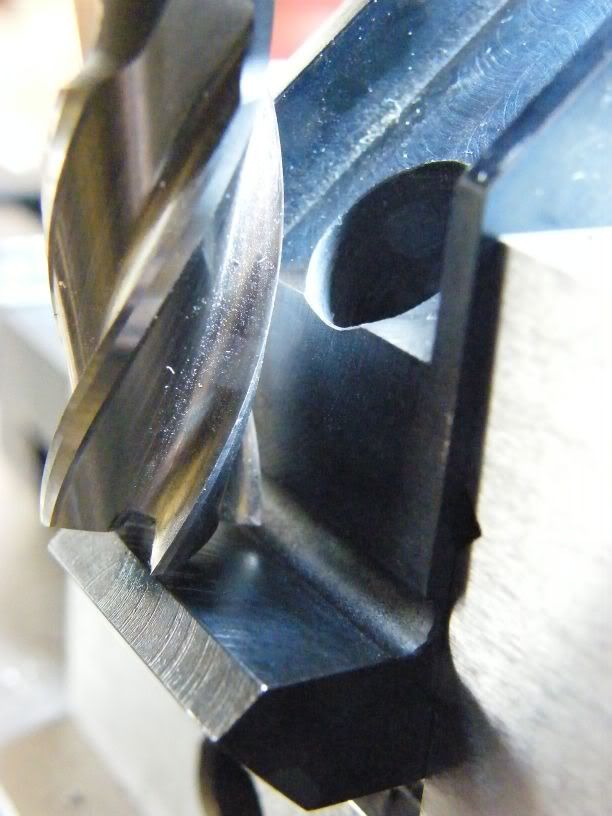
The Vee on Hercus (and SouthBend) lathes is 90 degrees and symmetrical to the vertical and as such easy to set up in the mill vice (the other lathe I have has the front Vee angled a few degrees to the horizontal).
I did first drill a hole at the top of the V for clearance, and thus could have done the job easily with an endmill alone. I did however choose to clean-up the surfaces with a dovetail cutter just for a nice finish (my mill collet can only take 16mm shaft tools).
The similar saddle stop I made long ago for the smaller lathe is Aluminium. Easier to machine and needs no rust protection. But after using it many years, I found that the surfaces that contact the lathe bed vee get dented from chips caught in between when sliding it along the ways. That is why I used steel for this one. I hope it was a good choice, because my Hercus 260 bedways are not flame hardened - I would hate to see dents in the bedways instead of the saddle stop. Time will tell. The original part from SouthBend or Hercus was made from cast iron, but I had no suitalbe lump of c.i. handy..... Chris
-
18th August 2011, 12:07 AM #8
GOLD MEMBER
- Join Date
- Jul 2008
- Location
- near Warragul, Victoria
- Posts
- 2,500
Another one
Another version
http://www.metalwebnews.org/mr-tools...meter-stop.pdf
-
18th August 2011, 11:01 AM #9
Cba
- Join Date
- Aug 2007
- Location
- Melbourne
- Age
- 68
- Posts
- 1,417
In an older thread, Steve "blackfrancis" did post sketches for how to make the original Hercus saddle stop. This is his link to the sketches:
http://rsc.anu.edu.au/~swilliams/eng/stuff/mcs.zipLast edited by cba_melbourne; 18th August 2011 at 01:19 PM. Reason: corrected faulty link
-
18th August 2011, 11:13 AM #10
GOLD MEMBER
- Join Date
- Jul 2008
- Location
- near Warragul, Victoria
- Posts
- 2,500
Link defunct
Chris, that link doesn't work for me . Originally Posted by cba_melbourne

If you have the time . Can you please post a pic of how you made the V section in your piece. I'm not good with written descriptions I need pics .
Mike
-
18th August 2011, 01:33 PM #11
Cba
- Join Date
- Aug 2007
- Location
- Melbourne
- Age
- 68
- Posts
- 1,417
Mike, oops wrong link --- I edited the mail now the link should work.
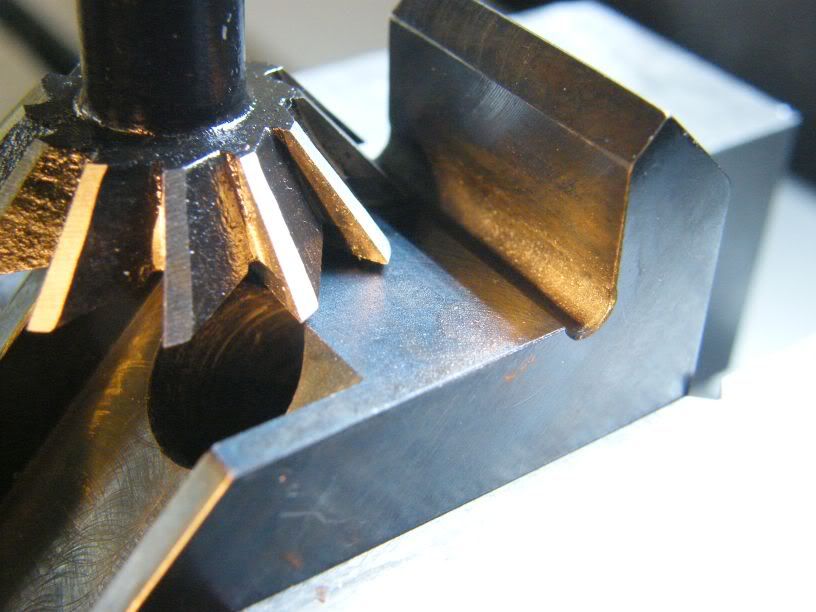
Sorry I did not take pics as I went along.... so have to mock it with the finished piece. That should still give you an idea how I did it.... but there are many other ways to skim a cat. If you cannot set the 90 degree angle accurately, make it just a tiny tad smaller than 90, that way it at least cannot rock on the ways. It may not matter much for a stop, but the dial indicator would reveal the smallest rocking. This is also why I made the brass part with only one grub screw as pivot, this way it will always align flat to underside of the bedway and clamp properly. The spring is by the way to spread the two parts apart when the locking screw is loosened, it makes attaching the clamp easier. Originally Posted by morrisman


-
18th August 2011, 02:27 PM #12
.
- Join Date
- Nov 2008
- Location
- Perth WA
- Age
- 71
- Posts
- 5,650
There are some photos of the original Hercus stop here to augment Steve's sketches. Originally Posted by cba_melbourne
https://www.woodworkforums.com/f189/d...holder-130727/
-
18th August 2011, 02:53 PM #13
GOLD MEMBER
- Join Date
- Jul 2008
- Location
- near Warragul, Victoria
- Posts
- 2,500
Excellent
Chris
I appreciate you taking the time to take the pics .. I understand the process now
And Anorak, thanks for the link . I saved it all to my memory stick , including Chris's info .
Tip: use two memory sticks, one is a backup . I learn't the hard way after losing a stick. I lost heaps of stuff ..never again .
Mike
-
18th August 2011, 06:55 PM #14
GOLD MEMBER
- Join Date
- Nov 2007
- Location
- melbourne australia
- Posts
- 2,645
will the carriage stop morrisman provided the ebay link for in post #3 (made for a South Bend 9/10k) fit a Hercus 260?
-
18th August 2011, 07:11 PM #15
GOLD MEMBER
- Join Date
- Jun 2007
- Location
- sydney
- Age
- 64
- Posts
- 3,566
Should do but if concerned ask the seller for the centre distance from the centre of the Vee to centre of Dial bore.
Also ask the Height from top of clamp on the Vee to centre of Dial bore.

Similar Threads
-
Back in the saddle
By Grumpy John in forum WOODTURNING - GENERALReplies: 21Last Post: 7th March 2010, 09:13 PM -
9A saddle disassembly
By neksmerj in forum THE HERCUS AREAReplies: 3Last Post: 15th January 2010, 08:31 PM -
Saddle lock.
By mob in forum THE HERCUS AREAReplies: 2Last Post: 1st September 2009, 09:29 PM -
Back in the saddle.
By ciscokid in forum WOODTURNING - PEN TURNINGReplies: 9Last Post: 27th April 2009, 09:31 PM -
Micrometer saddle stop?
By neksmerj in forum THE HERCUS AREAReplies: 18Last Post: 19th March 2009, 10:10 PM
