

 Thanks: 0
 Likes: 0
 Needs Pictures: 0
 Picture(s) thanks: 0
Results 16 to 30 of 32
Thread: Glue Drying Time?
-
22nd November 2007, 03:11 PM #16
 the youngin'


- Join Date
- Oct 2007
- Location
- Sydney
- Age
- 33
- Posts
- 120
 ye dats wat i thought, thanks
 Originally Posted by RGM

-
22nd November 2007 03:11 PM # ADSGoogle Adsense Advertisement
- Join Date
- Always
- Location
- Advertising world
- Age
- 2010
- Posts
- Many
-
22nd November 2007, 06:30 PM #17
Former "lurker"
- Join Date
- Oct 2007
- Location
- Sydney, Australia
- Posts
- 173
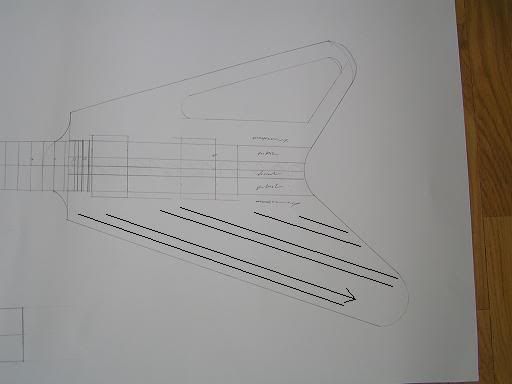
The only thing I wanted to add, is the detail for clamping "steps" as you will need to allow for these when rough cutting the body. See the attached sketch for indication of this aspect.
One more thing popped into my head, as I looked back at some pictures of a "Randy Rhodes" flying V replica from years ago. BEFORE gluing the body, make sure you are able to drill or rout all your wiring channels with the body together. Otherwise, now is the time to drill those hidden holes or cut trenches.
Cheers, Adam.
-
23rd November 2007, 08:12 PM #18
the youngin'
- Join Date
- Oct 2007
- Location
- Sydney
- Age
- 33
- Posts
- 120
oh man, good point! i'll rout the control cavity first then drill it through to connect to the pickup cavities Originally Posted by addo
thanks alot adam
-
23rd November 2007, 08:30 PM #19
Senior Member
- Join Date
- Jan 2006
- Location
- aust
- Posts
- 271
Of course, you could just spend $15 at Bunnings and get an ultra long drill bit that will drill any wire channel hole in any sized guitar, and save you having to line up routs and holes, which just get full of glue when you glue the wings on anyway...

-
23rd November 2007, 09:41 PM #20
Former "lurker"
- Join Date
- Oct 2007
- Location
- Sydney, Australia
- Posts
- 173
Check out the selector switch location on this.
 No way other than pre-drilling (unless you want to start drilling and plugging).
BTW, extra long drill bits were dear as poison 15 years ago. From memory I paid over $50 each for SKF/Dormer 12" long bits back around 1990. Budding luthiers have it better now!
Regards, Adam.
-
23rd November 2007, 09:52 PM #21
the youngin'
- Join Date
- Oct 2007
- Location
- Sydney
- Age
- 33
- Posts
- 120
ye i got an old long drill bit but i think its not wide enough for the wires to fit through. Originally Posted by rhoads56
i'll rout out the control cavities then drill a straight hole from the exposed side which will be part of the pickup cavity after i rout it (if u know wat i mean , i dont think even i know wat i mean)
-
23rd November 2007, 09:54 PM #22
the youngin'
- Join Date
- Oct 2007
- Location
- Sydney
- Age
- 33
- Posts
- 120
lol did u make that adam? i like the bowtie inlays haha. Originally Posted by addo
-
23rd November 2007, 10:30 PM #23
Senior Member
- Join Date
- Jan 2006
- Location
- aust
- Posts
- 271
I'll take your one PDV replica, and raise it with 15 more... Originally Posted by addo
Currently in progress: (Brazilian Mahogany)

Three piece quartersawn rock maple through necks, with scarf joint headstocks...

Some of the fretboards:

And some of the finished products from the last batch:


Of course, you COULD prerout the channels, or rout them into the face of the body and inlay a strip over, but its MUCH easier just to drill a hole from the jack to the bridge pickup, and from the jack to the switch cavity (which in this case is right next to it).
Here is a photo to show that its quite easy to drill from the jack to the pickup cavity. Of course, if the jack wasnt there, you could just drill from the end of the horn, straight through, and plug it later (with a stronger wood to prevent possible strap button screw stripping the wood out )
)

For the record, i dont cut 'steps' into the wings. Thats too much wasted wood (considering the availability of Brazilian Mahogany these days). I have a cradle that each wing fits into (one per side), and the clamps force the cradles together. The cradle also aligns the wings to the top and bottom of the through neck piece. Not worth making it for one or two v's, but when you are making a few... unfortunately i dont have a photo handy, maybe if i get time when I'm gluing up the next lot in a few weeks i'll takes some shots.
I did the step method a few years ago, and here is a photo for clarity:

... and with the wings placed in position (not glued in this shot) to show you what it looks like without clamps.

There are a million ways to do everything... so do whatever is easiest for you...Last edited by rhoads56; 23rd November 2007 at 10:33 PM. Reason: added photo
-
23rd November 2007, 11:38 PM #24
the youngin'
- Join Date
- Oct 2007
- Location
- Sydney
- Age
- 33
- Posts
- 120
rhoads56, are u Perry Ormsby? Realised you have the ormsby guitars logo on the pictures. I saw some of your builds on UG and i love them.
thanks for the tips, i'll try the cradle method.
-
24th November 2007, 10:39 AM #25
Senior Member
- Join Date
- Jan 2006
- Location
- aust
- Posts
- 271
Thats me, thanks.
I wouldnt bother building a cradle for one or two guitars. Glue a couple wedges on the sides and then cut them off later, it will be much easier.
-
24th November 2007, 08:56 PM #26
Former "lurker"
- Join Date
- Oct 2007
- Location
- Sydney, Australia
- Posts
- 173
Fifteen?
I was glad to see the back of just that one in 1994! Don't know how you can get away with not "seeing spots".
The glued wedges have worked for me, too, when materials are at a premium.
-
25th November 2007, 01:19 PM #27
Senior Member
- Join Date
- Jan 2006
- Location
- aust
- Posts
- 271
seeing spots is not the problem, its inlaying all those damn boards! Originally Posted by addo

-
25th November 2007, 01:25 PM #28
Former "lurker"
- Join Date
- Oct 2007
- Location
- Sydney, Australia
- Posts
- 173
Are they supposed to be propellers? We just surmised they were. Only real reference sources I had were a couple of magazine features, a poster and the Crazy Train video.
Only Vee I ever enjoyed making was a true semi King Vee with ¾" thick (routed) sides and maple cap, one F-hole and tapped P-100s. Just a jazz box in disguise.
-
25th November 2007, 03:06 PM #29
Senior Member
- Join Date
- Jan 2006
- Location
- aust
- Posts
- 271
You know, i reckon im the biggest RR fan in Oz, and i dont know if they are propellors (flying V), or bowties (as he wore on stage). I do tend to think they are bowties. I managed to get hold of a guy who worked at Fernandes guitars... they did a run of 100 or so guitars and measured the original... so i was able to confirm most of the sizes from my own plans draw from hundreds of photos and video footage. Ive also got a couple clients who own the Ed Roman/GMW versions, and the Sandoval version (which havent been correct replicas since 1984), and its been cool to go over those guitars with a fine tooth comb Originally Posted by addo
We also flew to LA last year at met with Randy's family, although we didnt see the original PDV. Working from photos was a pain in the butt, and the first couple guitars were changed so many times to get it right (dots versus body shape and layout).
I actually want to build a flying v lap steel
-
25th November 2007, 04:14 PM #30
the youngin'
- Join Date
- Oct 2007
- Location
- Sydney
- Age
- 33
- Posts
- 120
perry u going to the ozzy concert? my friends are, i cant afford it, not a huge fan either so ye.
oh and i reckon the inlays look like bowties. just suits the dot theme better.


 Reply With Quote
Similar Threads
-
Shellac drying time?
By outback in forum WOODWORK - GENERALReplies: 7Last Post: 14th February 2006, 11:27 AM -
One Day Cricket - Wife's First Time
By Honest Gaza in forum NOTHING AT ALL TO DO WITH WOODWORKReplies: 5Last Post: 23rd March 2005, 01:32 PM -
Time and motion study
By Iain in forum WOODIES JOKESReplies: 0Last Post: 3rd March 2005, 07:43 AM -
Drying rough-outs
By BobGilmour in forum WOODTURNING - GENERALReplies: 1Last Post: 11th August 2002, 10:48 AM
