

 Thanks: 0
 Likes:
  Needs Pictures:
  Picture(s) thanks: 0
Results 31 to 45 of 60
-
23rd November 2016, 09:03 PM #31
 GOLD MEMBER


- Join Date
- Oct 2014
- Location
- Caroline Springs, VIC
- Posts
- 1,645

Nathanael, do you have the plunge spring removed from your TRA001 when using it in table mode? If you still have the spring in there, you have to fight the spring pressure AND gravity. I use the micro adjust and all I do is unclamp the plunge lock and give the micro adjust a small turn to make the adjustment I desire. I don't have to relieve any forces.
Woodpixel, I have the woodpeckers aluminium router plate and it comes with 3 plastic inserts. I use them all. I use the big one for better dust extraction when the workpiece is big enough that it won't fall down the hole. I use the insert which accepts porter cable style guide bushes. And I use the small one when I am doing tiny parts which would fall down the hole if I use the big one.
-
23rd November 2016 09:03 PM # ADSGoogle Adsense Advertisement
- Join Date
- Always
- Location
- Advertising world
- Posts
- Many
-
23rd November 2016, 09:20 PM #32
GOLD MEMBER
- Join Date
- Feb 2016
- Location
- Canberra
- Posts
- 5,125
Ah, yes, well, EXCEPT those three exceptions... and, perhaps one or two more.... but never! Originally Posted by Kuffy

On my suggestion, I was hoping to give advice for a low (or zero) dollar solution. Myself, I run an embarrassing setup more akin to Aladdin's Cave of Wonders than a humble poverty stricken studio :3
Speaking of PC bushes, I'd really like to see how people use theirs in the table. I feel a little lacking in invention on those and quite sure there must be some creative uses....
-
23rd November 2016, 09:54 PM #33
Supporting my wife's hobby.
- Join Date
- Nov 2013
- Location
- Caboolture QLD AU
- Posts
- 781
Hi to all on the forum, I normally hang out on the dust forum, but under instructions from my wife I have started the process of tackling and building a router table for her � BTW She is the woodworker.
Was going to buy one but the price seemed way to high for what we may need, so as usual, it was up to me to come up something. Anyway, happen to find some white fully edge trimmed 25mm x 900mm x 500mm laminated MDF pieces that were used as heavy duty floating shelves (usually suspended by a tiny C section metal clamp at each end, as Masters are closing down I got them for $9.00 each, so grabbed enough to do the base, sides and a few spare for experimenting with the table itself.
As the exact requirements need for a router table and associated hardware are new to both of us, I�ve spent the past few weeks on YouTube, various forums and of course here.
Armed with a tiny bit more insight, I have managed to build the router table frame (draws will be made later), found some 55kg rated locking/wheels for $8 each and installed them, grabbed a low cost insert plate so I can make mistakes and figure out exactly what is needed in the robustness and the installation of same. Also managed to mount our smaller triton router with micro adjustment to the plate, built the dust extraction, 150mm port in the top back of the cabinet, no hose in the back of the fence, but still with through the fence extraction and modified insert plate extraction that is adjustable / variable between the two, depending on the job and setup, and almost finished the fence based on the old Deluxe Router Station design.
I decided to fit a separate air intake for the router motor as the way I�m pulling air across the underside of the plate and router top, I was worried I may starve the router. With a 3HP DC and a 150mm port trying to suck the router out of its dust enclosure, there is some serious air flow across the underside of the insert plate, and although that should also help draw air through the router, when I post pictures it may become apparent why I decided to add a small clean intake below and directly into the router motor.
So all up I�m at around $150 mark - router not included.
BTW hope I�m not hijacking the thread.
-
24th November 2016, 01:47 PM #34
Intermediate Member
- Join Date
- Jan 2016
- Location
- Gold Coast
- Age
- 54
- Posts
- 32
That can be an idea, I have a a thick piece of melamine chipboard, I suppose I need to get longer screws for the router to attach it.
Originally Posted by woodPixel
-
24th November 2016, 02:07 PM #35
Senior Member
- Join Date
- Mar 2009
- Location
- Brisbane
- Age
- 73
- Posts
- 488
I suspect that may be considerably more difficult than it sounds... Originally Posted by Vannip

-
24th November 2016, 07:42 PM #36
Supporting my wife's hobby.
- Join Date
- Nov 2013
- Location
- Caboolture QLD AU
- Posts
- 781
Router table build in progress.
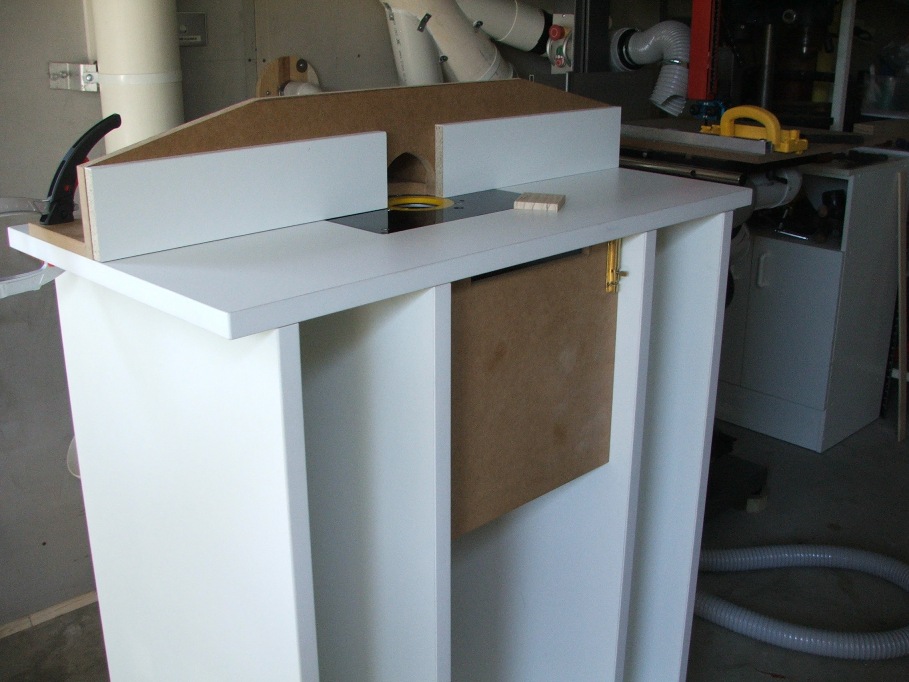
Keep in mind that this is a build in progress. The door and crude draw bolt are being used to test and fine tune the Dust collection, they will be replaced when the final Port size and configuration is arrived at, you can just see the a test intake port at the very top to pull bulk air across the underside of the router plate.
Note: The router DC cabinet door is recessed back from the front to accommodate the Magnetic safety switch, the modified micro adjust knob and the plunge lock, all will controlled from the front panel.
The 150mm DC intake is directly in line with the router, again the cabinet back panels are screwed so they can be removed and modified as needed, also making it easier to install runners and draw hardware, later on they will be glued.
I have not made the fence locking hardware as yet, the fence is in its raw state and not finished in any way.
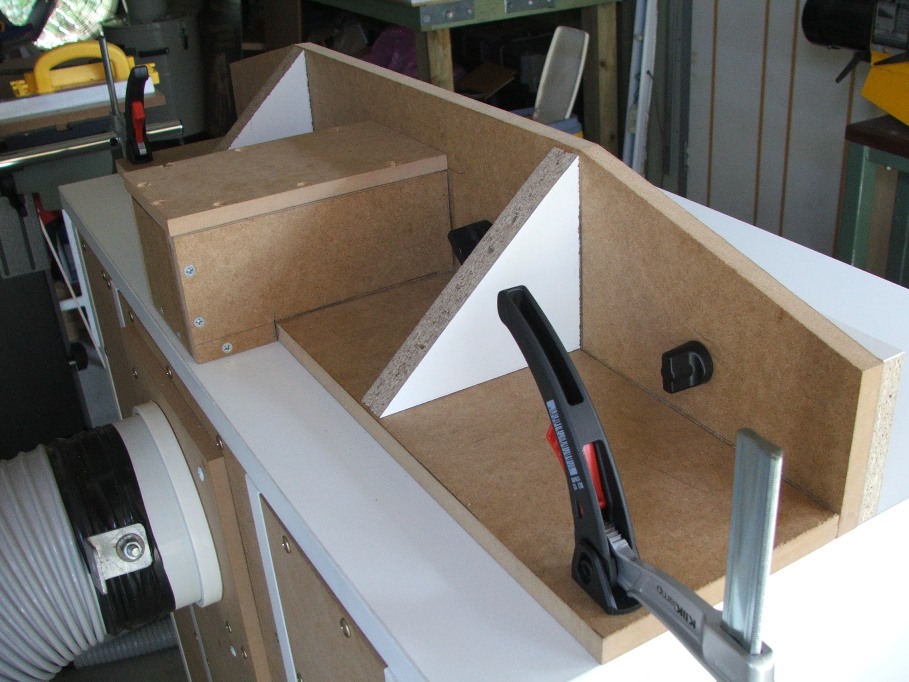
The air control box is screwed and partly glued so that I can modify the compartment internally as I fine tune the DC pickup.
I made some long Dados and did various timber routing today to test the dust collection, there was not a speck of dust left above or below the table. Considering the DC is not working as efficiently as it should be yet, I was very pleased.
Separate air intake for the router motor, it follows the router as it's raised or lowered, it in no way restricts the removal of or access to the router, it cost nothing.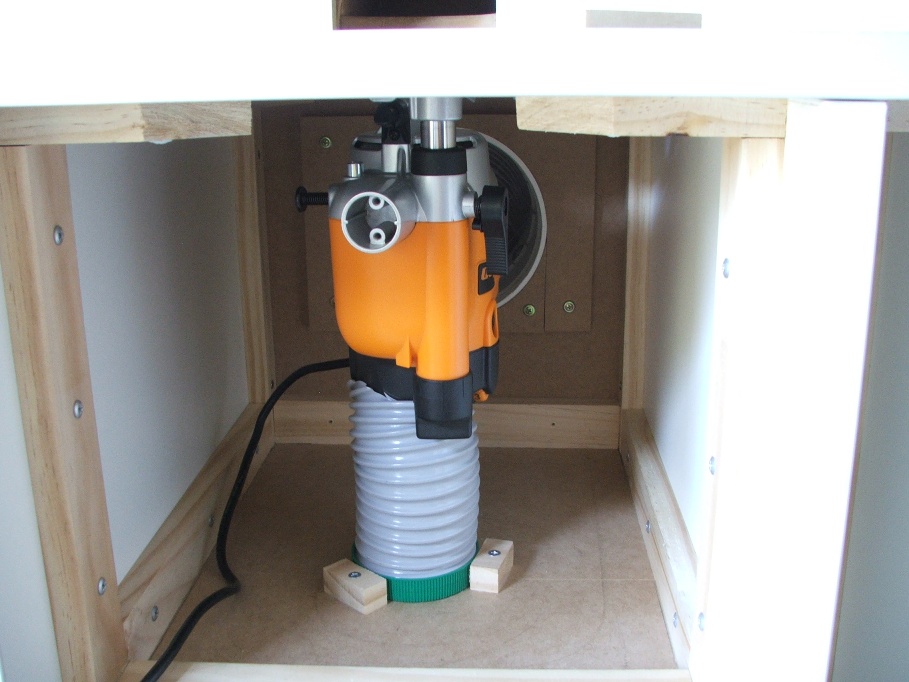
-
24th November 2016, 08:28 PM #37
New Member
- Join Date
- May 2015
- Location
- Melbourne
- Posts
- 4
Dilemma with regards router / table. I am such a newbie :-)
IMG_4650.JPG
Approx 8mm Perspex from Bunnings
Sheet cost about $60 from memory but enough meat to make at least 2 inserts.
If I was to make another I'd use melamine and spend big on a router lift if I had the $$$ to spare.
IMG_4649.JPG
-
26th November 2016, 12:29 PM #38
Supporting my wife's hobby.
- Join Date
- Nov 2013
- Location
- Caboolture QLD AU
- Posts
- 781
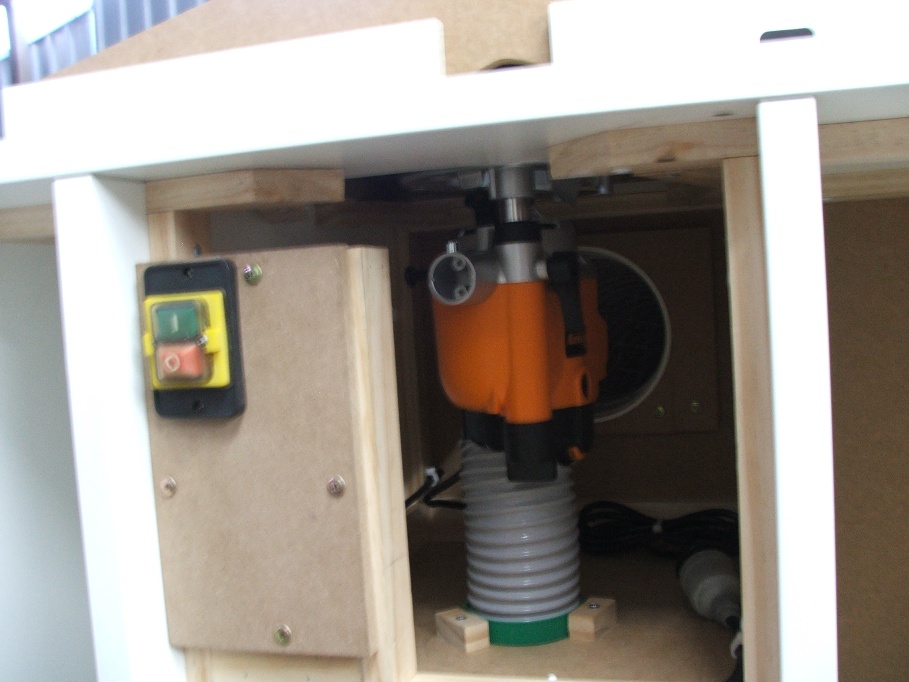
Router table build in progress.
For anyone is interested:
A quick test fit up of the magnetic switch, that panel will later have router speed, micro adjust and plunge lock bought out.
Low DC flow detect cut-out (cannot start the router unless the DC is on AND there is sufficient flow at the table) and a 2nd emergency stop switch at the RH side of the table will soon be fitted.

Panel does not hinder access in anyway.
-
27th November 2016, 09:42 AM #39
GOLD MEMBER

- Join Date
- Aug 2016
- Location
- Brisbane
- Age
- 57
- Posts
- 1,315
Please keep the examples coming. I'm finding them invaluable.
How important is it to be able to adjust the insert to be perfectly level with the table?
Sent from my SM-G935F using TapatalkMy YouTube channel: https://youtu.be/2_KPRN6I9SE
-
27th November 2016, 09:55 AM #40
plane sailing...
- Join Date
- Oct 2006
- Location
- Wodonga
- Age
- 53
- Posts
- 712
The insert should be as level as possible with the table top to avoid the work piece catching as you move it across the cutter.
Very frustrating having the piece stopping mid cut as it catches when the insert is lower than the table top.
Hope my messy description makes some sense.
Steven.
-
27th November 2016, 10:09 AM #41
GOLD MEMBER
- Join Date
- Aug 2016
- Location
- Brisbane
- Age
- 57
- Posts
- 1,315
OK so I'll plan to have some grub screws under the insert. I think I'll try to have these grub screws thread directly into the chipboard top and just hope that is satisfactory.
Sent from my SM-G935F using TapatalkMy YouTube channel: https://youtu.be/2_KPRN6I9SE
-
27th November 2016, 01:23 PM #42
Senior Member
- Join Date
- Mar 2009
- Location
- Brisbane
- Age
- 73
- Posts
- 488
I think you're over complicating things. If you use a router to make the rebate for the plate you shouldn't need any adjustment post installation...
-
27th November 2016, 02:38 PM #43
Intermediate Member
- Join Date
- Jan 2016
- Location
- Gold Coast
- Age
- 54
- Posts
- 32
Hey guys, I returned the Ozito routers as it was falling a part after a couple of times of testing it. Running took it back no question asked. Now, I definitely need a new router. I saw the Ryobi but it looks the copy of the Ozito so it is a no go. The other option I saw was a Makita (900w) with 1/4 and 3/8 bit. Nice, smooth but not sure if it is too much under power. I need something to use under a table, with some sort of fine adjustment. I know Triton has those features but I read controversial posts about it. Please help. I am also willing to buy a second hand one.
-
27th November 2016, 02:48 PM #44
 Woodworking mechanic
- Join Date
- Jan 2014
- Location
- Sydney Upper North Shore
- Posts
- 4,470
Unless you are 100% accurate with your rebate, you will need some type of adjustment, be it screw, shim whatever. Better to rebate slightly deep so you can adjust the plate insert up to the table height. If you can feel an edge with your finger then there is a chance small items will catch.
The other two important points are that 1) the router bits are 90 degrees to the table surface therefore the router must be mounted level and 2) the fence is 90 degrees to the table - particularly important if working with tall, thin pieces.
Reducing rings are also useful - I work with router bits from 3mm to 50mm so having a range of rings is handy.
Regarding the Makita 900W. Sooner or later, if you get into this great hobby with gusto, you will want 1/2" router bits and the Makita is 1/4" and 3/8". 3/8" aren't that common re local suppliers. Longer 1/4" can flex.
i've had my Triton MOF001 for almost 2 Years and, apart from buying new collets, it's been great once you iron out a few quirks. It also has a 3 year warranty. The problem is that the price has skyrocketed in the past few months.Last edited by Lappa; 27th November 2016 at 03:06 PM. Reason: Additional info
-
27th November 2016, 03:39 PM #45
Supporting my wife's hobby.
- Join Date
- Nov 2013
- Location
- Caboolture QLD AU
- Posts
- 781
As Lappa pointed out, the price was just too high for us. However we had the smaller 1.4 HP JOF001 and as we will not be spinning big diameter bits it�s gone into the table, and will be staying there.
We have a small unit for any small plunge work. The smaller Triton has most of the features of the big unit, like micro adjustment from below and through the table, auto locking single spanner bit changing, speed control, soft start, and takes our ever increasing selection of � bits.

 Reply With Quote


Similar Threads
-
Best Router for a Complete Newbie!
By Inzy1 in forum ROUTING FORUMReplies: 29Last Post: 30th July 2015, 01:44 PM -
router table newbie
By spongebrain in forum ROUTING FORUMReplies: 3Last Post: 11th December 2009, 10:49 PM -
Triton Router table RTA300 VS Carba-Tec Cast Iron Top Router Table
By pellcorp in forum TRITON / GMCReplies: 17Last Post: 30th April 2009, 02:43 PM -
table saw dilemma
By SteveMcM in forum TABLE SAWS & COMBINATIONSReplies: 20Last Post: 18th December 2007, 06:03 PM
