

 Thanks:
  Likes:
  Needs Pictures:
  Picture(s) thanks:
Results 1 to 5 of 5
Thread: How To Route This M&T Joint
-
7th November 2019, 09:00 AM #1

 GOLD MEMBER


- Join Date
- Mar 2006
- Location
- Earth
- Posts
- 3,567
 How To Route This M&T Joint
I want to start using this style of M&T joint in a few pieces. I like the look of flat faced rungs/stretchers intersecting the round posts/legs. Where the rail / stretcher has a half round top and bottom and the tenon has no shoulder instead the shoulder is in the mortise.
Screen Shot 2019-11-05 at 10.37.11 pm.jpg Screen Shot 2019-11-05 at 10.37.49 pm.png
The best way I can figure is that I use a router to cut out a shallow 5mm deep mortice say 19mm wide using a 19mm bit to form the mortise shoulder. Then I route out the deeper 10mm wide mortice for the tenon (OR maybe that should be reversed - cut the deeper narrower mortise first then the larger shallow mortise after). Either way some kind of indexing jig that will allow me to cut the mortises in the exact centred position seem to be in order. Any pointers for such a jig?
I then used a 9.5mm half round bit like this one to cut the rail. I expect that I will need a few test pieces to get the rail to fit perfectly. I also figure that I would have to size and finish plane / sand the rail perfectly before routing the round over so as to get and maintain the sizing.
What am I missing?
What is this style of M&T called?
Comments/suggestions...
Screen Shot 2019-11-07 at 8.44.04 am.png
-
7th November 2019 09:00 AM # ADSGoogle Adsense Advertisement
- Join Date
- Always
- Location
- Advertising world
- Posts
- Many
-
7th November 2019, 09:18 PM #2
GOLD MEMBER
- Join Date
- May 2011
- Location
- Albury
- Posts
- 3,032
I've created exactly the joint shown in the second pic. to convert a telephone table into a single drawer table for my mother by removing the seat from the side. The joint was created using a home made mortise jig that attaches to my bench with the bit guided by a 3/4" guide bush. I use this jig to rout 1/8", 1/4", 8mm, 3/8" and 1/2" mortises. Loose tenons were used and the stretcher housed in the leg by exactly the method you propose. Rather than using a roundover bit I use a full round bit guided by the router fence - Half Round Side Cutter Bit Arden Router Bit 1/4*1/4 1/4" Shank Arden A0607014-in Milling Cutter from Tools on AliExpress - 11.11_Double 11_Singles' Day If you use a bearing guided roundover bit once you've done one side there's nothing for the bearing to ride on.
There are plenty of router mortise jig build details on the net and some members here have built some very good ones, Lappa and tccp123 come immediately to mind.
The table was only Rubberwood, but it did turn out very nicely.
-
8th November 2019, 12:56 AM #3
Be inspired. Be creative. Be bold.
- Join Date
- Apr 2001
- Location
- Perth
- Posts
- 10,820
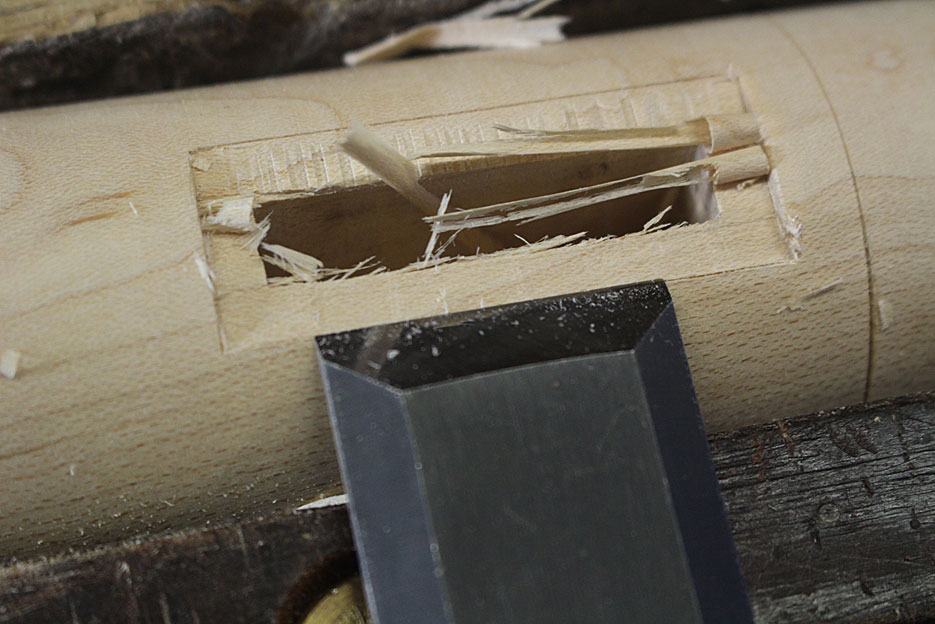
You mean, like this ... ?


The mortices were first cut in the blanks ..

.. and then turned ..

The tenons were fitted into the mortice ...

... and marked out:

.. before being rebated (is that the correct term here?) for the shoulder ...
Regards from Perth
DerekVisit www.inthewoodshop.com for tutorials on constructing handtools, handtool reviews, and my trials and tribulations with furniture builds.
-
8th November 2019, 08:16 AM #4
SENIOR MEMBER
- Join Date
- Apr 2007
- Location
- Sydney
- Posts
- 749
That's what the fence is for. Originally Posted by aldav

If you use a full round over bit any slight irregularity or dust on either the work piece, fence or table can translate into an upward movement that results in gouging of the finished surface, as the upper face is trapped inside the cutter. This can also occur by any slight upward pressure from feeding (don't ask how I know all this )
)
IMHO you will get a way better result, with less stress, using a normal roundover bit guided by the fence.
-
9th November 2019, 03:23 PM #5
 GOLD MEMBER
- Join Date
- Apr 2006
- Location
- Hobart
- Posts
- 5,121
A little trick.
"Originally posted by Aldav."
If you use a bearing guided roundover bit once you've done one side there's nothing for the bearing to ride on.A little trick: Originally Posted by RossM
If you set the roundover bit about 0.5 mm low, then it will leave a flat top on the moulding 1 mm wide. That is sufficient bearing surface for the second pass on the router.
Two strokes with sandpaper and no one will ever know.
Cheers
Graeme

 Reply With Quote
Similar Threads
-
Trivia en route
By Rodgera in forum WOODIES JOKESReplies: 0Last Post: 6th March 2015, 11:45 PM -
Which Route should I go with my Kitchen Cabinets?
By Jcari in forum WOODWORK - GENERALReplies: 3Last Post: 21st March 2010, 10:58 PM -
how to route tenons
By DPPATT in forum ROUTING FORUMReplies: 5Last Post: 4th November 2008, 05:29 PM -
vintage stanley route
By fubar in forum ROUTING FORUMReplies: 0Last Post: 20th October 2008, 09:16 PM -
going the triton route - advice pls
By old_picker in forum TRITON / GMCReplies: 3Last Post: 5th March 2006, 07:52 PM
