

 Thanks: 0
 Likes: 0
 Needs Pictures: 0
 Picture(s) thanks: 0
Results 1 to 15 of 64
Thread: Router Fence Design
-
28th July 2006, 10:31 PM #1
 Electron Murderer


- Join Date
- Aug 2002
- Location
- Melbourne, Victoria
- Posts
- 5,513
 Router Fence Design
I'm in the latter stages of designing a router table fence, and have done quite a bit of research on the web to find the best ideas to incorporate, plus a couple unique ones of my own (well, unique in as much as I have not seen anyone else do it). Such as replaceable inserts, one for each router bit type to provide zero clearance, and modification of existing ideas, such as the Incra positioning system for stops for things such as stopped rebates, and dovetails done using the Incra fence system.
However, before starting the build, I wanted to make sure that I hadn't missed any decent fence design concepts, so if anyone has any input, it would be very welcome.
The basis of the fence is a 100x50mm aluminium RHS beam. It will (ok, may, depending if there are better ideas) have MDF facings, and these are not specifically sacrificial, as there is the central removable router bit surround that will be cut by the router bit. The RHS will be plugged at one end, and will have dust extraction attached to the other. The design includes 2 stops that engages the incra toothed rails that extend the length of the fence providing precise positioning.
A 90 degree attachment will slide along the rail, again for incra type joint production. To the rear of the fence is the base version of the incra positioner (which one day I'd love to upgrade to the LS version).
Planing will be possible by placing shims behind the outfeed fence.
So, any other ideas, design changes, novel inclusions etc all welcome!"Clear, Ease Springs"
www.Stu's Shed.com
-
28th July 2006 10:31 PM # ADSGoogle Adsense Advertisement
- Join Date
- Always
- Location
- Advertising world
- Posts
- Many
-
29th July 2006, 12:35 AM #2
Senior Member
- Join Date
- Sep 2003
- Posts
- 165

If your using box section, then you should have your "blocked end" right beside the opening in your fence for the cutter, or, leave the end open all together to allow extra air into the box section so that the section doesnt fill up with shavings, due to swirling and cavitation of the air entering near the cutter only...
It's Ripping Time!!!
-
29th July 2006, 02:22 AM #3
SENIOR MEMBER
- Join Date
- Nov 2004
- Location
- Port Pirie SA
- Age
- 52
- Posts
- 6,908
What are you draughting it with vac or dusty?
....................................................................
")
-
29th July 2006, 03:01 AM #4
Electron Murderer
- Join Date
- Aug 2002
- Location
- Melbourne, Victoria
- Posts
- 5,513
Good thoughts - I have the far end designed blocked off, but with holes drilled to allow airflow through to prevent the 'dead' end filling up. I prefer your idea Mick of having that seal much closer to the mid-section of the fence. I chose the right end to be the dead end, as the cutter would (i'm guessing) tend to throw shavings toward the right inside the fence, given the direction of rotation.
See - already a simple, but valuable contribution / modification of the design!
Harry - thinking of using vac (coupled to my cyclone), rather than the shop's 4" dusty. Reason for this is 2 fold - firstly, the added difficulty in converting the square section to 4" round (although not that hard, the smaller tube is easier), and secondly, I don't want the weight of the dust extraction tube having any chance to pull the fence out of position. Thoughts?"Clear, Ease Springs"
www.Stu's Shed.com
-
29th July 2006, 10:38 AM #5
Senior Member
- Join Date
- Sep 2003
- Posts
- 165
He's a rough pic of my flow through fence with a 4" dusty connected, i've never had any trouble with it moving when i didnt want it to, and never had trouble with it not getting rid of waste properly. Is simply a few PVC fittings that i'm sure you can identify.
It's Ripping Time!!!
-
29th July 2006, 11:02 AM #6
Dissenting opinion
- Join Date
- May 2005
- Location
- Turramurra, NSW
- Posts
- 2,267
Stu
After seeing Zed's Carbatec router table, and getting all envious and accquisitive, you might think to add a sliding tenon cutting jig to the fence.
I know its a bit of relatively complex engineering, but that would probably give you an extra choice (bringing the total into double figures) in how you cut tenons.
Boy can't have too many toys.Bodgy
"Is it not enough simply to be able to appreciate the beauty of the garden without it being necessary to believe that there are faeries at the bottom of it? " Douglas Adams
-
29th July 2006, 01:00 PM #7
SENIOR MEMBER
- Join Date
- Mar 2004
- Location
- Carine WA
- Age
- 74
- Posts
- 679
Hi
WHat about those rectangle downpipe to round pipe adaptors? They are about that size.Harry - thinking of using vac (coupled to my cyclone), rather than the shop's 4" dusty. Reason for this is 2 fold - firstly, the added difficulty in converting the square section to 4" roundKind Regards
Peter
-
30th July 2006, 03:37 AM #8
Blood letter extraudinair
- Join Date
- May 2003
- Location
- Broome West Aussie
- Age
- 67
- Posts
- 3,683
Zed has that one Ive got? thats wider than it is long? bloody pain in the ass in my view... and you cant fit one of those risers in either by the way... unless Zed has figured something out that I havent cause none that Carbatec had would slot in!... main problem I have is the back part of the thing I mean youve almost got two tables in one with that major winder setup bloody takes up too much room... gotta make a router table soon Originally Posted by Bodgy
Believe me there IS life beyond marriage!!! Relax breathe and smile learn to laugh again from the heart so it reaches the eyes!!
Originally Posted by Bodgy
Believe me there IS life beyond marriage!!! Relax breathe and smile learn to laugh again from the heart so it reaches the eyes!!
-
31st July 2006, 01:21 PM #9
SENIOR MEMBER
- Join Date
- Apr 2006
- Location
- Melbourne Victoria
- Posts
- 621
Just a thought on the zero clearance insert. You probably need a bit of room, otherwise your bit may end up cutting the shaving/chips a second time if they get between the bit and insert. More likely on the way back out from the rear of the fence, if the shavings aren't thrown clear.
-
31st July 2006, 01:33 PM #10
Electron Murderer
- Join Date
- Aug 2002
- Location
- Melbourne, Victoria
- Posts
- 5,513
Thanks for that Brian - was thinking something along the same lines - was concerned about getting chip-out from the insert as the bit passed back through, so was thinking of leaving about 1mm clearance all round. Still, that gives a very good "zero clearance" benefit cf normal fences, even those with movable in and out feed.
Didn't get a chance to start on the fence last weekend - decided to start with the router table instead. It is going to be functional rather than beautiful, so don't expect any works of art!"Clear, Ease Springs"
www.Stu's Shed.com
-
31st July 2006, 01:52 PM #11
Electron Murderer
- Join Date
- Aug 2002
- Location
- Melbourne, Victoria
- Posts
- 5,513
Few photos:
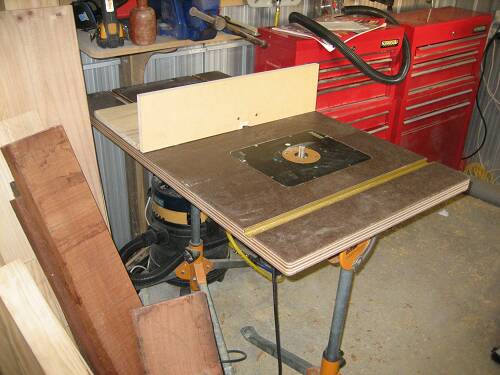
The current router table - currently supported by a couple of Triton Multistands. A very temporary fence so I can make the proper one.
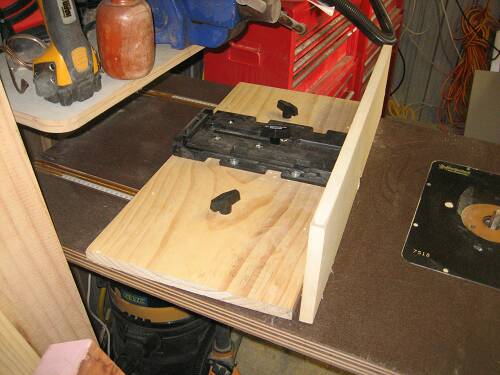
The back of the fence - showing the Incra positioner that will be used on the new fence
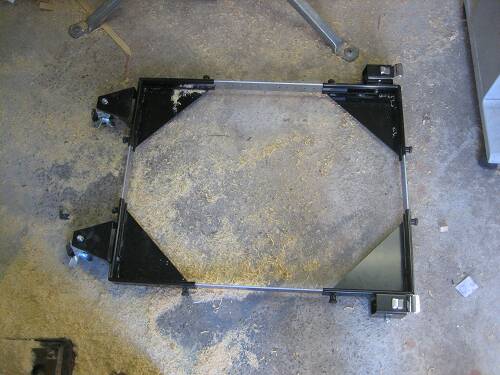
The base for the new table - a Jet Universal Roller Stand. Not sure whether it will be the long term base or not. At some stage it may be moved to the bandsaw, and more permanent wheels added to the router table, but at this stage, it is convenient.
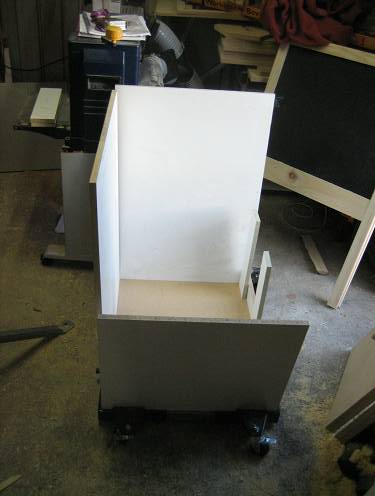
The start of the table - using melamine that I got free from NidekFurniture that he offered on here last friday (thanks Nick).
It is very (very) loosely based on the NYW table, but obviously I have a different requirement because of the orientation of the table. It will be coupled up to both the 4" dust system, and the 1" cyclone systems in the workshop, with the 1" collecting dust directly from the Triton router's dust port, and the 4" from the fence, and from the table, as per the NYW design."Clear, Ease Springs"
www.Stu's Shed.com
-
31st July 2006, 03:19 PM #12
Blood letter extraudinair
- Join Date
- May 2003
- Location
- Broome West Aussie
- Age
- 67
- Posts
- 3,683
eerr have I gone blind?? :eek: IM BLIND!!! AAAHHHHHHHHHHHHHH!!! :eek:
note to self stop runnin around like a chook with its head cut off yer galah! Stuart has just had a momentary old phart moment and forgotten to post the pics
mmmm Stuart?? oooohhh Stuart mate could you kindly post the pics you refer to ol son ... cheers mate
  Believe me there IS life beyond marriage!!! Relax breathe and smile learn to laugh again from the heart so it reaches the eyes!!
-
31st July 2006, 03:29 PM #13
Electron Murderer
- Join Date
- Aug 2002
- Location
- Melbourne, Victoria
- Posts
- 5,513
Pics are there for me to see - anyone else not see them?
Great. Something's gone wrong with the post - the HTML shows the images there, but now the links are not working. I hate computers Have added the images as attachments - at least that should work.
Thanks for the heads-up Dingo - appreciated."Clear, Ease Springs"
www.Stu's Shed.com
-
31st July 2006, 11:10 PM #14
SENIOR MEMBER
- Join Date
- Nov 2004
- Location
- Port Pirie SA
- Age
- 52
- Posts
- 6,908
Just on the draughting, I had a bit of a play around yonks ago in positioning the intake and found it was better to have the intake directly behind the bit, having it draughting from the side added an extra bend for the flow to go around.(well thats what im putting it down too...)
I made a fancy box section with side a intake to go behind my fence, but it still let most chips/dust to fall too the floor
so I just put the vac hose behind the fence close to the bit without any box section and found it performed way better.
So now its just got a slapped together bits of scrap box with the infeed facing towards the bit.
Dust and chips still fall to the floor, the only way is to box the router in as well and draught it with big air flow.
My up and coming RT(one day...)will have both top and bottom draughted by the dusty, as running both vac and dusty is silly.
Im thinking along the lines for my new fence is to use a box section like you, but it will sit up high apon another two box sections with a 100mm cutter gap between them and with 50mm "C" section separating them from the top box section... I like a high fence because it allows for 2 T tracks for feather boards and stops to have 2 fixing points... rock solid!
My current fence was made to have ZCI's but have never used it, Im looking for another face material other than melimine as it has expanded on the outfeed side PITA!
I thinking some sort of plastic, but I've spent way to much now($1k+) so im looking for something cheaper than phenlonic/UHMW ?....................................................................
-
31st July 2006, 11:21 PM #15
Electron Murderer
- Join Date
- Aug 2002
- Location
- Melbourne, Victoria
- Posts
- 5,513
So you are saying I'm being silly by running a vac and 4" system then?
Think I will still try it and make my own decision on that one. Given the Triton router is designed with a vacuum collection directly from the shrouding of the base, that will be reasonably effective. Combined with an overall 4" collection below the table, and also from the fence, I don't see why it won't be pretty effective."Clear, Ease Springs"
www.Stu's Shed.com


 Reply With Quote


Similar Threads
-
Design Problems with the Triton Router Table (2001) - RTA300
By barrysumpter in forum TRITON / GMCReplies: 19Last Post: 19th November 2018, 08:43 AM -
Metal fence design
By Malc in forum METALWORK FORUMReplies: 5Last Post: 1st August 2006, 02:10 PM -
triton router fence
By jow104 in forum ROUTING FORUMReplies: 3Last Post: 15th May 2003, 10:30 AM -
router table fence RTA 300 model
By jow104 in forum ROUTING FORUMReplies: 2Last Post: 6th April 2003, 05:22 PM -
MK3 router table fence
By Taffy in forum TRITON / GMCReplies: 0Last Post: 8th March 2001, 10:17 PM
