

 Thanks:
  Likes:
  Needs Pictures:
  Picture(s) thanks:
Results 61 to 75 of 264
Thread: Yet another Router table build.
-
5th January 2018, 06:09 PM #61
 Supporting my wife's hobby.


- Join Date
- Nov 2013
- Location
- Caboolture QLD AU
- Posts
- 781
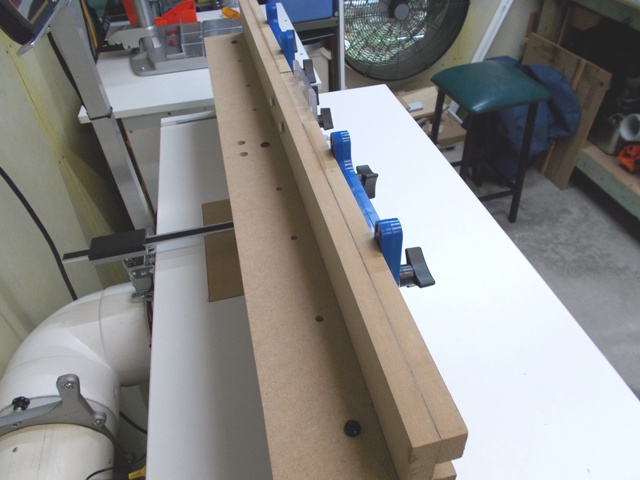
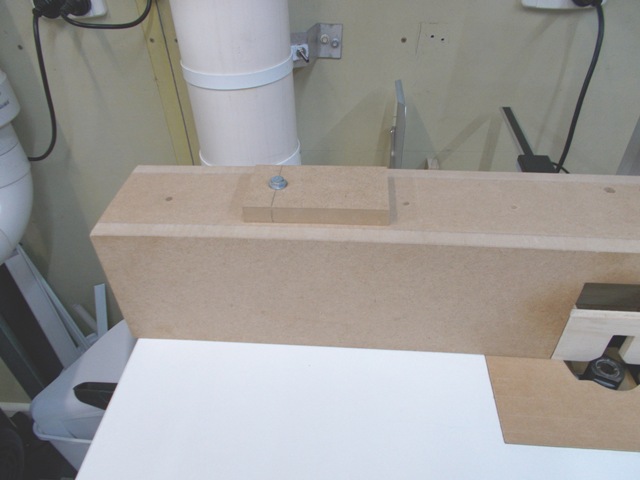
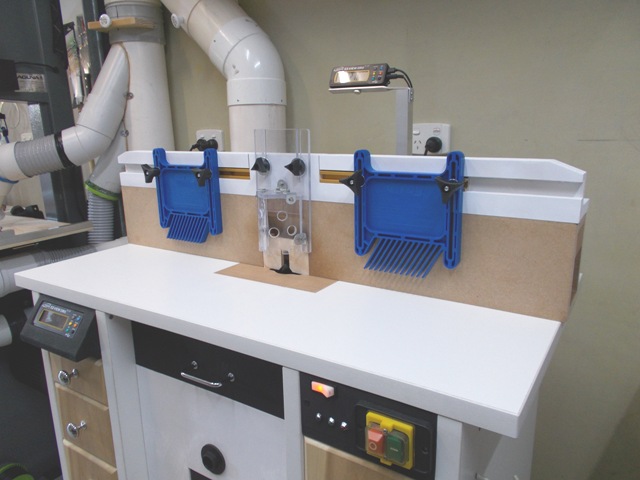
 First fence Jig.
Standard Feather board and Bit guard - I know it's not really a jig but I'll call it that for this RT build.
The T-slot channels are from the old fence, they are short, new length of T-slot is on the way.
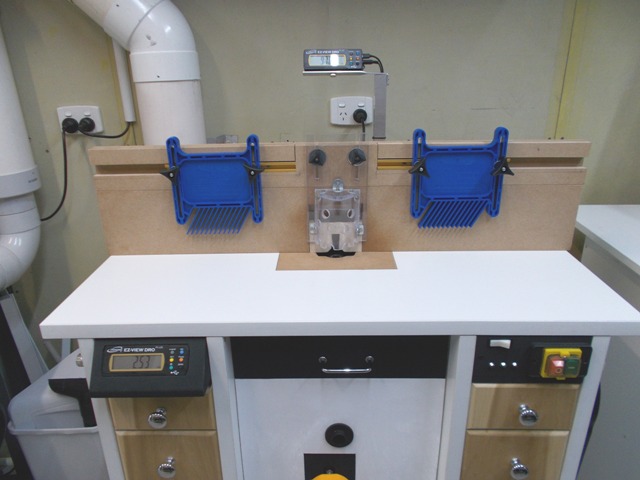
Jig is held on by 3 bolts, but while I was at the Drill Press I drilled the rest of the holes to match all tee nuts built into the main fence. This standard jig is simple to remove and refit, no need to remove feather boards or bit guard when swapping to another jig. Absolutely rock solid.
Only the two end and one middle tee nuts are used to lock the feather board jig down.
This will be the largest jig with most others being less that half the width.(1) Our small workshop layout __ (2) Bandsaw circle cutting jig __ (3) Spindle sander modifications __ (4) Dust Sensor
(5) Router table redesigned ____ (6) DC and where it all began __ (7) Bandsaw dust extraction build
-
5th January 2018 06:09 PM # ADSGoogle Adsense Advertisement
- Join Date
- Always
- Location
- Advertising world
- Posts
- Many
-
8th January 2018, 02:58 PM #62
Supporting my wife's hobby.
- Join Date
- Nov 2013
- Location
- Caboolture QLD AU
- Posts
- 781
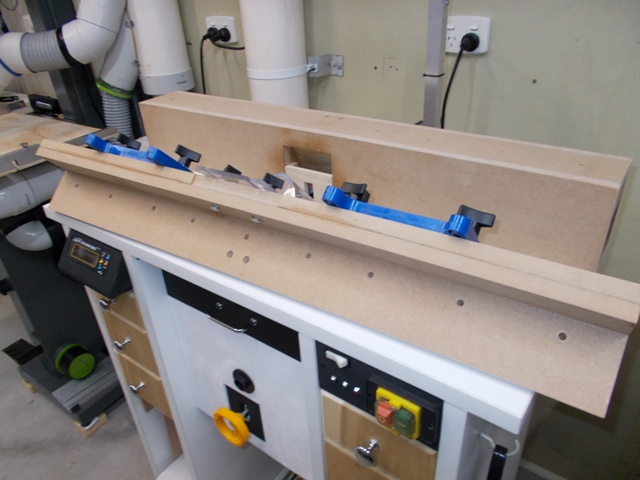
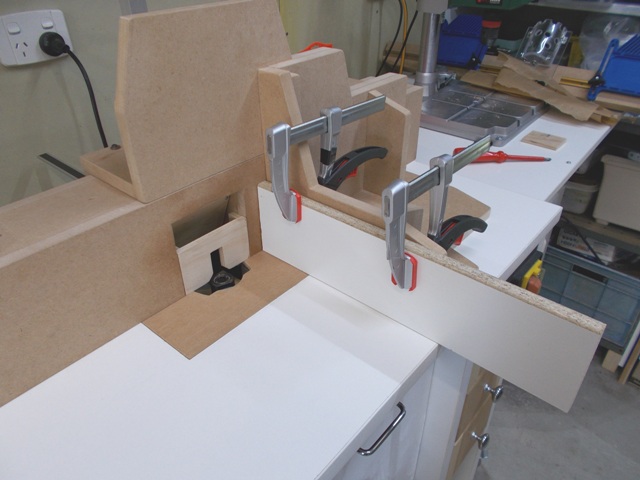
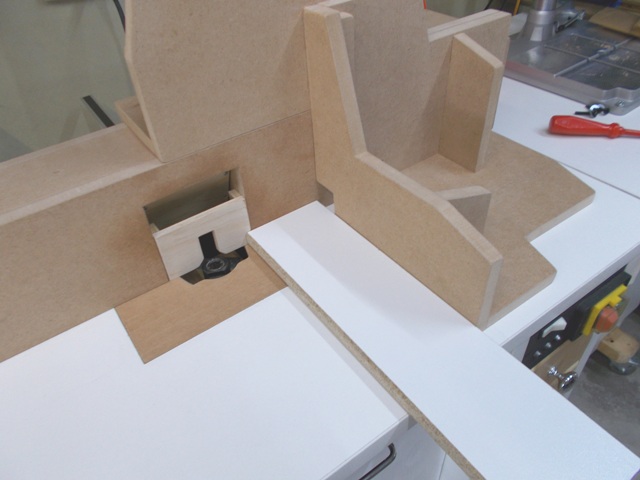
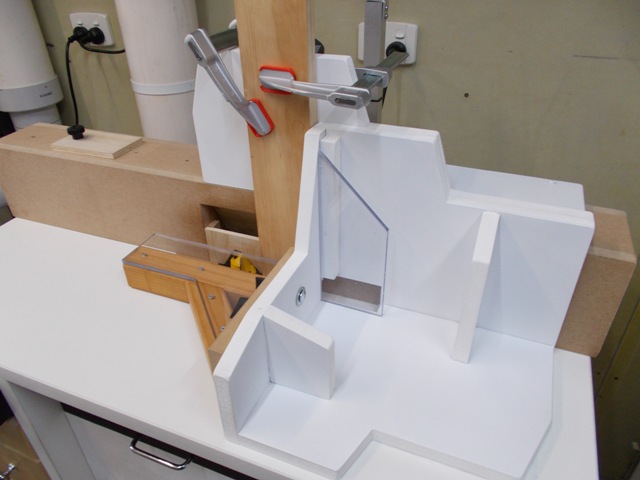
A jig for Lock Mitre joints and other RT work.
I needed a jig to handle vertical and cross cut on small width timber when making Lock Mitre joins etc. The Jig has to be totally independent of any mitre slot and referenced only to the fence. I've just finished the main part of the jig so here are a few pictures to give an idea of what I was aiming for. Like the rest of this new fence design and build it still has to be sanded sealed and finished.
Fence slide, back and bottom of the jig: The slide that fits over the fence has has an adjustable clearance block for a getting a perfect fit - in case anything changes.

Jig on it's side.
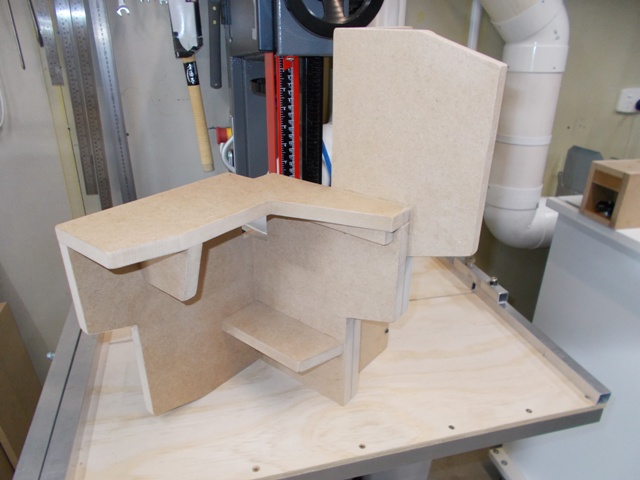
Looking at the jig from the front, Optical illusion - the tall extension part to the jig actually starts over half way up the front face of the jig.
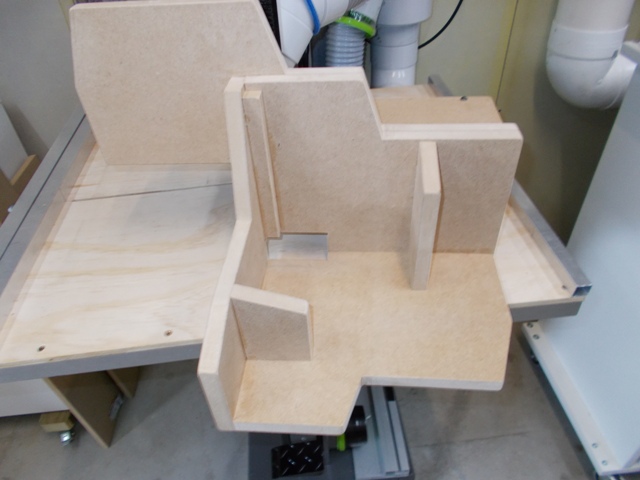
Fitted to the fence, the jig just slots over the main fence.
The End stop for the jig screws into one of the 8 locating T-Nuts built into the main fence.
The high backing plate on the slide is used to clamp tall narrow vertical pieces to the slide.
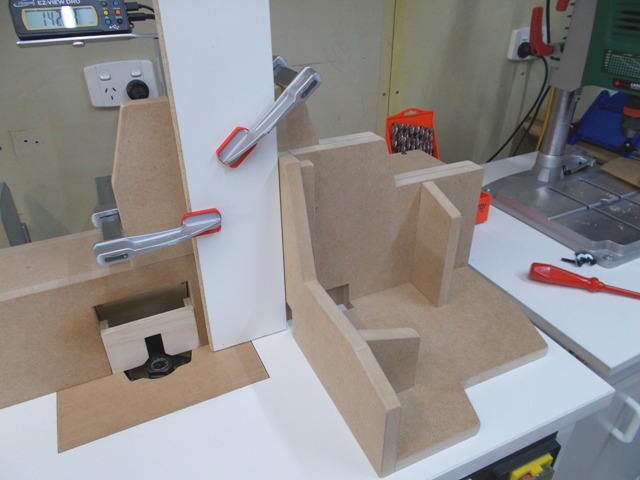
Jig slides smoothly along the fence with no play and accurately tracks the fence.
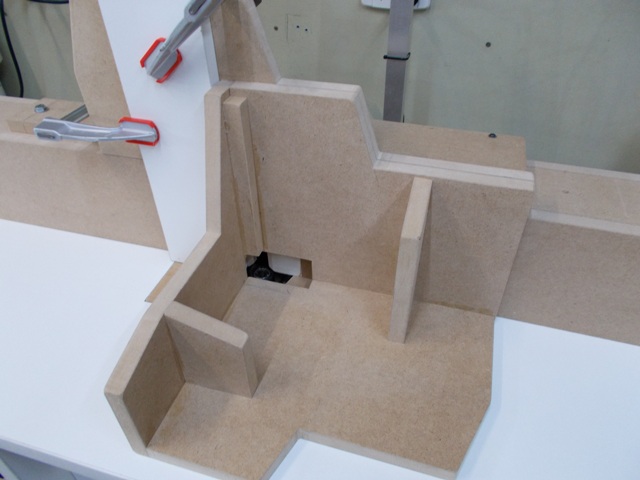
Hitting the End Stop - the end stop halts the jig at the correct position (work piece had cleared the bit) and from cutting past the jigs router bit clearance slot.
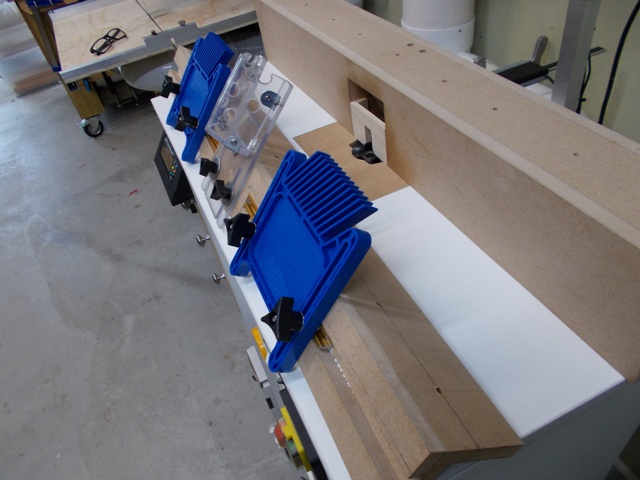
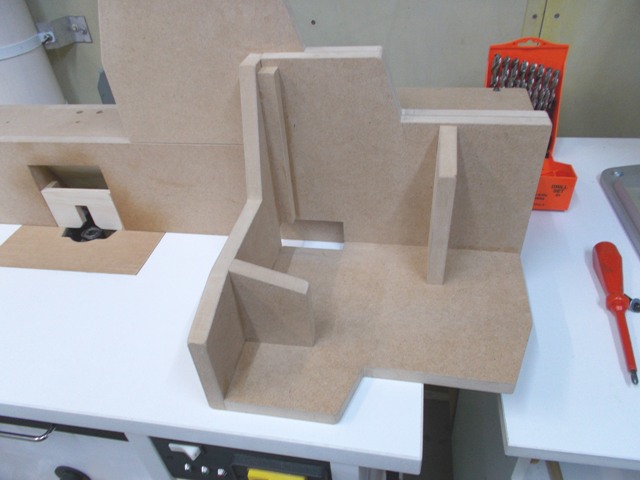
If I wanted to do this.
Narrow work pieces across the bit.
Still to add to the jig:
1: An adjustable guard for both types of routing.
2: A small slide clamp to hold the flat piece (last photo) against the table.
3: A similar adjustable slide to hold the vertical clamped timber against the fence just above the bit. Both will incorporate the Bit safety guards.
I managed to get all work holding surface as square as my set square will indicate. It slides a smooth as silk and takes a second to install or remove, with the exception of the end stop which has to be screwed down, so similar time as adjusting a feather board for that.(1) Our small workshop layout __ (2) Bandsaw circle cutting jig __ (3) Spindle sander modifications __ (4) Dust Sensor
(5) Router table redesigned ____ (6) DC and where it all began __ (7) Bandsaw dust extraction build
-
9th January 2018, 04:49 PM #63
Supporting my wife's hobby.
- Join Date
- Nov 2013
- Location
- Caboolture QLD AU
- Posts
- 781
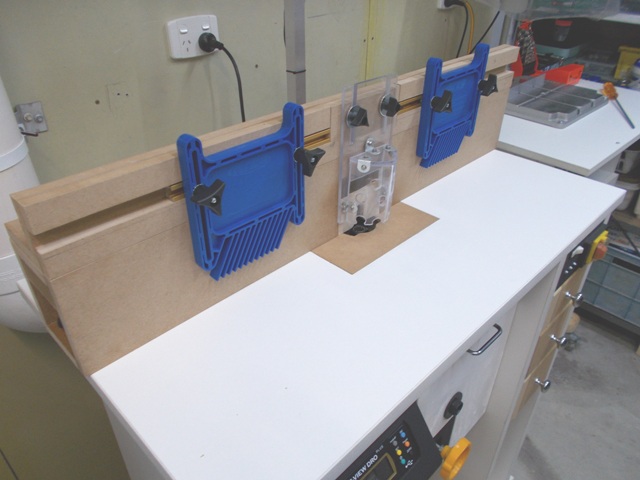
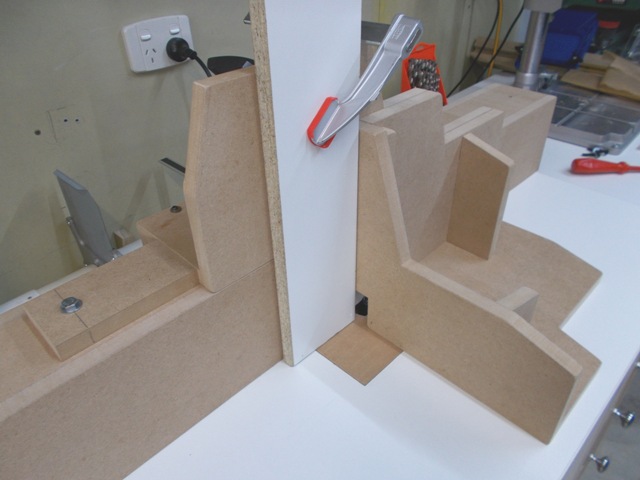
Tiny update of the Jig sanded and painted.
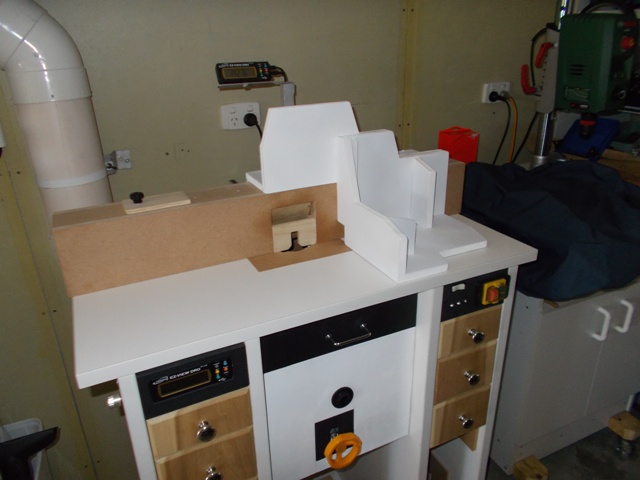
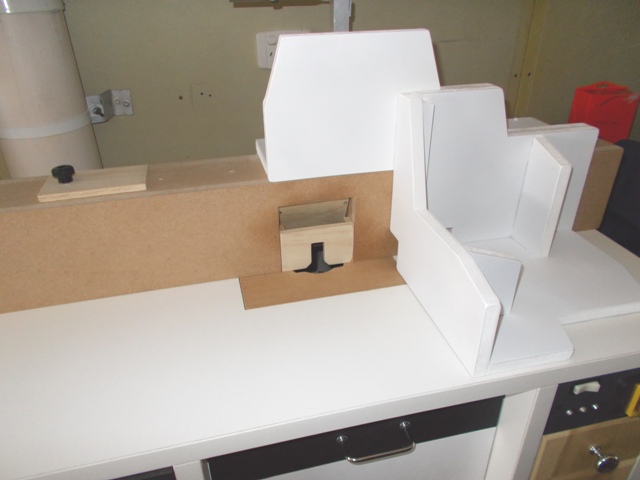
The main fence will be the last to be finished as various jigs are tried and built around it.
Standard jig sealed and almost finished.
 (1) Our small workshop layout __ (2) Bandsaw circle cutting jig __ (3) Spindle sander modifications __ (4) Dust Sensor
(5) Router table redesigned ____ (6) DC and where it all began __ (7) Bandsaw dust extraction build
-
10th January 2018, 12:39 PM #64
GOLD MEMBER
- Join Date
- Jun 2005
- Location
- Helensburgh
- Posts
- 7,696
I found this, being electronic illiterate I don't know if it helps....ArduLift - DIY Arduino controlled Router Lift Originally Posted by MandJ

You will have to log in to view the pictures.CHRIS
-
10th January 2018, 08:37 PM #65
Supporting my wife's hobby.
- Join Date
- Nov 2013
- Location
- Caboolture QLD AU
- Posts
- 781
Thanks for the link, I was just looking at CNC parts the other day, similar to the parts used in the link for making the lift. I've been designing interfaces and writing stepper motor code for as long as I can remember so that's the simple part for me, and I have a nice stepper motor ready for the task, it's one of the plans I have for the table, just deciding which way to go.
Mike.(1) Our small workshop layout __ (2) Bandsaw circle cutting jig __ (3) Spindle sander modifications __ (4) Dust Sensor
(5) Router table redesigned ____ (6) DC and where it all began __ (7) Bandsaw dust extraction build
-
10th January 2018, 08:54 PM #66
Supporting my wife's hobby.
- Join Date
- Nov 2013
- Location
- Caboolture QLD AU
- Posts
- 781
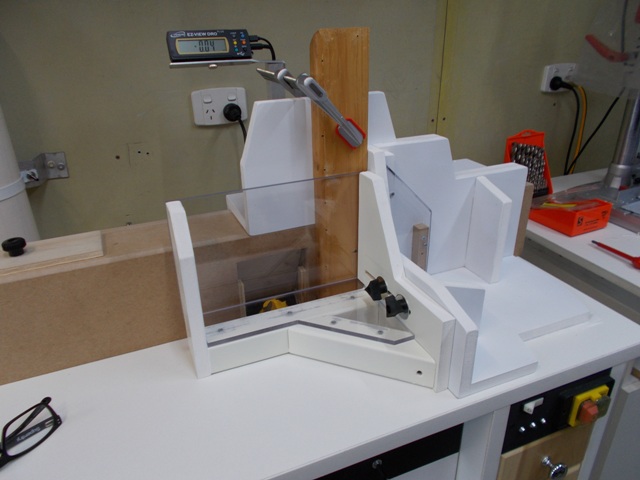
Rough lash up of the dual purpose adjustable bit guard + lower clamp, removes any chance of the work piece flexing away from the bit and gives a clear view of the work piece at the base.
The clear part is 6 mm polycarbonate, it's incredibly strong and rigid and also works beautifully as the lower clamp, just tested and it's rock solid. I went over kill on the clamp frame but swinging a big heavy bit can generate a lot of torque if there is a grab for some reason, I din't want the clamp to twist or break.

Same 6 mm poly protecting the bit clearance slot. As before, the complete jig slides as smooth as.
Now to make one for the horizontal work pieces.(1) Our small workshop layout __ (2) Bandsaw circle cutting jig __ (3) Spindle sander modifications __ (4) Dust Sensor
(5) Router table redesigned ____ (6) DC and where it all began __ (7) Bandsaw dust extraction build
-
11th January 2018, 04:18 PM #67
Supporting my wife's hobby.
- Join Date
- Nov 2013
- Location
- Caboolture QLD AU
- Posts
- 781
Completed the vertical part of the guard and finished the jig.
 (1) Our small workshop layout __ (2) Bandsaw circle cutting jig __ (3) Spindle sander modifications __ (4) Dust Sensor
(5) Router table redesigned ____ (6) DC and where it all began __ (7) Bandsaw dust extraction build
-
11th June 2018, 09:21 PM #68
GOLD MEMBER
- Join Date
- Jun 2005
- Location
- Helensburgh
- Posts
- 7,696
After having a bit of a chat with the OP MandJ I have decided to resurrect this thread as it carries on from the original build and takes it where MandJ the OP wants to go and that is to remove the router and lift and replace that with a CNC spindle mounted on two rails along the lines of this

The whole point of doing this is to mount the spindle in a way that it is not attached to the top. This does a number of things such as making the top so it can be hinged for access to the stuff inside and to change router bits. Doing that means the the total travel of the router need not be more than 100mm and lifting the top to change bits will be a lot quicker than either winding it up so the chuck clears the table. A similar set up is shown here...

Taken from this page https://www.popularwoodworking.com/p...de-router-lift
Using a CNC will allow variable speed control via a remote control panel with the VFD in the cabinet and the big plus it will allow braking to stop the router quickly. I have yet to buy the spindle but I think this one looks to be ok....
https://www.ebay.com.au/itm/CNC-2-2K...97.m4902.l9144
It comes with a full set of ER collets and I can buy some imperial ones to suit common router bits.
This might not go as fast as I would like as I have recently had a few hand problems that are going to take many months to overcome but I have to start somewhere even if it only to dream about building it. I also have not finalised whether to put it into my sliding table saw or not and that of course would have a big impact on the whole thing. We discussed using a CNC spindle in this thread and that thread has some really cool router tables linked in it..
Router MotorCHRIS
-
11th June 2018, 10:55 PM #69
Woodworking mechanic
- Join Date
- Jan 2014
- Location
- Sydney Upper North Shore
- Posts
- 4,469
While i�m using a router and not a spindle, I hope to get mine in the table in the next lot of holidays.
All the electronics and programming is sorted, it�s just mounting. As you say, 100mm is what I worked out so I�ve got some shortening of rails to do
Will you be using an alloy frame or timber?
-
11th June 2018, 10:59 PM #70
GOLD MEMBER
- Join Date
- Jun 2005
- Location
- Helensburgh
- Posts
- 7,696
Frame as in frame for the cabinet?
CHRIS
-
12th June 2018, 08:04 AM #71
Woodworking mechanic
- Join Date
- Jan 2014
- Location
- Sydney Upper North Shore
- Posts
- 4,469
Frame as in frame for the lift rails, mounting block, stepper etc.
-
12th June 2018, 11:10 AM #72
GOLD MEMBER
- Join Date
- Jun 2005
- Location
- Helensburgh
- Posts
- 7,696
I would prefer to do it in Aluminium IF I can find a supplier of small quantaties I need. I am going to have a scout around for a fabricator and hopefully find some off cuts. If not I will do it out of flooring, nice and stable or as stable as something resembling wood ever gets. My main problem in doing this is the electronics, I don't do electrons at any level.
CHRIS
-
12th June 2018, 12:14 PM #73
Supporting my wife's hobby.
- Join Date
- Nov 2013
- Location
- Caboolture QLD AU
- Posts
- 781
In my case the plan is to make a simple braced frame from aluminium square tube, the frame will fit the inside dimensions of the current router compartment. Even though I've substantially braced that enclosure, I feel that the aluminium frame will tie the two vertical mounted side Linear Bearing Rails and the lift mechanism together and eliminate any possible flex or movement in the enclosure.
The hinged top is the way to go, more so in my case to give ease of access to the CNC and lift mechanism compartment and the electronics that will be in top compartments either side of the router / CNC enclosure, similar to the table build and layout in this thread.
I'm still debating on whether to use a linear actuator for the lift or a Stepper and screw. Some of the actuators have extremely fine movement, zero backlash and can hold substantial loads, and can run very fast when raising / lowering the CNC for bit changes.
After playing around with these low cost linear bearing rails I've found they can be used to greatly simplify those large jigs I built for testing, they allow the jigs to be made smaller but just as robust with respect to flex and tracking. They also open the way for a really simple means of having the fence move and track accurately and smoothly, allowing a fence DRO to be mounted at one end of the table and below the table surface. Everything becomes neat and way more professional.
Like a lot of others I've been fighting another health battle, so not been able or even felt like getting back into the workshop for nearly six months, hopefully that will change soon, however it will be some time before I can get enough funds for a CNC and VFD, getting certain health problems is VERY expensive. However I do have the linear rails to experiment with the other ideas mentioned, I�ll get those mods done and work towards the final CNC spindle update in the future.
Chris, looking forward to your findings and thoughts with the CNC and your project build, I'm happy to help out with any electronic questions, ideas or building of same if you need it.
Mike.(1) Our small workshop layout __ (2) Bandsaw circle cutting jig __ (3) Spindle sander modifications __ (4) Dust Sensor
(5) Router table redesigned ____ (6) DC and where it all began __ (7) Bandsaw dust extraction build
-
12th June 2018, 12:59 PM #74
GOLD MEMBER
- Join Date
- Jun 2005
- Location
- Helensburgh
- Posts
- 7,696
Thanks for your thoughts Mike and the offer to help as it avoids me putting you on the spot when I ask! I have two complete sets of rails, one I will use for the lift and one I will use to mount the fence on, the drive for the fence will be centrally attached so it has no tendency to skew. Doing this just about eliminates putting it in the tables saw as the fence rails will be below the table top surface.
CHRIS
-
12th June 2018, 02:25 PM #75
Member
- Join Date
- Mar 2018
- Location
- Melbourne, Australia
- Age
- 70
- Posts
- 80
This isn't a router table it's a work of art, it gives me an "I am not worthy" moment.


 Reply With Quote

Similar Threads
-
Router table - Build or buy?
By Dazm in forum ROUTING FORUMReplies: 9Last Post: 12th November 2015, 11:35 AM -
New router table build - no really!
By snowyskiesau in forum ROUTING FORUMReplies: 24Last Post: 14th November 2013, 08:02 AM -
New router table build
By snowyskiesau in forum ROUTING FORUMReplies: 12Last Post: 27th May 2012, 01:35 PM -
Another router table build.
By Nihilist37 in forum ROUTING FORUMReplies: 2Last Post: 31st May 2009, 07:30 PM -
Want to build a table for router and cms
By Guy in forum HAND TOOLS - POWEREDReplies: 3Last Post: 23rd June 2004, 12:31 AM
