

 Thanks:
  Likes:
  Needs Pictures:
  Picture(s) thanks:
Results 1 to 15 of 20
-
26th January 2014, 10:41 PM #1
 Quantum materiae materietur marmota monax si marmo


- Join Date
- Jan 2009
- Location
- Bathurst NSW
- Age
- 55
- Posts
- 512
 Blast gate position and three 4" outlets from one 6"
Hello
Just wanted to confirm my thoughts on blast gate positioning is correct
PIPE LAYOUT.jpg
I will cap the end of the run after the bandsaw but wanted to put the gates in for future expansion.
Does anyone have patterns or advice for a dummy on getting three 4" outlets from one 6". I read somewhere to use a couple of WYE's and other fittings, but it looks messy and fairly expensive. I was thinking of making something, but can't work out how to make the cuts to make it. Along the lines of this
3 way.jpg
ThanksLast edited by ozhunter; 26th January 2014 at 10:43 PM. Reason: carnt spel fro nutts
If you find you have dug yourself a hole, the first thing to do is stop digging.
I just finished child-proofing our house - but they still get inside.
-
26th January 2014 10:41 PM # ADSGoogle Adsense Advertisement
- Join Date
- Always
- Location
- Advertising world
- Age
- 2010
- Posts
- Many
-
26th January 2014, 10:53 PM #2
 ... and this too shall pass away ...
- Join Date
- May 2012
- Location
- Brisbane (Chermside)
- Age
- 71
- Posts
- 2,084
Did a similar thing for my old 14 inch bandsaw.
The 6 inch pipe was positioned over the 4 inch port in the back of the cabinet. Then two new 4 inch outlets were created in the sides of the six inch pipe.
First, two pieces of four inch pipe were cut to 45 degrees. I thermo-moulded a flange on the angled ends (dip into hot oil and push down onto a cutting board). Then two undersized holes were cut into the six inch pipe with a jigsaw. The edges of these holes were heated with a heat gun. Once the pipe was soft, the new 4 inch port was pushed through the hot hole from the inside. Once the new 4 inch port was in position and I was happy the inside of the pipe was reasonably smooth the pipe was cooled with water. Finally, the new 4 inch port was held in place with silicone and four short self tappers.
Using this approach you can put the 4 inch ports wherever you want them.
-
26th January 2014, 10:56 PM #3
.
- Join Date
- Feb 2006
- Location
- Perth
- Posts
- 27,792
I used a 150 to 100 mm Y. I used a "Level Inverter" to convert the 150 mm to 100mm, and cut a hole in the Y and welded a third 100 mm PVC arm to it.
I just winged the cutting but there are patterns and programs out there that will do this precisely if you wish.
.
-
26th January 2014, 11:57 PM #4
... and this too shall pass away ...
- Join Date
- May 2012
- Location
- Brisbane (Chermside)
- Age
- 71
- Posts
- 2,084
Good grief ... plastic welding. Originally Posted by BobL

Haven't done that since I was a boy apprentice ... which was not recently.
-
27th January 2014, 11:45 AM #5
SENIOR MEMBER
- Join Date
- Aug 2008
- Location
- Brisbane (Macleay Is)
- Posts
- 271
Hi BobL
What is a "Level Inverter" and where do you get them?
are they a standard plumbing fitting?
Do they come in other sizes e.g. 150 to 125mm?
Ron
-
27th January 2014, 01:14 PM #6
.
- Join Date
- Feb 2006
- Location
- Perth
- Posts
- 27,792
Level inverters are another name for a non-symmetrical "reducer" used in standard storm water and Sewage (DWV) fittings Originally Posted by ronboult
This is what they look like
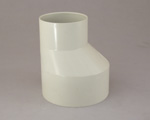
Here is the typical ranges of sizes
STORMWATER FITTINGS - LEVEL INVERT - Perth Irrigation - Retic Fittings , Plumbing Fittings, Reticulation Supplies, Western Australia
125 mm is non standard for these pipe so I doubt that they are available in this size.
-
27th January 2014, 01:49 PM #7
SENIOR MEMBER
- Join Date
- Aug 2008
- Location
- Brisbane (Macleay Is)
- Posts
- 271
Thanks BobL
I had guessed that 150 to 125 was a no goer.
I have also tried to get a 150 Y with a 125 or 100 side arm with no luck. Total Eden does not seem to stock them.
Can you remember where you bought yours?
Thanks
Ron
-
27th January 2014, 01:50 PM #8
.
- Join Date
- Feb 2006
- Location
- Perth
- Posts
- 27,792
My first task in the first job I had as a research scientist was to fit out a small demountable as an ultra clean laboratory. Originally Posted by John Samuel
The basic structure was a 3 x 6 m HD demountable with a 1 m wide airlock at one end making the inside of the lab 5 x 3 m
It arrived with no plumbing and a breaker box with 2 breakers (light and power).
When I finished with it, it had 13 breakers (one for lighting and 1 for each of 4 fans, and the rest were independent power circuits)
It had "all plastic" plumbing - 3 PVC sinks, 1200 CFM external air exchange and 1600 CFM internal air filtration.
We purified all our own water and all sorts of nasty acids by distillation in Telfon stills in a chamber at one end of the lab which was vented to the outside.
Entry required full length lab coat, bootees or shoe exchange, hair cover and double layer plastic gloves.
Typically one would spend anywhere from about 15 minutes to 1-2 hours inside at any one time.
Here are a couple of shots of the outside.
The grey box adjacent to the entry was the battery backup for one of the fans to hold a slight overpressure to the lab to enable us to get there to fire up a genset we had readily available in an adjacent building.
What ever the temperature was outside it was some 8-10� warmer inside so when it was 40� outside it was 50� inside and we simply could not work for more than about 15 minutes at one time and we often worked in underwear under our lab coats.
Eventually we had the big 5kW Aircon fitted which knocked 8-10� off the outside temp.Still very warm but not life threatening.
The little window at the end of the building was a view port through to the acid distillation units so we could see how far along the distillation was without having to go inside. Letting the stills run dry meant a major clean up of the still and starting all over again.
This is what it looked like from the inside.
Most of the lab wear (beakers and bottles) you see are telfon (PTFE or PFA)
All that plastic was welded by yours truly.
It took me 10 months at half time to fit it out and then strip it out and paint it.
It had 7 coats of 2 pack epoxy hi-build white. We used to joke that the plywood could be eaten away by
The fume hood at the far end was were most samples were processed.
The Polypropylene walls are false and act as return ducts to recycle the air back to the 99.997% efficient ceiling mounted HEPA filters .
These boxes are made of HDPE - benches and work surfaces were lined with clear teflon film and then cling wrap.
I used 6" black PP pressure pipe for ducting because PVC was deemed too dirty to carry clean air - all the ducting is hidden inside the plastic boxes.
The planned lifetime of the lab was 5 years and it was finally shut down - still operating as intended - after 17 years.
After building this lab I used it for 2 years before moving to the US where I worked in a similar but much bigger lab.
-
27th January 2014, 01:51 PM #9
.
- Join Date
- Feb 2006
- Location
- Perth
- Posts
- 27,792
I got mine from that website in my post above - fortunately for me the physical shop front is about 20 minutes from my place. Originally Posted by ronboult
-
27th January 2014, 01:54 PM #10
SENIOR MEMBER
- Join Date
- May 2011
- Location
- gippsland
- Posts
- 815
At the risk off being shot down, here is a temporary setup I use until I can afford to upgrade machine ports to 6". It allows me to run 3x4" hoses to my bandsaw, it is the 3 way adapter off the 3hp carbatec DE. I used a stud adhesive bucket with the bottom removed to adapt from the odd sized approx 8" DE inlet down to 6". By the way the saw dust is from being lazy and not using the DE for a couple of cuts. Ignore the location of my blast gates I didnt want to cut up my 4" flex for a temporary setup so i just used the lengths I had
SAM_0862.JPGSAM_0861.jpg
regards
joel
-
27th January 2014, 02:07 PM #11
.
- Join Date
- Feb 2006
- Location
- Perth
- Posts
- 27,792
Looks a good temporary fix to me. Originally Posted by shedbound

The main problem with those very short adapters (and many like them that are included on the 2 and 3HP DCs are that they are too angled and the incoming air stream from each inlet will collide each other and create excessive turbulence and reduce the flow.
Slightly better are these 4 way adapters as the entries are less steep but even these have problems as they like the others are often located way too close to the impeller inlet.
4way.jpg
If you can afford it, it is better to use a couple of 150-100 Y's in series.
-
27th January 2014, 02:14 PM #12
SENIOR MEMBER
- Join Date
- Aug 2008
- Location
- Brisbane (Macleay Is)
- Posts
- 271
Hi BobL
The Perth plumbing store had what I require plus a heap of irrigation fittings I was after. Cheap postage to Brisbane as well
Many thanks for the heads up
Ron
-
27th January 2014, 02:17 PM #13
SENIOR MEMBER
- Join Date
- Aug 2008
- Location
- Brisbane (Macleay Is)
- Posts
- 271
Hi ozhunter
Looking at your first diagram I think the first two blast gates in the main line are not required. Blast gates on each branch should serve your purpose
Ron
-
27th January 2014, 02:37 PM #14
.
- Join Date
- Feb 2006
- Location
- Perth
- Posts
- 27,792
Correct Originally Posted by ronboult
-
27th January 2014, 06:58 PM #15
Quantum materiae materietur marmota monax si marmo
- Join Date
- Jan 2009
- Location
- Bathurst NSW
- Age
- 55
- Posts
- 512
Thanks for the comments chaps. If I can get the Wye with the 4" outlet I'll have a go at "winging" the cuts to put another 4" in.
Blast gate comments received and understood.
You had a very interesting and exacting career Bob.
RegardsIf you find you have dug yourself a hole, the first thing to do is stop digging.
I just finished child-proofing our house - but they still get inside.


 Reply With Quote
Similar Threads
-
Combining a wye with a blast gate
By zelk in forum DUST EXTRACTIONReplies: 4Last Post: 18th January 2010, 09:55 AM -
6" ducting with 4" outlets?
By snapman007 in forum DUST EXTRACTIONReplies: 42Last Post: 25th January 2009, 05:09 PM -
Blast gate with 100% efficiency
By Wongo in forum HINTS & TIPSReplies: 10Last Post: 30th June 2005, 11:45 PM -
Blast gates for 6" PVC ducting
By rev in forum DUST EXTRACTIONReplies: 30Last Post: 3rd June 2004, 09:50 PM -
Blast Gate
By ozwinner in forum DUST EXTRACTIONReplies: 5Last Post: 9th May 2004, 07:12 PM
