

 Thanks:
  Likes:
  Needs Pictures:
  Picture(s) thanks:
Results 16 to 30 of 38
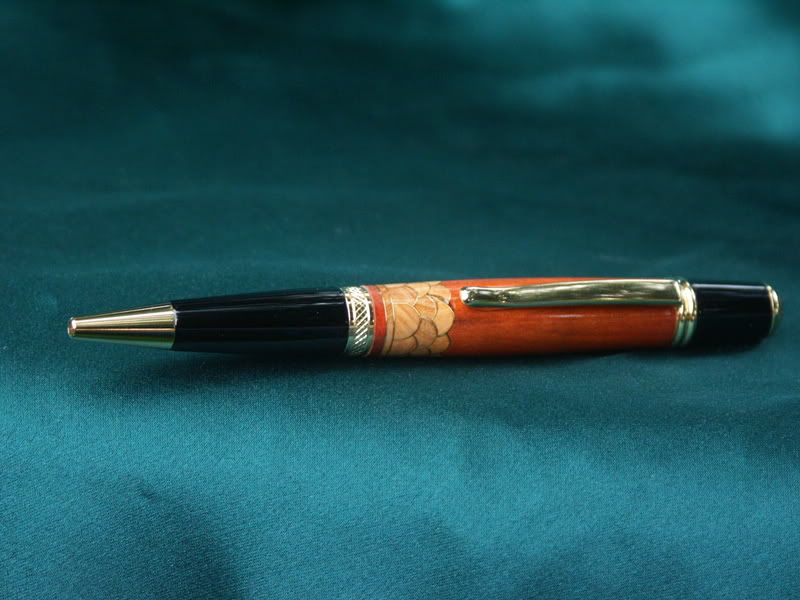
Thread: Celtic brass
-
20th January 2009, 09:46 PM #16
 SENIOR MEMBER


- Join Date
- Nov 2008
- Location
- Houston Texas USA
- Age
- 65
- Posts
- 839

Patrick,
Look here for the jig used to cut it...nothing more than 4 cuts, each at 45 degrees..
https://www.woodworkforums.com/f207/ambonia-celtic-knot-jig-cut-87801
if you liked the brass "knot" this should tickle you too...
 Originally Posted by new_guy90

-
20th January 2009 09:46 PM # ADSGoogle Adsense Advertisement
- Join Date
- Always
- Location
- Advertising world
- Age
- 2010
- Posts
- Many
-
20th January 2009, 11:16 PM #17
SENIOR MEMBER
- Join Date
- Sep 2008
- Location
- Queensland
- Posts
- 741
edblysard after thinking about it all day, reading the tutorial and everyones help i finally get how you guys went about the cuts .......what i was thinking before was if you make 2 cuts on opposite sides, drill through the 2 sides that were not cut and fill it with dowel then it should make 2 crosses and 2 eyes ..........anyway your pens look great
 thanks for showing me these ideas
Patrick
-
21st January 2009, 12:38 AM #18
Sum ergo cogito (Cogito)
- Join Date
- Oct 2006
- Location
- Tallahassee FL USA
- Age
- 82
- Posts
- 4,650
This is about as basic as it gets: http://www.woodworkforums.ubeaut.com...ad.php?t=16781
Cheers,
JoeOf course truth is stranger than fiction.
Fiction has to make sense. - Mark Twain
-
21st January 2009, 01:36 AM #19
SENIOR MEMBER
- Join Date
- Oct 2008
- Location
- new jersey
- Posts
- 531
Ed
You have the knot thing worked out real well. Very nice work on this one also. Have a few questions. The inlay, is that actually a sandwich of 2 pieces of brass and a piece of corian??? What saw blade are you using for your inlays??? What glue did you use to glue alll this together??? How did it turn when you got it on the lathe??? Do you mkae all the cuts first and then drill and where do you drill, lathe or drill press??? Thanks for the replys.
-
21st January 2009, 06:46 AM #20
SENIOR MEMBER
- Join Date
- Jun 2003
- Location
- queensland
- Age
- 77
- Posts
- 1,069
-
21st January 2009, 08:11 AM #21
SENIOR MEMBER
- Join Date
- Nov 2008
- Location
- Houston Texas USA
- Age
- 65
- Posts
- 839
I will post some photos in a while...
Originally Posted by JTTHECLOCKMAN
-
21st January 2009, 09:06 AM #22
SENIOR MEMBER
- Join Date
- Nov 2008
- Location
- Houston Texas USA
- Age
- 65
- Posts
- 839
Ok,
I will do this in a couple of posting so as not to give the forum server a headache.
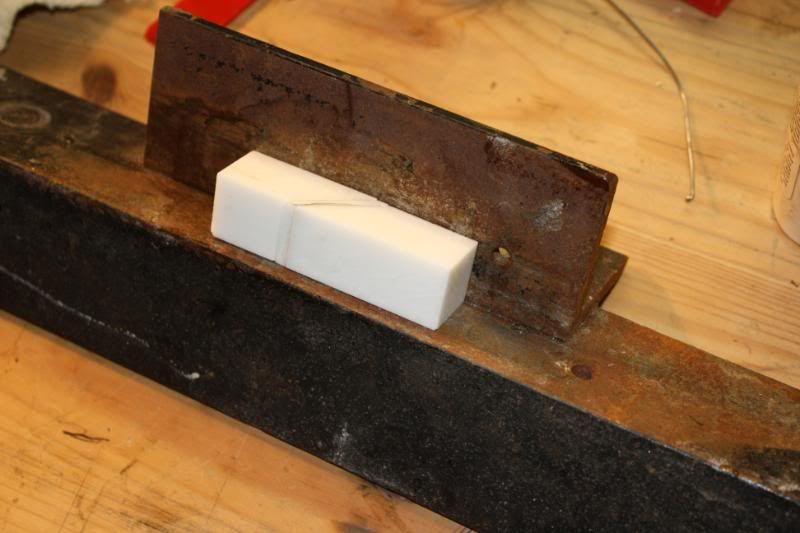
First photo shows cutting off the insert, note the witness mark it is 2/32 cut off.
Adding the 2 brass shim brings the insert up to 3/32 the kerf width of my Freud blade.
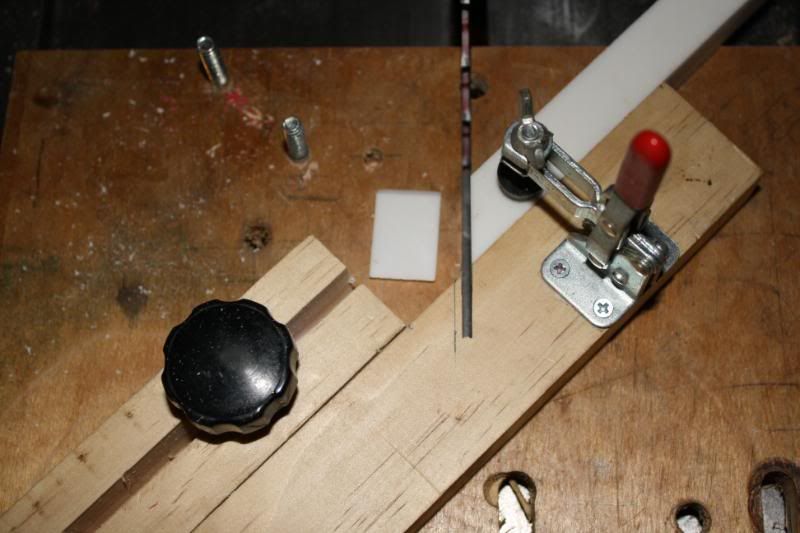
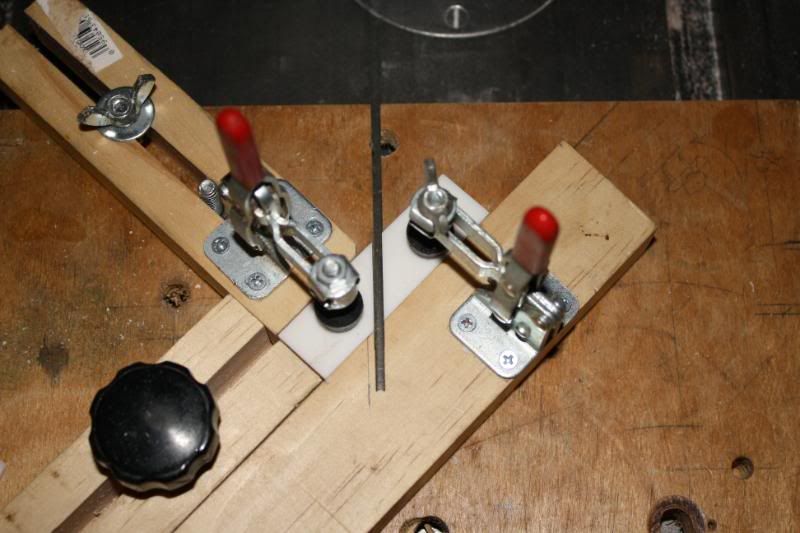
Photo 2 shows the jig and the first cut in the blank.
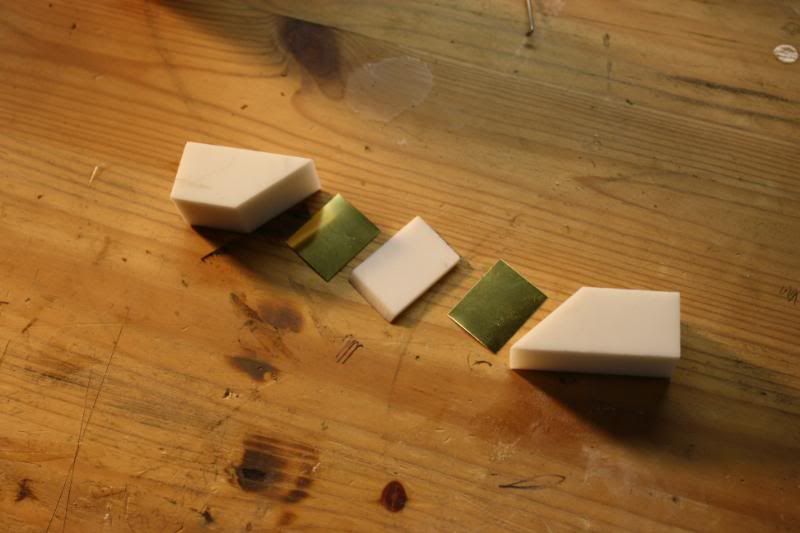
Photo 3 shows all the parts laid out for the first glue up scruff the brass with sandpaper and wipe with lacquer thinner brass is lacquered at the mill to prevent tarnish; the lacquer will prevent the glue from holding.
Photo 4 shows my high tech glue up jig 2 pieces of angel iron bolted together by the way, CA glue does not like to stick to steel, so all that is needed to un glue the blank for this jig afterwards is a light tap on one end, it will simply pop off.Last edited by edblysard; 21st January 2009 at 11:04 AM. Reason: adjust photo
-
21st January 2009, 09:18 AM #23
SENIOR MEMBER
- Join Date
- Nov 2008
- Location
- Houston Texas USA
- Age
- 65
- Posts
- 839
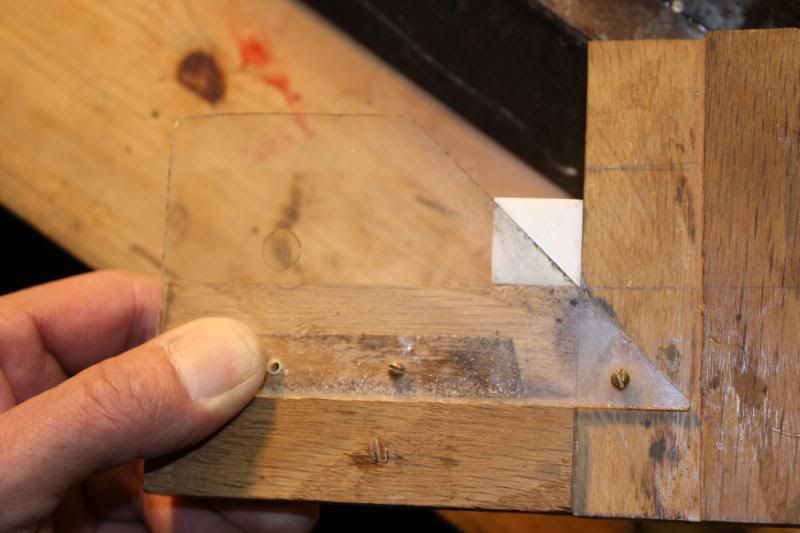
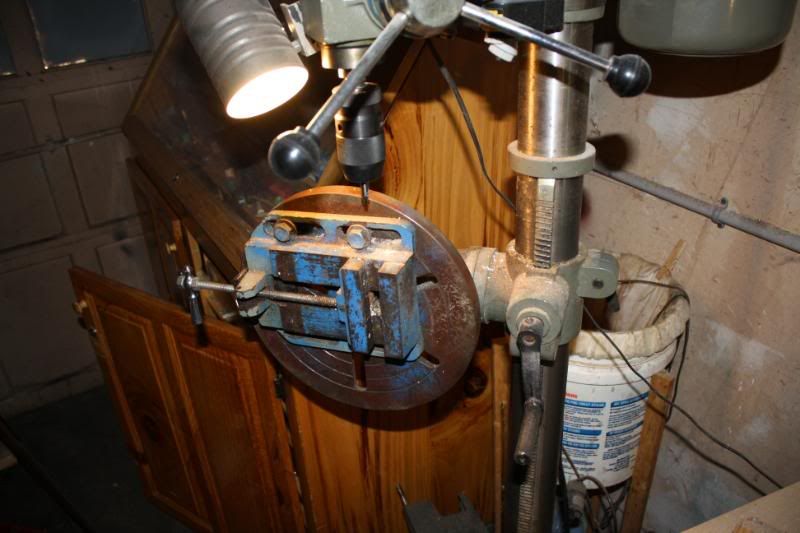
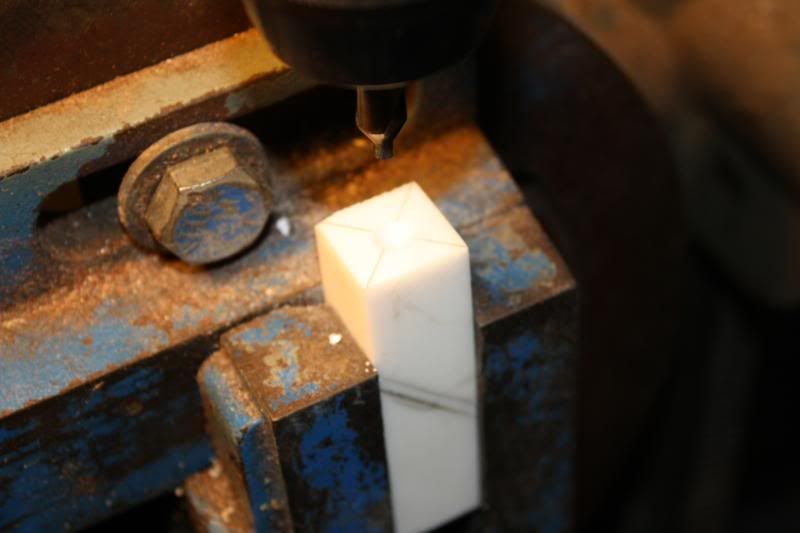
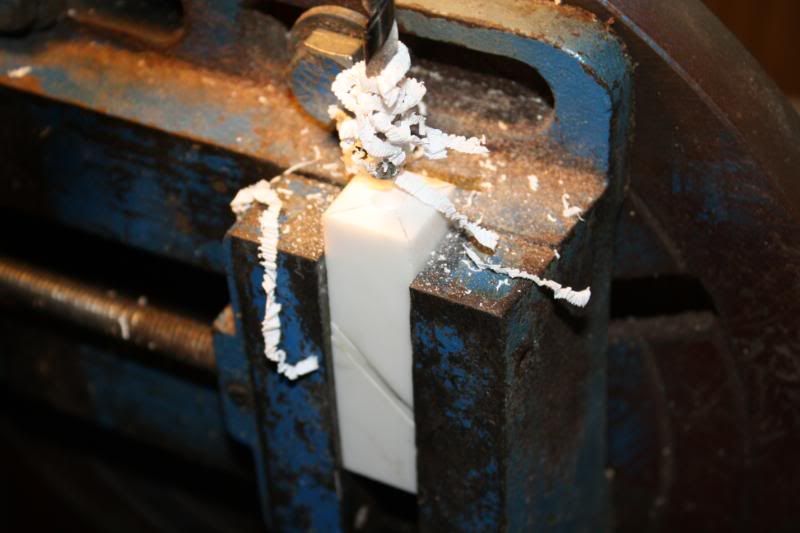

Photo 1 my high tech center finder, photo 2 drill press set up adjustable on 3 axis.
Photo 3 & 4 show the ends drilled,,,3 shows a counter 60 degree sink on one end, 4 shows a ¼ hole.
Photo 5 shows the 60 degree to match the live center in the lathe tailstock.Last edited by edblysard; 21st January 2009 at 09:19 AM. Reason: add info
-
21st January 2009, 09:31 AM #24
SENIOR MEMBER
- Join Date
- Nov 2008
- Location
- Houston Texas USA
- Age
- 65
- Posts
- 839
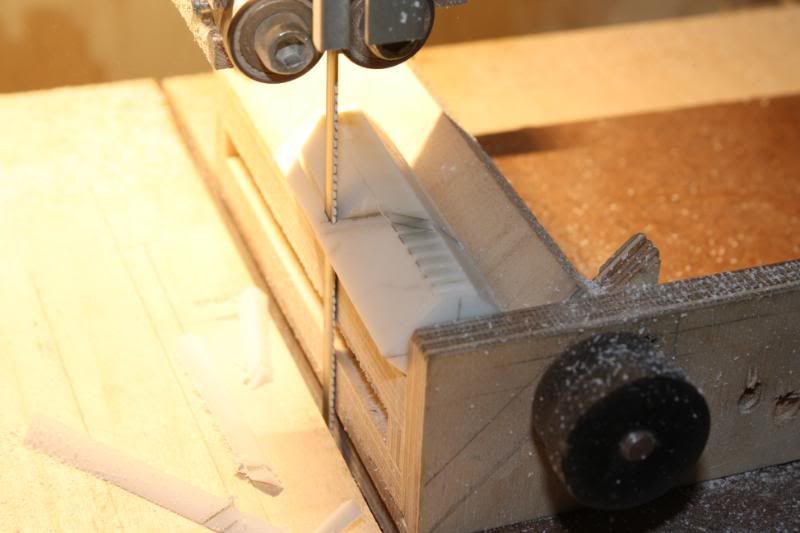
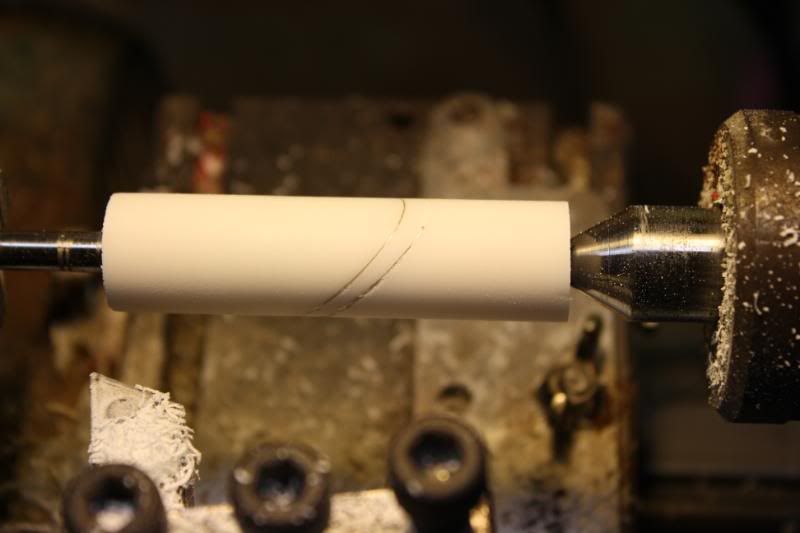
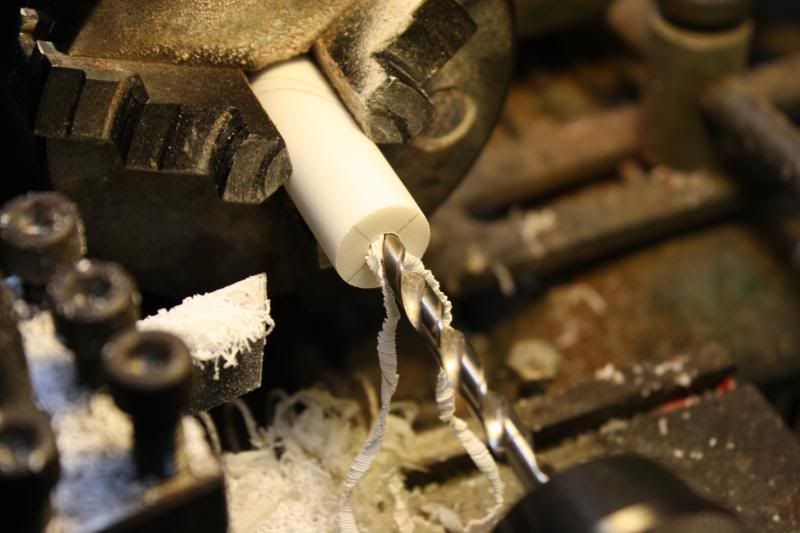
Photo 1 shows my fancy corner cut off rig beats sanding it round and a lot less dust.
Photo 2 shows the blank mounted in the lathe, and yes, that is a 1/4 junk drill bit mounted tail out in the 3 jaw chuck and used as a jam chuck.
Simply tighten the tail stock up and this will drive the work quite well, and saves trying to avoid the prongs on a dead center.
Never toss old dull drill bits away, you can always find a use for them, from drives like this to center punches to pen diss-assembly tools.
Now you know why there is a counter sunk hole on one end and a ¼ hole on the other.
Photo 3 shows the drilling process .once you round out the blank, you can chuck it up in the 3 or 4 jaw and drill it because it is already turned on dead center.
Drill a ¼ or 7mm pilot hole through and through, then follow with a 8 mm, then a 9mm, so forth and so on till you have reached the tube size of your choice.
If you are doing a slimline or other 7mm tube kit, simply drill slow and clean out the bit frequently, bigger tubes simply use a step process to get to the size you want after the initial pilot hole is drilled, you are reaming out an existing hole instead of drilling through solid material this keeps the brass from snagging on a drill and tearing out trust me, if you try to drill a 27/64 Sierra hole in one shot you will destroy the blank.
I only did one cut for this demo but once you get the first insert glued in, clean up the off the sides of the blank, flip the blank 90 or 180 degrees, (your choice) and do the second cut you make four cuts and inserts in all, then go to the drill press and drill your mounting holes, knock off the corners, chuck it up and goLast edited by edblysard; 21st January 2009 at 11:06 AM. Reason: spelling add photo
-
21st January 2009, 11:37 AM #25
GOLD MEMBER
- Join Date
- Oct 2006
- Location
- Trinity Beach, Qld.
- Age
- 76
- Posts
- 5,313
Ed, Thanks for walking us through this, and for your time and effort taken to educate those less gifted! like me. Amos
 Greenie for you.
Good, better, best, never let it rest;
Greenie for you.
Good, better, best, never let it rest;
Til your good is better, and your
better, best.
-
21st January 2009, 11:56 AM #26
SENIOR MEMBER
- Join Date
- Nov 2008
- Location
- Houston Texas USA
- Age
- 65
- Posts
- 839
Thats the idea behind the forum, isn't it?
Besides, I really like you Oz folks...you act like Texans, just in another country!
You talk straight, say what you mean, and mean what you say...
-
21st January 2009, 02:23 PM #27
Retired Member
- Join Date
- Nov 2006
- Location
- Bendigo Victoria
- Age
- 80
- Posts
- 16,560
Thanks for putting that info up Ed, it is very much appreciated
From your first remarks I take it that the brass shim is 1/64", ie 2 x brass shims adds 1/32"?
-
21st January 2009, 02:30 PM #28
SENIOR MEMBER
- Join Date
- Oct 2008
- Location
- new jersey
- Posts
- 531
Ed
Pictures tell 1000 words as they say. Thanks for showing it. You make it look easy. Just a follow up when you make your second and third and fourth cuts what are you lining up to???? Is that a special blade you have in your saw??? Thanks.
-
21st January 2009, 02:50 PM #29
SENIOR MEMBER
- Join Date
- Sep 2008
- Location
- Queensland
- Posts
- 741
very nice procedure of how it all works
couldn't help but notice the metal lathe that looks like it comes in very handy  ............wish i had one
Patrick
-
21st January 2009, 03:23 PM #30
SENIOR MEMBER
- Join Date
- Nov 2008
- Location
- Houston Texas USA
- Age
- 65
- Posts
- 839
The jig returns the blank to the same place every time...the piece of wood with the black handle and the slot is a stop...because the insert and brass are the exact thickness as the blade kerf you are not changing the length of the blank whenyou cut, you are simply replacing material.
I make one cut, do the insert, then rotate the blank 90 degrees, (flip it on the next side).
As long as you keep the same end of the blank against the stop, the blade lines up to make the same exact cut on the side facing up in the exact same spot as the previous cut, just on the next side...repeat, then flip to the next side...so forth and so on.
My blade is a 10" Freud Diablo 80 tooth 0 rake comb cut, originaly designed for cutting plywood carcasses for cabinets with little or no laminate tear out...Freud uses carbide and Titanium Nitrate in their teeth, this thing zips through just about anything, it is over 5 years old, has made thousands of cuts through corian, wood, acrylic and aluminun and has never needed sharpening...plus I modified my old table saw with a higher ratio pully and 2 hp motor...the pully on the motor is 1 and 1/2 the diameter of the one on the arbor, so this thing screams...its an old 1950s "craftsman" saw...Sold by Sears, back when it was Sears and Roebuck...craftsman was a style of tools for home workshops, not a trade name back then, Sears didn't begin using "Craftsman" as a trade name till the late 1960s.
Made by Delta/Rockwell, it weighs over 200 lbs, for a "contractor" type saw it is rock solid, all steel and cast iron.
Patrick,
For around $130. American you can get a very good 3 or 4 jaw chuck to fit most wood lathes, Delta, Jet, Rikon, Steel City and General, and the chuck in the tail stock is a Jacobs keyless drill press chuck on a #2 morse taper, $34.00 American...check this sites sponsers for Oz pricing...with a little practice you can use a skew and make round over cuts to within 100th of a inch end to end, so turning the blank round so you can grab it with the 3 jaw is easy even on a wood lathe...I started doing this stuff on a old Delta Midi lathe with skews and scrapers years before I bought the engine lathe.
Bet if you practice a little on some scrap you will find you can make a perfect 3/4" dowel rod that mics out within 100th end to end.
I use the metal or engine lathe most of the time simply because it is set up for pen turning, is precise, and allows me to do almost all the operations needed to turn a pen right on the lathe, on one machine...I havent used a pen end mill in years, rarely use my drill press to drill through blanks...I make almost all my own bushings, my own mandrels, you can cut threads with it, use a tap and die with it...it turns all materials equally well, from corian to wood to acrylic to aluminum and steel, the list goes on and on...it is simply my machine of choice...but most of the pen turnings I do can also be done on a wood lathe with a little planning and adaption.Last edited by edblysard; 21st January 2009 at 03:26 PM. Reason: duh, seplling?


 Reply With Quote


Similar Threads
-
Celtic Knot
By wheelinround in forum WOODTURNING - ORNAMENTAL TURNINGReplies: 13Last Post: 30th December 2008, 03:28 PM -
1st go at Celtic Knots
By Stu in Tokyo in forum WOODTURNING - GENERALReplies: 33Last Post: 4th November 2008, 08:46 AM -
Celtic Knot Sierra
By Sawdust Maker in forum WOODTURNING - PEN TURNINGReplies: 10Last Post: 17th September 2008, 11:37 PM -
NZ Celtic influence
By Andy Mac in forum NOTHING AT ALL TO DO WITH WOODWORKReplies: 1Last Post: 3rd August 2006, 04:56 PM
