

 Thanks: 0
 Likes: 0
 Needs Pictures: 0
 Picture(s) thanks: 0
Results 1 to 15 of 36
Thread: Gold N" Green
-
21st March 2009, 03:17 PM #1
 SENIOR MEMBER


- Join Date
- Nov 2008
- Location
- Houston Texas USA
- Age
- 65
- Posts
- 839
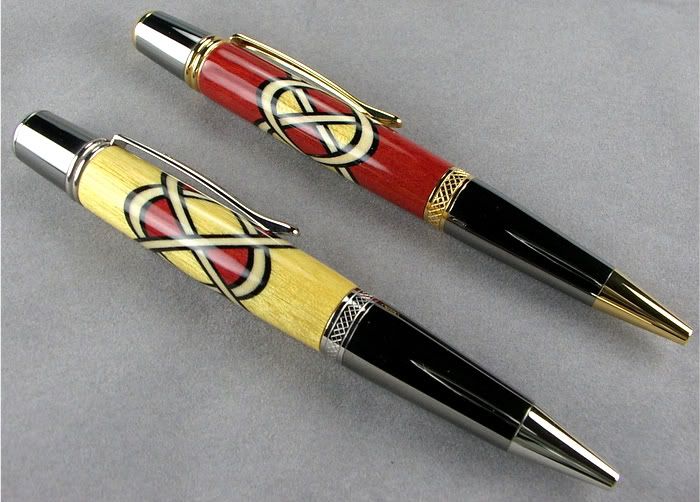
 Gold N" Green
This is picture heavy, because a picture is really worth a thousand words...
So I will break it up into a few seperate postings to keep from over loading the server...
You will be seeing the project as it progresses, no editing here, what is in the photo is what is being assembled.
I wanted to see if I could do a celtic knot in the gold and green of your sports teams colors...it is an attractive color combination, and I choose acrylic as the medium because I could get the colors close.
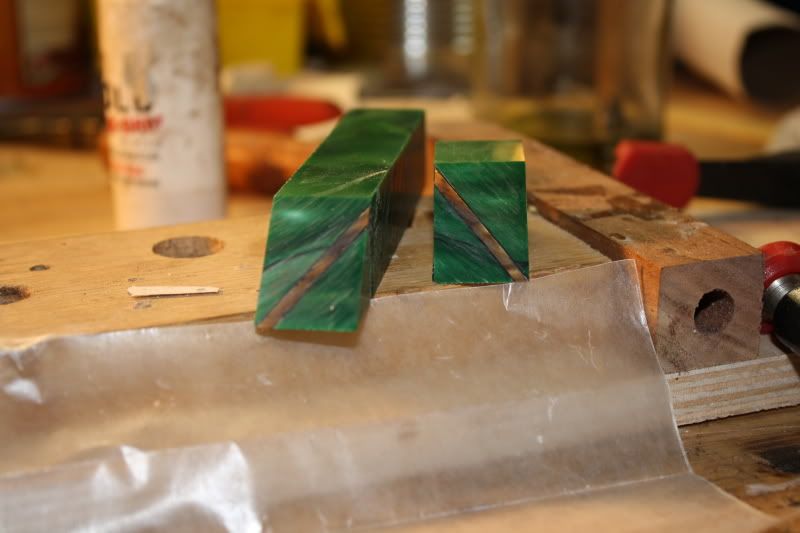
Photo 1
Using my "deli slicer" jig to cut a 5/64th thick insert strip from an gold acrylic blank.
Photo 2
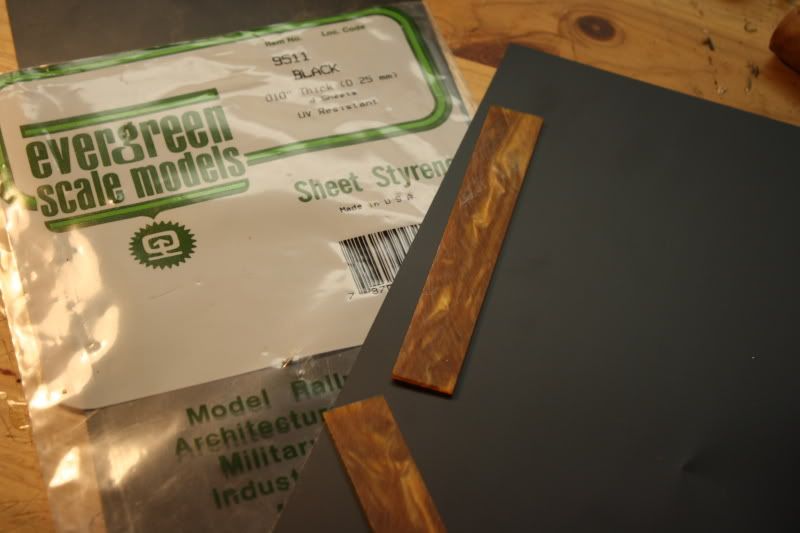
The black sheet stryene used to outline the insert...you will make a laminate sandwich with the strip and the sheet stryene.
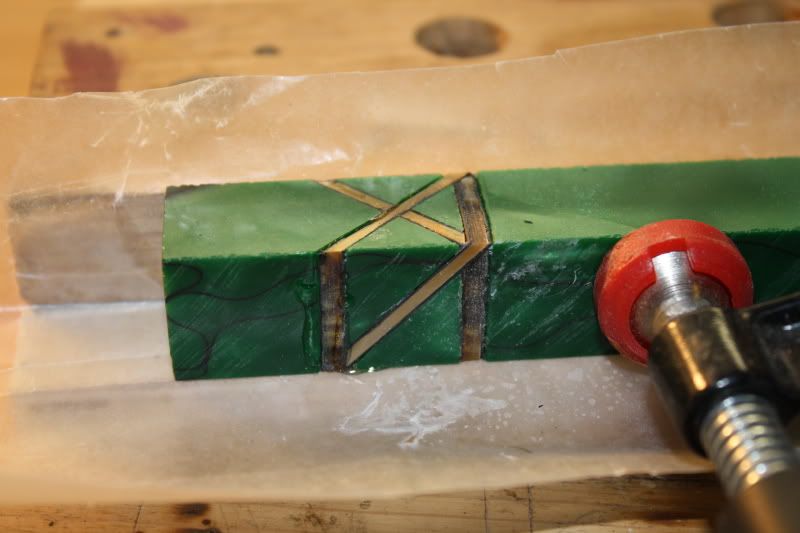
Photo 3
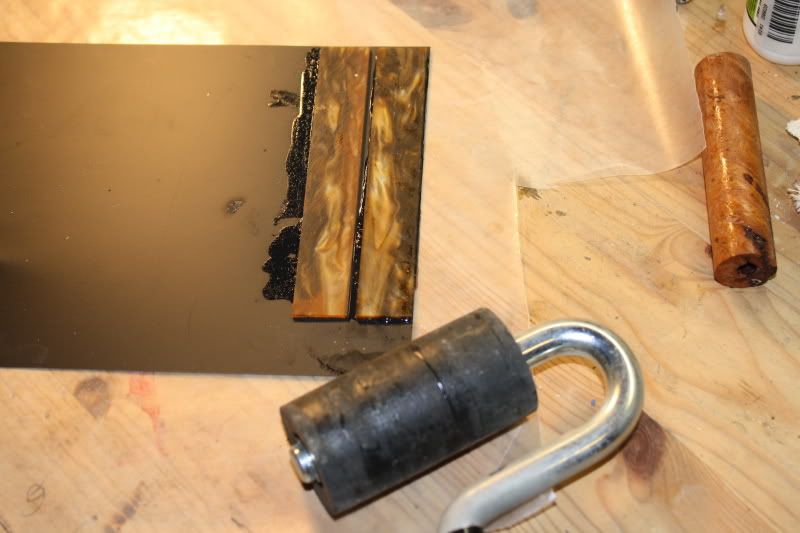
Using medium CA and a laminate roller, glue the strips to a sheet of stryene.
I do 2 strips in case one fails or I like it enough to want to do another pen later.
I use the roller to insure the CA is spread evenly and it applies enough pressure to ensure a good, flat bond with no air bubbles.
Hit the strips with the CA accelerator, then using a hobby or Xacto knife, cut them out of the stryene...flip them over and glue them down again so you have a solid acrylic strip with black stryene on either side, repeat the accelerator and cut them out of the stryene, clean up the edges well and you end up with...
Photo 4
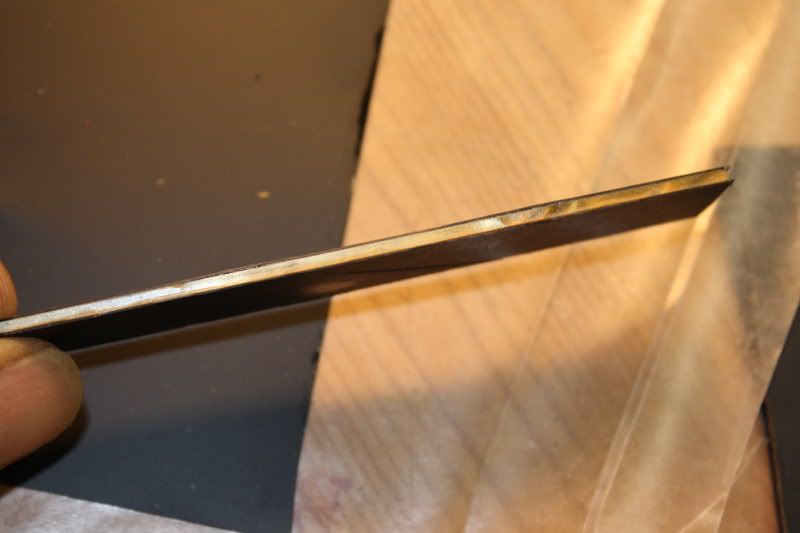
The finished laminate strip, or insert.
-
21st March 2009 03:17 PM # ADSGoogle Adsense Advertisement
- Join Date
- Always
- Location
- Advertising world
- Age
- 2010
- Posts
- Many
-
21st March 2009, 03:32 PM #2
SENIOR MEMBER
- Join Date
- Nov 2008
- Location
- Houston Texas USA
- Age
- 65
- Posts
- 839
Photos 5 & 6
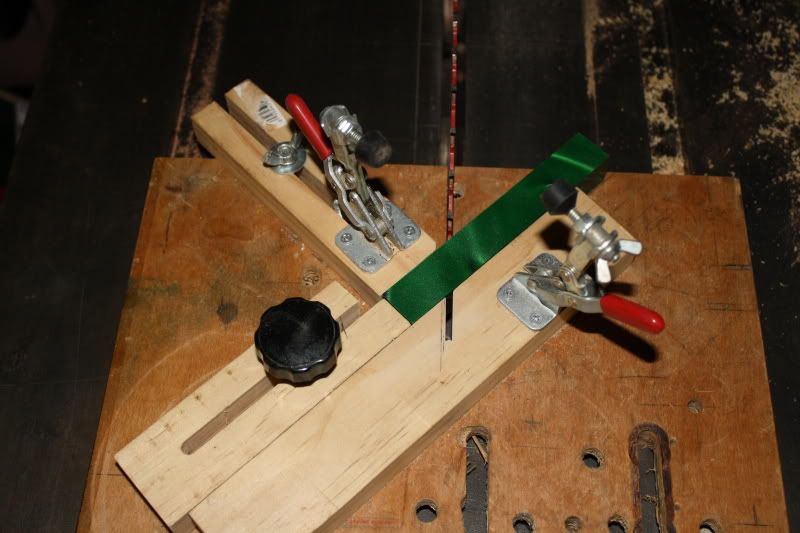
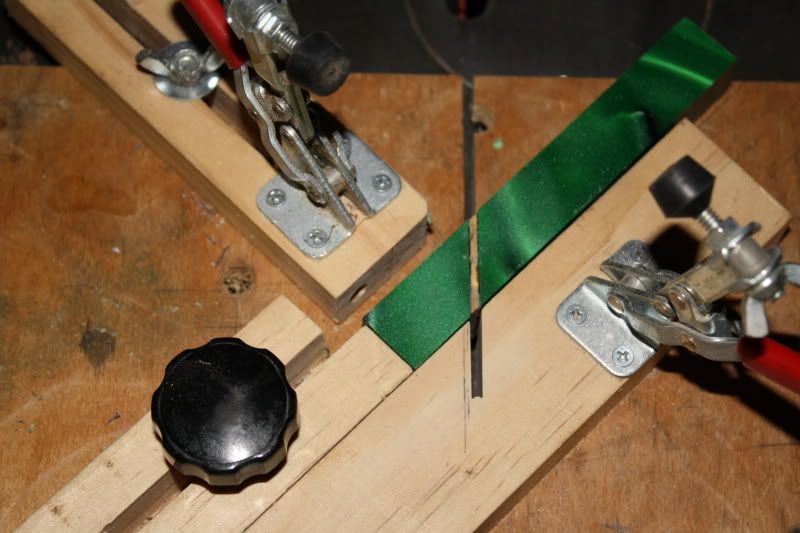
Using my handy "Celtic Knot" blank cutting jig, I cut a 45 degree through and through a blank.
Once you have made the first cut, you can not move the end stop...every cut from here on out must be in the exact same place on the blank, just on different sides.
Photo 6 shows the kerf cut out...the laminate strip is the exact same thickness as the blade kerf, 3/32".
A 5/64ths gold acrylic strip plus two pieces of the black sheet stryene equal 3/32"..I am simply replacing the material removed by the saw blade with a insert of the exact same thickness...in this manner, the blank never changes length, so each subsequent cut will always start at the same point on the blank.
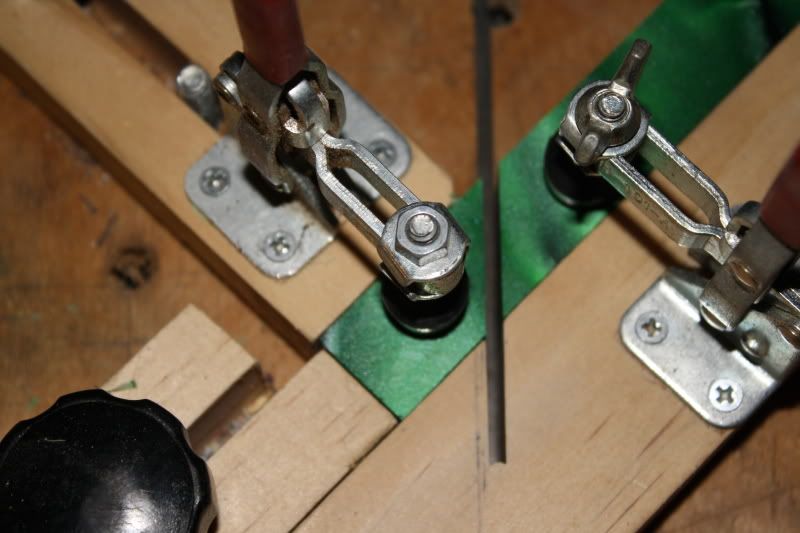
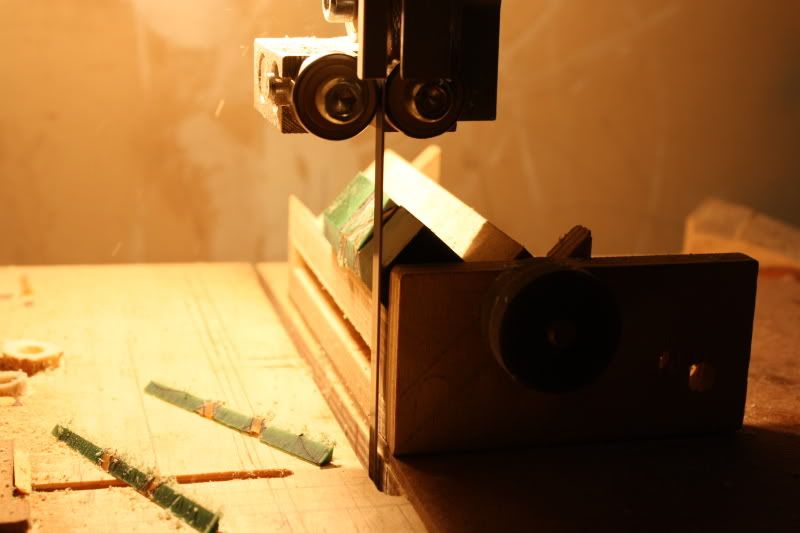
Photo 7
Using one of the ends of the blank to determine the length I want to cut the insert to...the sacrifical fence is at a 45 degree to the bandsaw blade.
You must make sure the blank and the inserts are the same height, (in this instance, they are both 3/4" square, so the strips I cut off earlier from the gold acrylic are the same height as the green blank body.)
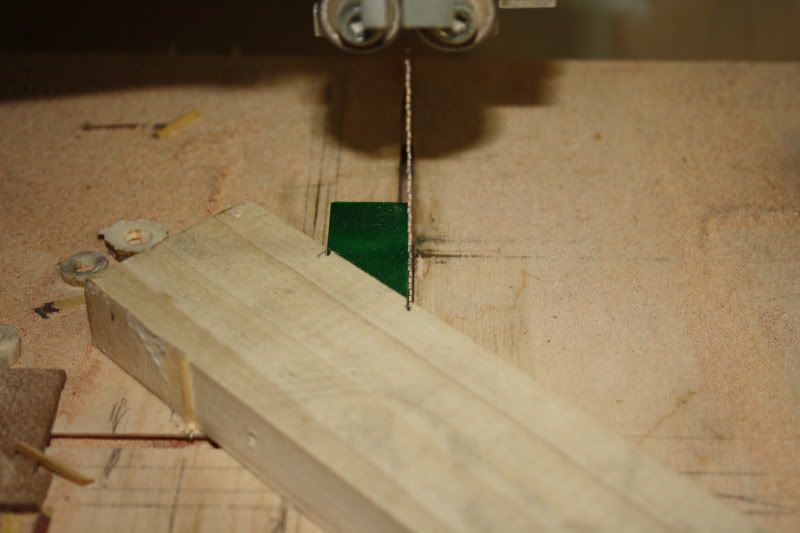
Photo 8
An laminate insert ready to be glued into the blank...I try to make the insert a tad shy of the blank so there is nothing to sand down after the glue up, but remember with each insert you glue in, you must clean the sides of the blank of any squeeze out, so it will fit in the cutting jig square and flat.
Precision and neatness count here...a few 1000ths of an inch off here will show up later when you turn the blank.
Most of you can see where this is headed.Last edited by edblysard; 21st March 2009 at 03:33 PM. Reason: computer cant spell
-
21st March 2009, 03:32 PM #3
Newish Member
- Join Date
- Jul 2004
- Location
- Launceston, Tasmania
- Age
- 58
- Posts
- 315
Had been wondering about the styrene and where to source it.
Thanks for the post.
Mike
-
21st March 2009, 04:07 PM #4
SENIOR MEMBER
- Join Date
- Nov 2008
- Location
- Houston Texas USA
- Age
- 65
- Posts
- 839
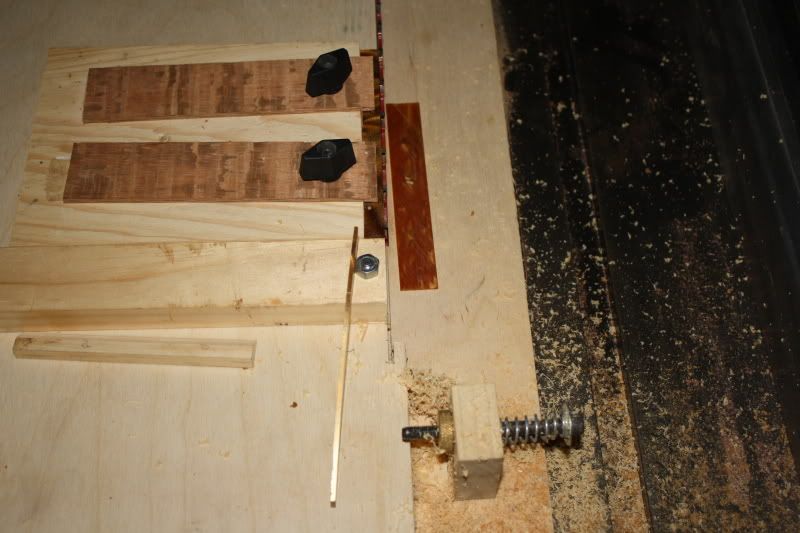
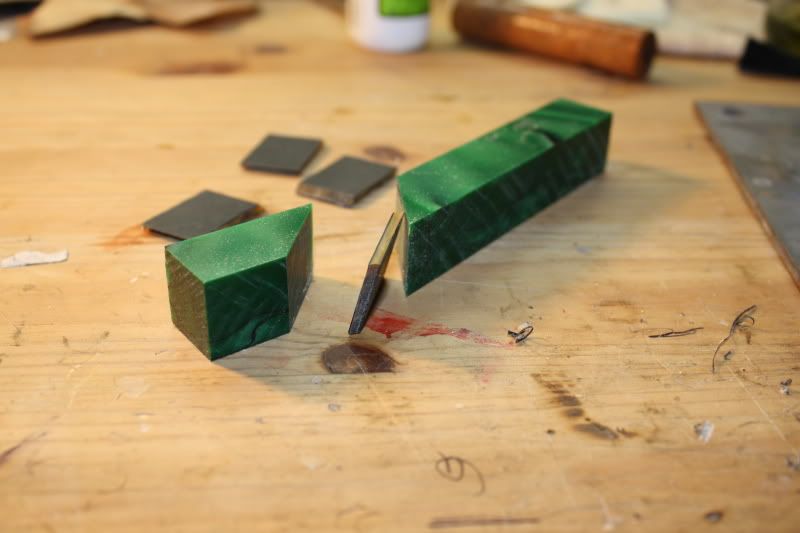
My glue up jip...two pieces of 3/4" thick stock screwed together so they form a 90 degree back fence and platform...the waxed paper keeps the CA from gluing the blank to the jig..(CA dosent stick to waxed paper)
Photo 9 & 10...the clamp holds one part of the blank in place so I can apply pressure on the other end.
The reason I make up the laminate insert sandwich is so you dont have to try and glue two thin strips of stryene and one strip of acrylic (or wood veneer and wood strip) in place all at once...this way you only have to deal with three pieces instead of five.
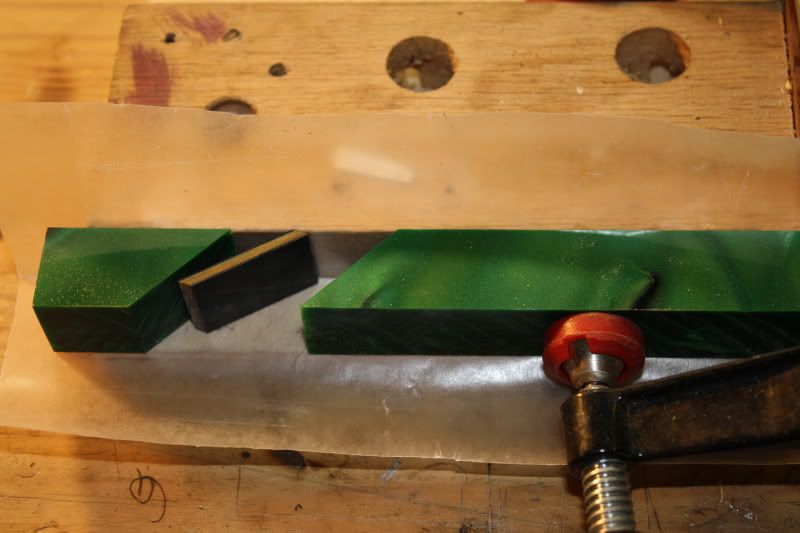
I use medium CA so I have 30 seconds of so to line it all up...the back fence gives me something to press against, and the clamp hold the other end in place so I have one hand free to apply the accelerator, plus it allows me to push against the short end of the blank also to get a good clean square joint.
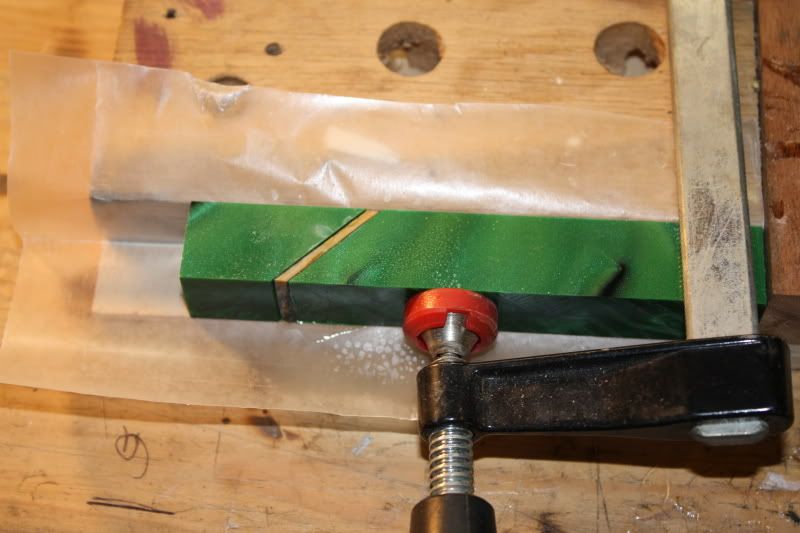
Photo 11
This shows the blank after glue up and cleaning...it is in the same position as when I first cut it, simply to show the insert replacing the saw kerf.
You will flip the blank one turn to the left, or right as you prefer and make the second cut...this will make each of the finished knot loops or bands appears to overlap the next one.
Photo 12
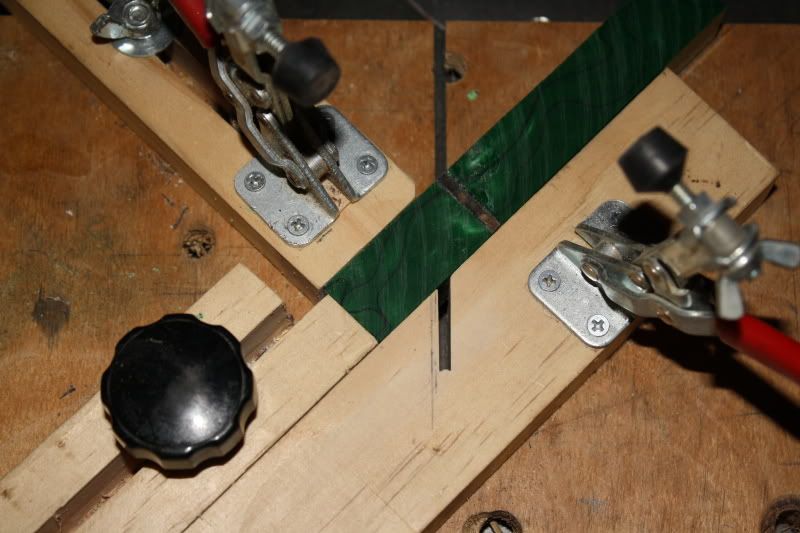
The blank flipped over to the next side...note the saw blade is going to start cutting in the exact same place on the blank as it did on the first cut, only on the next side over.
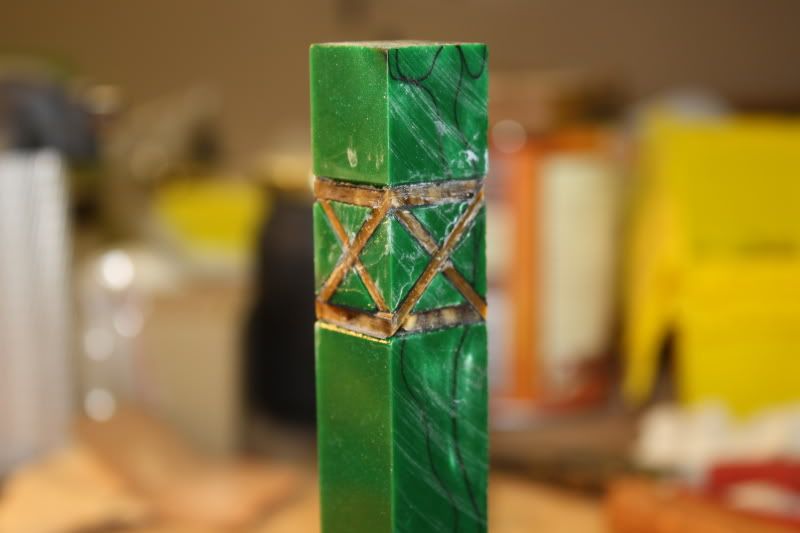
Photo 13
A shot of the end of the blank after the second cut...you can see the insert on a 45 degree...you will simply repeat the above cut and glue steps 3 more times.
Photo 15
After the second insert is glued in place...you can begin to see the "knot" forming up...each "band" or cut is nothing more than a 45 degree through and through in the same place, just on the next side of the blank.
You can use a 60 degree, or pretty much any degree cut you choose, as long as all the cuts are the same degree.
A steeper cut makes the knot a little more elongated or oval..I like the 45 degree because the knots turn out almost round.
Well, it is midnight friday here in Texas, which makes it about 3 in the afternoon saturday over there...I will have to finish this tomorrow...Last edited by edblysard; 21st March 2009 at 04:24 PM. Reason: the later is gets, the worse my computer spells
-
21st March 2009, 04:19 PM #5
SENIOR MEMBER
- Join Date
- Nov 2008
- Location
- Houston Texas USA
- Age
- 65
- Posts
- 839
You can order it over the internet direct from Evergreen, or stop by a model hobby shop...Model train folks use it all the time, as do RC airplane and car hobby guys.
 Originally Posted by mag

-
21st March 2009, 09:27 PM #6
SENIOR MEMBER
- Join Date
- Nov 2008
- Location
- Houston Texas USA
- Age
- 65
- Posts
- 839
Decided to post these before I head off to work.
Photo 16
The blank after all four cuts and inserts glued in....I know, when you first look at it, you think you have nevr made anythig so ugly before in your life but....
Photo 17
Aftre knocking the corners off, you can mount it up and begin to turn it round...once you start that, you will see the knot begin to take shape.
Photo 18
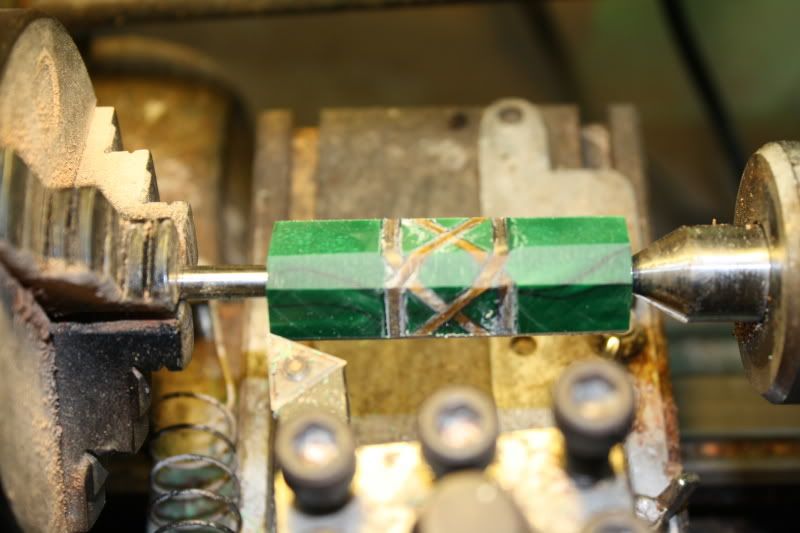
Now, you can stop at the point shown in photo 16 and cut the blank to your choosen length, then drill the tube hole on a drill press, or like myself, you can round it over and drill on the lathe...I prefer the latter because it is always dead center and has zero blow out.
Word of warning...Do not try and drill a large bore hole through this blank, or any acrylic blank in one pass.
With the glue up and the fact that even the top notch drill bits can not eject the shaving fast enough, you will create a lot of heat trying to drill a large bore hole in one pass....instead, drill a 7mm pilot hole through and through, follow that with a 8 or 9mm, then a 10mm and finaly the 27/64th.
Depending on what pen kit you are using, you of course simply step drill up to the size of the final tube drill size...in this instance I am making a Serria, so 27/64 is the final size.
Trying to drill large bore holes in acrylic in one shot dosent work...the shavings jam the ejector slots on the bit, create heat, and melt the inside of the blank, even with the addition of water as a coolant it still wobbles out the tube bore some, and with a glue up like this, the big bit will catch or snag the laminate and bust the glue joint...trust me on this, after several hundred glues up I have figured this out the hard way.
Simply step drill from the smallest drill you feel comfortable with up to your final size.
Once you have drilled the pilot hole, you are not really drilling the blank, but you are reaming the hole out to a bigger size...the shavings are small enough to not jam or pack the ejector slots in the bit, and you get a lot less blow out at the end of the blank.Last edited by edblysard; 21st March 2009 at 09:29 PM. Reason: too early to try and type
-
22nd March 2009, 12:43 AM #7
SENIOR MEMBER
- Join Date
- Oct 2008
- Location
- new jersey
- Posts
- 531
Ed
You have done it again. Thanks for giving us this tutorial. I think this should be bookmarked here someway. You took the time to show us in detail your method. I am looking forward to seeing the finished pen. It should look both stunning and classy. Nice combination. Your method is the one I follow and have had success with it. Thanks for sharing.
-
22nd March 2009, 07:47 AM #8
SENIOR MEMBER
- Join Date
- Sep 2008
- Location
- Maryvale, Queensland
- Posts
- 2,338
Fantastic posts Ed. As you say, a picture is worth a thousand words, and that explains it all very well. The only bit left from there is how to make accurate jigs
 I agree this should be in our "library" somewhere....
That's obviously not your standard table saw blade there. Given I don't have a proper table saw at the moment, but am looking or one, what sort of blade do you call that - thin kerf or something?
Russell.Pen Affair Craft Supplies - Cheapest Pearl Ex & Pemo Polymer Clay in Australia
http://craftsupplies.penaffair.com
-
22nd March 2009, 07:54 AM #9
Skwair2rownd
- Join Date
- Nov 2007
- Location
- Dundowran Beach
- Age
- 76
- Posts
- 19,922

Wonderful work in every respect Sire!!

A great tutorial indeed. Greenie on the way
-
22nd March 2009, 08:14 AM #10
GOLD MEMBER
- Join Date
- Mar 2007
- Location
- Munruben, Qld
- Age
- 83
- Posts
- 10,027
I second that
Reality is no background music.
Cheers John
-
22nd March 2009, 08:20 AM #11
Enemy of mediocrity
- Join Date
- Jun 2004
- Location
- Mornington Peninsula
- Age
- 48
- Posts
- 2,825
JT,
You got me... what process did you use to get the different colours in your knot. I can see what you did but in what order did the swaps take place?
Sorry for the hijack Ed, to bring it back on topic... this post was the reason I went through your other posts to find the jig you do the cuts with. In the process of making one that isn't anywhere near as pretty as yours
CorbsIt's only a mistake if you don't learn from it.
-
22nd March 2009, 09:31 AM #12
SENIOR MEMBER
- Join Date
- Nov 2008
- Location
- Houston Texas USA
- Age
- 65
- Posts
- 839
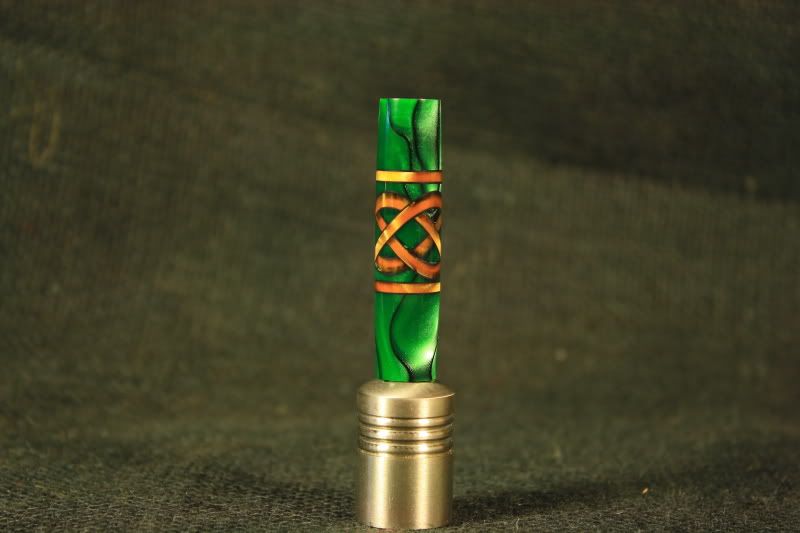
End results.
Russell...
I use a Freud 80 tooth negative rake plywood blade with a light tooth off set...it is old, very old.
Designed to cut thin plywood venners for cabinet work with miminal tear.
They make a really nice melamine or veneer blade, runs about $84.00 American, about the same rake a set.
-
22nd March 2009, 11:07 AM #13
Enemy of mediocrity
- Join Date
- Jun 2004
- Location
- Mornington Peninsula
- Age
- 48
- Posts
- 2,825
Love the finished product and how it appears to have some shading between the black & gold
. Where did those extra top & bottom lines come from though It's only a mistake if you don't learn from it.
-
22nd March 2009, 11:11 AM #14
SENIOR MEMBER
- Join Date
- Sep 2008
- Location
- Maryvale, Queensland
- Posts
- 2,338
They're in the original pictures Corbs - look closer Originally Posted by corbs

Russell.Pen Affair Craft Supplies - Cheapest Pearl Ex & Pemo Polymer Clay in Australia
http://craftsupplies.penaffair.com
-
22nd March 2009, 11:33 AM #15
SENIOR MEMBER
- Join Date
- Nov 2008
- Location
- Houston Texas USA
- Age
- 65
- Posts
- 839
I think Corbs means the border bands...top and bottom.
I added them this afternoon.
Thats the fun of using a round stock blank, you can slice and dice at will!
The shading shows up because the gold acrylic is slightly transparent when this thin, and being on an angle the black stryene shows through some.
Depending on the material, this can add a nice shadow line.
So, if I can find a solid green blank, and use solid dark yellow for the bands, would it work better?Last edited by edblysard; 22nd March 2009 at 11:35 AM. Reason: computer still can't spell.


 Reply With Quote


Similar Threads
-
Green and Gold
By dj_pnevans in forum WOODTURNING - PEN TURNINGReplies: 4Last Post: 1st January 2009, 09:42 AM -
Green and Gold Sierra
By timberbits in forum WOODTURNING - PEN TURNINGReplies: 7Last Post: 26th December 2008, 11:26 AM -
"Gold Rush" Executive Rollerball + a few others
By BoomerangInfo in forum WOODTURNING - PEN TURNINGReplies: 10Last Post: 19th October 2008, 03:09 AM -
Green & Gold Elite
By Simomatra in forum WOODTURNING - PEN TURNINGReplies: 4Last Post: 18th January 2008, 08:00 AM -
Should We Drop the Green & Gold Colours For Our Sports Teams?
By Metal Head in forum NOTHING AT ALL TO DO WITH WOODWORKReplies: 20Last Post: 14th September 2007, 07:39 PM
