

 Thanks: 0
 Likes: 0
 Needs Pictures: 0
 Picture(s) thanks: 0
Results 1 to 14 of 14
Thread: cray-'s first workbench
-
9th January 2012, 11:52 PM #1
 Senior Member


- Join Date
- Dec 2011
- Location
- Perth
- Age
- 45
- Posts
- 106
 cray-'s first workbench
What better way to introduce myself to the forums than to write up a post about my workbench build.
My wife and I recently built our first home in Perth on an extremely tight 10m wide block. Space was at a premium and the budget needed to be kept in check, so I had to settle for a small workshop area off the back of our double garage.
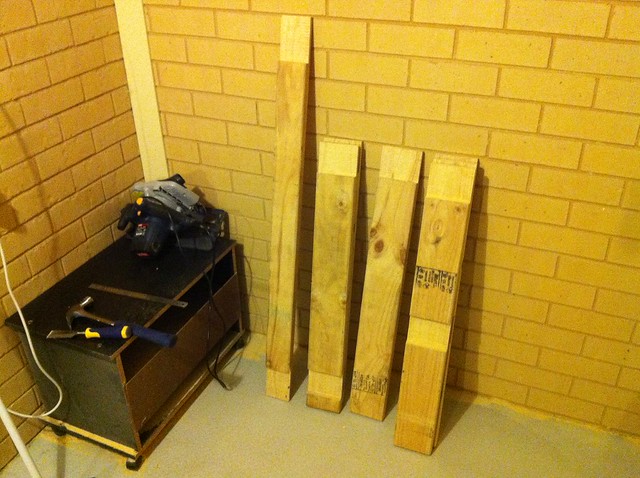
I saved this lot from the skip bin after the roof carpenters had done there thing on the house next door. Plenty of good stuff.

Being a huge geek, I measured everything up and whipped a scale model in Google SketchUp first. The nook is 2500mm wide but there is a brick pier in the way so I will have to make the frame 2380mm wide in order to slide it into the space.
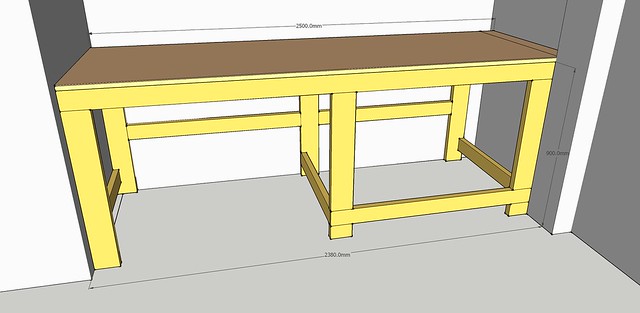
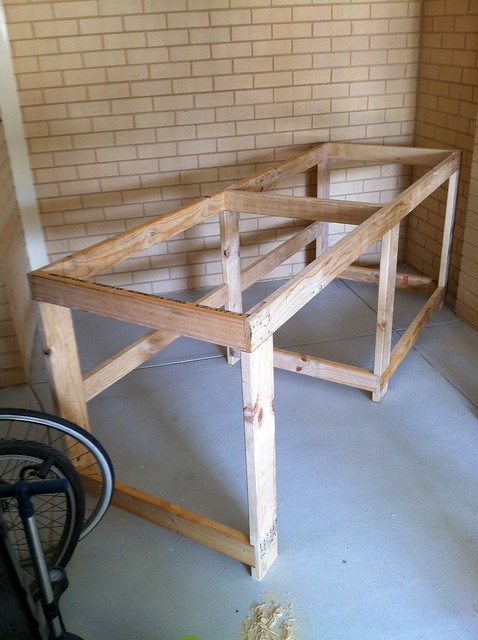
The frame without the top and garage walls. I wanted to leave one half open so I can sit at the bench on a stool or wheel things under for storage. The other side will become a shelf, or cuboards or something.
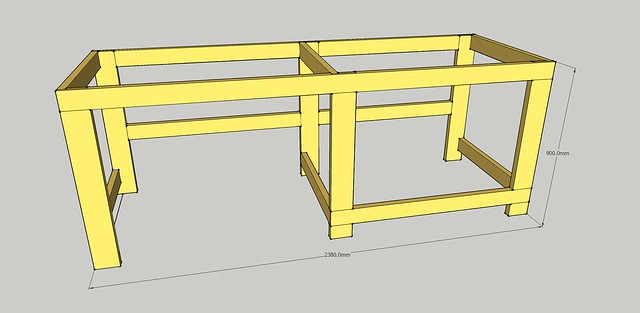
Detail of the frame. Trying to keep it simple, half-lap joints screwed together. The top will also be screwed down and help to keep the whole lot nice and rigid ...I hope.

How does one build a workbench without a workbench?
I thought I could cut all the half-laps with the tenon saw, bad idea. But it'll come in handy later on. I got sick of working on the floor and clamping my timber to a tiny old TV cabinet so I went out and bought this badboy for $19. It's a bit flimsy but it does the job.

My Ryobi circular saw has been sitting in it's box since Xmas '09 and today I finally got a chance to use it.

This is the poont where you really wish you specified a drop-saw or table-saw to your family back in Xmas '09. The Ryobi is not light and my arm was getting sore after doing so many cuts in a row.

I like to call this part: making biscotti. Once you chisel out all the waste you end up with a pile of wooden biscotti at your feet.

All cleaned up, on to the next one.

Three down, many to go.

-
9th January 2012 11:52 PM # ADSGoogle Adsense Advertisement
- Join Date
- Always
- Location
- Advertising world
- Age
- 2010
- Posts
- Many
-
10th January 2012, 07:49 AM #2
Life's Good, Enjoy each new day & try to encourage
- Join Date
- Dec 2009
- Location
- Faulconbridge, Lower Blue Mountains
- Age
- 68
- Posts
- 11,202
G'Day & Welcome to the forum "cray",
Looks like you've got this project well in hand.
Enjoy the bench when finished with many more beaut projects.
Cheers, crowie
-
10th January 2012, 07:53 AM #3
GOLD MEMBER
- Join Date
- Oct 2007
- Location
- vic clayton
- Posts
- 1,041
gday and welcome shame the roofers dont use jarrah like they used to good luck with the project
Some people are like slinkies - not really good for anything, but they
bring a smile to your face when pushed down the stairs .
-
10th January 2012, 08:12 AM #4
Skwair2rownd
- Join Date
- Nov 2007
- Location
- Dundowran Beach
- Age
- 76
- Posts
- 19,922

G'day Cray and welcome to the asylum!

Every thing seems to be going well so far.
What type of woodwork are you interseted in?
-
10th January 2012, 10:11 AM #5
GOLD MEMBER
- Join Date
- Jan 2010
- Location
- Melbourne
- Posts
- 2,636
So far so good Cray. Welcome to the forums.
-Scott
-
10th January 2012, 10:32 AM #6
Senior Member
- Join Date
- Dec 2011
- Location
- Perth
- Age
- 45
- Posts
- 106
Part 2...
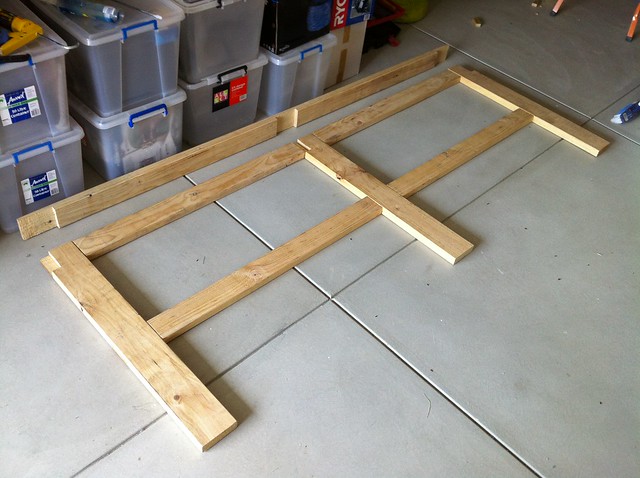
Got the 2 stretchers and 3 legs done for the rear of the frame, time for a test fit.

Fits like a glove (pay no attention to the hammer dents).

Test fit of rear frame, good to go.

This shot was taken at about 9:30pm, time to call it a night. All 6 legs and 4 stretchers chiseled, a few more notches need to come out with the saw tomorrow.
Cleared enough space to start piecing things together, something is missing though...
Aha! Still need to cut these recesses for the lower stretchers. Can't do it with the circular saw, can;t do it with the tenon saw. Time to bust out the little Ozito plunge router.
Clamped two legs together and went at it free hand (OK one guide at the top). It took many, many passes taking off 3-4mm at a time. And so much sawdust, really should have fitted the extractor and busted out the Dyson. Bit of cleanup with the chisel and it was good to go.

Frame all screwed together, will it fit? Only just. I should have paid more attention the the brickwork. The left hand wall and the right hand pier it had to pass between wasn't perfect, I should have given mysef an extra 10mm. Got it in there with a bit of gentle percussive persuasion.
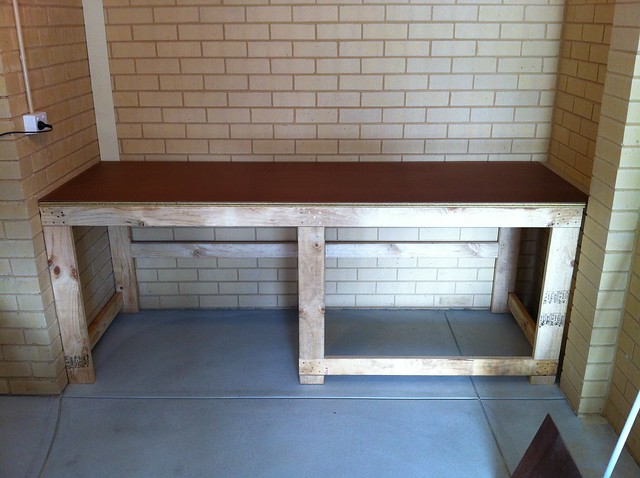
Benchtop on. Because the space between the walls was 2500mm and more MDF/ply/masonite/etc. only comes in 2400mm wide sheets I had to go with a piece of cut down 800x3600mm particle board flooring (yellow tongue).
I had the cut shop dock it for me and managed to get the sheet home in the back of my Subaru Liberty sedan. I got some strange looks when I stopped the trolly in front of my car and proceeded to load in the sheet. But only about 800mm hung out the back of the boot, so I strapped it closed and headed home.

Done! The top surface is a sacrificial piece of Masonite, I can easily and cheaply replace it when it wears out.All it needs now is a bench vise. I'll probably have to add some more timber under the top to mount the vise, but I've still got a bunch of off-cuts ready and waiting.
Not bad considering most of the timber was free & I learned a hell of a lot along the way. On to the next project!
-
10th January 2012, 11:22 AM #7
What... you mean it's not 1792?
- Join Date
- Oct 2006
- Location
- Melbourne
- Posts
- 5,271
Welcome Cray!

I like the label on the work horse "Folding Work Bench". Just in case anyone was in any doubt as to its purpose..
I know you believe you understand what you think I wrote, but I'm not sure you realize that what you just read is not what I meant.
Regards, Woodwould.
-
10th January 2012, 01:50 PM #8
Lignum Vexator
- Join Date
- May 2007
- Location
- North of the coathanger, Sydney
- Age
- 68
- Posts
- 9,417
Welcome to the forum
and very useful bench
what type of vise are you looking at?regards
Nick
veni, vidi, tornavi
Without wood it's just ...
-
10th January 2012, 02:04 PM #9
Member
- Join Date
- Nov 2011
- Location
- Perth
- Age
- 41
- Posts
- 52
Nice build mate. It's a great feeling getting that first useful project finished up isn't it.
-
10th January 2012, 07:01 PM #10
Senior Member
- Join Date
- Dec 2011
- Location
- Perth
- Age
- 45
- Posts
- 106
Thanks for the warm welcome everyone. I should probably do a intro post in the relevant thread, but I'll say a few more words here.
My name is Michael, I'm 32 years old, originally from Geelong but I've been living in Perth for the last 12 years. I studied Multimedia and work as a Designer for a print company so I'm in front of a computer all day long. I've always been quite handy, my Dad and Nono are responsible for teaching me so much and giving me a DIY ethic.
I did woodwork in highschool in year 8 & 9 but didn't take it any further in favour of a more academic curriculum (seemed like a good idea at the time, in hindsight I might have done things differently). I've been renting up until now and itching to get into my own home/garage to do what I want. Now that I have my little space I'm slowly growing my tool collection and my skills.
Probably a lot of cabinet making and storage to fill our new house. I'll start with the linen press in the laundry to practice and then move on to custom wardrobes for the master bedroom with drawers, shoe racks and shelves. Built-in desks and wall to wall shelving for the study. Low desks for the kids activity room aka. LEGO construction zone (Our first daughter is due to be born in April, I've already started the LEGO collection). A new entertainment unit for the AV gear, a side table for the dining room, wooden toys for the future spawnlings.... the list is endless... oooo and a cubby house! Originally Posted by artme

Hehehe yeah I laughed when I saw it, at least it's spelled correctly. You certainly wouldn't want to mistake it for a step ladder, I've seen softdrink cans made from thicker aluminium. Originally Posted by Woodwould
Nothing fancy, just one of those ones that sits flush with the benchtop with the wooden inserts. Originally Posted by Sawdust Maker
-
10th January 2012, 08:06 PM #11
Life's Good, Enjoy each new day & try to encourage
- Join Date
- Dec 2009
- Location
- Faulconbridge, Lower Blue Mountains
- Age
- 68
- Posts
- 11,202
G'Day Micheal,
That bench came up a treat; you've done a great job on it.
Are you going to bolt it off to wall?
What about a vice, pegboard on the wall above it, some extra GPO's, some work lighting above the work area & a shelf or two.
Just a thought to finish off the work area for all your new projects.
I'm sure they will be very well made after seeing the effort you put into the bench.
Cheers, crowie
-
10th January 2012, 09:44 PM #12
Member
- Join Date
- Jul 2007
- Location
- Whittlesea, Victoria
- Age
- 43
- Posts
- 88
Looks great mate, very well done!

-
11th January 2012, 07:59 PM #13
Senior Member
- Join Date
- Dec 2011
- Location
- Perth
- Age
- 45
- Posts
- 106
Thanks mate, all of those things are in the works. Though I'm not sure about bolting the bench to the wall, is that just to anchor it since it's a bit of a light weight? Originally Posted by crowie
I saw these "Mag-Bloks" on the benchcrafted.com site, it gave me an idea since I have a tonne of old PC hard drives containing serious neodymium magnets ready to be harvested. Perhaps some kind of magboard/pegboard combo?
-
19th January 2012, 03:58 PM #14
Junior Senior Member
- Join Date
- Dec 2008
- Location
- Adelaide, SA
- Posts
- 962
Nice work Cray, and welcome to the site. Keep posting your projects, it gives the rest of us ideas and inspiration to make our own.

 Reply With Quote


Similar Threads
-
30ft cray boat
By dopeydriver in forum CLASSIC BOAT RESCUE & ADOPTIONReplies: 0Last Post: 4th January 2012, 07:39 PM -
Paulownia for cray pots
By nifty in forum TIMBERReplies: 1Last Post: 17th June 2011, 08:36 AM -
Where to find Tassie cray boat
By dopeydriver in forum CLASSIC BOAT RESCUE & ADOPTIONReplies: 11Last Post: 16th October 2010, 05:24 PM -
Julian - old cray boat
By dopeydriver in forum CLASSIC BOAT RESCUE & ADOPTIONReplies: 6Last Post: 24th January 2010, 08:36 PM -
wooden cray boat plans
By cliff abbott in forum BOAT DESIGNS / PLANSReplies: 11Last Post: 26th April 2009, 08:59 PM
