

 Thanks:
  Likes:
  Needs Pictures: 0
 Picture(s) thanks: 0
Results 16 to 30 of 112
Thread: Home-built vises Part 1
-
20th April 2013, 01:01 AM #16
 GOLD MEMBER


- Join Date
- Aug 2009
- Location
- Armadale Perth WA
- Age
- 55
- Posts
- 4,524

You may have hear od the Super Sawbench ... now ...
(Wood magazine #95 Feb 1997) He makes walking sticks
Super horse.JPG
-
20th April 2013 01:01 AM # ADSGoogle Adsense Advertisement
- Join Date
- Always
- Location
- Advertising world
- Age
- 2010
- Posts
- Many
-
9th May 2013, 04:11 PM #17
Luddite Lite
- Join Date
- Jan 2009
- Location
- Brisbane
- Posts
- 800
Home-built vises Part 1
I don't know if I really want to own up to this bench hook come vice but it was something I knocked together and it works for what I use it for, holding boards on edge for planing. Actually, I do most things with it but I can't imagine why you'd put one on a bench in lieu of an actual vice, I just needed something pronto.
So here, for curiosity's sake is the rubber grip bench hook (that is what they're called isn't it?). A normal bench hook with a piece of heavy black rubber on the inside face. I originally put the rubber there so I wouldn't bruise the hoop pine I was planing but I found that if i pulled the rubber, which is attached at the very inside corner only, it would grab the timber when it was put in place and then, releasing the rubber it would retract clamping the piece in the hook. The other end could be propped on a pin in the apron but in the photo I've just clamped it.
 whatever gets the job done
ImageUploadedByTapatalk1368076175.121248.jpgImageUploadedByTapatalk1368076199.347274.jpgImageUploadedByTapatalk1368076219.989510.jpg...I'll just make the other bits smaller.
-
9th May 2013, 05:21 PM #18
Be inspired. Be creative. Be bold.
- Join Date
- Apr 2001
- Location
- Perth
- Posts
- 10,851
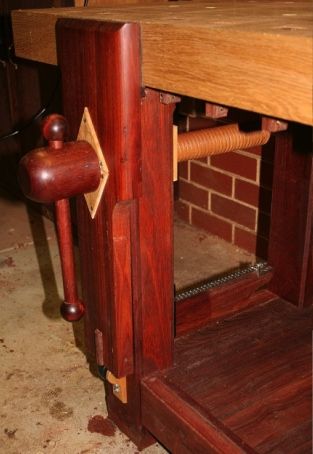
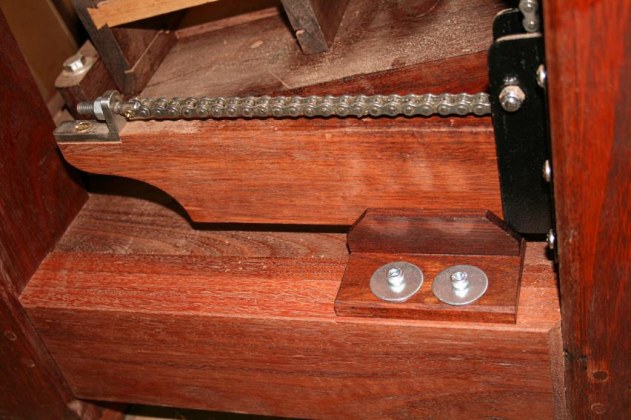
I've posted these before.
Leg vise with wooden screw and chain adjuster ..
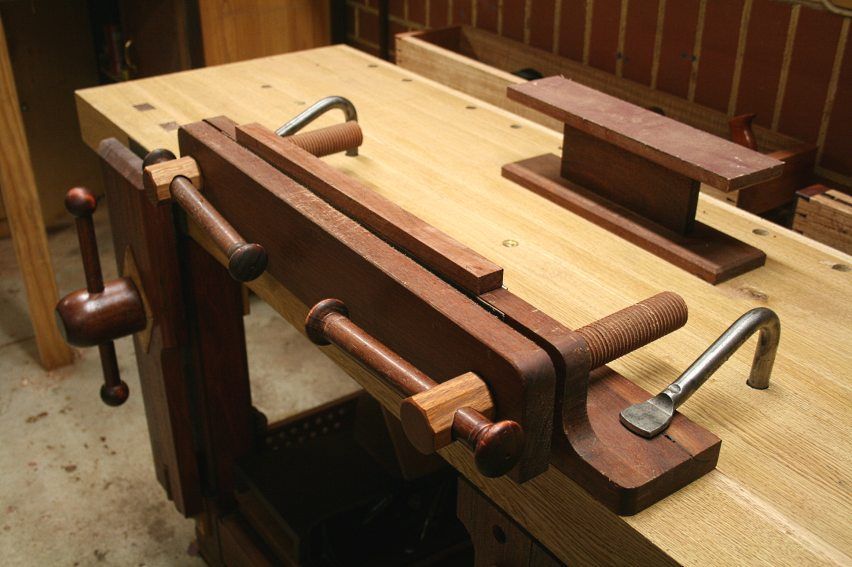
Moxon dovetail vise, with I-beam in the background ...
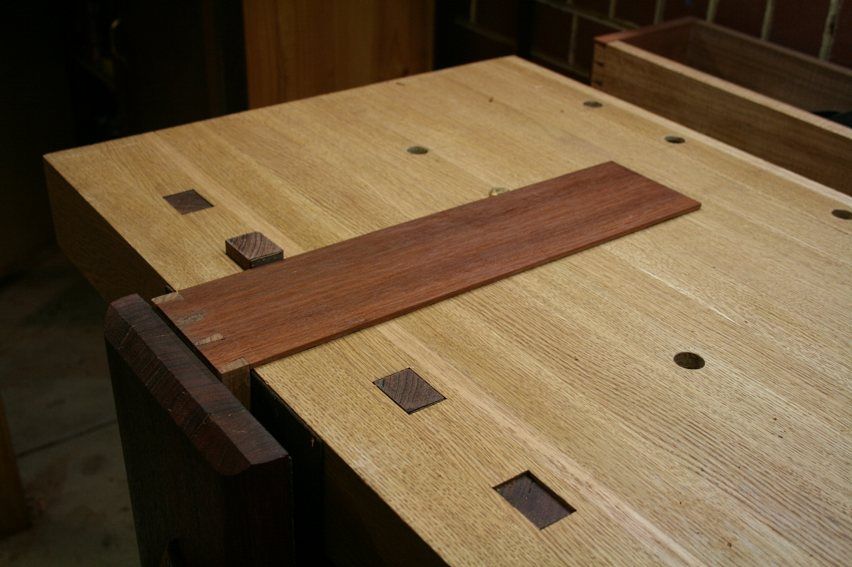
Low planing stop. Note the combination of square dog holes at the front and round elsewhere ...
Complete bench ..
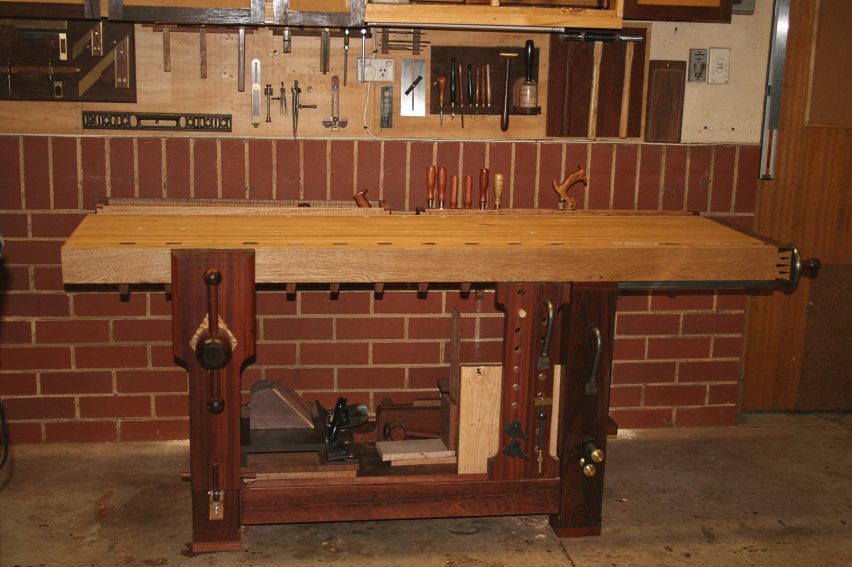
And someone to watch over me ...

Regards from Perth
DerekVisit www.inthewoodshop.com for tutorials on constructing handtools, handtool reviews, and my trials and tribulations with furniture builds.
-
9th May 2013, 05:33 PM #19
almost a woodworker
- Join Date
- Feb 2007
- Location
- blue mountains
- Posts
- 4,899
A bench dog!
-
12th May 2013, 10:20 PM #20
Senior Member
- Join Date
- Aug 2007
- Location
- Melbourne
- Posts
- 159
This is not meant to be a hi jack as it does relate to home made vises.
I am currently building my workbench, ( Vic ash flooring laminated ).
Also laminating generic Forrest Reds to make an end vice.
So my Q is what length would be advisable for the end vise min - max.
Regards
Shippers
-
13th May 2013, 10:20 AM #21
GOLD MEMBER
- Join Date
- Mar 2004
- Location
- Brisbane (western suburbs)
- Age
- 78
- Posts
- 12,158
Shippers, I'm not sure what you mean by 'end vise'. Do you mean what I call a 'tail' vise - i.e. the one that works parallel to the bench front against the dog-holes? Originally Posted by SHIPPERS

If so, there isn't any set 'length' for it. The length is primarily determined by either the screw used, or the mechanism employed (there are several alternative mechanisms available for tail vises). A 'conventional' old-style vise is a pretty hefty construction, and you lose some of the useable length to the front cross-piece and the arm (the continuation of the end-cap) that holds the nut. It needs to be long enough that you can include at least two dog holes, preferably 3 or even 4. However, the longer you make it, the more small inaccuracies will show up in the final fit, & the more likely you will get sag down the track, so there are all the usual compromises to be considered. I'm not in a position to measure mine atm, but it's about 450mm total length, give or take a bit.
I would advise spacing the dog holes in the vise at half the distance between the bench-top dog holes, to reduce the amount of winding in & out to fit things between dogs - you just pick the spacing with the closest fit, & drop your piece of wood in there. This is not an issue if you are going to use a quick-release mechanism like LV's, of course.
The other consideration is how much overall travel it will have. The jaws are at right angles to the bench front, which makes it a very handy place to hold stock when cutting tenon cheeks, etc. Unless you are into giant tenons, that only needs 100mm of travel or less, but amongst the many jobs mine does is holding my makeshift router table. The 'table' is clamped between dogs, with the router hanging free between the jaws. That obviously needs an opening more like 200mm, to fit the router body with comfortable clearance.
The tail vise is such a versatile bit of equipment, which is why I much prefer it to a travelling dog system (aka 'wagon vise'). I could almost live without a front vise as long as I had a good tail vise!
Cheers,IW
-
13th May 2013, 02:12 PM #22
Senior Member
- Join Date
- Aug 2007
- Location
- Melbourne
- Posts
- 159
Thanks Ian.
Yes I meant a tail vise.
I was thinking 450 long by 160 wide.
Hadn't given travel much thought however I think the more it travels the more deviation my occur so 250 would be max
-
13th May 2013, 05:08 PM #23
GOLD MEMBER
- Join Date
- Mar 2004
- Location
- Brisbane (western suburbs)
- Age
- 78
- Posts
- 12,158
Yes, that's what I reckon - around 200mm travel is ok, so 250 should be heaps. The shorter you make it, the easier it is to keep it all straight & aligned & operating smoothly. Originally Posted by SHIPPERS
I forgot I had posted this pic some time ago when I changed the dog-hole spacing in my vise. It is almost exactly 450mm long in total. The length of travel is the distance between the ends of the front dovetails, less the width of the end cap - a little over 200mm, reading off the tape measure..
Back together.jpg
The width you need also depends on the mechanism and the size screw. Mine has a 2" wooden screw, and is about 150mm wide. The width of the front member and dog slots takes up about 75mm, leaving a comfortable space for the screw. If you go with a LV mechanism, or a similar type, the vise can be quite a lot narrower. Again it's horses for courses - depends on how far from the edge you like your dog holes. My dogs holes start about 55mm from the edge (they are 25mm square). This is good when I need to hold narrow pieces overhanging the edge of the bench (so that fences will not foul the bench top), but when holding wider boards for planning, it would sometimes be better if the dogs were further from the edge. On balance, I prefer mine where they are, fortunately.....
Cheers,Last edited by IanW; 2nd December 2019 at 09:54 PM.
IW
-
13th May 2013, 05:44 PM #24
Senior Member
- Join Date
- Aug 2007
- Location
- Melbourne
- Posts
- 159
At present my dog hole are approx 50mm in however i havent fitted a face board yet, so once fitted they will be about 70mm from the edge. I will be having a go at making my own wooden screws, 50mm dia is what i am aiming for. It will all depend on the size of the borers or cutters i have and or can get to produce the jigs to make the screws.. you more than appreciate the process involved to get there..
Hopefully some pics to come
Shippers
-
13th May 2013, 07:47 PM #25
GOLD MEMBER
- Join Date
- Mar 2004
- Location
- Brisbane (western suburbs)
- Age
- 78
- Posts
- 12,158
I certainly remember the first couple of wooden screws I made as presenting a few challenges, but eventually everything fell into place & it all turned out well. Once you get your system working, it takes no time to whip up several (provided you have enough suitable wood), & I would advise you to make 2 or 3. That way, you have a couple of spares & can afford to muck one up getting your vise working. I have a spare for my vise, in case the original ever breaks or wears out, but to judge by the way it has held up (about 26 or 27 years, so far, & no sign of wear), I don't think I am going to need a replacement any time soon! Originally Posted by SHIPPERS
Cheers,IW
-
23rd May 2013, 10:09 PM #26
Senior Member
- Join Date
- Aug 2007
- Location
- Melbourne
- Posts
- 159
This is for anyone, though the reference is Ian's tail vise pic..
I am in the throws of designing my tail vise, and thought of an idea with regard to alignment only to see that it may have already been done. I believe in the pic with the jaw open i see that a housing has been created in the bench for the jaw to slide in. yes ??
I have not seen this in any of the plans thus far and thought it to be a good idea, for Ian, has it caused any issues??
Shippers
-
23rd May 2013, 10:55 PM #27
Luddite Lite
- Join Date
- Jan 2009
- Location
- Brisbane
- Posts
- 800
Home-built vises Part 1
Just a general comment on making 'wrackless' vices: has anyone used lineal bearings to guide a vice jaw/chop?
It seems to me that it would be a good, if not trad, solution....I'll just make the other bits smaller.
-
23rd May 2013, 11:43 PM #28
Be inspired. Be creative. Be bold.
- Join Date
- Apr 2001
- Location
- Perth
- Posts
- 10,851
Does this count ..Just a general comment on making 'wrackless' vices: has anyone used lineal bearings to guide a vice jaw/chop?
Link: http://www.inthewoodshop.com/ShopMad...uideGuide.html
Regards from Perth
DerekVisit www.inthewoodshop.com for tutorials on constructing handtools, handtool reviews, and my trials and tribulations with furniture builds.
-
24th May 2013, 12:27 AM #29
Luddite Lite
- Join Date
- Jan 2009
- Location
- Brisbane
- Posts
- 800
Home-built vises Part 1
Yes and no Derek. Yes it's a great solution but no it's not a lineal bearing.
I'm sure I've seen it somewhere but I can't find it; a round guide bar at the bottom instead of the usual guide rail with holes and instead of needing a pin to block the rail or a chain to divert the thrust a lineal bearing (ie a long collar that only allows parrallel movement) is used to prevent wracking.
Your system is clearly fantastic and I'm not mooting this as an improvement just another potential solution. If it works it would be very neat, just two parts and the bearing could be housed in the leg or apron meaning all you saw would be the guide bar... Does that make any sense?
Matt...I'll just make the other bits smaller.
-
24th May 2013, 12:38 AM #30
Be inspired. Be creative. Be bold.
- Join Date
- Apr 2001
- Location
- Perth
- Posts
- 10,851
Hi Matt
Have a look at this ..
Maguire Pin Less Leg Vice - YouTube
Regards from Perth
DerekVisit www.inthewoodshop.com for tutorials on constructing handtools, handtool reviews, and my trials and tribulations with furniture builds.


 Reply With Quote


Similar Threads
-
Home built router with feed
By shedhappens in forum ROUTING FORUMReplies: 2Last Post: 26th February 2013, 10:22 PM -
Home built cyclone cone
By HeadScratcher in forum DUST EXTRACTIONReplies: 21Last Post: 4th September 2012, 01:24 AM -
Home built pressure pot
By dikman in forum CASTING & STABILISATIONReplies: 13Last Post: 23rd January 2012, 07:21 PM -
My first home built workbench.....
By jsherman86 in forum THE WORK BENCHReplies: 8Last Post: 16th November 2010, 09:04 PM -
Home Built
By nev25 in forum BOAT BUILDING / REPAIRINGReplies: 17Last Post: 4th February 2008, 10:27 PM
