

 Thanks: 0
 Likes:
  Needs Pictures: 0
 Picture(s) thanks: 0
Results 1 to 8 of 8
Thread: Moxon vise build
-
22nd November 2020, 11:46 AM #1
 SENIOR MEMBER


- Join Date
- Oct 2019
- Location
- Brisbane, Australia
- Age
- 43
- Posts
- 519
 Moxon vise build
Hi all,
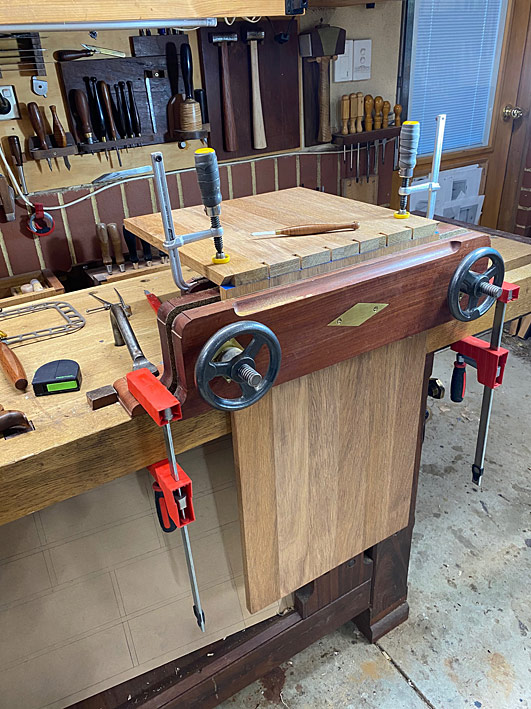
I posted earlier about wood dimensions for a Moxon vise dimensions (as in for the wood thickness) with no luck but thought I would share my results. I did not take photos of the process as there's really not much in it. It largely borrows from Derek Cohen's design (many thanks for your helpful website!), using the Benchcrafted hardware, but sans all the "fruit". Although I hope to add the flip-up spacer etc.
Some differences were - out of practicality because I was trying to keep the mass down, I only added "ears" at the sides of each board (again a Derek Cohen innovation) and without the "stabiliser" block that is recommended. However I am starting to feel like that is an error as it does have a little more wobble at the centre than I was hoping for. I will probably also glue down the bits of leftover corkrubber/crubber from the jaw (you can see them loose).
(Edit: I thought I might mention here for locals. Cork rubber is sold fairly cheaply in Supercheap Auto. I have one at the end of my street and I am trying to keep tabs on stuff I can pick up from there from time to time.)
Something I was thinking of doing to really minimise flexing even further, instead of the stabiliser block in the instructions, a little triangular support in behind the chop to reinforce against flexing, for the entire height of the back jaw.
These only have jaws with a thickness of about 35mm thick. As I posted earlier, I was concerned that 45mm (per the instructions) would result in a fixture that was just too heavy with a dense Australian hardwood. I went to the timber supplier and bought a plank of rosegum/flooded gum, which is a wood I like and which is merely tough, not one of those super-dense eucalypts. I picked up a plank of wood in spotted gum and for me the weight would have just been too much for convenience even with that thickness. Maybe for a smaller version.
PXL_20201122_001841086.jpgPXL_20201122_002137743.jpg
I also aimed for a width to permit space between the screws of 450mm. That is quite wide. If I was ever doing anything bigger I would look at a temporary clamping jig.
I have done a few test saws, and the 35mm thickness boards have a very slight give but not enough to make the sawing other than, dare I say it, pleasurable! I was motivated to get the Moxon vise because I was failing miserably at dovetailing, and it would hurt after only a short time to stoop down low enough to see what I was doing with wood in the usual vise.
This is a world apart from stooping down and trying to do fine saw work in the front vise (my only other option). Anyone thinking about a Moxon vise build I thoroughly recommend it. Sawing up nice and high really makes things possible that I just couldn't do before.
-
22nd November 2020 11:46 AM # ADSGoogle Adsense Advertisement
- Join Date
- Always
- Location
- Advertising world
- Age
- 2010
- Posts
- Many
-
22nd November 2020, 12:57 PM #2
almost a woodworker
- Join Date
- Feb 2007
- Location
- blue mountains
- Posts
- 4,886
Nice moxon.
As you say standing upright makes all kinds of work easier. My saw sharpening improved when I made a saw vice. I have been using a bench bull for a couple of years to raise a lot of work to a decent height. Since Mcjings have now got moxon hardware at a reasonable price I've been thinking of making one but as I am slowly being elbowed out of the shed by jigs then something else will have to go.
Regards
John
-
22nd November 2020, 01:07 PM #3
Be inspired. Be creative. Be bold.
- Join Date
- Apr 2001
- Location
- Perth
- Posts
- 10,820
That is a nice looking Moxon vise!
 I am not sure whether you are planning to add the clamp on the top, as I did. I would highly recommend this - it is a game changer.
One reason I did not offer too much in the way of thicknesses is that so many different timbers have a different relationship between flex and thickness. Fond the thickness for your wood where it flexing is minimised.
Regards from Perth
DerekVisit www.inthewoodshop.com for tutorials on constructing handtools, handtool reviews, and my trials and tribulations with furniture builds.
-
22nd November 2020, 01:13 PM #4
SENIOR MEMBER
- Join Date
- Oct 2019
- Location
- Brisbane, Australia
- Age
- 43
- Posts
- 519
Thanks John,
Yes I've decided to dedicate the shelf underneath the bench to the Moxon vise.
For saw sharpening I have only so far used blocks with a kerf cut out so you can clamp the saw into the block in your vise. But this will also let me clamp those blocks a little higher and make it easier until I get around to a saw vise that adds height.
The only other solution I've seen to raised sawing height without a separate vise or jig is Rob Cosman's bench which has legs with hinged riser blocks, meaning you can lift up the bench and flip them in to raise the bench height, then flip them out to lower it again. Because he uses a shoulder vise, there's no issue with the screws. This seems like the best of all worlds of course but quite the build!
Chris
-
22nd November 2020, 01:19 PM #5
SENIOR MEMBER
- Join Date
- Oct 2019
- Location
- Brisbane, Australia
- Age
- 43
- Posts
- 519
Many thanks Derek - I do plan to - I thought your design was ingenious in every respect.
An issue is that I am not sure how I would go about the groove that the clamp slides into. I do not have a router table. The car wheels right behind my bench would illustrate one of the reasons. Although I wonder if a "bodge" might be just hand-planing a suitable bevel on two sticks down to a measured line and then glueing together, rather than trying to rout out the dovetail trench?
I would also be keen if you had any tips on how to precisely true up the "I-beam" and the top of the spacer block. I was thinking of just shifting them side by side, assessing which was higher, and very carefully taking shaves off the tallest until they were precisely mating?
Chris
-
22nd November 2020, 11:48 PM #6
Be inspired. Be creative. Be bold.
- Join Date
- Apr 2001
- Location
- Perth
- Posts
- 10,820
Chris, there are a couple of ways to make the track for the MicroJig clamps. Incidentally, some have used other types of clamps, but I do recommend the MicroJig ones, although more expensive, as they are incredible useful for many other tasks, and they use less space.
I used a router to create the sliding dovetail, but I have done this many times with a plough plane (to make the groove), and a side rebate plate-come-dovetail plane (converted Stanley #79). I am sure you are familiar with these. Shout out if you need pictures/links.
The other way to go is simply to use aluminium track. This may be rebated into a spacer, or screwed on top (creating a spacer). Glue cork rubber on top as a non-slip.
The I-Beam is easy enough to level. Either measure the height to the top of the spacer, or use a spirit level to get it level. You can always add wood slices if it is too low.
I took these photos today as I started a tool cabinet for underneath my bench ...

Regards from Perth
DerekVisit www.inthewoodshop.com for tutorials on constructing handtools, handtool reviews, and my trials and tribulations with furniture builds.
-
23rd November 2020, 09:16 AM #7
SENIOR MEMBER
- Join Date
- Oct 2019
- Location
- Brisbane, Australia
- Age
- 43
- Posts
- 519
Thanks Derek
That is a good idea. I bought a Veritas side rebate plane but have not used it much (it was on the discount table because it had a cosmetic defect). I assume you could just cut a fence with a 14' wall (I would use my trusty tracksaw), clamp it against the wall of the rebate, and then use that as a dovetail fence?
One thing I did notice is that the crubber is the cause of very slight, cushioned flex. There is slight movement but doing some testing I noticed it is the crubber compressing with the additional force, not the wood flexing. As such I am fortified in my view that the advised thickness is not necessary provided you are careful in your wood selection. That is not a criticism of course - it would make sense to specify a "safe" thickness that would do for pretty much any timber.
-
30th November 2020, 12:12 AM #8
SENIOR MEMBER
- Join Date
- Oct 2019
- Location
- Brisbane, Australia
- Age
- 43
- Posts
- 519
Just a post-script... I found some time and added the *fruit*, a rather slavish copy to Derek's version. I also checked amazon for the microjig clamps, and saw they were 1-2 days delivery so I splurged.
PXL_20201129_122500776.jpg
I tinkered around with the last of the rosegum stock I had, but just didn't had enough length but I found enough in an offcut of a rosegum panel from Bunnings. One detail I had to try and figure out from photos was how the flip-up spacer block was secured. I couldn't really see but just clamped it closed, drilled a hole and used a threaded insert nut (I really like these for whenever I need a hardware fixing), and bought a turnbuckle with M6 eyebolts to provide a long eye bolt. It seems to work well.
PXL_20201129_125705685.jpg
The dovetail track was actually easier than I had apprehended. It does not need to be precise - something I can state because mine is very much not so, but works effectively. It does not need a high clamping pressure, it is just for holding the piece for light work.
Time to hit the dovetailing!

 Reply With Quote

Similar Threads
-
Moxon vise dimensions
By Cgcc in forum THE WORK BENCHReplies: 0Last Post: 17th November 2020, 05:25 PM -
WEST AUST Moxon Dovetail Vise
By derekcohen in forum WOODWORK - Tools & MachineryReplies: 7Last Post: 10th October 2019, 11:55 AM -
The Last Moxon Dovetail Vise
By derekcohen in forum FURNITURE, JOINERY, CABINETMAKING - formerly BIG STUFFReplies: 17Last Post: 28th September 2019, 05:27 PM -
An improved Moxon vise
By derekcohen in forum HAND TOOLS - UNPOWEREDReplies: 3Last Post: 24th June 2019, 10:16 PM -
Moxon Vise
By VikingCode in forum WOODWORK - GENERALReplies: 3Last Post: 23rd August 2016, 10:43 AM
