

 Thanks:
  Likes:
  Needs Pictures: 0
 Picture(s) thanks:
Results 16 to 30 of 245
Thread: Roubo Bench Issues and Questions
-
18th January 2012, 08:16 PM #16
 SENIOR MEMBER


- Join Date
- Jan 2011
- Location
- Sydney
- Posts
- 613

Hi Derek
I put together a bench with 100mm x 100mm legs a while back and I think it was overkill, so you should have no problem with your choices.
Are you planning on putting the leg tenons right through to the top of the benchtop or only half way?. I'm planning on doing the bench from Mr Schwatz's first book but made of pine laminations and was thinking that by putting them through into the top I could build the mortices into it and then glue and screw them into it before adding the outside rails, which should hide the joins.
How tall are you?. I'd suggest that 86cm is a big high for someone who uses hand planes as much as you do
Also, why square dog holes? Wouldn't round dogs give you better flexibilty if you want to work anything that's not square?
Cheers
Andrew
-
18th January 2012 08:16 PM # ADSGoogle Adsense Advertisement
- Join Date
- Always
- Location
- Advertising world
- Posts
- Many
-
18th January 2012, 08:20 PM #17
Be inspired. Be creative. Be bold.
- Join Date
- Apr 2001
- Location
- Perth
- Posts
- 10,828
Hi Ian
I am not making the dogs, but a template for the dog hole strip, which is what I am building.
Mostly small things at this point as I am trying to use the little time I have efficiently.
More later.
Regards from Perth
DerekVisit www.inthewoodshop.com for tutorials on constructing handtools, handtool reviews, and my trials and tribulations with furniture builds.
-
18th January 2012, 08:24 PM #18
Be inspired. Be creative. Be bold.
- Join Date
- Apr 2001
- Location
- Perth
- Posts
- 10,828
Hi Andrew
Read post #10.
I would suggest that the reason that Chris Schwarz build the egs he did in his slab Roubo was because it was a slab. If you tried that with a bench top make of laminations it is likely that it will become weakened.
I am using blind tenons. I will post pictures later.
Regards from Perth
DerekVisit www.inthewoodshop.com for tutorials on constructing handtools, handtool reviews, and my trials and tribulations with furniture builds.
-
18th January 2012, 10:09 PM #19
GOLD MEMBER
- Join Date
- Aug 2004
- Location
- Brisbane
- Posts
- 4,986
It's more likely that the slab Roubo bowed to the traditional method. From memory, Chris gave no reason for the blind tenons of his earlier laminated bench, but as we all know, or should know by now, glue (in capable hands) is stronger than wood and therefore the laminated top would be entirely compatible with the traditional through tenon method without compromising the structure at all. Originally Posted by derekcohen

-
20th January 2012, 08:15 PM #20
SENIOR MEMBER
- Join Date
- Jan 2011
- Location
- Sydney
- Posts
- 613
I've just finished watching Roy Underhill cut one of those dovetails and I can honestly say with my current skill level I wouldn't nail it, but they do look strong!
Derek - looking forward to more in progress pics
-
22nd January 2012, 02:21 AM #21
Be inspired. Be creative. Be bold.
- Join Date
- Apr 2001
- Location
- Perth
- Posts
- 10,828
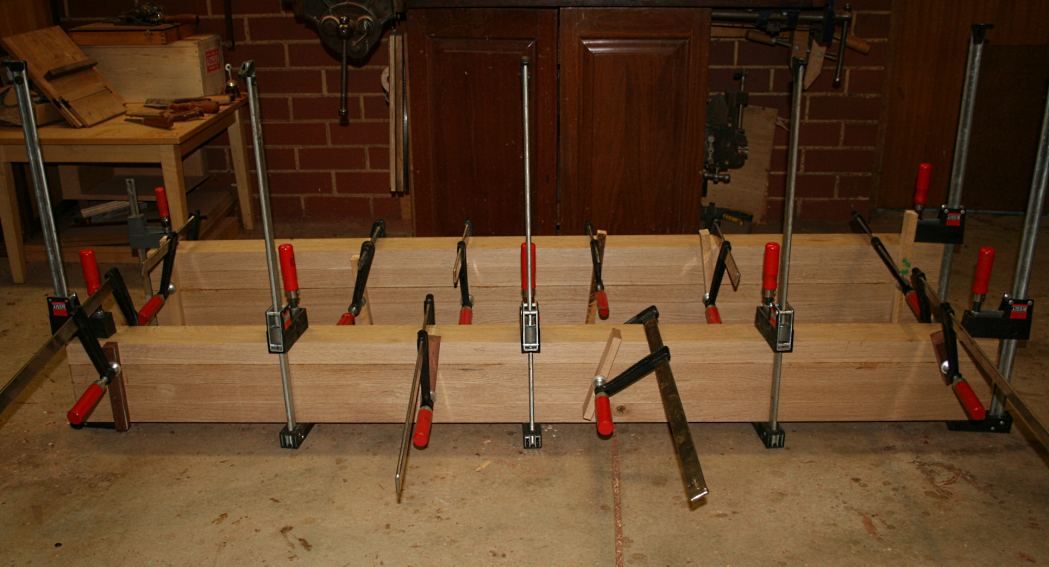
Some progress with the bench:
Firstly the bench top has progressed from a a bunch of separate glue- ups to two groups ..
... and finally (today) to a single panel. This lacks the bench dog strip and outer strip ...
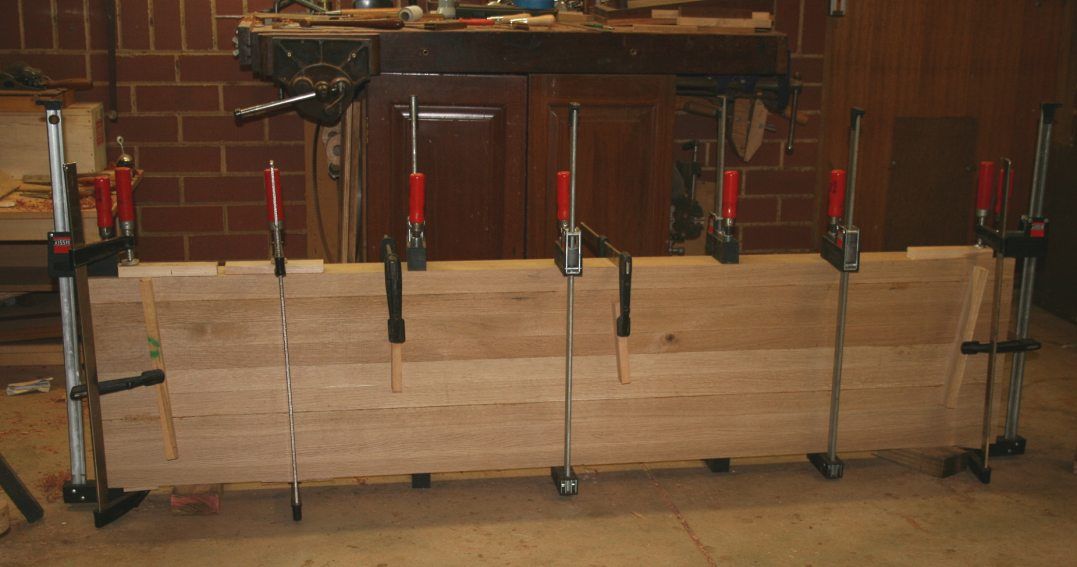
I started with 4x2s that were dressed for me. However these all required re-jointing and re-thicknessing before I could use them (moral of the story - do them yourself when you need them). The current panel is pretty flat and square, and will only require a light handplaning to remove any fine ridges. The expected thickness of the benchtop is 3 1/2".
The expected width of the bench is likely in my planned 20 - 21" range. However, I am short one board for the dog hole strip and, try as I might, there are no European Oak boards available. I could use Tassie Oak as a substitute. It is very close in colour and grain. I may be forced to do so. What I am planning first is to use the offcuts for the doghole strip, and join them together. This should work.
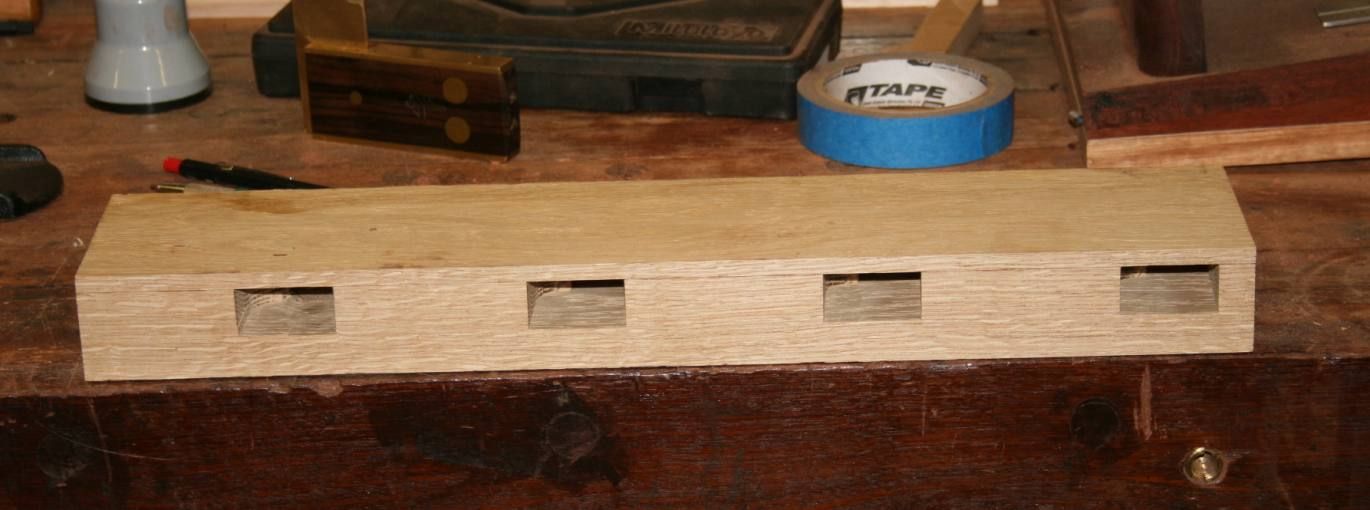
Here is a test dog hole strip I made. The router bit I had was too short and I could not get the depth I wanted. Still, it provides an idea of what I will do. Note that all dog holes angle at 2 degrees.
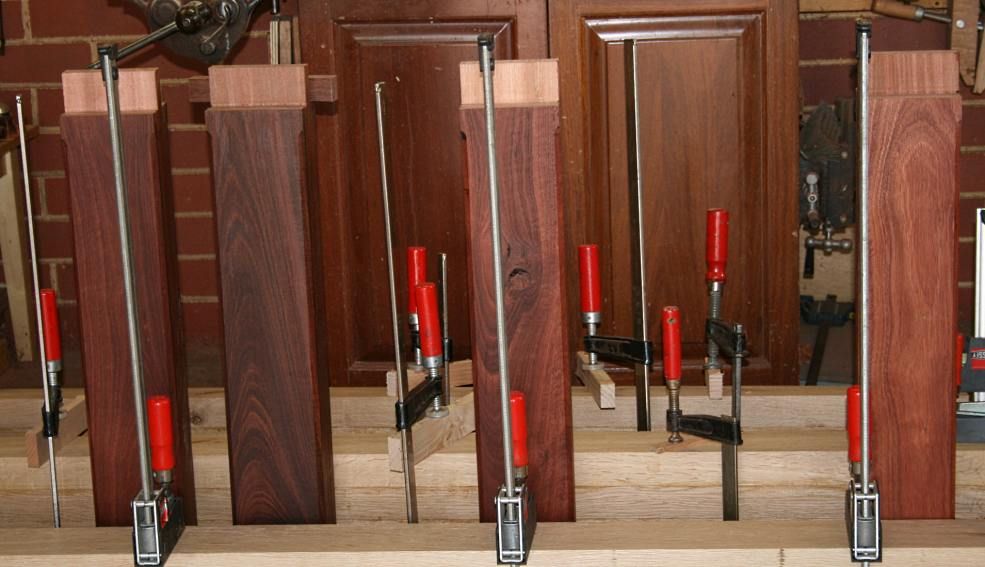
The legs have been glued up. They are a three-layer lamination, which I discussed previously.

More later.
Regards from Perth
DerekVisit www.inthewoodshop.com for tutorials on constructing handtools, handtool reviews, and my trials and tribulations with furniture builds.
-
22nd January 2012, 05:08 AM #22
Lignum Vexator
- Join Date
- May 2007
- Location
- North of the coathanger, Sydney
- Age
- 68
- Posts
- 9,417
coming along well
regards
Nick
veni, vidi, tornavi
Without wood it's just ...
-
22nd January 2012, 09:36 AM #23
Junior Senior Member
- Join Date
- Dec 2008
- Location
- Adelaide, SA
- Posts
- 962
Nice work Derek, keep us posted.
-
22nd January 2012, 10:58 AM #24
GOLD MEMBER
- Join Date
- Sep 2010
- Location
- Sydney
- Posts
- 1,983
Turns out if you use what Schwarz calls punky timber in the slab there is cause for concern. Most of you have probably read that the solid top Roubo was cracked recently ( if not read here). What was good for me to read was that there was a problem area, it got broken, it was repairable and life goes on. Originally Posted by derekcohen
Last edited by Pac man; 22nd January 2012 at 10:58 AM. Reason: left a word out
-
22nd January 2012, 11:11 AM #25
Neander Normite
- Join Date
- Jan 2005
- Location
- Melbourne
- Age
- 65
- Posts
- 11,997
I'm disappointed at the failure and the repair. IMO the repair is crude, the section should have been removed and replaced with solid timber. Bolts look out of place and plain ugly. I'm also surprised he used that timber in that area in the first place. That corner is arguably the most used corner of the bench.
-
22nd January 2012, 11:23 AM #26
GOLD MEMBER
- Join Date
- Sep 2010
- Location
- Sydney
- Posts
- 1,983
Groggy i re read the blog based on your comments. I am now wondering why he used the same timber ( the bit that broke off) and I agree it is an ugly repair. It seems that he used the same timber not a new piece.
-
22nd January 2012, 12:31 PM #27
Neander Normite
- Join Date
- Jan 2005
- Location
- Melbourne
- Age
- 65
- Posts
- 11,997
Derek, what is the finished size of the 4x2s? I guess the top is at that stage where you are planning each move in advance to save effort.
If you haven't already, may I suggest you look at the layout of the wagon vise in relation to the legs and don't forget the rails as they can foul the legs.
-
22nd January 2012, 03:01 PM #28
Be inspired. Be creative. Be bold.
- Join Date
- Apr 2001
- Location
- Perth
- Posts
- 10,828
Thanks Greg.
I was about to contact you regarding the layout of the tail vise.
The benchtop will finish off at 3 1/2" thick. I have a tad over for finish planing, but the top is flat and coplanar at this time (taking into account glue lines).
I cannot find any plans in regard to placement of the tail vise, and no one on the internet has blogged about this. My understanding is that the screw must travel behind the legs, which means that the dog hole strip must be glued in behind the legs as well (as the dog holes in the bench must line up with the dog hole in the vise).
The latest version of the BC tail vise allows for either left- or right hand placement of the plate/dog hole in the vise itself. So it is possible to move the plate in- or out. This offers some customisation of the bench dogs.
The issue with bench dogs - for those unfamiliar here - is that it is better to get them as close to the side of the bench as possible. Also, I am building rectangular dog holes, rather than round dog holes. This means that they need to be pre-build and inserted into the bench at glue-up.
The legs are 3 5/8" deep. Do this mean that the closest I can get to the side of the bench is greater than this dimension?
Other information desired: (1) what is the overhang at the rear of they bench for the tail vise? (2) what overhang did you use for the front of the bench? (3) Did you include a planing stop and (a)what size (I am thinking 2" wide to span the dog hole strip), and did you (as I plan to do) to place it in line with the dog holes?
Fastest reply would be most appreciated as I have some time to work on this today.
Best wishes for the New Year!
Regards from Perth
DerekVisit www.inthewoodshop.com for tutorials on constructing handtools, handtool reviews, and my trials and tribulations with furniture builds.
-
22nd January 2012, 04:52 PM #29
Neander Normite
- Join Date
- Jan 2005
- Location
- Melbourne
- Age
- 65
- Posts
- 11,997
Drat. Had a power failure and have just got back online. Will post some pictures and answers shortly.
-
22nd January 2012, 05:14 PM #30
Neander Normite
- Join Date
- Jan 2005
- Location
- Melbourne
- Age
- 65
- Posts
- 11,997
This shows where the wagon vise ends, exactly halfway along the leg. This was so I could use the holdfasts, pegs and clamps to secure items in the vise. It's best to support heavy items from underneath before clamping with the wagon vise (IMO) as it reduces stress on the vise. It also takes the impact from chisels or sawing without adding to stresses already on the vise. Looking down the vise slot in this picture you will see the holdfast can provide support if needed. In a later picture you will see a clamp in place holding a large board to the leg.
If the vise ends short of the leg you can derive none of the supporting/clamping benefits the leg has to offer. Note the edge of the vise slot is not flush with the leg but 10mm in toward the center of the bench. To clamp something to the leg I use a 10mm mdf spacer. This was a deliberate trade-off to avoid the rail going into the tenon and weakening it.

 Reply With Quote


Similar Threads
-
Underhill's Roubo bench
By The Pom in forum THE WORK BENCHReplies: 4Last Post: 14th June 2011, 11:57 AM -
Dan's Blackbutt Roubo Bench
By BozInOz in forum THE WORK BENCHReplies: 215Last Post: 8th April 2011, 08:21 PM -
WIP Roubo bench
By mic-d in forum FURNITURE, JOINERY, CABINETMAKING - formerly BIG STUFFReplies: 48Last Post: 30th January 2009, 04:34 PM -
Bench Questions
By noodle_snacks in forum WOODWORK - GENERALReplies: 89Last Post: 13th March 2006, 11:32 PM -
bench top glue-up questions
By Richie in forum GLUEReplies: 3Last Post: 18th February 2006, 12:00 AM
