

 Thanks:
  Likes:
  Needs Pictures: 0
 Picture(s) thanks:
Results 46 to 60 of 245
Thread: Roubo Bench Issues and Questions
-
29th January 2012, 12:57 PM #46
 Be inspired. Be creative. Be bold.


- Join Date
- Apr 2001
- Location
- Perth
- Posts
- 10,868

Hi Denim
You are correct - Roubo benches do not have a tool tray. On the other hand they may have a hanging tool holder at the rear, for chisels, saws, etc.
I do not plan to add one as they simply prevent the full width of the bench being used. I also want to pull the bench out from the wall as the wall cabinets are overhead and prevent work being stood up on the top. My idea is to add a tool tray to the wall in line with the bench. This will be handy to hold a plane or other tool when in use. It is also less likely to become filled with shavings.
I am hoping to post updates of the bench soon (we are having some difficulty with our modem, which cuts out frequently, making it difficult to upload images).
Regards from Perth
DerekVisit www.inthewoodshop.com for tutorials on constructing handtools, handtool reviews, and my trials and tribulations with furniture builds.
-
29th January 2012 12:57 PM # ADSGoogle Adsense Advertisement
- Join Date
- Always
- Location
- Advertising world
- Posts
- Many
-
29th January 2012, 10:57 PM #47
SENIOR MEMBER
- Join Date
- Jan 2011
- Location
- Sydney
- Posts
- 613
Aim a fan at it - chances are the heat is causing the issues. I've lost count of how many people have told me they are having similar issues each summer and cooling it down always seems to cure it. Originally Posted by derekcohen

-
29th January 2012, 11:36 PM #48
Be inspired. Be creative. Be bold.
- Join Date
- Apr 2001
- Location
- Perth
- Posts
- 10,868
Hi Andrew
The wireless modem sits away from the sun and in an airconditioned room.
A couple of weeks ago we had a severe storm with lightening and a blackout. I am with iiNet, and they reported a great many users have now problems with their wireless modems, as we do. It cuts out constantly. I now have a new modem, but as yet to install it.
Regards from Perth
DerekVisit www.inthewoodshop.com for tutorials on constructing handtools, handtool reviews, and my trials and tribulations with furniture builds.
-
30th January 2012, 12:30 AM #49
Be inspired. Be creative. Be bold.
- Join Date
- Apr 2001
- Location
- Perth
- Posts
- 10,868
Here is a progress report.
It is now two weeks since I began working on the bench. I suspect that my plans to finish it the first weekend were a touch optimistic
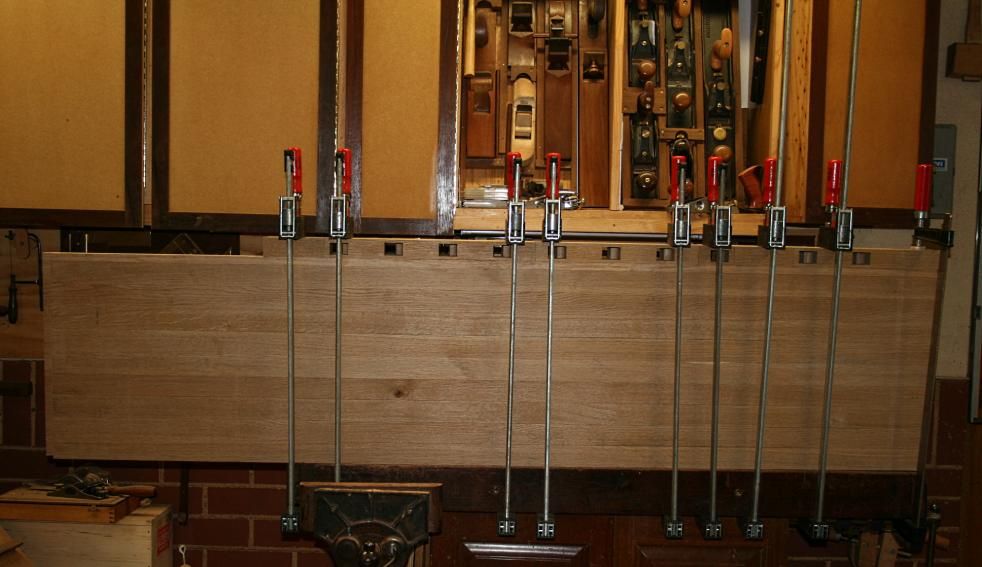
What has been frustrating has been the feeling that I get two paces forward, and then move back one. This is in part due to using Jarrah I have salvaged over the years - all needs to be laminated. For example, the stretchers are three layers each to reach the desired 2" thickness ..

I am beginning to see a light at the end of the tunnel, however. The top is nearing completion, and all the pieces for the base are essentially ready to go. I have estimated the final weight of the bench, and was shocked to discover that it will end up 182kg or 400 lbs.
Much of the time to date has been determining how to fit the Benchcraft tail vise (wagon vise). The first issue was that the oak benchtop's final thickness is 3 1/2" (rather then the 4" ideal for which the BC was designed). This is not a big deal as it just requires spacers to align with the 4" end cap (all in the instructions).
The second issue was to decide how far out to place the dog holes - in a continuous, unbroken line outside the legs, or broken by the legs but close to the edge of the bench? I decided to go for the latter. The bench dogs are 2" from the edge of the bench, each 3" apart, except for the area of the legs, where they are 6" apart. I also decided not to include a planing stop. Either I will use the first bench dog, or I will use a jig that uses the bench dog and a holddown.
(the bench dog strips were shown in the previous report)
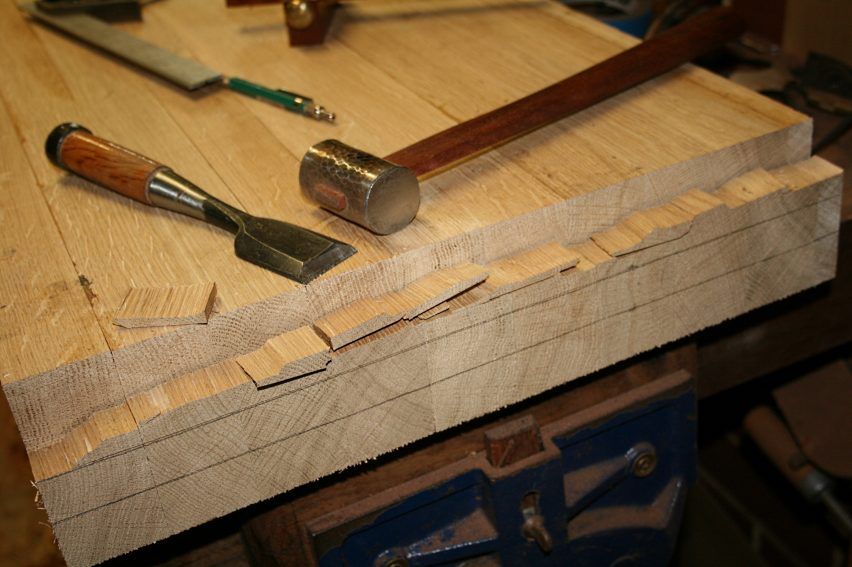
So the order today was (1) form the tenon for the end cap, as this forms part of the tail vise screw installation, (2) rout out the mortice for the screw, and then (3) glue in the bench dogs.
I have watched a few videos on various blogs of the end cap tenon being formed with a circular saw and a power router. I took a slightly different route.
Firstly, I sawed the shoulders of the tenon on a sliding tablesaw ...

Then used a wide chisel to split the waste off ...
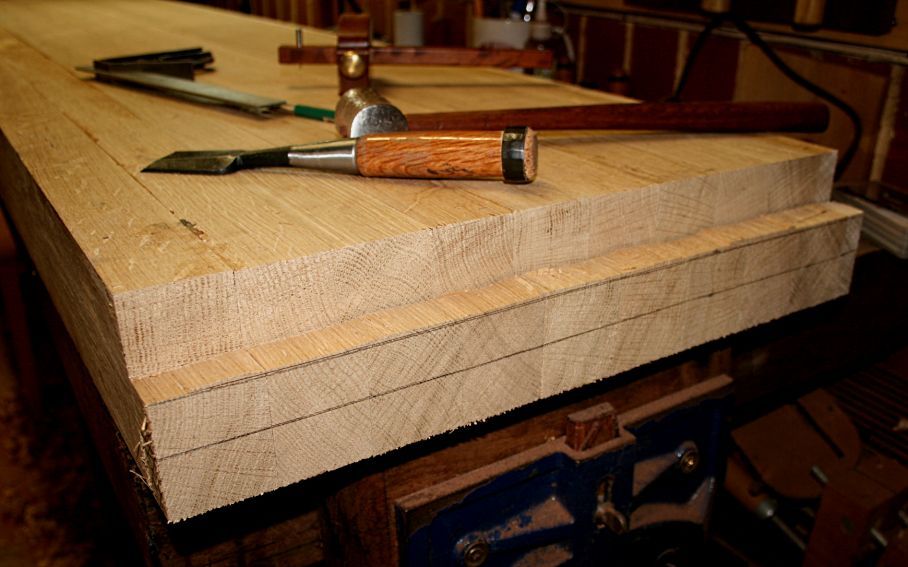
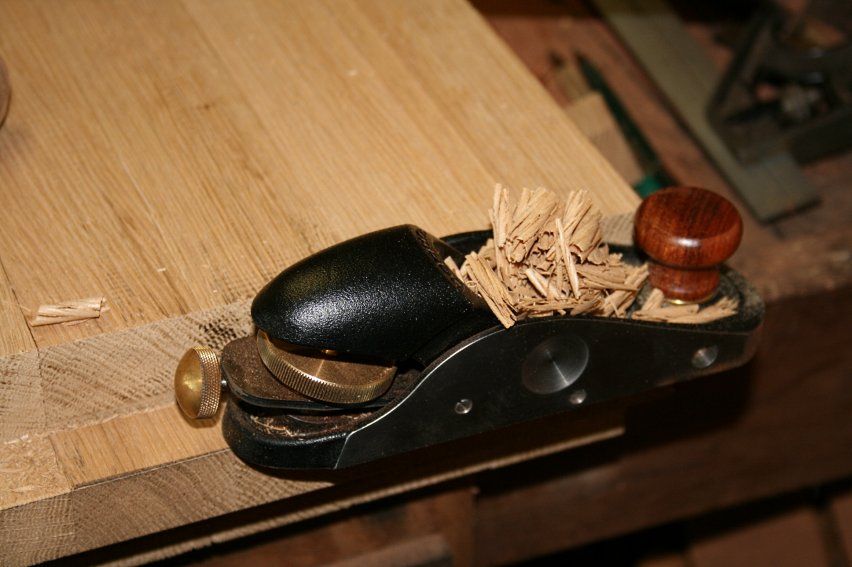
The first side I used my old Stanley #93 (perfect for a 1" deep tenon), as it could adjust from thick to fine shavings.
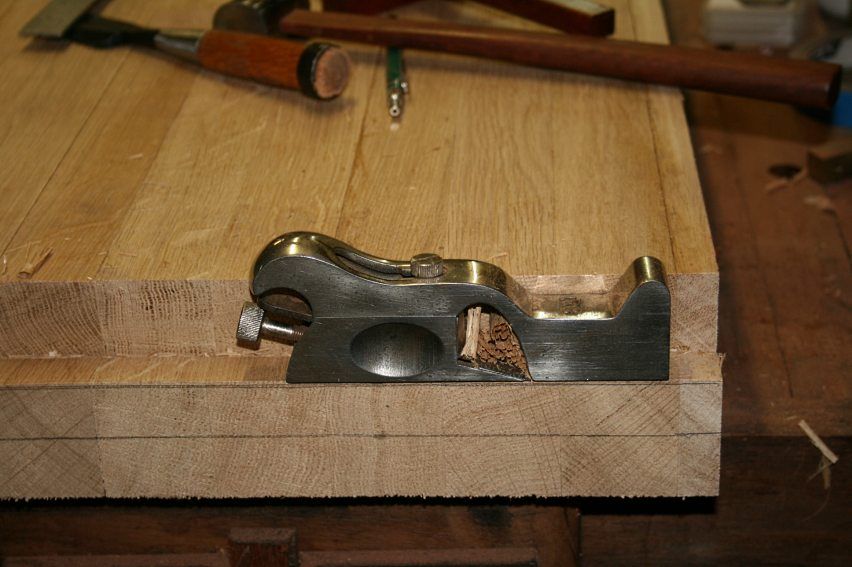
On the other side I used a Veritas skew block plane. This was a better choice.
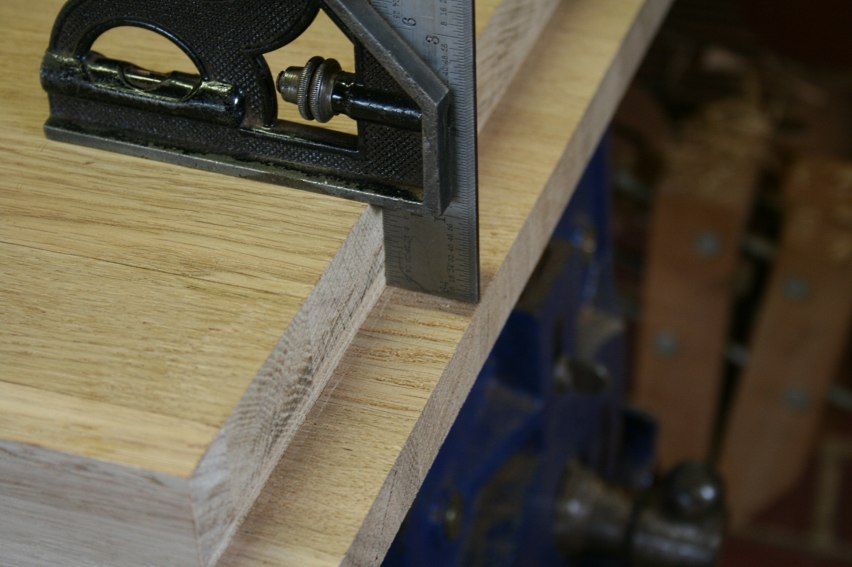
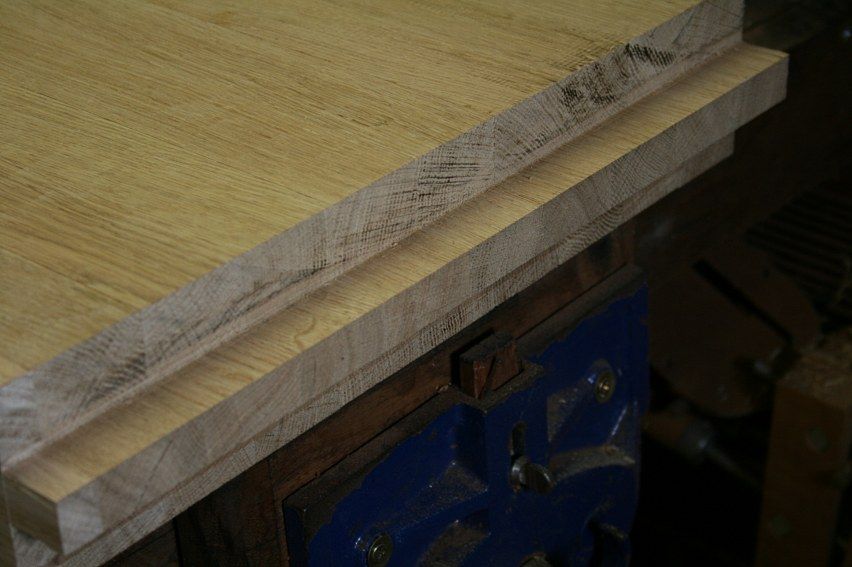
Having then routed the slot for the tail vise screw, I was finally able to glue on the dog hole strips.
The side piece and end cap are both loose (they will later be dovetailed together) ...

Regards from Perth
DerekVisit www.inthewoodshop.com for tutorials on constructing handtools, handtool reviews, and my trials and tribulations with furniture builds.
-
30th January 2012, 10:37 PM #50
SENIOR MEMBER
- Join Date
- Jan 2011
- Location
- Sydney
- Posts
- 613
Whoops, made the first mistake of tech support - jumping to conclusions without getting the information first! Originally Posted by derekcohen
Workbench is looking great Derek
-
31st January 2012, 06:49 PM #51
Be inspired. Be creative. Be bold.
- Join Date
- Apr 2001
- Location
- Perth
- Posts
- 10,868
How to attach the end cap ???
Jameel generally advises that one bolt the end cap to the bench. The vise must create some pressure as the screw is tightened.
My understanding is that bolts are necessary as this is all that holds the end cap to the bench for most users of his tail vise. Now I would rather not bolt on the end cap (it looks ugly), so I am wondering whether a combination of dovetails at each side of the end cap along with wooden pins through the end cap into the 1" x 1" tenon (see pictures in the first post) would be strong enough to withstand the forces involved?
Your opinion is needed here. (Is anybody watching this thread?)
I was asked the following question on another forum:
Not having built a wagon vise (or whatever you choose to call the Benchcrafted vise), why do you need an end cap in the first place?
In reply:
The end cap connects the vise screw to the bench. Without the end cap, the screw would just turn on itself. Connected to the bench it will move forward or back.
Here is the underside of the bench with the wagon vise under installation (flip the image 180 degrees in your mind to recognise the vise is on the rear left side of the bench). As the bench top is 3 1/2" thick and the the end cap is 4" high (to fit the wheel at the correct height), you will see a spacer under each steel runner (the spacers are each 1/4" high. A 4 " thick bench would recess the runner by 1/4").
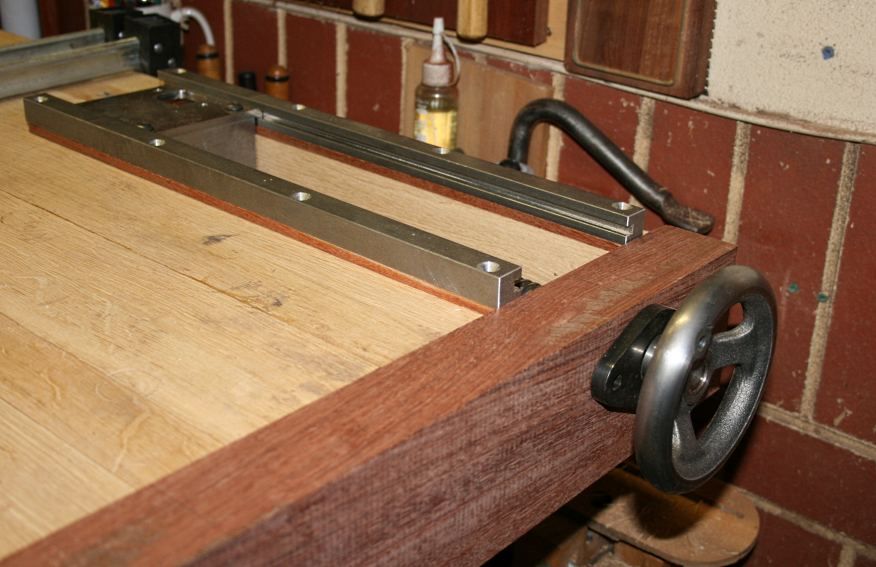
Here is a view into the vise. The area for the screw was routed out. The slot for the moving dog hole was built in.

The vise, end cap and side rails are loose at this point. They have been cut to exact size. The next step is to dovetail the sides to the end cap, and then glue and pin the end cap t the bench via the tenon (shown in the original post).
Regards from Perth
DerekVisit www.inthewoodshop.com for tutorials on constructing handtools, handtool reviews, and my trials and tribulations with furniture builds.
-
31st January 2012, 07:16 PM #52
GOLD MEMBER
- Join Date
- Sep 2010
- Location
- Sydney
- Posts
- 1,985
Not having installed this vise but wanting to do so in future i would ask Jameel why he recommends the bolts and what his experience has been with not using the bolts?
Is it because of the forces involved or because he has a preference for the use of bolts?
I understand from your previous posts that you have given yourself a tight timeframe but maybe a case of less haste more speed would work here.
-
31st January 2012, 07:38 PM #53
GOLD MEMBER
- Join Date
- Sep 2010
- Location
- Sydney
- Posts
- 1,985
If you go to the benchcrafted site there is a short video of customers benches.
One of the benches by sauer and steiner shows an end cap without bolts.
There is also one by Frank Strazza without bolts alsoLast edited by Pac man; 31st January 2012 at 07:41 PM. Reason: added link
-
31st January 2012, 08:07 PM #54
Neander Normite
- Join Date
- Jan 2005
- Location
- Melbourne
- Age
- 65
- Posts
- 11,997
Derek, I went to great lengths to avoid the bolts being visible and to ensure they would not foul the clamps that I used to hold things to the top. I suggest you use something like the bolts pictured and hide them underneath. Keep them accessible for re-tightening later due to movement. Some people have used coach bolts then put a plug over the top (which they may regret after a few seasons of movement). Using dovetails alone is not sufficient in my opinion. The wagon vise will compress the dovetails and moisture variations will open the gaps over time. Originally Posted by derekcohen
EDIT: I used four heavy 1/2" bolts for each end cap. The end cap is free to allow movement of the bench because although it is quite firm, it is only glued at one end and the cap is waxed everywhere else to allow slippage. The bolts prevent the cap from moving backward when the vise is tightened.

-
31st January 2012, 08:25 PM #55
GOLD MEMBER
- Join Date
- Feb 2003
- Location
- back in Alberta for a while
- Age
- 68
- Posts
- 12,006
Derek Originally Posted by derekcohen
Dispensing with the bolts is not a good idea.
when you use the wagon vise as a clamp, it's the bolts that stop the end cap being pushed off
in terms of structural strength, to avoid bolts altogether, the end cap would need to attach via a sliding dovetail.
FWIW, my recommendation is you use bolts, but recess the heads sufficiently to allow you to cover them with a diamond shaped inlay of a strongly contrasting timber -- I can send you some Australian Beech or you could use a mother of pearl inlay
Round fox-wedged tenons are a possible option, but not IMO as strong or as flash as bolts covered by adecorative inlay
Derek, please don't do thisThe vise, end cap and side rails are loose at this point. They have been cut to exact size. The next step is to dovetail the sides to the end cap, and then glue and pin the end cap to the bench via the tenon (shown in the original post).
please bolt the end cap on insteadregards from Alberta, Canada
ian
-
31st January 2012, 08:30 PM #56
GOLD MEMBER
- Join Date
- Feb 2003
- Location
- back in Alberta for a while
- Age
- 68
- Posts
- 12,006
Originally Posted by Pac man

the direction of the dovetails on that end cap implies, to me, that they are there to hold the front apron in place
which inturn implies a slidng dovetail for the end cap or concealed bolts, al la what Groggy suggestedregards from Alberta, Canada
ian
-
31st January 2012, 08:42 PM #57
Neander Normite
- Join Date
- Jan 2005
- Location
- Melbourne
- Age
- 65
- Posts
- 11,997
I am very interested in the longevity of that endcap. It appears to have been drawbored with pegs and perhaps glued. If so, there may be problems later when the benchtop expands but the endcap doesn't lengthen at the same rate. If the timber is dimensionally stable he may get away with it. I hope that is the case as it is a very nice bench. Originally Posted by ian
-
31st January 2012, 09:10 PM #58
SENIOR MEMBER
- Join Date
- Jul 2008
- Location
- Aspley, Brisbane
- Age
- 46
- Posts
- 362
Derek,
Another alternative is to recess some nuts into the underside of the endcap and bolts into the underside of the bench. No visible bolts and you still get the strength recommended.
Regards,
Denim.
-
31st January 2012, 09:45 PM #59
GOLD MEMBER
- Join Date
- Aug 2009
- Location
- Armadale Perth WA
- Age
- 55
- Posts
- 4,524
To have any mechanical contribution to the vice-holding ... those dovetails are the wrong way round surely? They are holding the front of the bench on - not the end-cap.
How about a sliding dovetail all the way across the end? maybe tapering?
I know you can attach a table-top to the base this way, but I'm not sure what constraints the table end-grain puts on things.
I've been looking at the dovetailing of the moving sections of tail-vices ... similar idea.
A lot of work I'm sure ... just to add to the fun of the build
Cheers,
Paul McGee
Hmmmm ... I must type really slowly
Originally Posted by Pac man
-
31st January 2012, 10:18 PM #60
GOLD MEMBER
- Join Date
- Sep 2010
- Location
- Sydney
- Posts
- 1,985
I looked closer at the Frank Strazza site and it appears that the end cap is bolted on and then the bolts/ holes are then capped. Which brings me back to my original thought ---what are Jameels experiences and thoughts?
What is interesting is that the cap is on one side of the split top only.


 Reply With Quote


Similar Threads
-
Underhill's Roubo bench
By The Pom in forum THE WORK BENCHReplies: 4Last Post: 14th June 2011, 11:57 AM -
Dan's Blackbutt Roubo Bench
By BozInOz in forum THE WORK BENCHReplies: 215Last Post: 8th April 2011, 08:21 PM -
WIP Roubo bench
By mic-d in forum FURNITURE, JOINERY, CABINETMAKING - formerly BIG STUFFReplies: 48Last Post: 30th January 2009, 04:34 PM -
Bench Questions
By noodle_snacks in forum WOODWORK - GENERALReplies: 89Last Post: 13th March 2006, 11:32 PM -
bench top glue-up questions
By Richie in forum GLUEReplies: 3Last Post: 18th February 2006, 12:00 AM
