

 Thanks:
  Likes:
  Needs Pictures:
  Picture(s) thanks:
Results 61 to 75 of 112
Thread: Underbench cabinets
-
27th March 2021, 01:12 AM #61
 GOLD MEMBER


- Join Date
- Feb 2016
- Location
- Canberra
- Posts
- 5,125

I like the hoops.
It suits, adding a nice posh element.
Plus, they look good to reef upon
-
27th March 2021 01:12 AM # ADSGoogle Adsense Advertisement
- Join Date
- Always
- Location
- Advertising world
- Posts
- Many
-
2nd April 2021, 12:06 AM #62
Senior Member
- Join Date
- Jul 2008
- Location
- geelong
- Posts
- 359
Did pan down trough photos
Stop making stuff for the shed. Make it for the house or clients. -the missus will be much happier. TOO pretty for shed !!!!

-
6th April 2021, 12:32 AM #63
Be inspired. Be creative. Be bold.
- Join Date
- Apr 2001
- Location
- Perth
- Posts
- 10,821
What lies behind drawer #1?
The underbench cabinet is done ....
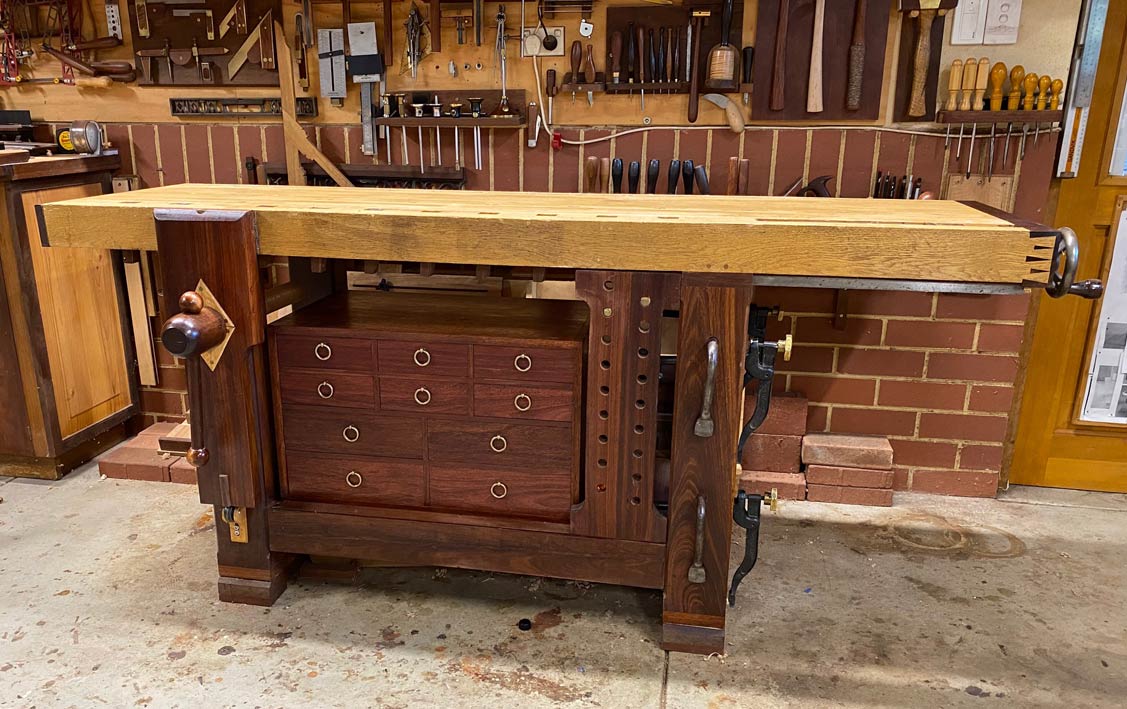
... and now the drawers are being filled, starting with the centre drawer in the top row.
There are 10 drawers in all, and the aim is to use the space as efficiently as possible. Into this cabinet will be those tools I want close at hand, and to access readily.
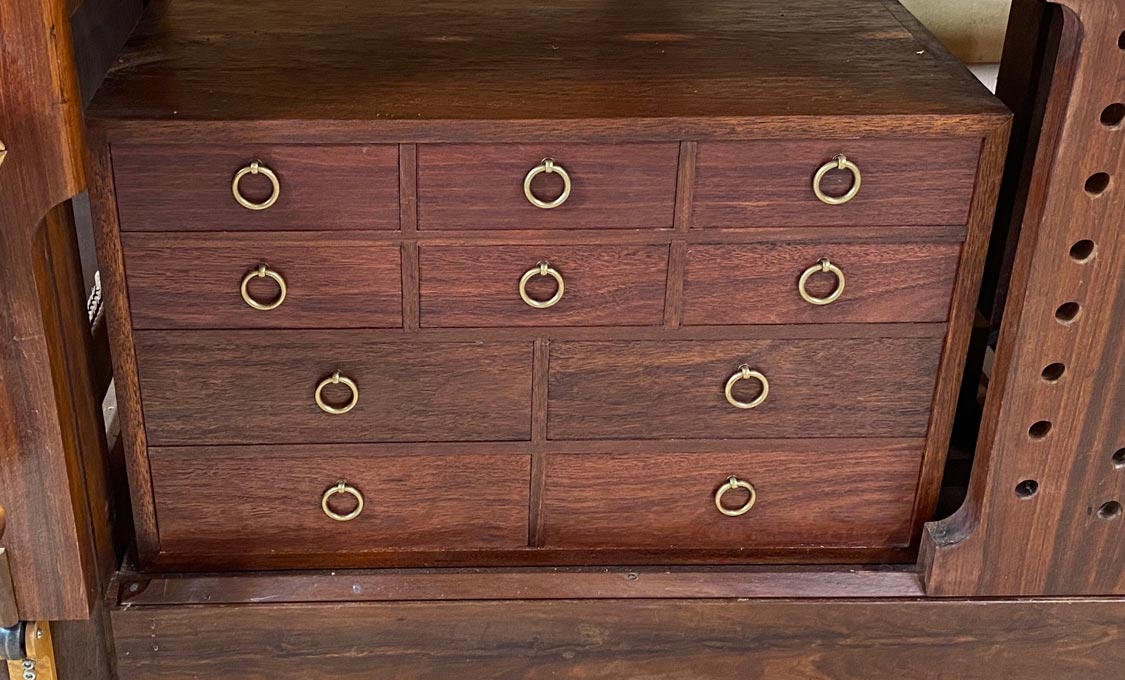
The centre drawers in the top two rows are for marking tools. The top drawer will be for squares I use all the time.
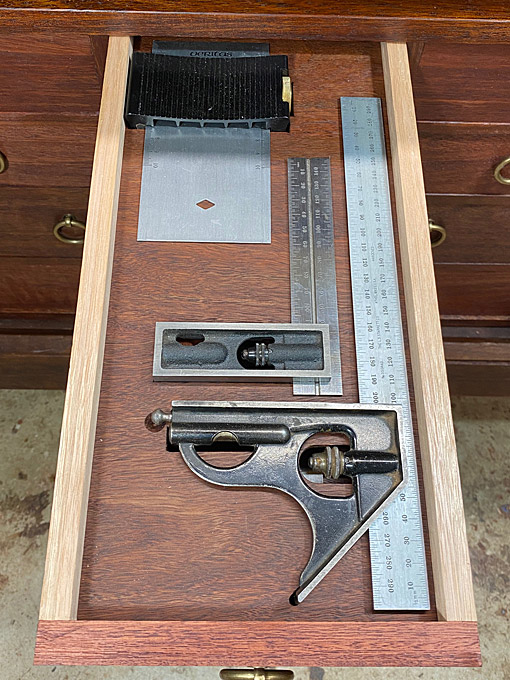
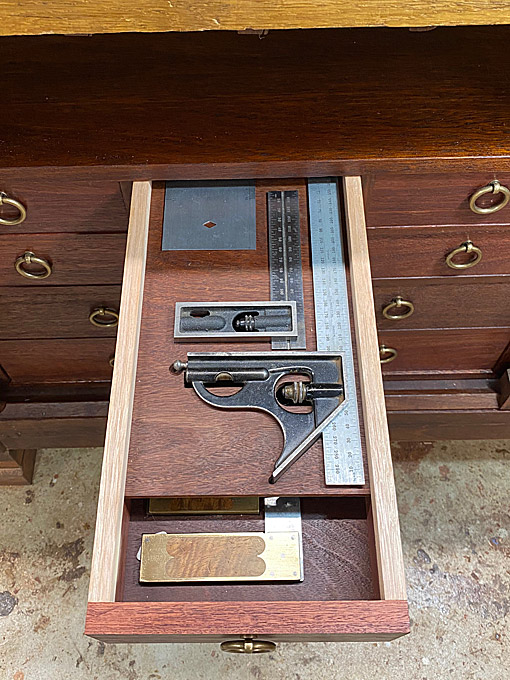
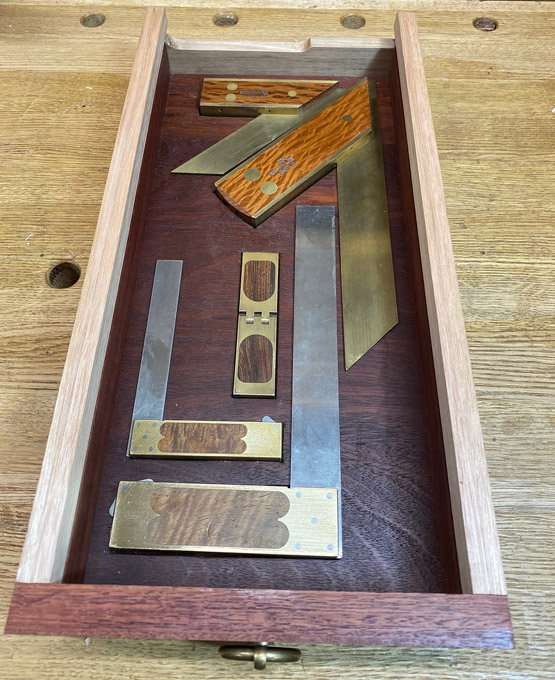
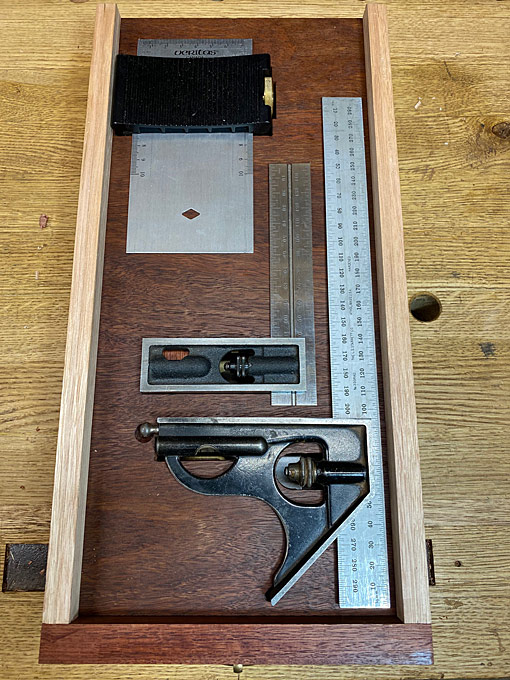
Opening the drawer produces a 300mm Starrett combination square, a 150mm Starrett double square, and a Veritas Sliding Square. these are french fitted into a Jarrah panel (more on the french fitting shortly). ...
Now you know how I like secret drawers - well, if you slide this panel back ...
... you find the treasure drawer with a pair of Colen Clenton mitre squares infilled in Sheoak, and pair of Chris Vesper 4" and 7" squares infilled in Tasmanian Blackwood, and a 2x2" Bridge City saddle square ...
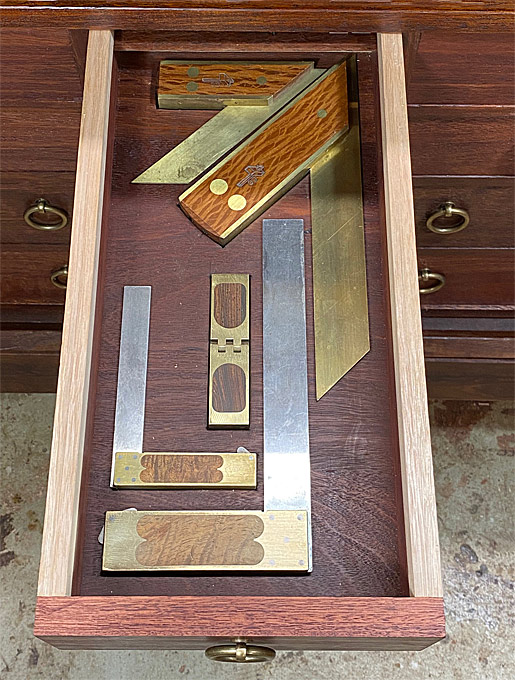
The Jarrah panel for the latter squares is a loose fit, snug at the sides and about 5mm of expansion space at the end. At the right side of the photo are the rails, which were glued to the sides (but not the loose panel)
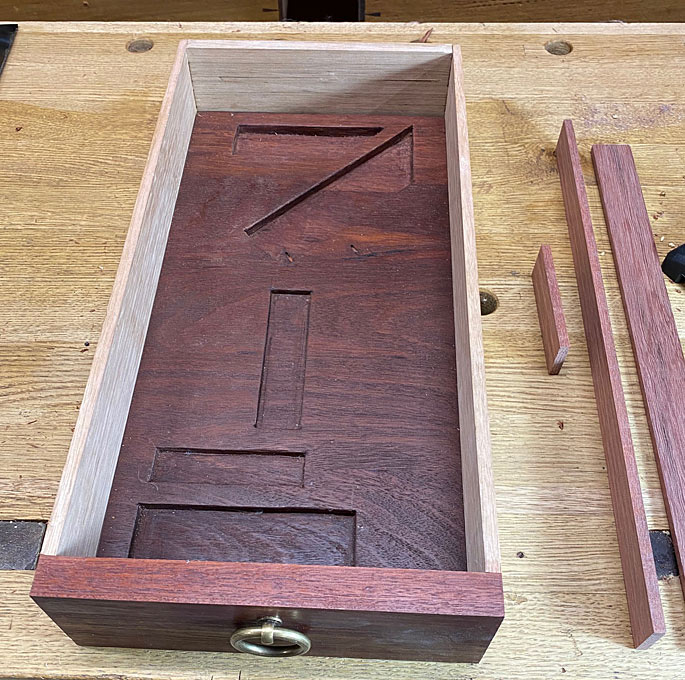
Below is the upper panel for the Starretts and Veritas squares. The panel needed to be thin - it is 6mm thick - and cut outs made rather than french fitted. This was to save space by having the tools handing down rather than sticking up.
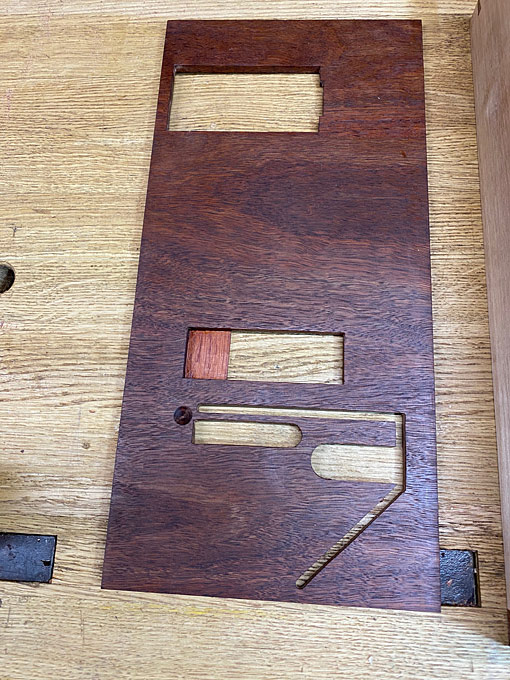
The eagle eyed will have noticed that the rear of the drawer was cut away. This was to allow for the upper tray to slide past the drawer back, which takes advantage of the space behind the drawer when it is opened.
There was a little extra shaping as the body of the Veritas hung down lower than the other squares.
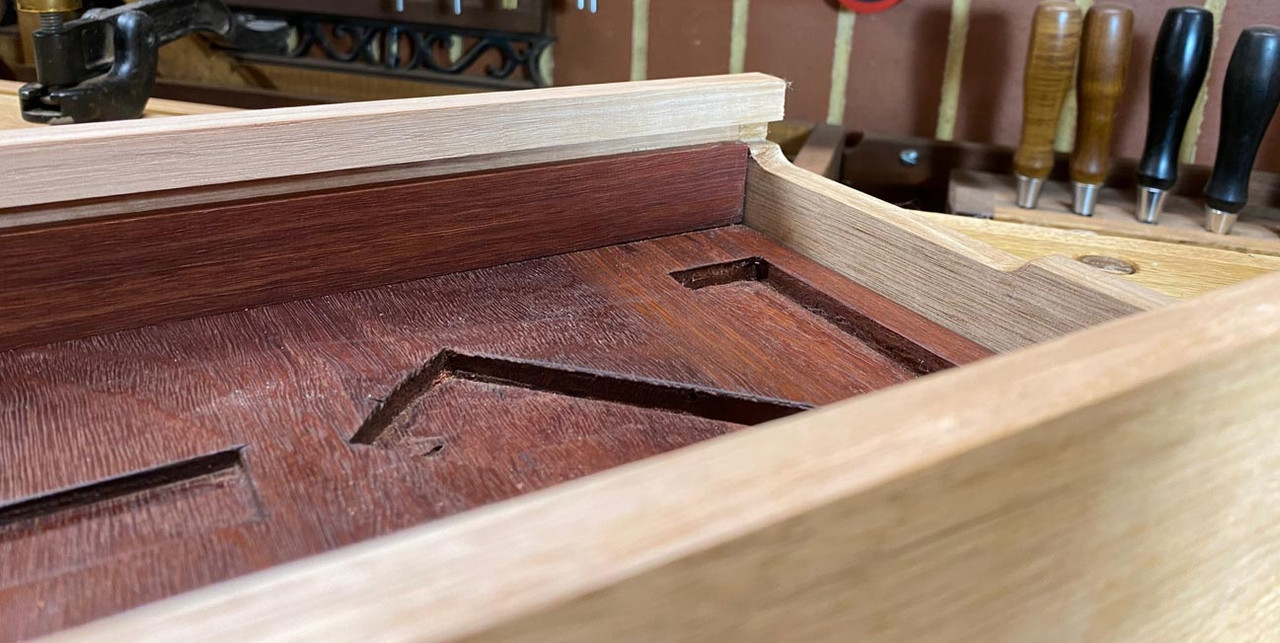
The upper tray runs on the Jarrah rails attached to the inside of the drawer sides. Finally, there is a rail added above the tray to prevent it tipping as it is slid back. This is in the same Tasmanian Oak as the drawer sides.
The drawer manages about 90% extension without any support.
Regards from Perth
DerekVisit www.inthewoodshop.com for tutorials on constructing handtools, handtool reviews, and my trials and tribulations with furniture builds.
-
6th April 2021, 10:40 AM #64
Butcher of wood
- Join Date
- Jun 2010
- Location
- Bundaberg
- Age
- 54
- Posts
- 3,427
One down; nine to go! Looks like you�ll be clearing a fair amount of your tool wall?
Nothing succeeds like a budgie without a beak.
-
6th April 2021, 02:33 PM #65
SENIOR MEMBER
- Join Date
- Sep 2010
- Location
- Port Sorell, Tasmania
- Posts
- 592
Thanks for taking the trouble to post this build Derek. I like the idea of what you have done here and this will be an excellent resource when I get around to to building my own under bench storage.
You can't use up creativity. The more you use, the more you have. ~Oscar Wilde
-
6th April 2021, 08:32 PM #66
Be inspired. Be creative. Be bold.
- Join Date
- Apr 2001
- Location
- Perth
- Posts
- 10,821
Yep ... that is why some of the tools are appearing for sale here. Ideally (unlikely!), the cabinet will store all I need. It is a nice fantasy Originally Posted by Chief Tiff

Regards from Perth
DerekVisit www.inthewoodshop.com for tutorials on constructing handtools, handtool reviews, and my trials and tribulations with furniture builds.
-
6th April 2021, 10:03 PM #67
GOLD MEMBER
- Join Date
- Feb 2016
- Location
- Canberra
- Posts
- 5,125
Careful. A museum might come and forcefully requisition your Nationally Important Artifact .....
-
15th April 2021, 06:51 PM #68
 GOLD MEMBER
- Join Date
- Mar 2004
- Location
- Brisbane (western suburbs)
- Age
- 77
- Posts
- 12,124
A nice fantasy indeed, and it would be very interesting to watch the maestro going through his current collection of tools, mercilessly culling & culling until the reminder all fit in that box! That cabinet is a tour de force of cabinetry, Derek, and should be pretty capacious with all your little space-saving trickery, but unless you have secretly mastered Tardis technology, where is the other 75% of your tool collection going to live?! Originally Posted by derekcohen

Being a couple of years ahead of you in this retirement business, I started a vaguely similar exercise some years ago. At the time, one option floated was to go to one of those retirement village type places, which would have meant very limited space for my activities (shudder! I think the look on my face put that idea on a back-burner).
But about that time, I wanted a smaller bench to drag off to wood shows because the �portable� bench I�d made for such purposes kept gaining weight through some strange physics-defying process. For this project I took on a few extra challenges, one being to see if I could incorporate a full set of all-wood vises, front, tail & twin-screw in a space about 900 x 500. That part turned out quite well & all vises function as they should: Bench screws as used b.jpg Toolbox under.jpg
For the toolbox that goes under, I went for a slightly different approach from Derek�s, my idea was to have a strong box that can be lifted in & out for carriage. It looks very utilitarian on the outside: Box finished.jpg
But I tried to tart it up a bit inside: Open.jpg
I can fit a reasonable selection of tools in it, enough to make a fair fist of a wide range of jobs (as long as I have a strapping young bloke to help lift it), but I started to wonder if I could manage to make this my �retired from retirement� toolbox & squeeze in enough tools to keep me happy & productive in my dotage. The answer, of course, is �not a snowball�s chance in Hades�. It would take an order of magnitude more willpower than I posses to cull my tools to the extent I could house them in a box 540W x 500H x 400 deep!
The drawers are all designed for specific tools & just deep enough to fit what they have to contain. There�s room for a couple more things in this drawer: Setting out tools3.jpg
But it gets a bit tight in the two chisel drawers: Drawer R2.jpg
(& where am I going to put the rest of each of these sets, let alone the other 3 lots of chisels I have?)
I'd have to throw out half of my marking gauges: Setting out tools4.jpg
Culling them would be almost as bad as deciding which of my children to disown.
So the idea of fitting all of my tools into a single under-bench box remains a fantasy for me too, unless Derek really does have the secret of the Tardis�

Cheers,IW
-
15th April 2021, 10:23 PM #69
GOLD MEMBER
- Join Date
- Feb 2016
- Location
- Canberra
- Posts
- 5,125
IanW, only 7 marking gauges.
I can see the conundrum.
-
16th April 2021, 08:37 AM #70
GOLD MEMBER
- Join Date
- Mar 2004
- Location
- Brisbane (western suburbs)
- Age
- 77
- Posts
- 12,124
I knew I'd get lots of sympathy, WP. Originally Posted by woodPixel
BTW, there's many more than that in my main tool cupboard - those were just spares posing for the pic, most of which have gone to new homes...
 IW
IW
-
16th April 2021, 11:52 PM #71
Be inspired. Be creative. Be bold.
- Join Date
- Apr 2001
- Location
- Perth
- Posts
- 10,821
Ian, I shall respond to this in due course Originally Posted by woodPixel
Regards from Perth
DerekVisit www.inthewoodshop.com for tutorials on constructing handtools, handtool reviews, and my trials and tribulations with furniture builds.
-
17th April 2021, 09:19 AM #72
GOLD MEMBER
- Join Date
- Mar 2004
- Location
- Brisbane (western suburbs)
- Age
- 77
- Posts
- 12,124
OK, I'll wait 'til I see how many you manage to squeeze in, Derek... Originally Posted by derekcohen
You have shown us a lot of different gauges over the years, so unless you've parted ways with a few, I suspect there'll be some pushing & shoving to get them all in the under-bench.
This is my drawer of 'users': Gauges b.jpg
One of those large gauges is earmarked to go when I get time to modify the other one. I got the idea of making a "multi-tool" with cutter or pin, and had the foresight to make the diameter the same as a pencil, so it's a 3-in-1 gauge:3 Double ended insert.jpg 4 Cutter mode.jpg 1 Pencil mode.jpg
The other is a traditional panel gauge with a 'stepped' stock. It didn't occur to me until recently that I could make a new stock, with a step one side & a wear-strip on the other & it will be a 4-in-1.
So, WP, the number of gauges in the drawer is about to be reduced by one, when I get the round tuit. That is, unless I use the freed-up space to squeeze in another couple of smaller gauges.....
Cheers,IW
-
17th April 2021, 04:22 PM #73
GOLD MEMBER
- Join Date
- Feb 2016
- Location
- Canberra
- Posts
- 5,125
Super fancy marking guage... Manky pencil!
You must suffer from choice paralysis for the quick jobs
-
17th April 2021, 04:56 PM #74
SENIOR MEMBER
- Join Date
- Mar 2018
- Location
- Sydney
- Posts
- 469
Hi Ian, Originally Posted by IanW
For panel gauges, when do you use a step vs the flat with a wear strip? I'm needing to build one very soon and looking at ideas.
Regards,
Adam
-
17th April 2021, 05:24 PM #75
GOLD MEMBER
- Join Date
- Mar 2004
- Location
- Brisbane (western suburbs)
- Age
- 77
- Posts
- 12,124
Adam, the "step" allows the stock to be registered very stably on the edge of the panel. When you are marking 300 or 400mm from an edge, the step helps greatly to keep the beam perpendicular as you push/pull the gauge along. It isn't absolutely essential, but if you use a stepped gauge to mark a wide panel, I think you'll quickly find how helpful that step can be. panel & regular Gs cf.jpg Originally Posted by taz01
On the other hand, the step is a nuisance if you need/want to roll the gauge over a bit as you typically do with a regular gauge. My initial solution was to have two gauges (because I can!), and I only realised fairly recently that it would be a simple matter to make a stock with a step on one side & a flat face with a brass wear-strip on t'other.
So you could have your cake & eat it too...
Cheers,
P.S. The brass angle wear strip in the step is optional, there are lots of old gauges that simply have an unlined rebate, & most I've seen were in reasonably good condition for their age. My guess is that even in a busy cabinet shop, they would get way less use than regular gauges.IW

 Reply With Quote


Similar Threads
-
Underbench kitchen island floor shelves
By chode in forum WOODWORK - GENERALReplies: 12Last Post: 15th February 2016, 09:21 PM -
underbench dust collection
By Bluegum in forum DUST EXTRACTIONReplies: 1Last Post: 7th February 2013, 07:40 PM -
Ply for cabinets
By noelb in forum TIMBERReplies: 0Last Post: 20th May 2011, 08:06 PM -
Underbench Storage of Router table and thicknesser
By Dengue in forum WOODWORK - GENERALReplies: 4Last Post: 24th November 2010, 05:07 PM -
1hp Underbench Dust Extractor
By PEN in forum HAND TOOLS - POWEREDReplies: 8Last Post: 14th April 2005, 11:02 PM
