

 Thanks:
  Likes:
  Needs Pictures:
  Picture(s) thanks:
Results 121 to 134 of 134
-
4th March 2020, 10:41 AM #121
 GOLD MEMBER


- Join Date
- Nov 2004
- Location
- Millmerran,QLD
- Age
- 73
- Posts
- 11,135
 Ian
Ian Originally Posted by IanW

I was thinking that as I read through. Another of life's mysteries.
Regards
PaulBushmiller;
"Power tends to corrupt. Absolute power corrupts, absolutely!"
-
4th March 2020 10:41 AM # ADSGoogle Adsense Advertisement
- Join Date
- Always
- Location
- Advertising world
- Age
- 2010
- Posts
- Many
-
25th April 2020, 11:56 AM #122
 GOLD MEMBER
- Join Date
- Jul 2011
- Location
- In between houses
- Posts
- 1,784
I did a YouTube video on it, after heaps of requests, here�s the link for those interested: YouTube Originally Posted by riverbuilder
-
25th April 2020, 05:37 PM #123
Be inspired. Be creative. Be bold.
- Join Date
- Apr 2001
- Location
- Perth
- Posts
- 10,824
POST TITLE:
Roubo bench
PRIMARY FUNCTION:
Hand tool woodworking: focus on planing, sawing and chisel work.
DIMENSIONS in mm:
80"(2030mm) long x 22" (560mm) wide. Top is 3 1/2" (90mm) thick.
MATERIALS (timber species etc):
Jarrah base and European Oak top
VISES INCLUDED:
Shop made leg vise with wooden screw; BenchCrafted wagon vise.
LINK TO YOUR BUILD THREAD (if applicable):
"The Building of a Bench": Shop Made Tools
BRIEF DESCRIPTION:
It's a Roubo! How much can you say!?
THINGS YOU PARTICULARLY LIKE
It's a Roubo! How much else to say!?
THINGS THAT YOU WOULD CHANGE (in retrospect):
It's a Roubo! What's there to change!?
THINGS THAT YOU WOULD INCORPORATE NEXT TIME :
:
BenchCrafted leg vise
WHAT or WHO INSPIRED SOME OF THE INCLUSIONS (provide links):
Chris Schwarz inspired the Roubo, per se. The rest came from lots of places, friends, and discussion.
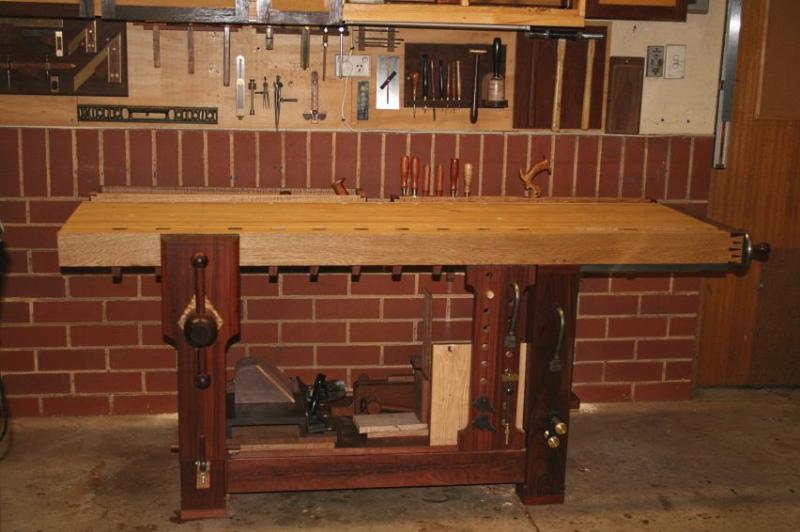
It occurs to me that I never did post my bench to this thread. It's not like I have been hiding it away, but many have seen it in the builds I have posted to the forum. Well, I guess that is not quite accurate - what you see is some parts of it in action, and not the complete bench.
I looked up the record of its build on my website, and it is exactly 8 years to the day that it was completed, in April 2012. The bench was built from scratch over 12 weekends. The record of this is here ... scan down to "The Building of a Bench": Shop Made Tools
The design is a Roubo-style, which was certainly influenced by Chris Schwarz at that time. It just made sense to me. For example, the slab sides that flowed into legs without any overhang.
The base is Jarrah recycled from old roof trusses. Several years earlier, we had removed the roof over the garage and built a granny flat, which was to become the suite of rooms for my private practice in clinical psychology (and the answer is "no" ... I do not have the time to nip into the shed to play with tools between patients ). The top of the bench is 3 1/2" thick European Oak. This sounds extravagant, however it was going quite cheaply at the time. Cheaper than Tassie Oak, and quite a lot nicer. Having worked with a Jarrah top on my previous bench for 18 years, I knew that I wanted one in a light wood, which would make everything easier to see.
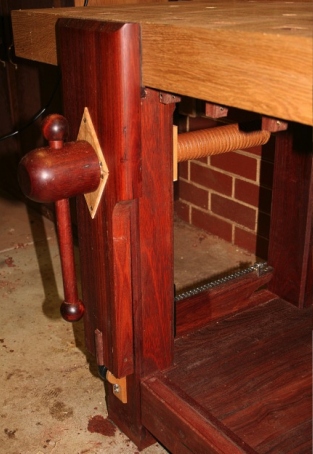
The vises include a leg vise using a wooden screw that a friend in the USA sent to me. The tail vise is a Bench Crafted wagon vise. Both have proved themselves over the years. I have been extremely happy with the BC, but if I did this all again, I would not go for a wooden screw for the leg vise, as it is more vulnerable to racking (and I have had to build fixtures to counter this in mine).
The choice of a leg vise was made possible by the re-introduction of the Moxon dovetail vise around that time by Chris Schwarz. The original plan had been to use a Veritas double screw face vise, because this could also be used for dovetails. The Moxon not only raised the work to a more comfortable height, but it left the face vise free to hold long boards (together with a sliding deadman). A leg vise is the best design for this purpose, in my opinion. So leg vise it was.
A work bench is never complete, just because the main build is stated to have concluded. This was the bench at that point ...


Legvise with AYS chain adjuster ...

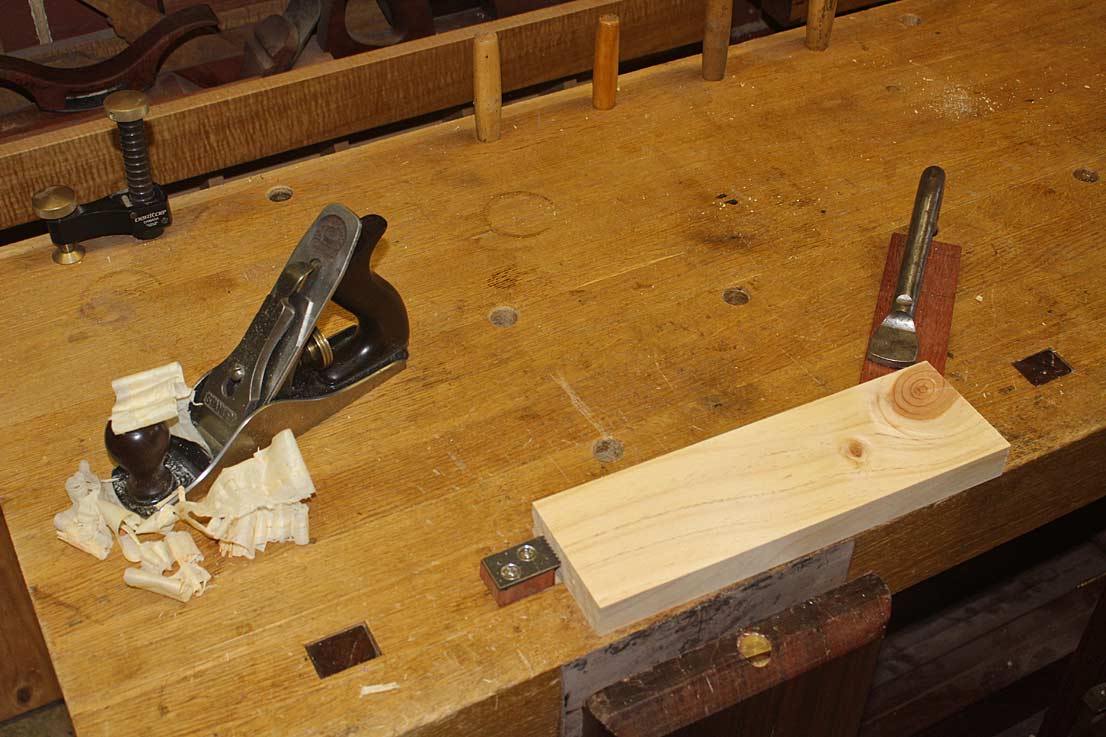
Planing stop ...
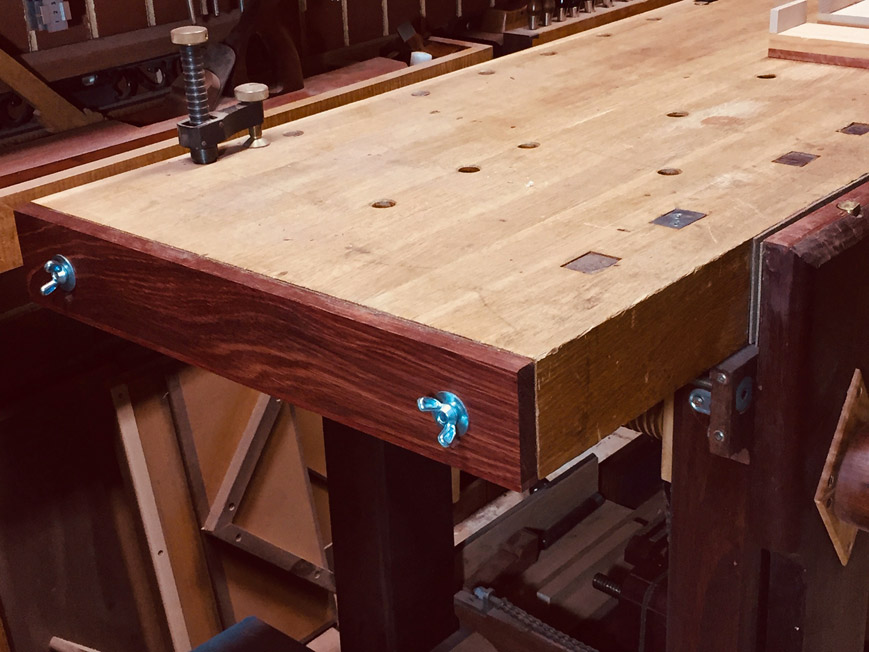
There have been many accessories build for- and into the bench over the years. One of the more important ones has been bench stops I made from O1 steel which are inserted into the dogs ...
It's been a good bench, solid as a rock when planing, sawing or chopping. I have no plans to build another.
One last item to point out are the tool trays, which I built onto the wall rather than the bench. This keeps the clutter down and makes the bench easier to move further out if necessary.
Regards from Perth
Derek
Visit www.inthewoodshop.com for tutorials on constructing handtools, handtool reviews, and my trials and tribulations with furniture builds.
-
25th April 2020, 06:07 PM #124
The prize lies beneath - hidden in full view
- Join Date
- Oct 2010
- Location
- 1017m up in Katoomba, NSW
- Posts
- 10,662
Thanks Derek. Could I possibly encourage you to fill out this template (from post #1) please? It makes reading the thread easy for comparison of various builds and ideas. (maybe drop it in the top of your post? No need to remove any of the other text though)
POST TITLE:
e.g. Roubo, hybrid etc
PRIMARY FUNCTION:
Hand Tools / Power Tools / Hybrid
DIMENSIONS in mm:
(length x depth x height) e.g. 2000 x 600 x 900
MATERIALS (timber species etc):
xxxxxx
VISES INCLUDED:
xxxxxx
LINK TO YOUR BUILD THREAD (if applicable):
xxxxxx
BRIEF DESCRIPTION:
xxxxxx
THINGS YOU PARTICULARLY LIKE :
:
xxxxxx
THINGS THAT YOU WOULD CHANGE(in retrospect):
xxxxxx
THINGS THAT YOU WOULD INCORPORATE NEXT TIME:
xxxxxx
WHAT or WHO INSPIRED SOME OF THE INCLUSIONS (provide links):
xxxxxx
-
3rd May 2020, 09:25 PM #125
Intermediate Member
- Join Date
- Oct 2010
- Location
- Kambah
- Posts
- 30
Shaker Inspired work bench.
POST TITLE:
Shaker inspired work bench I HAVE A ALBUM OF PHOYOS YOU CAN LOOK AT. Hope it works
PRIMARY FUNCTION:
Hand Tools
DIMENSIONS in Mm
2270 x 650 x 910 h
MATERIALS (timber species etc):
Bench top Silver top Ash from Eden ( Mill closed now), Bench end caps Silver Top heart wood, Leg Vise, Red Gum (thanks Scott),
frame 3/4 ply internal, spotted gum external face frame, and numerous other places, recycled Oregon doors And bench skirts.
VISES INCLUDED:
Benchcrafted Tail and leg vise, English Record 53 at back quick release. Stanley 203 on sliding dead man.
LINK TO YOUR BUILD THREAD (if applicable):
xxxxxx
BRIEF DESCRIPTION:
Got plans from Benchcrafted in US and built as I went to suit my materials, kept to their philosophy.
Added my personality and changed some dimensions and material �if it�s useful and beautiful even better�
THINGS YOU PARTICULARLY LIKE
The Tail vise, first time I have had one, it�s brilliant. Leg vise not like grandads, it works so powerfully, spins closed just like the vids on YouTube.
Square dogs x 15 (red gum with spotted gum springs, fun to build.
Construction Took three months full time nearly. The weight, it won�t move. My wheels which took a week of experimentation and welding after I found the best wheel to keep low. I can move it any where when needed.
THINGS THAT YOU WOULD CHANGE (in retrospect):
Nothing really,
THINGS THAT YOU WOULD INCORPORATE NEXT TIME :
Can�t think of anything at the moment,
WHAT or WHO INSPIRED SOME OF THE INCLUSIONS (provide links):
Glad I used Australian timbers.
Thanks Benchcrafted, Scott, Bill, Fred, Jimmy for all the help to turn over the top, and turn over the top and turn over the top yet again, if you make one you will understand how much happens upside down, as I was not strong at the time. M for Cups of tea and cakes.
Lie Nielsen tools that work.
Woodwork forum members and heaps of useful inspirational posts.
Books by James Krenov and Christopher Schwarz (Where I did my research)
The Moxen will be another story. 👻 best regards to all
All too hard, Don't know how some of you get time to do these complex posts, but good on you.
Last edited by Brandavino; 4th May 2020 at 04:19 PM. Reason: ITS so clunky this software. I Gove up trying
-
3rd May 2020, 10:33 PM #126
Intermediate Member
- Join Date
- Oct 2010
- Location
- Kambah
- Posts
- 30
got heaps on phone but now how to get them into this system
-
4th May 2020, 01:23 AM #127
Intermediate Member
- Join Date
- Oct 2010
- Location
- Kambah
- Posts
- 30
Made a album "workbench". does it work ?? Cheers
-
4th May 2020, 08:20 AM #128
GOLD MEMBER
- Join Date
- Mar 2004
- Location
- Brisbane (western suburbs)
- Age
- 77
- Posts
- 12,127
Nope. All I can see is a dead icon.... Originally Posted by Brandavino
IW
-
4th May 2020, 04:20 PM #129
Intermediate Member
- Join Date
- Oct 2010
- Location
- Kambah
- Posts
- 30
Still no good ?? I can see it ok.. Its like watching grass grow.
-
4th May 2020, 06:36 PM #130
GOLD MEMBER
- Join Date
- Mar 2018
- Location
- Sydney
- Posts
- 1,166
They're in your post now mate, all good Originally Posted by Brandavino
-
11th March 2023, 12:15 AM #131
SENIOR MEMBER
- Join Date
- Nov 2016
- Location
- Bris
- Posts
- 843
POST TITLE:
Shaker/Roubo hybrid with Split-Top
PRIMARY FUNCTION:
Everything - handtools, power tool, assembly table, etc
DIMENSIONS in mm:
2925L x 880D x 915H
MATERIALS (timber species etc):
Base: Blackbutt, Ironbark, Spotted Gum
mainly reclaimed Spotted Gum (ex-20yr old pergola/deck)
Left endcap: Purpleheart
Right endcap: Rock Maple (Lie Nielsen twin-screw dovetail/moxon vice)
Drawers: Tassie Oak sides. Faces have a thick "veneer" of fiddleback old-growth Tassie Oak with Purpleheart handles
VISES INCLUDED:
Benchcrafted Classic Leg Vice with CrissCross Solo
Lie Nielsen 24" Chain Drive Dovetail or Moxon Vise
HNT Gordon 150mm Tail Vice
LINK TO YOUR BUILD THREAD (if applicable):
WIP Shaker Workbench with Split Top
BRIEF DESCRIPTION:
It's what I imagine the resulting offspring would be from the union between a traditional Roubo and a Shaker workbench with a bit of bling thrown in
THINGS YOU PARTICULARLY LIKE:
Pretty much everything. It has exceeded my expectations and it meets all of my workholding needs thus far. I like how I can vigorously pound down pretty much anywhere on the bench and not have to be concerned about being directly above a leg. The only areas I avoid are the front chops of the leg vice and the moxon vice especially when they are extended out. I also love the amount of "real estate" I have to use. It's quite common for me to have a workpiece in clamps on one end, and continue working on other parts of the project at the other end. When I was building my drawers for the bench, I had my shooting board secured with the leg vise, my dovetail alignment jig in the moxon vise, and using another corner of the bench to secure a drawer side for rebating. I'm sure I'm also going to enjoy all the storage now that I've just finished the drawers.
THINGS THAT YOU WOULD CHANGE(in retrospect):
If I only knew that I'd be able to pull it off before I started building the bench, I would have invested more in the timber I used for the bench. I wasn't confident enough to spend money on premium timber. As such, I made do with seconds (i.e. feature-grade) and re-claimed timber. The one aesthetic "feature" that I particularly hate about my bench is the "licorice allsorts" appearance of the ends of the base particularly the end with the cupboard. This was a direct result of my mish-mash of timbers. The only furniture-grade timber I specifically bought for the bench are the plantation-grown Tassie Oak (Bunnings) for the drawer sides, a sheet of marine ply for the drawer bottoms and door panels, and the fiddleback Tas Oak from the Marketplace. The Purpleheart I purchased when I came across it on Gumtree and only much later did I decide to use it for the bench.
I actually wish I could have made it a foot longer. The length I ended up with was dictated by the lengths of the reclaimed Spotted Gum boards I used for the top. I even used floating tenons at the moxon vise end to make sure the bench was at least 2.9m long
The only other change I'd probably make is substitute another LN chain drive vise instead of the Benchcrafted leg vice. The leg vice definitely looks cooler but IMO, the moxon vise is more practical. Although I do plan to build a few bedroom doors that may see the leg vise come into its own and I anticipate I'll end up reversing my view.
THINGS THAT YOU WOULD INCORPORATE NEXT TIME:
Nil
WHAT or WHO INSPIRED SOME OF THE INCLUSIONS (provide links):
Auscab's Jarrah Workbench was an inspiration as well as Benchcrafted's Shaker Workbench and Samuel Mamias's exquisite Shaker Workbench.
P3101163.jpg
P3101167.jpg
P3101168.jpg
P3101214.jpg
P3101205.jpg
P3101289.jpg
P3101230.jpg
P3101178.jpg
P3100002.jpg
P3100054.jpg
P3100025.jpg
P3100028.jpg
Cheers,
Mike
-
11th March 2023, 12:35 AM #132
Be inspired. Be creative. Be bold.
- Join Date
- Apr 2001
- Location
- Perth
- Posts
- 10,824
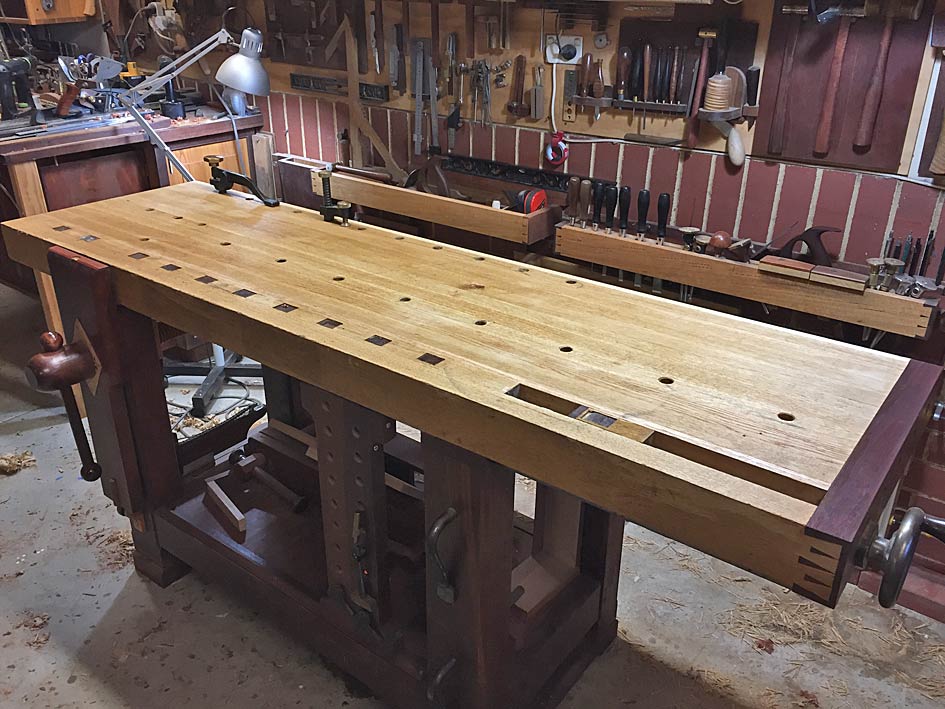
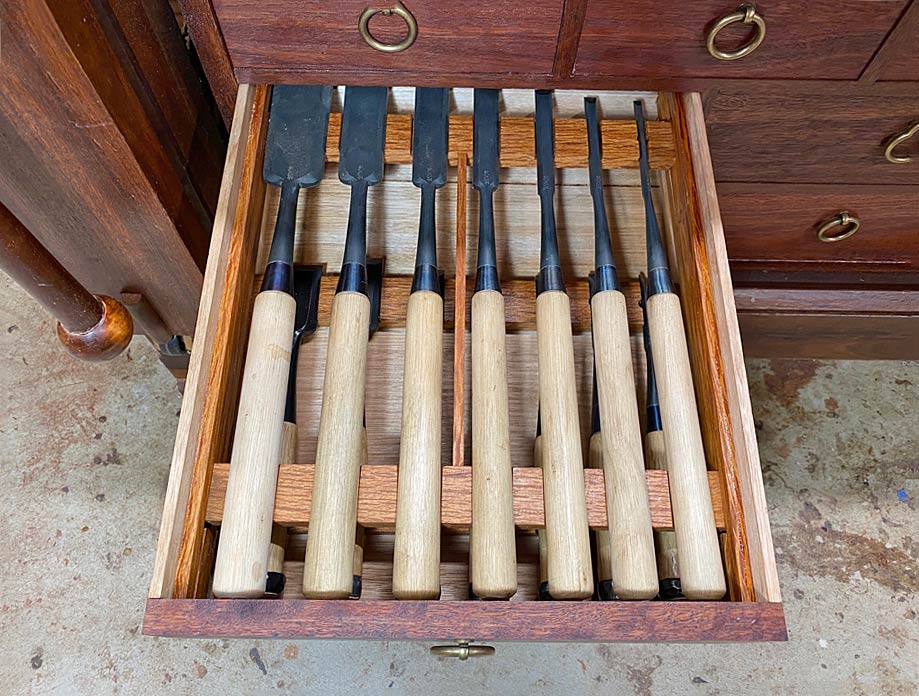
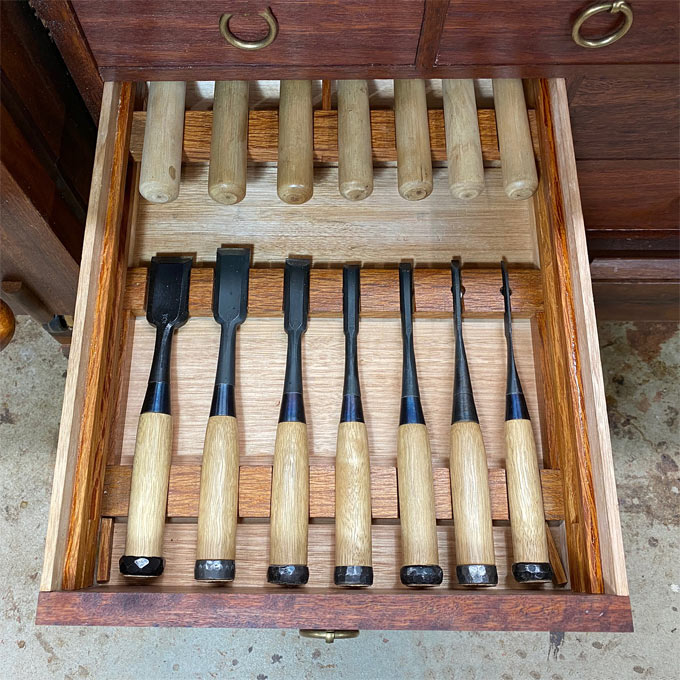
Updated photo of bench to include underbench cabinet ...

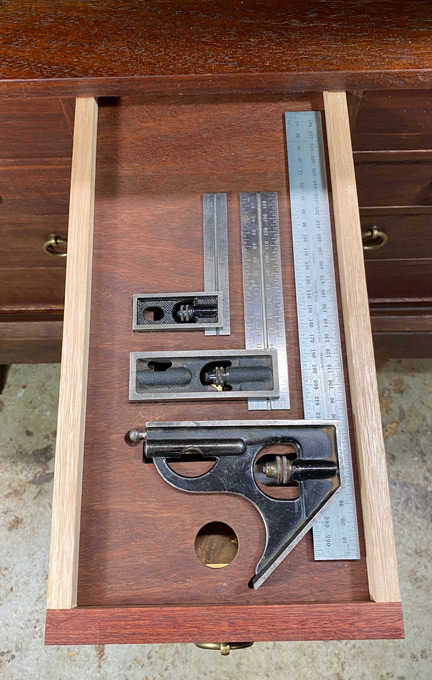
With the exception of one or two drawers, such as this one, all drawers have two layers of tools ...
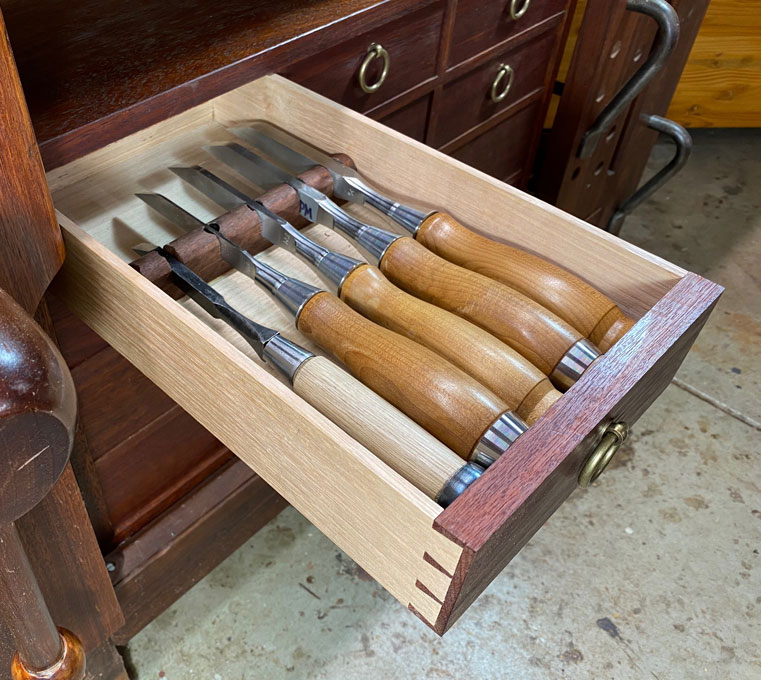
This ...
... slides back to reveal ...
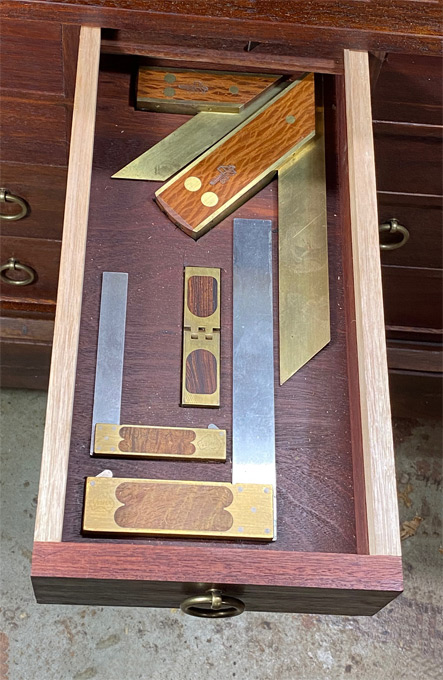
and this ...
... to reveal this ...
Many others.
Regards from Perth
DerekVisit www.inthewoodshop.com for tutorials on constructing handtools, handtool reviews, and my trials and tribulations with furniture builds.
-
11th March 2023, 06:53 AM #133
GOLD MEMBER
- Join Date
- Nov 2004
- Location
- Millmerran,QLD
- Age
- 73
- Posts
- 11,135
Mike Originally Posted by KahoyKutter
I think that bench is fabulous just as it is. I would put it in the dining room even if I couldn't get chairs and legs underneath it! It is the mish mash that appeals. Would you be able to give a little more information on the Purpleheart drawer pulls or a link if you have already posted elsewhere?
Regards
Paul
Edit: I think I found the relevant post: WIP Shaker Workbench with Split Top (woodworkforums.com). I just have to find the time to wade through it.Bushmiller;
"Power tends to corrupt. Absolute power corrupts, absolutely!"
-
11th March 2023, 08:44 AM #134
SENIOR MEMBER
- Join Date
- Nov 2016
- Location
- Bris
- Posts
- 843
Originally Posted by Bushmiller
Paul,
Firstly, thank you for your kind comments. You may be surprised to hear that although the drawers have just been completed, the rest of the bench is about 21 months old and has the battle scars from vigorous use. For the photos, all I did was lightly sand the top with 320 grit on my ROS so that there was no risk of sanding low spots and making the top no longer flat, apply 2 coats of Osmo and 1 coat of paste wax, and then just scraped off the glue splatter from the base and gave it a quick spit-and-polish with a damp rag and actually a bit of spit on some stubborn stains.
As for the Purpleheart (and FB TasOak) handles, I detail how I made it on post #93 of my WIP build thread. The design kinda developed organically as a solution to two problems I had.
20200113_110135.jpg
Originally, I planned to laminate wider pieces of PH to the drawer faces and cove cut the handle on the table saw and then carve to shape similar to what I did on my Rosewood desks (picture the handle and the rest of the drawer face above it in PH). But after deciding to use PH for the left side endcap to maximise the contrast of the houndstooth dovetails, I realised I simply did not have PH left for all 9 drawer faces.
The 2nd problem the PH handles solved was disguise the height of the bottom row of drawers which are around 275mm high. Due to the height, I would have to edge-laminate 3 pieces of FBTO to get the width (2 pieces for the 165mm high middle row of drawers) I needed and I discovered when making the centre panels for the cupboard drawer and RH end panel that it was impossible to make the glue seam invisible when laminating highly figured wood. By doing what I did, I broke up the "slabbiness" of the bottom row of drawers and got "rid" of one of the seams. It's the same reason why the front chop of my leg vise has a PH "racing stripe" running down the middle.
If it's not clear by now, I didn't have any plans to follow and just had a rough idea in my head and I was just "winging it" throughout the whole build. It's pretty much how I build most things including my 130sq.m deck that wraps round 2 sides of my house.
Cheers,
Mike


 Reply With Quote
 , also, we have been without power for over three weeks so we have been working at other jobs off river.


Similar Threads
-
Executive Summary
By joe greiner in forum WOODIES JOKESReplies: 3Last Post: 6th January 2011, 04:01 PM -
Woodworking TV show
By beejay1 in forum Links to: BOOKS, VIDEOS & PLANSReplies: 7Last Post: 9th May 2005, 10:34 PM -
Woodworking show
By ppotter in forum WOODTURNING - GENERALReplies: 0Last Post: 13th November 2000, 09:13 AM
