

 Thanks:
  Likes:
  Needs Pictures: 0
 Picture(s) thanks:
Results 16 to 29 of 29
-
21st December 2022, 12:23 PM #16
 Be inspired. Be creative. Be bold.


- Join Date
- Apr 2001
- Location
- Perth
- Posts
- 10,820

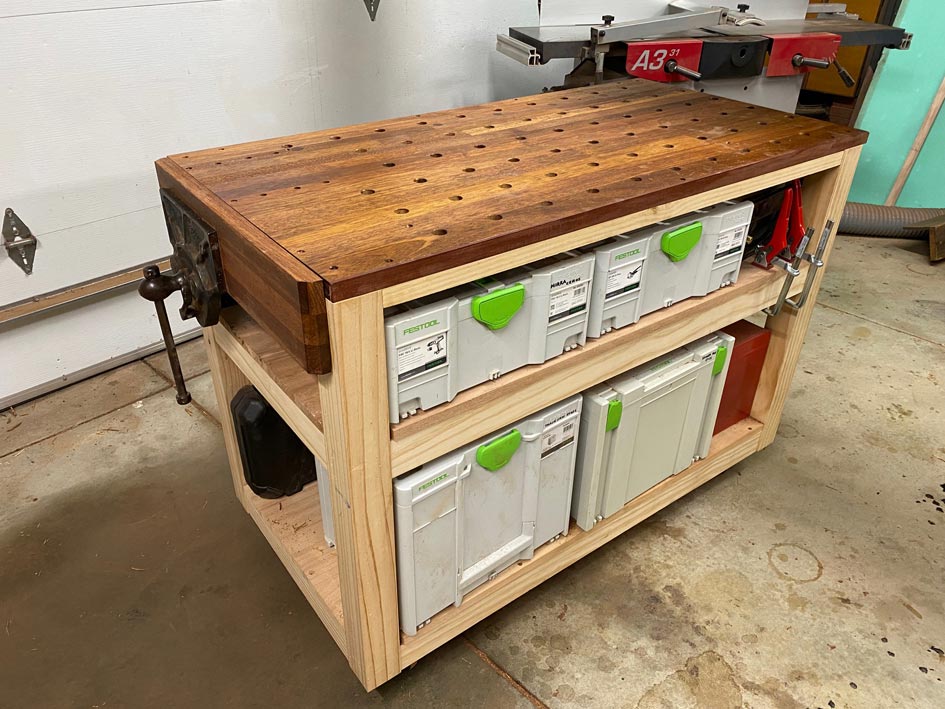
Hi EB
Yes, the top is simply screwed down. It is a laminated Merbau panel, which is available from Bunnings. This one came in 1200 long x 450mm wide and 25mm thick. I added 150mm to the width to make a panel 600 wide, but this was for a MFT bench.
It runs on castors, which make the bench unstable for hand sawing or planing from the sides (will rock a little). However, it is stable to work from the ends. My use will be work holding for routing, power sanding, power sawing, and assembly. Plus it is a convenient height to use as an outfeed for tablesaw and jointer.
Regards from Perth
DerekVisit www.inthewoodshop.com for tutorials on constructing handtools, handtool reviews, and my trials and tribulations with furniture builds.
-
21st December 2022 12:23 PM # ADSGoogle Adsense Advertisement
- Join Date
- Always
- Location
- Advertising world
- Posts
- Many
-
21st December 2022, 01:58 PM #17
GOLD MEMBER
- Join Date
- May 2007
- Location
- Sth Gippsland Vic
- Posts
- 4,378
Nice drawing Sam . I work off the same type all the time . Originally Posted by EagerBeaver71

Some things I didn't mention before that you can see in my pictures. The space under the top has its own bottom as well . I did this so any liquids I spill when my loose top was off wouldn't go through the dog holes . I then discovered that it was also a good handy place to keep my oil stones. They sit on a scrap of thin ply that acts as a slide so when I slide it out the three oil stones come out at once. so you may want to make sure that space with a bottom can do that bit extra for you if you have the need.
I see the end for a vice. If you do a wood face like Derek's with a metal vice or if it were me I'd do two wood threads Moxon style but thicker than Derek's and have two dog holes that match a line of two dog holes down the top . Then You'd be able to clamp things for Dog type work but most important is the ability for holding round tops . My Emmert does this and its what I have so far used the Emmert mostly for over the years . All the other features of the Emmert I hardly use . The good thing about a Moxon type and two dogs is its nice and simple and strong. The Emmert type I have is known for its brittle cast iron and a lot of care has to be taken not to over crank it to tight . I have been good with it but when I had younger guys sometimes using it a cast dog got broken and anything else could have happened. But it didn't luckily. Mainly because I said "Stay away!" unless other wise told.
The Moxon type is great for marking out and cutting dovetails on big box ends like tool boxes or carcase work . If its wide enough. I also do that stuff on my workbench which is why a well on a workbench is a must . One side of the job is held in my vice and the other has a clamp going from the work to the well .
-
21st December 2022, 06:06 PM #18
GOLD MEMBER
- Join Date
- Apr 2009
- Location
- Melbourne
- Age
- 52
- Posts
- 1,112
Thanks Rob, I normally start with sketch as I can be more creative and think better with a pencil in my hand rather than a mouse. Originally Posted by auscab
I'm not sure which part you mean? Originally Posted by auscab
-
21st December 2022, 06:10 PM #19
GOLD MEMBER
- Join Date
- Apr 2009
- Location
- Melbourne
- Age
- 52
- Posts
- 1,112
Just started transferring the plans to sketchup. Would I be ok with 25mm deep mortise & tenons on the ends?:
tennons.jpg
-
21st December 2022, 06:18 PM #20
GOLD MEMBER
- Join Date
- Apr 2009
- Location
- Melbourne
- Age
- 52
- Posts
- 1,112
Unfortunately or maybe not unfortunately, I've rough cut the rails and the shortest would only allow for 25mm M&T, thats why I asked

-
21st December 2022, 07:31 PM #21
GOLD MEMBER
- Join Date
- May 2007
- Location
- Sth Gippsland Vic
- Posts
- 4,378
25mm will be OK if you do a tight job of the tenons . Just add screws if its sloppy . My table started very rough . It was all second hand de nailed house frame hardwood . The joins are halving joints all roughly sawn out with a circular saw, two pack glued with 1/2 inch dowels through pegging them together . You can still see the joinery in the pics. How I was easily able to add a bottom to the top section later on the third re build was.
The base started out like this. That top horizontal on the narrow end should be lower in the drawing
IMG_3041.jpg IMG_3042.jpg
Then on the last rebuild I added a ply top to the base. Just nailed on .
IMG_3045.jpg
Then 4 WA Karri hardwood beams roughly 50mm thick were screwed down with bugle screws to the side rails over the ply. And roughly a 50 mm thick WA Karri top screwed though to the beams in 4 places to each beam.
IMG_3043.jpg IMG_3044.jpg
That's how a ply bottom to the spaces was worked out . And How I ended up with a strong no flex top.
There is three drawers in one end that run all the way through . The red arrow to the rail is a rail I added later on the third build by just screwing it in . Pocket screw style .
IMG_8921a.jpg
The only thing I have regretted about doing it this way was shaping the beam like on the left where it goes right to the edge of the top like that . To many times I go to clamp something and I run into the end of a beam where I cant clamp so I have to re adjust things. If I ever re do that Ill do it something like on the right where I can at least grab the edge .
IMG_3048.jpg IMG_3049.jpg
-
21st December 2022, 08:22 PM #22
GOLD MEMBER
- Join Date
- Apr 2009
- Location
- Melbourne
- Age
- 52
- Posts
- 1,112
Got it, as tight as a nuns you know what. Originally Posted by auscab
Two pack glue?, whats that?. Originally Posted by auscab
Do you always design things with a mind to mod later? (with workshop furniture obviously). Originally Posted by auscab
With the top being disposable, is there some sort of hardware I can add to save ware and tear of the screw/bolt going in?, something like metal threaded insert?. Originally Posted by auscab
I saw that design feature and concluded you did it to get total rigidity across the entire surface. I may steal that Idea of the second drawing Originally Posted by auscab
 .
.
Sorry for all the questions Rob, I'm soaking the information up like a sponge and could probably go on all day if they let me!. I'll be starting on the legs tomorrow. I cant express how satisfying it is to now be able to mill my own timber and have it flat level and square, loving it!.
-
21st December 2022, 08:31 PM #23
GOLD MEMBER
- Join Date
- Apr 2009
- Location
- Melbourne
- Age
- 52
- Posts
- 1,112
Thanks for the link mate, I'll be reading that later!. Originally Posted by derekcohen
-
21st December 2022, 10:02 PM #24
GOLD MEMBER
- Join Date
- May 2007
- Location
- Sth Gippsland Vic
- Posts
- 4,378
Epoxy . Originally Posted by EagerBeaver71
two pack glue - Google Search
Not usually . This is an extreme example . Its mainly because it started as a need for a workbench when I was 18 and I was in a mad rush. I didn't draw it or plan it and just did it on the run then found that fitting the vice was going to be too hard because of that and never used it . It was timber from my parents house renovation and I kept it for years hanging around . Then one day I needed a work table and I was sentimental about it . So I pulled it in from the rain and just kept adapting it to my needs from then on. Originally Posted by EagerBeaver71
The top in those last drawings isnt disposable . Its fixed down and doesn't come off. The slip on removable top sits on top of all that . Its a light weight cover top for the messy jobs . Originally Posted by EagerBeaver71
I have two of these in my workshop . This later one was made when I had a need for a second . It does the same with the gap under the top. Being purpose made and matched to the first one its build is much more sleek and its half the weight .
you can see the gaps under the top for clamping .
IMG_3050.jpg IMG_3051.jpg
And with its loose top off. The loose top is just 1/2 inch chipboard and was the scrap from an old jig .
This has no vice or dog holes. It has the same wheel set up for moving it and I find I can just push it around .
IMG_3052.jpg IMG_3053.jpg
It sits in front of the other bench but also matches my first work table so large items can be put up on both tables with a space in between . For big things like this .
IMG_8857.jpg
Yeah very rigid is good for the clamping and pressing . Originally Posted by EagerBeaver71
-
22nd December 2022, 08:04 PM #25
GOLD MEMBER
- Join Date
- Apr 2009
- Location
- Melbourne
- Age
- 52
- Posts
- 1,112
With it being screwed down to the beams is there any issue with the WA Kerri top expanding?. Originally Posted by auscab
-
23rd December 2022, 09:05 AM #26
GOLD MEMBER
- Join Date
- May 2007
- Location
- Sth Gippsland Vic
- Posts
- 4,378
No movement that Ive noticed since I screwed it down . It also has two decent Bread board ends on it which I did on the third build. Originally Posted by EagerBeaver71
Screwing allows movement to some degree. It'd be a different story if I glued it down across the grain to those beams .
At the start when I first made the Karri top it did split at each join after a while. Then on the second build I re joined it and those joints split again . The timber was adjusting to the dry workshop. When I first bought the wood in to be made into a top and fitted to the base the wood came from under a tarp. It was stacked in the back yard over grass. Heavy duty hardwoods shift and just split glue joins very easily when they move.
-
23rd December 2022, 09:51 AM #27
GOLD MEMBER
- Join Date
- Apr 2009
- Location
- Melbourne
- Age
- 52
- Posts
- 1,112
Ah now that's something I didn't know!, excellent. You're worth your weight in gold thanks Rob. Originally Posted by auscab
Have a great Christmas to you and ya family mate,
Sam
And merry Christmas to everyone on the forums
-
23rd December 2022, 05:19 PM #28
GOLD MEMBER
- Join Date
- Apr 2009
- Location
- Melbourne
- Age
- 52
- Posts
- 1,112
I just brought some 33mm 2400x900 red oak from Bunnings. I don't think $187 is too bad?. Anyway, this is going to be the table top, its a mighty heavy piece and was glad when I had it rough cut to size!.
Hmmm.... early Xmas present to me.
thumbnail_IMG_9155.jpg
There's no way you could cut this in one pass with a Makita Tracksaw, that's why I brought a more powerful Saw (still by Makita) and just made my own track jig to use on a cheap Ozito track. The saw cut through it in one pass like butter.
thumbnail_IMG_9157.jpg
-
23rd December 2022, 07:24 PM #29
GOLD MEMBER
- Join Date
- Nov 2004
- Location
- Millmerran,QLD
- Age
- 73
- Posts
- 11,129
EB
Others have commented on the build quite adequately. As far as mobility and wheels go you either need substantial, load carrying wheels with brakes or a method of raising the bench/table off the wheels so it sits firmly on the legs. Incidentally, nice solid legs are good on work benches: think 100mm x 100mm if possible. this is a relatively simple solution to lifting the bench off the wheels:
Adjustable wheels.jpg
Don't skimp on the hinges or the fixing screws even though they will not be load bearing for the majority of the time. Recycled butt door hinges would be a cheap option. Not my idea, but one of the easiest I have seen.
Regards
PaulBushmiller;
"Power tends to corrupt. Absolute power corrupts, absolutely!"


 Reply With Quote


Similar Threads
-
HELP Advice needed on which tool is needed to make this marble run
By TPN4040 in forum HELP! "I've fallen and can't get up."Replies: 6Last Post: 19th October 2021, 11:48 AM -
What make of Workbench is this
By tomartomau in forum THE WORK BENCHReplies: 2Last Post: 21st December 2014, 08:13 AM -
advice on my workbench needed
By sepp in forum THE WORK BENCHReplies: 6Last Post: 18th December 2009, 10:57 AM -
a workbench to make a workbench
By mic-d in forum THE WORK BENCHReplies: 21Last Post: 2nd November 2008, 03:32 PM -
Make a Holtzapffel Workbench
By Wayne Davy in forum THE WORK BENCHReplies: 5Last Post: 19th June 2007, 06:12 PM
