

 Thanks: 0
 Likes:
  Needs Pictures: 0
 Picture(s) thanks: 0
Results 16 to 30 of 74
Thread: Saw Vice Build 2
-
26th May 2013, 01:37 AM #16
 GOLD MEMBER


- Join Date
- Aug 2009
- Location
- Armadale Perth WA
- Age
- 55
- Posts
- 4,524

I only worked on the 'K' saw today ... and wanted to file it to a near zero rake.
The other I will first file as it is and try it ... I expect I won't like it as-is ... then up the rake but not as much as this first one.
I left the first 3" at the same rake (roughly) and worked on increasing the rake of the rest.
The file has now probably done its best work using this first corner of it ... it did the S&J 888 and removed a lot of metal on this saw ... so I'd still recommend these Nicholsons as easy to buy and suitable to starting off sharpening.
If I was very particular about the results I would have rotated to the next corner by now ... but I didn't want to reposition the piece of wood on the end of the file indicating level
... What do you mean "lazy" ??
It didn't take all that many passes jointing, given the hollow in the toothline, but I could see myself re-jointing several times before I'd be done anyway.
It was untested water changing the rake, but perfectly do-able as it turns out. I started out slowly, but soon took off the level-guide and did a first-passenthusiasticfirm freehand shaping run along the teeth. For a first pass it was again enough to maintain the file angle and just do a few (2 or 3) strokes on each tooth ... then see where you are at.
Here are the teeth starting to be reconfigured ...
Toe section sharpen 4 1-2 pt (a) 020.jpg and the rest sharpen 4 1-2 pt (a) 019.jpg
After the first passes you definitely start to file either into the tooth in front of the gullet, or into the tooth at the back of the gullet to better reshape the teeth. I'd like to have some of the spray black 'ink' that Tom Law used ... or the red marking solution I think Bob Smalser had. Also a more mobile light at some stage.
It had gotten dark and I was losing concentration, so this job is probably only three-quarters done.
Here you can see that I have the odd short tooth ... the black line is 3" from the toe ... where the rake changes.
But you can see the teeth taking on the new configuration ... not well, but well enough started.
sharpen 4 1-2 pt (a) 022.jpg sharpen 4 1-2 pt (a) 023.jpg
The teeth feel good - but that's no real indication ... sharpen 4 1-2 pt (a) 025.jpg
But even having only gotten so far with it ... you can see the difference ... this is another ten strokes of the saw!
The saw wasn't running nice and smoothly through the cut like the S&J at least was ... so definitely more work on it tomorrow ... but a big difference already.
sharpen 4 1-2 pt (a) 026.jpg
-
26th May 2013 01:37 AM # ADSGoogle Adsense Advertisement
- Join Date
- Always
- Location
- Advertising world
- Age
- 2010
- Posts
- Many
-
26th May 2013, 11:58 AM #17
GOLD MEMBER
- Join Date
- Mar 2004
- Location
- Brisbane (western suburbs)
- Age
- 77
- Posts
- 12,142
Paul - you've made a good start, and if the saw is cutting better than it did before you went at it, you are obviously heading in the right direction. Better than the other way round (which I experienced a few times at the beginning of my saw filing career!
 ). Taking it easy, with just a couple of strokes at a time on each tooth works best for me, too, when forming or re-forming teeth. You can watch the teeth taking shape & make any necessary corrections much more consistently.
I still don't know why you are determined to have such a high rake angle when it seems you intend to hack into a lot of hard wood. I guess it's better you experiment & find out for yourself, but I wouldn't want any of my saws to be above -5*, and I cut a variety of softish (e.g. Camphor laurel) as well as harder woods. Perhaps it seems intuitively attractive to have teeth set up for nice shearing cuts like a bunch of little plane blades, but long use has shown that some negative rake is usually a better bet.
One other comment - the file you are using on those teeth is waay too large, imo, which is giving you a rounded gullet out of proportion to the tooth size (compare with the gullets before you began). You are probably not weakening that size of teeth significantly, as you would on smaller teeth, but the larger file not fitting well in the original gullets seems to have caused you some wobbling. You've got the leading edges pretty straight (which is presumably what you were concentrating on) but your trailing edges are decidedly wonky. You want to end up with nicely cut teeth so that the file will cut both sides of the tooth evenly on the sharpening run. The tops of saw teeth take a lot of wear, so when you re-sharpen, you will need to take metal off both sides of each tooth to square up the leading edge and maintain clearance on the trailing edge....
Cheers,IW
-
26th May 2013, 01:47 PM #18
GOLD MEMBER
- Join Date
- Aug 2009
- Location
- Armadale Perth WA
- Age
- 55
- Posts
- 4,524
A few things. The 6-1/2pt ripsaw I used in the video is zero rake ... at the heel it almost looks to be a hair forward ... and cuts like a dream. I was crosscutting 90mm x 220mm of variable jarrah and it had no problem. Mind you it came from a US professional saw doctor. Originally Posted by IanW

I have another saw from him that I bought as an unfancy one to use without any regrets - it is 5-1/2pt also zero rake.
It cuts very well - but I haven't fully bonded with it. It might just be the wider pitch, but I don't operate it as smoothly as I want to.
I was looking through my 'top shelf' (and deserving-a-dedicated-till) saws[*] to check a machine-filed saw ... it wasn't zero rake, but I got a bit of a shock. I have a George H Bishop #250 saw here that is a D100-equivalent. I only have it because PH (Homesy) pointed it out online to me when he was here once before. Not only is it an interesting brand and model, but the sharpener of this one - somewhat less of a 'celebrity' - seems to have sharpened it in the 'correct' (issue debatable) manner for an Acme120 ripsaw. This involves angling the file handle down in such a way that the front of each tooth is filed straight across, but the back of each tooth is bevelled. I will attempt to write a thread on the Acme120 at a later stage - research as opposed to knowledge - but for now the relevant point is that it is filed with zero rake and cuts very very well. Again, it is at the finer end of ripsaws at 8pt.
So ... short story far longer than necessary ... this is part of the reason for wanting to (attempt to) create a zero rake saw. I want to come up with a saw that cuts fast and hard in big material, and I have one 4pt, two 4-1/2pts, and plenty of the 'finer' pitches to play around with. I'm Wild-Ass-Guessing that there will be some trade-off between wider pitch and higher rake.
I'm not sure it's not the right file. Each side is about 11mm and the vertical height of the teeth is a bit over 4mm and might end up deeper. Perhaps you're seeing the result of me pushing the previously raked teeth back towards zero rake?? Plus perhaps the fact that the job is not at all done yet.One other comment - the file you are using on those teeth is waay too large, imo, which is giving you a rounded gullet out of proportion to the tooth size (compare with the gullets before you began).
I will re-joint it pretty hard again and see if I make things better or worse today
It's a bit of an ugly basstod so I'm happy enough to experiment with this one, and hopefully do a more elegant job on the next one.
... Exactly what Mum said about me when I was a toddler.
Paul
- - - - - - - - - - - - - - - - - - - - - - - - - - - - - - - - - - - - - [*] Cue the gratuitous saw-pawn shot ...
Top Shelf 002.jpg
-
26th May 2013, 05:19 PM #19
GOLD MEMBER
- Join Date
- Aug 2009
- Location
- Armadale Perth WA
- Age
- 55
- Posts
- 4,524
Getting there - not 100% yet
(painful and boring detail to follow ... much later)
-
26th May 2013, 07:23 PM #20
GOLD MEMBER
- Join Date
- Mar 2004
- Location
- Brisbane (western suburbs)
- Age
- 77
- Posts
- 12,142
Okay - I guess I'm the one with the problem. North American woods are a good deal softer than most of our stuff, so it's typical for their saws to have a more aggressive rake angle, but I have to say I never encountered zero. Me & zero rake just don't get on. I tend to go with at least 5, & probably more like 7 degrees on my rip saws. That still gives me a sufficiently aggressive cut, and a much smoother ride. Horses for courses! Originally Posted by pmcgee
Why I thought the file was too big was because of the very rounded bottoms of your gullets, plus the wobbly trailing edge slopes. The bigger the file, the more rounded the corners. However, there is such variability in the darn things now (brand to brand & batch to batch), that I find it impossible to predict what size & what taper will fit a given tooth size until I try it. It's not such a big deal when sharpening large teeth, but a major concern when sharpening small saws, because you can very easily end up with all gullet & very little tooth.
Cheers,IW
-
27th May 2013, 11:22 PM #21
GOLD MEMBER
- Join Date
- Aug 2009
- Location
- Armadale Perth WA
- Age
- 55
- Posts
- 4,524
We both know that's not true! Originally Posted by IanW
Standard routine would be that I go around in a big circle trying different things, then decide in 3 weeks that you were right from the beginning.Me & zero rake just don't get on. I tend to go with at least 5, & probably more like 7 degrees on my rip saws. That still gives me a sufficiently aggressive cut, and a much smoother ride. Horses for courses! Guess I'll get back to you in 3 weeks
My only 'advantage' is that I know stuff all, so am consequently stupid enough to try anything.
(My mind is like a newly opened pillow - soft, fluffy, and smelling slightly of formaldehyde.)
I think I can expand on the file-gullet issue ... and your mentioning it helped me out on sunday.
When I looked again at the saw on sunday, it was pretty inconsistent.
The teeth in the middle were mostly in shape ...

but at the heel they were not ...

-
27th May 2013, 11:41 PM #22
GOLD MEMBER
- Join Date
- Aug 2009
- Location
- Armadale Perth WA
- Age
- 55
- Posts
- 4,524
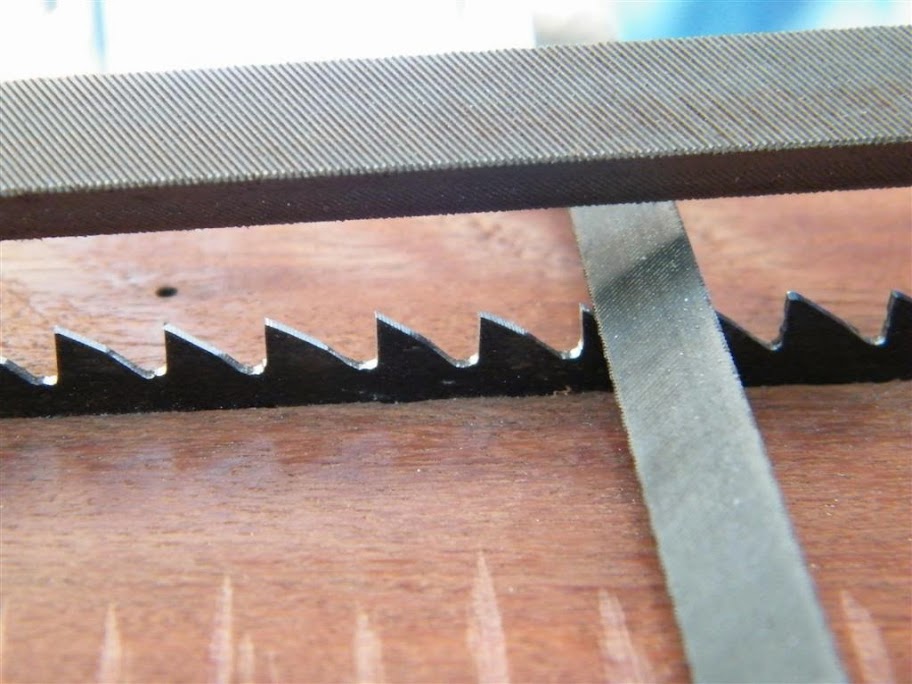
This is a good opportunity to talk about changing the rake on the teeth - and file size.
Starting with the teeth after jointing ... looking at the bottom few ...

In order to make them zero rake, from being raked at 10-or-so degrees, you need to file straight down from the upper point. The other side of the (big) file I was using would impact on the back of the tooth in front ... and as you file that front half of the gullet, you are decreasing the flat section on top of the tooth in front. Once you have removed the flat then you are making that tooth shorter.
First step ... I blacked the gullets - where I could - with a texta.

then jointing ...

and filing ...


-
27th May 2013, 11:52 PM #23
GOLD MEMBER
- Join Date
- Aug 2009
- Location
- Armadale Perth WA
- Age
- 55
- Posts
- 4,524
At this stage I had just been accepting that the next step would be to re-joint and re-file ... but I started thinking about what Ian said about the file size and then thought ... who says you can only use one file on a saw ...?!
I realised if I got a smaller file, I could file in the gullet without touching the tip of the tooth at the front of the gullet.
This is a ~4mm file compared to the 11mm one I have been using ...
and the result ...

and after doing a few more ...


It's still not a finished process, but closer to proper shape than before!
It still needs a re-jointing and re-filing, but the next time it should just work with the first big file.
-
28th May 2013, 01:10 AM #24
GOLD MEMBER
- Join Date
- Aug 2009
- Location
- Armadale Perth WA
- Age
- 55
- Posts
- 4,524
At this stage, the toe teeth + the rest look like ...
 (raked) +
  (unraked)
It was at this point that instead of re-jointing, I thought ... hmmm ... why not take it and test cut with it?
Well - that proved character building.")
I tried the saw on the floorboard ... and it was fitting and starting ... would NOT cut ... only with the 3" of raked teeth at the front.
I battled with it a bit ... then tried a 2" pine plank ... only a small improvement ...
I laid it on the floorboard and hammered lightly all along the toothline on both sides, to reduce the set.
That improved things a bit more.
Here's the test cuts ...

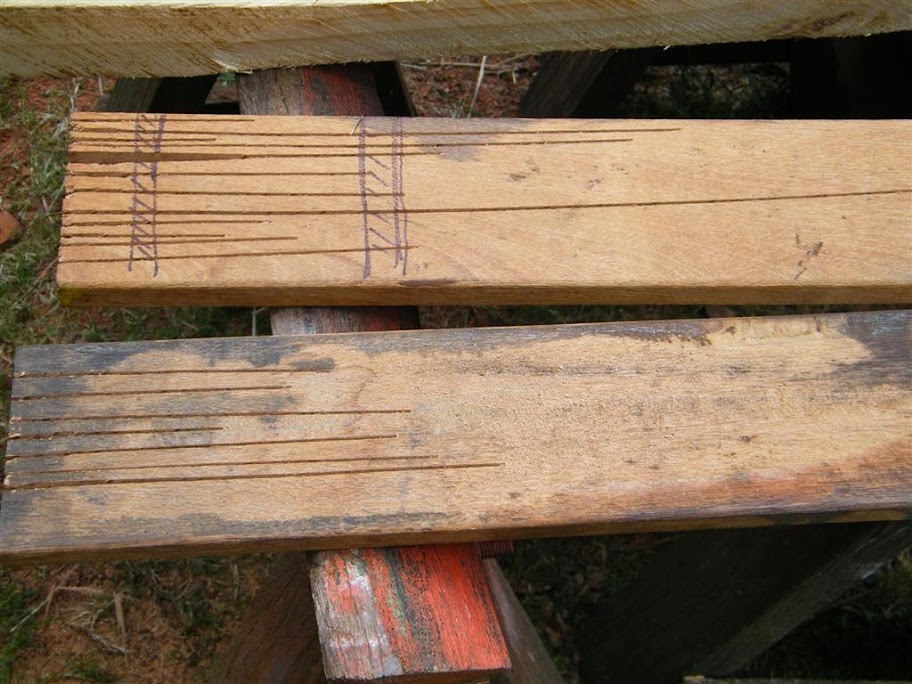
I expected some trouble because I knew I had shortened some of the teeth in reshaping the rake, but it had been pretty awful up to this point.
I had noted that it wasn't cutting straight ... see the long kerf in the floorboard ... so I gave it three strokes along that side with the car brake pad, and one on the other side. I should have given it a couple swipes before starting to test cut - but I wasn't thinking of it a finished job, so didn't think of it then.
It was cutting quite well then - after a fashion. That is the point at which I made the video. It has some of the characteristics of being properly sharp - hopefully you can tell that from the video - but is still unfinished and badly inconsistent.


The rear three inches are too high and need filing down. The rest I hope might be pretty good after the next joint/file cycle. I am jointing with a pretty long file ... there is 13" of teeth and another 4" of tang ... but the saw was hollow and some of that has been carried through. If I did it again I would score a reference line along under the teeth with a straight-edge as a visual guide.
it has been a very useful and informative exercise for me ... lots to learn here ... but if you have a pretty straight-toothed ripsaw and you can keep the rake angle that it already has ... definitely give it a go. Touching it up won't be that hard ... and even an amateurs job can work better than before
Cheers,
Paul
-
28th May 2013, 06:03 AM #25
GOLD MEMBER
- Join Date
- Aug 2009
- Location
- Armadale Perth WA
- Age
- 55
- Posts
- 4,524

-
28th May 2013, 09:26 AM #26
Luddite Lite
- Join Date
- Jan 2009
- Location
- Brisbane
- Posts
- 800
Saw Vice Build 2
What brand files are you using, Paul?
I picked up some NOS Australian Whiltshire's at the TWWS here the other week and they (with no small help from the idiot holding them) ruined the tenon saw I was sharpening. They are useless!
The reason I bring it up, is that what happened was that the edge on the file gave out really fast but not in the jagged way my other files tend to, it just buffed off to a smooth slippery edge. I used up two files for one tenon saw, all six edges and still had to finish with a haggard old grobet I'd pushed way too far already,
The teeth are a mess but the main symptom of the butter file was that it's soft edge would skate in the gullet but cut faces of the teeth, leaving round, over large gullets.
Matt...I'll just make the other bits smaller.
-
28th May 2013, 11:13 AM #27
GOLD MEMBER
- Join Date
- Mar 2004
- Location
- Brisbane (western suburbs)
- Age
- 77
- Posts
- 12,142
Paul & Mat - you seem to be recapitulating many of my own experiences in this saw-sharpening business. I guess all experience is ultimately good, even the bad - perhaps the bad experiences are the best teachers!
Paul - you are getting there. From the pics in your last post it is a lot easier to decipher how you went along, & you seem to be doing pretty much what I would have done. You have a few short teeth, to be sure, but if you need to do another heavy jointing to get rid of that belly, you should be able to fix them. The trick is to estimate which teeth are out of whack either side of the short one, and work on those correctly. The flats tell you what height to work to, but you need to watch the widths of the bases, and lean on whichever side needs reducing. It takes a bit of practice to get perfect teeth - I find if I haven't done any tooth forming for a while I can end up with a bit of a mess. Having to re-joint & re-form is punishment enough to make me pay more attention the next time!
Matt, I'm a bit alarmed about your experience - I thought Wiltshire files were generally ok - you have to wonder where these were actually made, whatever they say on the brand! Files are becoming a real bugbear, aren't they? Getting hold of suitable sizes is one thing, the inconsistency of the metal in them is another, and the inconsistency of corner radii even within what is ostensibly the same brand, is yet another.
I learnt quite a while ago, what it's like trying to sharpen with inferior files (impossible!). If you can't take off the same amount of metal consistently with each stroke, you just cannot do a decent job, no matter how skilled you are. I've struck a couple of softies, but most of the file trouble I've had was caused by excessive brittleness (probably exacerbated by heavy-handed technique), and losing many of the teeth from the corners. This makes the file chatter and catch, which also makes it impossible to cut an even amount per stroke. The tightwad in me wants to persevere & "use-up" the relatively new file, but it's far better all-round, especially for my temper, to chuck it, & break out a new file.....
Cheers,IW
-
28th May 2013, 11:56 AM #28
Luddite Lite
- Join Date
- Jan 2009
- Location
- Brisbane
- Posts
- 800
Saw Vice Build 2
Yes, Ian, I have learnt now to stick to files of a known pedigree. I only bought these because I thought for sure Whiltshire would be a good bet but I think maybe these never made it to the shelf back in the day for a good reason

The grobets have been really good but I can't find double extra slims for my back saws. That was the other reason I grabbed these, that and they had the nice narrow shoulders you've made me look for.
I spoke to the Bahco rep at the TWWS and asked about saw files and he said that Carbatec have just started stocking their files and if I put in an order he has all the sizes available, he didn't have an actual price but he thought somewhere around 7 bucks for a 5" xx slim. I have read good things about the Bahcos and at least I have this guy's card so I can always complain if they don't perform.
Matt...I'll just make the other bits smaller.
-
28th May 2013, 12:27 PM #29
GOLD MEMBER
- Join Date
- Mar 2004
- Location
- Brisbane (western suburbs)
- Age
- 77
- Posts
- 12,142
That's good news - a reliable local source of finer files will be much appreciated by me. I switched to Vallorbe needle files for 15tpi & finer saws some time ago. The needle files are good; they are consistent and wear well, but at $12 plus apiece, and the rate at which I go through them, it does hurt the pocket a bit! If the Bahcos are up to scratch, they will offer a welcome alternative.... Originally Posted by Berlin
Cheers,IW
-
28th May 2013, 02:18 PM #30
GOLD MEMBER
- Join Date
- Aug 2009
- Location
- Armadale Perth WA
- Age
- 55
- Posts
- 4,524
The main 11mm-sided file is (Brazil-made) Nicholson from the hardware store. The package says 200mm (8") SLIM. Originally Posted by Berlin
It was $16 over-the-counter about a year ago. It seems to be going perfectly fine for my level ofbutcherycraftsmanship.
I have in the same brand a 4" SLIM ($8 ??) and a 5" SLIM ($12) that haven't come into recent use - so I can't comment on them for wear.
There's also a chinese brand 'SUPER-xxxx' (7") that seems serviceable - but again I haven't used for many months.
The big flat file is a Nicholson - made in the USA.
The smaller file I used came in an assortment of used files from the US ... it is branded 'MADDEN'.
(There's also SAVILLE, Nicholson - canada, an elephant stamp, FEARLES(S), NF Co., Bedford - sheffield)
(and a dozen tiny grobets in different profiles)
I have some NOS Wiltshires in 4" three-square and 4" double-extra-slim. I can't give you feedback on them either, yet.
What size were yours?
I do wonder how I would have fared with a smaller file from scratch. Probably still end up in a different but similar mess Originally Posted by IanW
I didn't have it in my head from my reading that re-raking involved losing an amount of saw-blade, so I was a bit thrown by the "dilemma of the gullets" I think ... and having it hollow to start with just added to the character-building nature of the exercise.
Paul Sellers was talking very positively about Bahco in his video.
Cheers,
Paul


 Reply With Quote

Similar Threads
-
Saw Vice build
By pmcgee in forum HAND TOOLS - UNPOWEREDReplies: 4Last Post: 28th April 2013, 06:46 PM -
Shaper vice and milling vice
By morrisman in forum METALWORK FORUMReplies: 6Last Post: 5th September 2012, 12:06 AM -
Best possible vice options for upcoming bench build?
By TimberNut in forum THE WORK BENCHReplies: 35Last Post: 1st August 2011, 01:30 AM
