

 Thanks: 0
 Likes: 0
 Needs Pictures: 0
 Picture(s) thanks: 0
Results 16 to 30 of 173
Thread: Building a Navigator yawl
-
8th April 2010, 05:23 PM #16
 SENIOR MEMBER


- Join Date
- Oct 2008
- Location
- Victoria
- Age
- 71
- Posts
- 631

Good on you Mick- I'll look forward to your pics.
Yes, I've joined that group and I have to say it is very comforting having a build that has echoes all over the place. Nice to think there are others as silly as one's self...
As to speed, well it does have its downside. My shed looks like a bomb has hit it...never thought of myself as a bomb before, often thought I was a wreck, but not a bomb.
-
8th April 2010 05:23 PM # ADSGoogle Adsense Advertisement
- Join Date
- Always
- Location
- Advertising world
- Age
- 2010
- Posts
- Many
-
8th April 2010, 05:37 PM #17
SENIOR MEMBER
- Join Date
- Oct 2008
- Location
- Victoria
- Age
- 71
- Posts
- 631

A pile of oregon for scantlings and spars. Oregon from Barwon Timber. I'll be building spars as per plan (ie. hollow but fabricated not birdsmouth) and I'll be building a deck mounted tabernacle for hinging the mast.
-
8th April 2010, 09:12 PM #18
GOLD MEMBER
- Join Date
- Mar 2007
- Location
- Adelaide
- Posts
- 2,139
Must be the camera but it almost looks like WRC.
Did you size it or have it cut. Might have to check some prices my stash of close grain oregon has run out so I'm off to the salvage yard Saturday.
-
10th April 2010, 09:12 PM #19
SENIOR MEMBER
- Join Date
- Oct 2008
- Location
- Victoria
- Age
- 71
- Posts
- 631
centreboard work

A daunting pile of hardwood for the centreboard, I can't believe how much volume there is before the tools get stuck into it.

I made a jig to rout the foil profile onto the blank. The original template shape was projected up, by taking the given rising dimension perpendicular to the curve sufficient height for a rigid template, but not so much as to exceed the safe length of the cutter. Two of these, made as a pair are attached to eachother with suitable scrap blocks at each end.
I intended to rout the whole surface, but thought better of it after a few cuts. I love my router, but mainly for edge work, and not as a surfacer- too much noise and fuss. So, I cut vaguely parallel cuts to establish the profile, and used a selection of power and hand tools to sculpt down to the cut depths.


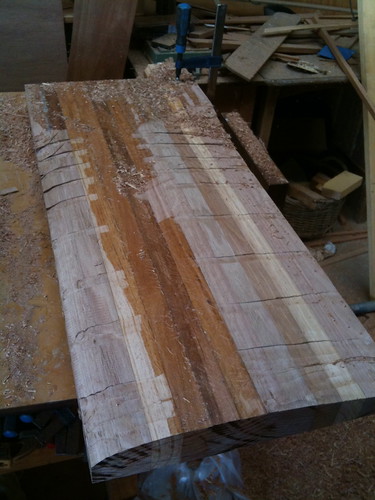
Ten minutes of power plane sculpting has one side roughed out. It's block plane and sander from here, then the other side.
-
11th April 2010, 09:09 AM #20
GOLD MEMBER
- Join Date
- Mar 2007
- Location
- Adelaide
- Posts
- 2,139
What are you using for the centrboard.
Hold you breath but I think I'm about to make a start and have been wondering what to use for Coquina. A heavy hardwood to minimise the lead weight required but what?
Cheers
Mike
-
11th April 2010, 09:45 PM #21
SENIOR MEMBER
- Join Date
- Oct 2008
- Location
- Victoria
- Age
- 71
- Posts
- 631
That's good news Mike, it'll be a lovely build. Originally Posted by m2c1Iw

My board is from what we Victorians call (variously and with varying accuracy) 'KDH' (kiln dried hardwood), 'Mountain Ash' (and sometimes it still is) or 'Tassie Oak' (and sometimes it is from Tassie, but has never been oak).
KDH is the safest because it defines the process not the species which can be from a variety of local hardwoods, in a variety of densities.
...and yet it was such a simple question....
Jarrah would be denser (Mickj used that I think), but I'm not too fussed about density given the designer's requirement for a moderate lead weight. I'm more concerned about getting it to work nicely, sink easily, and help me point as high as possible. Staying upright should be more a factor of design and management IMHO.
The strips are 60mm wide cut from 30mm boards that I had left over from other jobs (only needed 920 length so they are almost 'off-cuts' by furniture standards! (but kept carefully nonetheless.)
It might be short but it is a fatter foil than on the Waller.
Rob
-
12th April 2010, 11:16 AM #22
GOLD MEMBER
- Join Date
- Mar 2007
- Location
- Adelaide
- Posts
- 2,139
Thanks Rob,
I am tending towards Jarrah if I can find some at the recyclers or KDH if not. The weight in the board is only to keep it down not for righting moment so I figure the more dense (that's the board not the builder) the better, less messing with lead.
Gee 60mm thick starting point what is the finished thickness no risk of breaking that one.
Onward and upward.
-
12th April 2010, 11:28 AM #23
Senior Member
- Join Date
- Nov 2007
- Location
- Fremantle
- Age
- 56
- Posts
- 125
You doing some really nice work there Rob.
Just remember to leave plenty of room for a layer of Fiberglass cloth to wrap around the board. I made the mistake of not leaving enough clearance, and somehow during the build, the CB case got squeezed and I couldn't get the CB into the case.
Its heartbreaking to attack a beautifully shaped foil with an electric planer.
Cheers
Mickj
-
12th April 2010, 11:38 AM #24
SENIOR MEMBER
- Join Date
- Oct 2008
- Location
- Victoria
- Age
- 71
- Posts
- 631
Thanks for that Mick- and your new photos are great too- I don't know whether you want to remind people where to find them...
John shows the board as 60mm in a case of 64mm in case others are wondering. And that's good advice Mick, and it's why I'm making the board and case at the same time. Mine will come down a little from 60mm anyway because of some slightly thinner strips in there, so I should be OK with the 4mm allowed as spare.
-
13th April 2010, 10:15 PM #25
Senior Member
- Join Date
- Nov 2007
- Location
- Fremantle
- Age
- 56
- Posts
- 125
In case anybody is interested, here's a link to some photos of my Navigator build. The Navigator is not the easiest boat to build(well not for me anyway) but I'm sure the final result will be well worth the effort. As Rob has already noted, there is a lot of material that goes into this small boat.
Picasa Web Albums - Mick - chok dii - Bu...
Hopefully I'll learn something from you Rob, which will help me with the next build, a simpler/lighter Wherry.
Cheers
Mickj
-
13th April 2010, 11:15 PM #26
SENIOR MEMBER
- Join Date
- Oct 2008
- Location
- Victoria
- Age
- 71
- Posts
- 631
I'm sure there will be interest in those Mick, lovely work, thanks for adding the link.
As to learning things, I'd be very happy if you'd give a little run down on your technique for those Saturday night activities mentioned in your last photo
I've tried to get motivated to do those things, but never get past first base.
(and for those of you who suspect I'm envying his social life in an unhealthy way, the photo is of splicing braided lines)
I don't recall anyone demonstrating that here....you could insert it in this thread or start another on the topic- if you were interested of course
-
15th April 2010, 10:53 PM #27
Senior Member
- Join Date
- Nov 2007
- Location
- Fremantle
- Age
- 56
- Posts
- 125
Hi Rob,
I used the following site as a guide to splicing rope.
How to Eye Splice double braid rope
The method on the main page works fine for most double braided ropes.
BUT!! (There is always a But), when working with "Low Stretch rope" you need to remove some of the "Inner" strands. "Low Stretch" rope, as the name suggests, does not stretch enough to allow 2 x Cores within a single outer sleeve. All other steps are the same.
I've got 1 more rope to splice this weekend, so I'll take some pictures and post of you like.
But be prepared to raise a sweat. You'll get a real workout, and your hands will ache for days(the doctors says I have the hands of a 16 yr old Nintendo Champion)
Cheers
Mickj
-
17th April 2010, 05:02 PM #28
GOLD MEMBER
- Join Date
- Mar 2007
- Location
- Adelaide
- Posts
- 2,139
See what you've done Rob all the puddle duck crew are busily making router jigs for the foils.
Nice work but have you misplaced your #7.
-
17th April 2010, 10:46 PM #29
SENIOR MEMBER
- Join Date
- Oct 2008
- Location
- Victoria
- Age
- 71
- Posts
- 631
Mike, I'm also working on a router jig for trimming toe nails..want to be my test pilot?

These power tools make soo much mess..
Mick, thanks for the link- it's certainly something I'll come back to. I'd like to be much better at the rope craft and I admire your efforts there.
It was quite a surprise to me, just how much pleasure came with handling the lines while sailing; they are a wonderful vehicle to feel what the wind and boat are doing and a very pleasant tactile thing.
-
19th April 2010, 04:09 PM #30
GOLD MEMBER
- Join Date
- Jan 2009
- Location
- Blaxland, Australia
- Age
- 65
- Posts
- 2,551
Heh, there's one right here... Originally Posted by m2c1Iw

Cheers and thanks,
Alex.


 Reply With Quote

Similar Threads
-
GIS Yawl
By CCBB in forum Michael Storer Wooden Boat PlansReplies: 512Last Post: 8th February 2015, 12:30 PM -
Navigator
By Resination in forum WOODTURNING - PEN TURNINGReplies: 12Last Post: 6th January 2010, 02:04 PM -
Magma Navigator
By Resination in forum WOODTURNING - PEN TURNINGReplies: 14Last Post: 30th December 2009, 12:04 PM -
Figured Pink Ivory on a Gold Navigator
By Matt88s in forum WOODTURNING - PEN TURNINGReplies: 15Last Post: 17th May 2008, 10:24 PM -
Caledonian Yawl Plans
By Donald in forum BOAT BUILDING / REPAIRINGReplies: 1Last Post: 9th February 2004, 10:10 AM
