

 Thanks: 0
 Likes: 0
 Needs Pictures: 0
 Picture(s) thanks: 0
Results 31 to 45 of 173
Thread: Building a Navigator yawl
-
19th April 2010, 04:20 PM #31
 SENIOR MEMBER


- Join Date
- Oct 2008
- Location
- Victoria
- Age
- 71
- Posts
- 631

Good on you Alex- hope it works for you. Must have another look at your thread!

-
19th April 2010 04:20 PM # ADSGoogle Adsense Advertisement
- Join Date
- Always
- Location
- Advertising world
- Age
- 2010
- Posts
- Many
-
19th April 2010, 05:16 PM #32
SENIOR MEMBER
- Join Date
- Oct 2008
- Location
- Victoria
- Age
- 71
- Posts
- 631
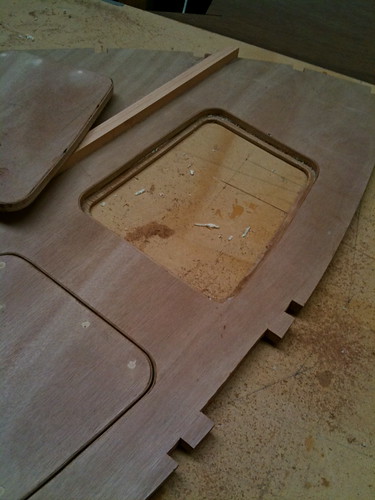
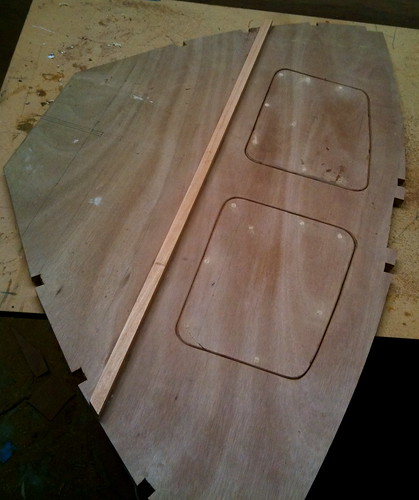
The bulkhead hatches. I've been very tempted to overlook the hatch covers (like many others) because there are so many other things that always seem more urgent at the time- BUT since these little covers will be all that is between me and a flooded forward buoyancy tank in a nasty salty bath, and since they are part of the designed flotation, I decided now was not only a good time, but probably the only time I'd get around to them.
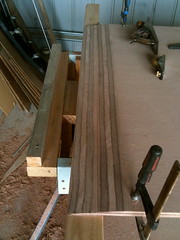
And here is the requisite pic of a sheetwide scarf in progress to create the bottom plank. (Since glued up. Came out quite nicely)
-
21st April 2010, 08:59 PM #33
SENIOR MEMBER
- Join Date
- Oct 2008
- Location
- Victoria
- Age
- 71
- Posts
- 631
fairies in my shed
This boat is to be assembled under the shadow of a pile of hay bales. It's all a bit dark in here, and the mice have come from miles around to nest in amongst the bales, so until the cattle get it all fed to them, I know that I will have my boat building observed by a tiger snake or two. For those of you in the city, it's not that snakes like to watch boats being built (although they don't mind it) it's the lure of endless pretty little mice that rattles their chains.
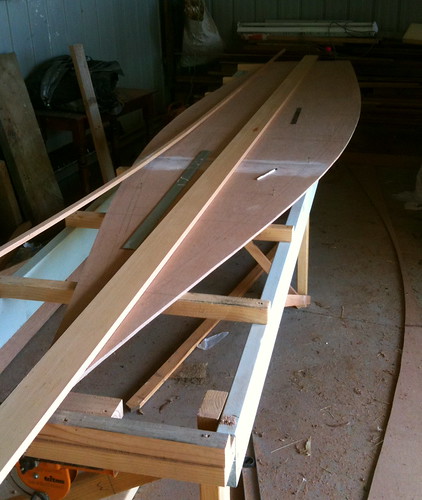
Here is what the mice did for me to-day while I was attending to a lovely cow who needed a vet to see to her feet. They marked out the bottom panel, the outer stringer lines and the keelson lines, then cut the panel out. Their work was better than the average shed fairy, but not, of course, as good as mine...
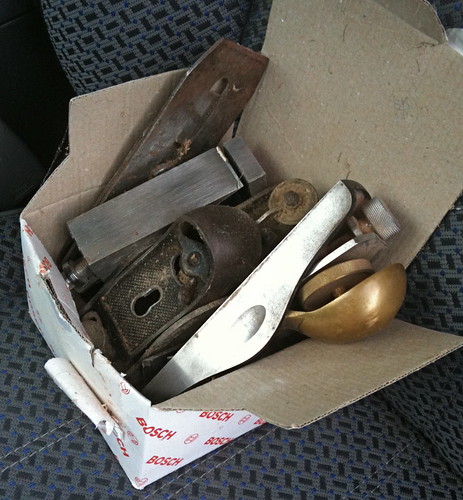
...and I had company in the ute on the way back to work. The 'usual suspects' reckoned they've been neglected and feel that they've been treated as mere 'site tools' (I'd never call them tools) and maintained that their edges were woofly and they needed some group therapy. So I brought them back to work (the 'mother' workshop) for a session.
Sometimes I think block planes are as 'needy' as a cello (and they are generally quite neurotic)
-
21st April 2010, 09:37 PM #34
GOLD MEMBER
- Join Date
- Mar 2007
- Location
- Adelaide
- Posts
- 2,139
Your mice do fine work Rob but you should've let them refer to the plans instead of looking over your shoulder, looks like they are building a Lute for you.


-
21st April 2010, 10:20 PM #35
GOLD MEMBER
- Join Date
- Jan 2009
- Location
- Blaxland, Australia
- Age
- 65
- Posts
- 2,551
Or a theorbo Originally Posted by m2c1Iw


-
21st April 2010, 11:00 PM #36
SENIOR MEMBER
- Join Date
- Oct 2008
- Location
- Victoria
- Age
- 71
- Posts
- 631
Mmmm, you've both got a point. I'll have to get those little tikes back to do it again.
Can't get rodents like you used to
-
21st April 2010, 11:52 PM #37
Grumpy old Bugga
- Join Date
- May 2003
- Location
- South Oz, the big smokey bit in the middle
- Age
- 67
- Posts
- 4,377
Pity they put the point on the wrong end Originally Posted by rob540

Richard
-
22nd April 2010, 12:24 PM #38
SENIOR MEMBER
- Join Date
- Oct 2008
- Location
- Victoria
- Age
- 71
- Posts
- 631
It might be useful to cover a few aspects of edge tool sharpening in case there are lurkers who are intimidated by the sharpening process to the point where it is one of the things preventing them from making something cool like a boat.
Everyone has their own method, and there are already threads that cover this, but I'll try to cover it briefly in the context of the normal sort of clean up that might be necessary during a build.

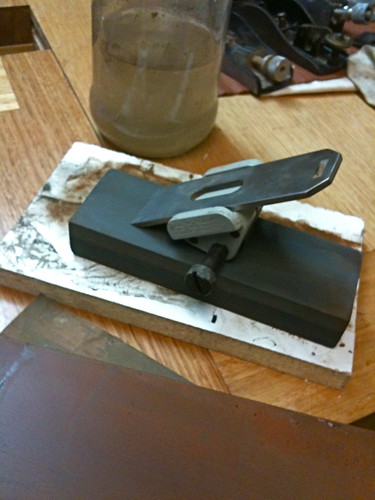
Above, I like to assemble a few jobs that are similar. Arranging the bits of several tools seems to make the getting out of the stones and the making of mess a bit more worthwhile, and it certainly focusses my mind on a job of significance rather than a rushed bit of maintenance (which might tempt me to cut corners)
Here we have a couple of block planes, a rebate plane and the iron from a #5 together with a jar of water with a stone getting soaked. The coarser the stone, the more water it will absorb before you can make a slurry to cut the surface of the tool. There is also a small honing guide there. Eclipse and Stanley make comparable ones and they are cheap. I also have a wonderful Veritas guide with all bells and whistles, but I prefer the simpler ones, largely because I don't measure angles anymore, preferring to judge the angle by eye, with regard to the job the tool will be doing. In general, a pointy angled or fine secondary bevel will cut a finer shaving, leaving a better surface, but will be more vulnerable to edge damage than a steeper angle would. So if you are roughing, a higher angle will save sharpening time, and keep the edge longer.
Along those lines, the Stanley block plane there is usually set up for rougher work than the Lie Neilson. If you can afford the luxury of the choice it saves time and gives you a lot of freedom.
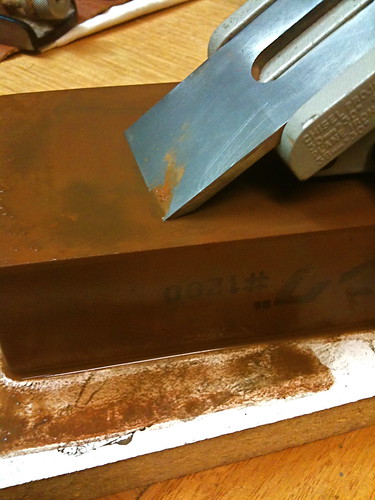
At left a carborundum coarse stone is being used first because this blade had a nick taken out of it by a submerged broken screw in my last boat. This tool has never been near a grinder and it is 5-6 years old. I prefer to spend a few extra minutes with the really coarse stone to grind the secondary bevel back to behind the nick without risking a burn or any other mechanical mishap. Having set the honing guide up to the best angle, it can be kept on without further adjustment through a series of stones, even polishing the back each time without difficulty.
If you've found a good angle and are happy with it, make sure you tighten the guide with the screw driver slot in the screw so it doesn't loosen during the process. This ensures the bevel doesn't end up with a multi-faceted face.
At right is a Japanese stone of 1200 grit which will produce a nice sharp edge and take the burr of without too much effort.

The dull grey secondary bevel here is straight off the carborundum. After a series of stones it will become mirror bright.

Here a 4000 grit stone, then an 8000 grit stone (which are progressively harder and less water absorbent) is used on the front and flat back of the blade without changing the honing guide in any way.
After this, except for the very finest work, I don't even bother to strop with leather. A little baby oil on the blade and other vulnerable surfaces protects against atmospheric moisture and corrosive sweat, and you are done!
As to why I don't use oil stones anymore, I find it easier to keep water stones unclogged and easier to flatten them, and if you wipe your dirty hands on trousers or apron it's much easier to go home with water soluble filth than an oily mess...and the stones don't get sticky and dusty in a workshop environment.
I tend to use the side of the 1200 stone to lap the backs of blades. This because I try to keep the faces of the stone flat by working the entire surface as evenly as possible, and this is harder to do on the back when the honing guide is attached.
-
22nd April 2010, 12:55 PM #39
GOLD MEMBER
- Join Date
- Jan 2009
- Location
- Blaxland, Australia
- Age
- 65
- Posts
- 2,551
Hi Rob,
You must have been reading my mind ;). That is in actual fact the very next piece of tool maintenance that I need to do (for foils shaping :).
Many thanks for that! I have the stones (soaked), a book (Ian Kirby's book on sharpening with waterstones), the bevel guide (same as yours by the looks), lots of blunt plane blades and chisels, but not the courage to sharpen them. I've lost that through many years of not being able to sharpen oboe reed scraping knives adequately (let alone properly) :(. Maybe reading through this valuable post several times more may give me the said bottle :).
Cheers,
Alex.
-
22nd April 2010, 01:17 PM #40
GOLD MEMBER
- Join Date
- Mar 2007
- Location
- Adelaide
- Posts
- 2,139
 I think I see rust on your #5 they must be your boat building planes not the everyday ones.
A great idea and very well written Rob but you forgot about the years of practice that has gotten you to this point. There is nothing like a shape blade even for some of the rougher type of boat building jobs.
I still struggle with getting that burr even with a guide so it's still a bit hit and miss for me.
-
22nd April 2010, 01:54 PM #41
SENIOR MEMBER
- Join Date
- Oct 2008
- Location
- Victoria
- Age
- 71
- Posts
- 631
Well, actually Mike it was the #5 that was doing all the complaining. It used to live in the dry comfortable studio workshop, on light duties and being well cared for. While building the Waller it lived in a mouse infested tin shed in a very moist, highish altitude bush setting. It was then asked to cut through epoxy, marine ply and live with power sanders
 next to it on the filthy bench, while it rusted on all the non-working parts.
Don't know what his problem was, really.
Mike, if the angle of the guide is such that you are actually abrading the edge (and not a band inside or back from the edge) at a constant angle and if the stone is OK and if the back is flat at the edge, and polished, the burr must occur as the edge retreats (ie. is abraded) or you haven't gone far enough, or the blade is too soft (IMHO)
And Alex glad it was timely and hope it proves helpful.
Rob
-
22nd April 2010, 02:20 PM #42
GOLD MEMBER
- Join Date
- Mar 2007
- Location
- Adelaide
- Posts
- 2,139
Rob, I've got some A2 and D2 blades and my greatest failing is being impatient when it comes to sharpening. Your approach of having a sharpening session going through the process on multiple blades and get them all up to scratch at ounce makes good sense.
The blades I have the most problem with is the A2 bevel up jack the edge wears on the back and requires a lot of abrading to enable a burr (I don't like using a grinder), again it's lack of patience that causes me to try and cut corners and leaving it too long to touch them up.
BTW that's why I don't have a #5 they are always complaining.
-
22nd April 2010, 03:39 PM #43
SENIOR MEMBER
- Join Date
- Oct 2008
- Location
- Victoria
- Age
- 71
- Posts
- 631
Mike, something that might be worth trying on your 'bevel up Jack plane' is a very small back bevel. By that I mean a fine low angled bevel on the 'flat' side of the edge, which is where your blade is wearing. It should probably only be about 1/32" wide- just enough (a couple of passes over the stone if you can set your honing guide low enough, I guess) to give you an accurate edge to sharpen up to on the other side.
In theory this will raise your effective cutting angle, but that might actually be a bonus on tough wood. It will save you from having to lap the entire back surface every time the edge gets rounded up.
-
22nd April 2010, 09:20 PM #44
GOLD MEMBER
- Join Date
- Mar 2007
- Location
- Adelaide
- Posts
- 2,139
Many thanks I have done this from time to time but always felt guilty as it seemed like cheating somehow despite it being common practice, silly really.
If you feel inclined a how to on gouge sharpening sometime would be appreciated.
Returning you to normal viewing.
Cheers
Mike
-
22nd April 2010, 09:31 PM #45
Grumpy old Bugga
- Join Date
- May 2003
- Location
- South Oz, the big smokey bit in the middle
- Age
- 67
- Posts
- 4,377
How do you flatten a stone Rob? I'm thinking oilstones, not water stones.
I got around this last time by buying a new stone ... though to tell the whole story, my old stone was too narrow, the lad had given me a handful of cash for my birthday and Mitre 10 were having a clearance sale ... but essentially, I got around the problem by buying a new stone
Richard


 Reply With Quote


Similar Threads
-
GIS Yawl
By CCBB in forum Michael Storer Wooden Boat PlansReplies: 512Last Post: 8th February 2015, 12:30 PM -
Navigator
By Resination in forum WOODTURNING - PEN TURNINGReplies: 12Last Post: 6th January 2010, 02:04 PM -
Magma Navigator
By Resination in forum WOODTURNING - PEN TURNINGReplies: 14Last Post: 30th December 2009, 12:04 PM -
Figured Pink Ivory on a Gold Navigator
By Matt88s in forum WOODTURNING - PEN TURNINGReplies: 15Last Post: 17th May 2008, 10:24 PM -
Caledonian Yawl Plans
By Donald in forum BOAT BUILDING / REPAIRINGReplies: 1Last Post: 9th February 2004, 10:10 AM
