

 Thanks: 0
 Likes: 0
 Needs Pictures: 0
 Picture(s) thanks: 0
Results 91 to 105 of 173
Thread: Building a Navigator yawl
-
10th May 2010, 11:48 PM #91
 Senior Member


- Join Date
- Nov 2007
- Location
- Fremantle
- Age
- 56
- Posts
- 125

Hi Rob,
I'm very close to finishing. I've been slowed down a bit as I'm studying part-time and I've got assignments due.
I've bought some bendy-ply and I'm about 50% complete on the coamings.
I yet to modify the CB case to allow the CB to be fitted from above. That might be next weekend.
After that, its just a few more coats of varnish on the deck, and she's finished.
A won a $1000 gift voucher from BCF, so I was able to get some great boating gear(radio, flares, etc....and a new fishing rod!!!!). So I'm itching to hit the water.
Did I mention I won a $1000 gift voucher from BCF
-
10th May 2010 11:48 PM # ADSGoogle Adsense Advertisement
- Join Date
- Always
- Location
- Advertising world
- Age
- 2010
- Posts
- Many
-
17th May 2010, 08:08 PM #92
SENIOR MEMBER
- Join Date
- Oct 2008
- Location
- Victoria
- Age
- 71
- Posts
- 631
Good luck with the study Mick, and well done with the prize! Amazing...
I found myself AWOL from work to-day while we inspected our cows rear ends in anticipation of their readiness for artificial insemination, and had (because they weren't ready) the most beautiful day in warm sunshine, no wind , no people, blissful views (even the back of our cows), in short, the sort of imagery that is impossible to improve, and the sort of image that I'll resort to when times get tough in the future as they will sometime, no doubt, not to mention perfect conditions to do a bit of epoxy work.


Here a mitred housing joint is being used to attach the 20 x20 stringers that run from the back of the CB case to B3. I've chosen to run a continuous piece, horizontal at the thwart then continuing in a sweep up to to B3, rather than 2 separate pieces because I like the curve. This joint is their meeting with B3. Chose that joint because it offers good surface area but very little sacrifice to the strength of the doubler it is joined to, and I like doing them anyway. Sometimes butt joints are boring.

Here is the mess. I include this because I had more bits to hold and adjust than I had hands to do it, so I resorted to the old 'clamp-the-spirit-level-to-the-work-so-you-don't-have-to-take-a-hand-off' trick.

and here are all the bulkheads attached, but it'd sink if I put it in the bath at the moment.

and here are those stringers along the CB case. The little piece at the forward end of the CB case is a bit different in shape from the one shown in the plans, but not different structurally. Here it is being dry fitted...

To-day I was able to do a bit of gratuitous epoxying, and even a few fillets, and felt pretty good about it till I got back to work and had to deal with the missed calls and phone messages. I'll be good soon, I promise.
-
18th May 2010, 05:33 PM #93
GOLD MEMBER
- Join Date
- Mar 2007
- Location
- Adelaide
- Posts
- 2,139
I do like the artistic flair in both the build and the photos but what is that I see........ a belt sander.


-
18th May 2010, 06:59 PM #94
GOLD MEMBER
- Join Date
- Jan 2009
- Location
- Blaxland, Australia
- Age
- 65
- Posts
- 2,551
I think it's a very small belt sander...

-
18th May 2010, 08:21 PM #95
SENIOR MEMBER
- Join Date
- Oct 2008
- Location
- Victoria
- Age
- 71
- Posts
- 631
a beltsander???? ME? (well, I do use one.)
I suppose you two are referring to my Transformer Shoe Phone. Very careless of me to leave it lying about, but there was talk of Norwegian spies in our area, and I needed to be prepared.
 When not on espionage duty it transforms into a 'palm planer' (ridiculously cheap from B..Bu..., you know) (less than $60 bucks) because I have this old darling of a Makita power planer that I've had since the 1980's- and which has never even needed sharpening, and is still the best power tool I own, anyway, I'm protecting her (I think she is a 'her' but I'm too frightened to look underneath in case she needs sharpening) from nasty plywood by using a cheap modern tool instead.
It'll be interesting to see how this new little toy-tool goes trimming the stringers to their bevels. It is certainly sharp and light.
I placed an order with Denman Marine for some of that (almost) edible gaboon for the hull planking. My luck, you sods have bought all his stock , so I have to wait for the next shipment. Perhaps I could learn to knit? Or crochet? Or even do some paying, sensible work...
-
18th May 2010, 09:03 PM #96
GOLD MEMBER
- Join Date
- Mar 2007
- Location
- Adelaide
- Posts
- 2,139
A palm power planer, what will they think of next. Originally Posted by rob540

Sorry about the ply, wow that went off quick how many sheets does a 40' container hold there must be a few boats being built out there.
-
24th May 2010, 10:46 AM #97
SENIOR MEMBER
- Join Date
- Oct 2008
- Location
- Victoria
- Age
- 71
- Posts
- 631

Managed to get a few stringers on, and the process was considerably easier than the heavier hardwood ones on the Waller. The slots I pre-cut in the bulkheads required less adjustment than I was anticipating, and I was glad to have had them there before fitting the bulkheads. Cutting them later would provide a very wobbly moving target- OK for a hand saw, but murder to clean ply up with a chisel when you need to hold it steady. When the angle of the stringer to the slot made the fit too tight, I used a handsaw flat on the stringer to cut a new edge into the bulkhead. Similarly, it was good to have the slots pre-cut in the stem. That made aligning the tapered ends of the stringers much easier. The plans show these rebates to be horizontal, and that worried me a bit when cutting them, because I realised even then that the stringers would join on an upward sweep, but again, this only required a couple of mm adjustment to angle the edges of the rebates to the angle of the stringer.
I'm not sure that I have the most perfect fair lines for the stringers, especially on the side which offers no opportunity for a long view, but the compound nature of the curve, and the fact that the stringers will be bevelled to fair the line in two directions at once make it hard to decide how fussy to be. These lines will be 'dressed' to the angles of the bulkheads in any case, so I'm not losing any sleep on it.
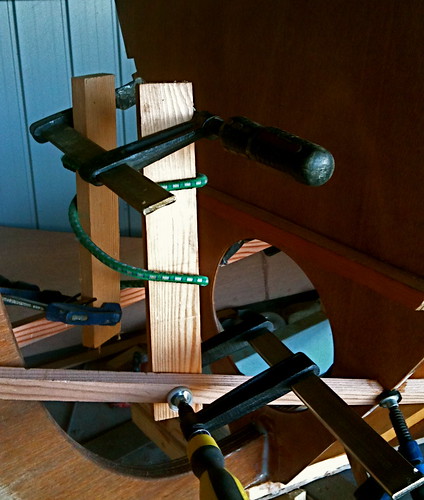
This is a mucky pic, and I hesitate to include it. I hate ugly pics. But, I've noticed looking at some builds that this end of the stringers can be a bit of a challenge, and it is the end in which we are most likely to build in some unfair curves by pulling the stringers into the stem with undue force, distorting it's line in the process. What I chose to do was to use wooden 'levers' clamped to the stringer and then pulled together with shock cord to twist the stringer so that it wants to lie flat on the stem. Letting the levers take care of that leaves your hands free just to worry about the correct fitting.
Cutting the stringers to the right length is also a bit of a worry till you actually do it. I found that placing the over-length stringer in (or across) the stem rebate and then using a thick carpenter's pencil flat across the stem produced a line parallel to the stem close to the correct angle, and about the right overhang, to allow for the pulling into the rebate once the stringer is cut. With the stringer cut, and the lever holding the piece flat into the rebate, a pilot hole was drilled through the stringer. One temp. screw was all that was needed gently to pull it home. (too hard, or too many would distort the stringer to make its entry into the stem concave)

Before the stringers went on I did some fillets and some epoxy coatings, especially in areas that will be difficult to see/access once the stringers and hull goes on. I remember how uncomfortable it was to be crouching on my knees squeezing out fillets once you have to climb in to work. I've used a combination of wood flour from the orbital sander (about 30%) with West 411 filler material. It has a bit of body in combination, but needs less sanding (has a smoother texture) than pure wood flour.


The CB pin hole also got a bit of attention while it was still easily accessed. If I had my time again, I would do this bushing before fitting the case. No biggie, though. Oversized hole, filled with goo, re-drilled for the tube. Only complication is the difficulty in aligning the two holes accurately, and I'll dress the bush with a bit more goo to adjust that, later. In drilling the initial holes, I managed to sneak the forstener bit through the ply, with its point just sticking through the 'glass and 3 coats of epoxy inside the case. The glass remained undamaged so that the goo didn't fall through on the inside, but all the wood was sealed. Obviously neat, unthickened pox was painted in there before the thickened stuff, so the ply would suck it all up. Thirsty little sausage, it was too.
-
24th May 2010, 12:48 PM #98
GOLD MEMBER
- Join Date
- Jan 2009
- Location
- Blaxland, Australia
- Age
- 65
- Posts
- 2,551
Hi Rob, Originally Posted by rob540
You call this snap murky? If it is the one that you are referring to, of course (the one below it is a bit fuzzy but doesn't show what you describe - but does show off the future lines of the boat nicely). It shows everything in crystal clarity, it's in focus where it matters, what's the problem? The composition? It does what it needs to, and it doesn't need to be a work of art to do that. Thanks for putting it up - I'm very glad that you did. I've squirrelled away the idea for future reference and use! You should see some of mine (I'm not excusing myself  )...
)...
Cheers,
Alex.
-
24th May 2010, 12:57 PM #99
SENIOR MEMBER
- Join Date
- Oct 2008
- Location
- Victoria
- Age
- 71
- Posts
- 631
Yep, that's the mucky one, and I mean compositionally, I suppose, and the fact that there are untidy bits of cord and off-cuts used to arrange the timber...I'd love to be a neater builder....
As to yours- I've never seen such a well illustrated thread as yours Alex. You'd have gone broke months ago if we still had to buy film!
-
24th May 2010, 01:06 PM #100
GOLD MEMBER
- Join Date
- Jan 2009
- Location
- Blaxland, Australia
- Age
- 65
- Posts
- 2,551
I suppose you could have screwed on blocks to act as guides to shunt the cord into a more attractive curve, but... Originally Posted by rob540
As to film, yes, I would have had to sell the Dog, the Child, the house, probably the cars and the Boss! And would have had to wait for the processing. And then torn my hair out at the waste incurred by the plethora of dud exposures. Digital photography still has severe limitations (even if you have huge amounts of money and can by top-of-the-range equipment), but it does have several benefits, and highly reduced turn-around is one of them!
Cheers,
Alex.
-
24th May 2010, 02:24 PM #101
Senior Member
- Join Date
- Nov 2007
- Location
- Fremantle
- Age
- 56
- Posts
- 125
Thats some nice work Rob.
Its about this point in the build that I started to have problems with access to all parts of the boat. Will you be following JW's instructions to the letter or can you think of an easier way to plank the boat?
If I had my time again, I would make sure that the stringers lay fair, and then remove them for planking, only putting each stringer on when required. The only problem would be to figure out a way to hold the bulkheads still while you wrestled with the planks.
Anyways, your boat is progressing nicely and we all appreciate the pictures and commentary.
Thanks
Mickj
-
24th May 2010, 02:33 PM #102
SENIOR MEMBER
- Join Date
- Oct 2008
- Location
- Victoria
- Age
- 71
- Posts
- 631
Cheers Mick,
interesting points about the planking. I guess I don't know till I get there, but I'd be inclined to put the bottom planks on with the hull upright then turn her over before she gets too heavy, and do the other planking, fairing and painting, then turn her again for the fit-out- probably on a low cradle or something...
-
25th May 2010, 06:36 PM #103
Novice
- Join Date
- Nov 2008
- Location
- Melbourne, Australia
- Age
- 57
- Posts
- 21
Hi Rob,
Just looking through a few of your recent posts. Your fillets are very neat! Do you have to glass them as well? I found making the fillets on my Stir Ven easy and neat enough, but it all got a bit messy when the glass tape went on (wet on wet with the fillet). I used peel ply to reign everything in, though this smoothed things out I still ended up with a lot of air bubbles to fill afterwards - frustrating! So far this has been the most unpleasant part of the build and its trashed my knees. I'll be watching with keen interest to see how you tackle it.
Cheers
Mike
-
25th May 2010, 06:51 PM #104
SENIOR MEMBER
- Join Date
- Oct 2008
- Location
- Victoria
- Age
- 71
- Posts
- 631
Hi Mike, they aren't particularly neat, but I'm slowly improving. These don't need glass sheeting so I'll not have your problem. Wet in wet is all very well for those who can hang around long enough for the curing to start, but I almost always have to 'hit and run', so have become used to laying down a coat of epoxy and then sanding it before filleting or re-coating. Slower, but sometimes there is no alternative. -Particularly where I build the weather is a major factor, and predicting the cure rate is fraught.
Maybe that's your issue. Maybe it would be easier if you were able to let the bottom layer go off more before you lay the tape on. I like it to be tacky, but not wet. Fillets will sometimes get firm sooner than a coating because of the heat in the mix and the body of the fillet.
Don't suppose any of that is useful. Good to hear from you and I look forward to seeing your progress. Great boat!
-
26th May 2010, 08:53 PM #105
SENIOR MEMBER
- Join Date
- Oct 2008
- Location
- Victoria
- Age
- 71
- Posts
- 631
preparation for The Great Sofa Installation
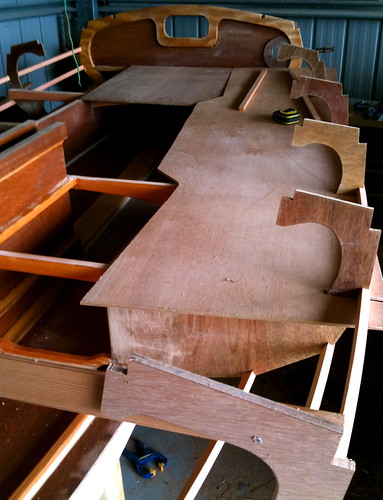

Decided to fit some ply for the cockpit seats before I got all carried away putting gunwales on. I'll cut them pretty much to required size and then stash them until the moment is right for The Great Sofa Installation. I wish Honkers was still hanging around, because I know he'd get all excited at the mention of SOFAS, and ask me to do them in leather. He likes leather, but has plenty of other things on his mind, I imagine. And don't worry, I won't turn it into a pair of sofas, I just like the sprawling expanse of it...not bad for a little dinghy.
Still have to cut the thwart and it's funny shaped mates, and also of course, the curving shapes for the inner cockpit seat edges.


 Reply With Quote


Similar Threads
-
GIS Yawl
By CCBB in forum Michael Storer Wooden Boat PlansReplies: 512Last Post: 8th February 2015, 12:30 PM -
Navigator
By Resination in forum WOODTURNING - PEN TURNINGReplies: 12Last Post: 6th January 2010, 02:04 PM -
Magma Navigator
By Resination in forum WOODTURNING - PEN TURNINGReplies: 14Last Post: 30th December 2009, 12:04 PM -
Figured Pink Ivory on a Gold Navigator
By Matt88s in forum WOODTURNING - PEN TURNINGReplies: 15Last Post: 17th May 2008, 10:24 PM -
Caledonian Yawl Plans
By Donald in forum BOAT BUILDING / REPAIRINGReplies: 1Last Post: 9th February 2004, 10:10 AM
