

 Thanks: 0
 Likes: 0
 Needs Pictures: 0
 Picture(s) thanks: 0
Results 1 to 15 of 19
Thread: How to repair a hole?
-
18th June 2008, 10:18 PM #1
 Growing in wood art


- Join Date
- Dec 2007
- Location
- Komenda, Slovenia
- Posts
- 78
 How to repair a hole?
Hi there
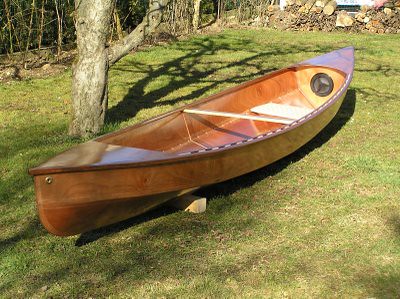
Unfortunately I have some bad news. My canoe slipped off the trolley (wheel carrier) and it punched a hole through one side panel.

The ply is 5mm and I was wondering if anyone could describe to me how to repair this 10x10 cm hole.
I have been looking at the forums but apart from one post I could not find any description/photos or videos on how to repair a hole in the boat.
Plywood seems to be too splintered so probably I will have to cut it out and put a new piece in. But how excactly do you do this?
Thanks for your replies.
Boat is a Eureka Canoe

You can read more about my Eureka Canoe on my blog (in Slovenia)
Or on the big discussion group for Eurekas here.
-
18th June 2008 10:18 PM # ADSGoogle Adsense Advertisement
- Join Date
- Always
- Location
- Advertising world
- Posts
- Many
-
18th June 2008, 10:36 PM #2
Grumpy old Bugga
- Join Date
- May 2003
- Location
- South Oz, the big smokey bit in the middle
- Age
- 67
- Posts
- 4,377
Bummer mate. I can feel it hurting from here
There are two basic methods:
- slather the break with epoxy, push it back into place, sand it flat and then put fibreglass cloth over it.
- cut out the piece and fit a new one.
I've done the first, not the second (not in a boat anyway).
The problem with the first is getting the piece back into place neatly though you can do some careful cutting of the splinters to allow the broken bit back into its hole while relying on the epoxy to fill the gaps and the glass cloth to hold it all together.
The problem with the second is getting a decent gluing area - you aren't going to be able to put a nice 6:1 scarf joint on it. I await the advice of experts on this one, even if it's just general advice (rather than specific to this case). I'm sure we'll have to do it one day.
Richard
-
21st June 2008, 05:06 AM #3
Yacht Designer & Builder
- Join Date
- Feb 2008
- Location
- Eustis, FL, USA
- Posts
- 2,270
Remove all the broken up wood along the edges, do a dry fit. If it doesn't fit, hack away more material until it fits easily and neatly.
It looks to be a relatively flat area, so wedge a backer block on one side. This backer block should fit the surface nice and flush. The backer block should be covered in plastic packaging tape or other plastic sheeting material so the goo doesn't stick.
Now the fun part, mix up some unthickened epoxy and wet out the edges of the broken hull and piece. Let soak in good then wet it out again an hour later. Mix up some thickened epoxy and wedge you backer in place. Apply the thick goo around the edges of the hole in the hull, and again on the piece you're putting back. Place the piece in the hole and wedge or weight it in place. Not a lot of weight, just enough to keep it where it supposed to live.
Before it cures but after it's kicked off, remove the backer and weights, then scrap the excess goo from the joint.
This is a non-structural repair and you probably don't want to step on or other wise abuse this area again. The thickened epoxy will make the repair stronger then the surrounding wood, but the whole area is weakened from the puncture. In other words, stop dropping the boat on the carrier.
-
21st June 2008, 05:52 AM #4
Deceased
- Join Date
- Dec 2007
- Location
- Guernsey Channel Islands UK
- Age
- 54
- Posts
- 307
could koala put a couple of layers of tape epoxied to the inside of the hull (depending if you can reach the hole from the inside) to make it a bit more of a strutual repair Originally Posted by PAR

-
21st June 2008, 09:41 AM #5
Senior Member
- Join Date
- Jan 2008
- Location
- qld
- Posts
- 159
First I should say I have never had to repair any of my boats,almost drove under an awning with a kayak on the roof once, but that's another story.
In a timber boat like this I would be looking for a nice cosmetic repair. I am assuming the area is relatively flat and the construction is stitch and glue.
Assuming you can find a suitably similar looking piece of ply or timber you could clean up the area with a stanley knife. Several swipes with the knife should cut through the fiberglass and ply. I would remove all the fractured area. then use the knife to mark through the hole onto your new ply so you will get a good fit.
You should now be able to glue the patch in place with thickened epoxy, then do some sanding to fair the area, and then finish with glass matting and unthickened epoxy.
The repair is going to be non structural, but should be difficult to notice if done well. you shouldnt need to worry about scarfing a patch in, from what I understand scarfing is only really necessary in stitch and glue boats to ensure that you get fair curves during construction.
If you do want to scarf you could try sanding the scarf in around the cleaned up hole with a ROS and then patching with solid wood. Provided you leave plenty of thickness in the patch you should be able to fair it back level, however I think this would be overdoing it.
I'm open to comments and criticism on this as I've never done a repair in practice.
James
-
21st June 2008, 10:34 AM #6
Happily receives emails.
- Join Date
- Jul 2005
- Location
- 'Delaide, Australia
- Age
- 65
- Posts
- 8,138
Howdy Koala.
First - for a temporary repair of this type of situation - just cover it with some good vinyl self adhesive tape - like a duct tape. So you can continue canoeing. My Beth had a repair of this type for a couple of years before I got round to doing anything.
For BIG repairs in plywood boats ... look here

Now back to small ones
To fix it I would do pretty much as PAR and the others point out. But first I would like to set everyone's brains up for dealing with such an eventuality - it is very likely that every boat that is used will end up with several scars of this type. I love to see a boat with repairs where parts of the skin have been replaced. It gives a feeling of the history. It also gives the feeling that "this is not a dead artifact".
Now ... for the repair.
PAR is spot on - Turn it into a neat hole and make a piece that fits in the hole reasonably neatly.
This particular repair goes down to the chine, so you need to cut the hole so it meets the chine. You also need to use a sander to remove the glass tape for about 25mm (an inch) around the hole.
Be careful with sanding - move the sander a lot to make sure that you watch carefully so you don't go through the plywood outer veneer. Watch what is happening with the glass and the wood.
Make a patch and glue it in like PAR says - but work out how you are going to hold everything in position first - that way if you need holes for screws into the temporary backing plate they can be neat. Do it all once without any glue.
If you precoat the edge using the end grain gluing method in the plan appendices then that will be OK - allow maybe 5 or 10 mins for the precoated resin and hardener to soak in to the edge of the hull and the edge of the patch before gluing. Add glue and now reassemble everything in place.
Wait at least half an hour to before cleaning up any excess epoxy - the ply edge grain is highly absorbant and the excess epoxy provides a reservoir. So clean up at the right time.
Now - the glass tape needs to be replaced inside and outside the hull. However if you can work carefully there is an extra trick.
on the outside of the hull - if you go carefully hand sanding with a block or a sander you can remove some of the outside plywood veneer either side of the join - I would make this slight hollow about 40mm wide and it only needs to be a fraction of a millimetre deep.
Work slow and carefully - to make this slight hollow - it can be filled with glass tape which goes clear and then can be sanded flush with the original hull surface. Generally if you are about to go through the veneer you can start to see some timber grains where the darker glue comes through - you want to stop before this happens. DON'T even try if the outside veneer of the plywood is REALLY thin - you can check from the edges of the cut out section of the hull.
So do this sanding. Then you will have to redo the glass taping of the chine and lay glass in this slight hollow on the outside of the boat.
When that is cured and still green ("green" as in the next day - not sticky at all, but it hasn't reached full strength either) you can use the same method used for fairing down the edges of the glass tape when you built the boat - with the same amount of care to make sure you don't go through the veneer. If you have to hand sand use a block to keep your sanding nice and flat when you are fairing things up.
The glass can make the join fairly structural for canoes and small boats where the ply is fairly thin. With thicker plywood you need to look at a scarfed patch or a permanent backing in plywood or heavy glass (a heavy biaxial or triaxial stitched cloth is ideal for thicker plywoods - the woven glass or tape is really only suitable for repairs in up to 6mm or unstressed areas in 9mm ply). You have to smile at the optimism of people who think that you can buttstrap 12mm (half inch) ply together using a layer of glass tape!!!
Best wishes
Michael
Just compiled some links to useful boat repair articles ... mostly to do with plywoodLast edited by Boatmik; 30th September 2008 at 10:24 AM.
-
21st June 2008, 06:23 PM #7
Sawing hack
- Join Date
- Oct 2007
- Location
- Sydney
- Posts
- 178
The most disappointing aspect to this whole saga is that Koala managed to put this hole in his Eureka the day before I return to Slovenia! While it is fantastic to see the finished canoe - admittedly I only had a very minute contribution to its build in the initial stages - I'm sad that Pete hasn't been able to take me out in it this weekend. Its sad to see him mourning the fact he hasn't had the opportunity to take it out much before this disaster struck! But no doubt, if it was my build, it would already have a dozen holes in it made during the construction process!
So anyway, I'm back in Slovenia and once the Eureka is patched up and we've tested the new sailing system, hopefully we'll be able to decide what to make next. Hopefully we'll have started something like 2 PDRs by autumn - I'm yet to convince my wife that building a boat in the sitting room means we'll have a lot more family time.
Cheers,
Mark
-
21st June 2008, 07:03 PM #8
Yacht Designer & Builder
- Join Date
- Feb 2008
- Location
- Eustis, FL, USA
- Posts
- 2,270
I didn't look closely at the pictures the first time around. Good catch Michael, there's tape and a chine. As he points out, you'll want to reinforce the taped area again. His method will work fine. For additional reinforcement and/or peace of mind you could use a very light weight cloth over the whole area. Any cloth under 5 ounces will disappear (unlike what is used on the chine seam currently). I use 4 ounce cloth for bright finishes all the time, with absolutely no weave being visible.
-
21st June 2008, 08:55 PM #9
Happily receives emails.
- Join Date
- Jul 2005
- Location
- 'Delaide, Australia
- Age
- 65
- Posts
- 8,138
Ha - Theodor and Koala are plotting again - did you get my thankyou email for the update and pics that you sent me for the Paddles Mark?
Thanks heaps for that.
And PAR - Paul - Cheers mate! Good explanation and suggestion!
Michael
-
21st June 2008, 09:33 PM #10
Sawing hack
- Join Date
- Oct 2007
- Location
- Sydney
- Posts
- 178
Mik,
Yea .. I think I got your email, but its been a busy for us preparing to move back to Europe so I haven't been able to read here or do much emailing. I hope its all good.
Mark
-
23rd June 2008, 06:39 PM #11
Happily receives emails.
- Join Date
- Jul 2005
- Location
- 'Delaide, Australia
- Age
- 65
- Posts
- 8,138
I had guessed that was the reason! So what are the plans now you are there?
AAAAAND - I've never asked .... why do you do this migration? If it is not rude to ask!!!
MIK
-
24th June 2008, 12:32 AM #12
Grumpy old Bugga
- Join Date
- May 2003
- Location
- South Oz, the big smokey bit in the middle
- Age
- 67
- Posts
- 4,377
And while you're waiting for a chance to fix the hole, just knock another hole in the bottom so the water that flows in through the first hole can flow out again

Richard
-
24th June 2008, 01:35 AM #13
Sawing hack
- Join Date
- Oct 2007
- Location
- Sydney
- Posts
- 178
Well the plans are 1. to help Koala's brother-in-law to finish building his shed; 2. to make some PDRs (once I've managed to find a new house with a suitable garage), most likely starting at the end of summer; and 3. ultimately I am keen on that GIS. At the end of the day will there be time to make a Tirrik? I suppose Koala has that Eureka hole to attend to somewhere in there too. Originally Posted by Boatmik
As for the migration [start Gilligan's Island theme music here], many years ago when Koala came to study at college in Sydney (where we met), he managed to convince me to join him here in Slovenia to work with him. The migration was a 6 month visit back home, since I've been here 3 odd years already.
Cheers,
Mark
-
29th July 2008, 03:13 AM #14
Growing in wood art
- Join Date
- Dec 2007
- Location
- Komenda, Slovenia
- Posts
- 78
Hole repaired
Thanks all for your helpfull hints.
The hole is repaired now. I've cut out a square bit just enought to come to the good wood. I've glues in a new piece and put a glass patch over it on both sides. I don't doubt about its trenght. As I was cutting and sanding the hull I also glassed the bottom and put 2 coats of varnish on, just to give a bit of extra protection against the scraches.
I wish I could say it's as good as new as the patch is clearly visible but as Mik said it give the boat a character.
Now it's time to go paddling soon. Huuuuuuuuuuuray
-
29th July 2008, 06:22 PM #15
Happily receives emails.
- Join Date
- Jul 2005
- Location
- 'Delaide, Australia
- Age
- 65
- Posts
- 8,138
Any chance of the pic Koala ... just to finish off the discussion!
MIK


 Reply With Quote


Similar Threads
-
Drilling large hole over small hole or vice-versa
By niki in forum HOMEMADE TOOLS AND JIGS ETC.Replies: 28Last Post: 2nd November 2007, 08:32 PM -
The hole is too big
By neksmerj in forum METALWORK FORUMReplies: 15Last Post: 21st July 2007, 10:29 PM -
Hole saw
By vin in forum HAND TOOLS - POWEREDReplies: 1Last Post: 12th April 2006, 04:16 PM
