

 Thanks: 0
 Likes: 0
 Needs Pictures: 0
 Picture(s) thanks: 0
Results 46 to 60 of 62
Thread: "toy" boats
-
17th April 2005, 08:47 PM #46
 Pretend my avatar moves!


- Join Date
- Nov 2003
- Location
- Australia and France
- Posts
- 8,175

A week of pontification... all the hard bits had to be nutted out!!
- Deck was glued in place and sanded flat, then two coats of Poly slapped on the whole lot as a sealer/protector while the rest of the work is done.
- Decided that the deck does need a gunwhale strip, so will pluck up the courage and route a 4mm deep by 2mm wide strip and inlay some Surian. I need the practice for future instrument making anyway!!
- Then the wind vane feather. 0.8mm thick Camphor, because there was a bit lying round and I thought I could make it thin enough. It's the tongue depressor shaped thing in the photos, only a wipe-on coat of lacqure though because it has to stay light!
- Gears. No matter what combination I tried I couldn't get a pair light enough. Eventually I put a bolt through the axle hole, bunged 'em in the drill press and using the vice as a steady, sliced them down to size using a very sharp chisel.
Then of course I couldn't work out how I was going to secure then to a shaft which was at least half the diameter. After much cogitation, I decided to drill the holes out till they fitted a standard wall plug.. Brilliant!!! Now the shafts are a firm push fit!!
- Drilling the hole for the rudder :eek: I left this till now because I wanted a perfectly plumb hole.... with the boat upside down on the drill press table, I filed a bit of the rudder shaft tube to sort of approximate a forstner bit...(OK I just made it a bit jagged).. then lined it up against the fin, and drilled. Perfect!!
Pics show gears in various stages of undress... the ones with the red plugs in them are the keepers! Also a general view of what's going on with the deck.
The Paint is a bit rough now, but will get a lot more sanding!!
Cheers,
P

-
17th April 2005 08:47 PM # ADSGoogle Adsense Advertisement
- Join Date
- Always
- Location
- Advertising world
- Posts
- Many
-
17th April 2005, 10:29 PM #47
Pretend my avatar moves!
- Join Date
- Nov 2003
- Location
- Australia and France
- Posts
- 8,175
While waiting for a bit of software to update:
Trimmed off the rudder tube and trial fitted all the stuff.
The gear attached to the wind vane is fixed with a machine screw tapped straight into the hull, and has about 4mm play so it can be lifted over the rudder gear and re-set to match the wind angle.
The nice thing is that it's all push-fit, so can be adjusted quite easily... time will tell whether it is up to the job though! I suspect so, loads won't be extreme!
Blondie Hasler eat your heart out!!
(Sorry the photo is over-exposed... I'll do better in a later post!)Hasler, who is credited with being one of the inventors of the modern steering vane, used a trim tab on the outboard rudder of Jester.
Cheers,
P
-
17th April 2005, 10:33 PM #48
SENIOR MEMBER
- Join Date
- Feb 2003
- Location
- Garvoc VIC AUSTRALIA
- Posts
- 11,464
Is the New Pope a current member of this BB
If Midge is pontificating is he after the job?? :eek: :eek: :eek: :eek: Originally Posted by bitingmidge
-
18th April 2005, 12:48 PM #49
Timber Hoarder
- Join Date
- Sep 2002
- Location
- Minbun, FNQ, Australia
- Age
- 66
- Posts
- 12,881
When are the sea trials?
Cliff.
If you find a post of mine that is missing a pic that you'd like to see, let me know & I'll see if I can find a copy.
-
18th April 2005, 03:29 PM #50
Grumpy old Bugga
- Join Date
- May 2003
- Location
- South Oz, the big smokey bit in the middle
- Age
- 67
- Posts
- 4,377
Next time he has a bath. Should be this decade, even if he doesn't need one. Originally Posted by Cliff Rogers
Richard
-
10th February 2008, 04:04 PM #51
Happily receives emails.
- Join Date
- Jul 2005
- Location
- 'Delaide, Australia
- Age
- 65
- Posts
- 8,138
This was a great thread... why isn't it up near the top???
MIK
-
10th February 2008, 05:44 PM #52
Pretend my avatar moves!
- Join Date
- Nov 2003
- Location
- Australia and France
- Posts
- 8,175
'cause I haven't finished it yet?
P
-
10th February 2008, 06:23 PM #53
Happily receives emails.
- Join Date
- Jul 2005
- Location
- 'Delaide, Australia
- Age
- 65
- Posts
- 8,138
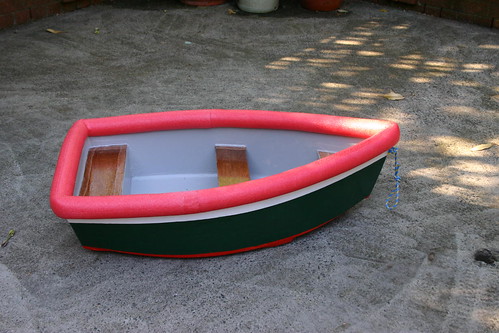
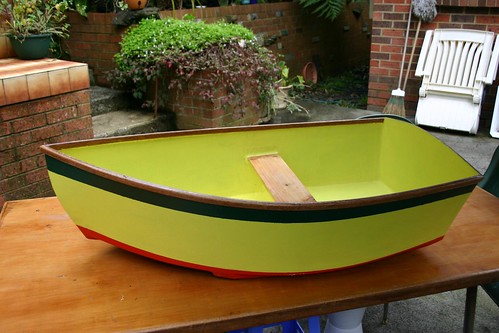
What I was sorta interested in was the general idea of small boats and modelmaking - whether they are destined to ever get wet or not.
Midge - we have talked about models a lot - after all your model of the GIS was the first finished boat I had seen at that time - how long ago now.
The other thing was the model you whacked together of the first version of the rowboat.

Here they are together
When designing I often use a mix of my own understanding and the computer image on the screen, looked at from lots of different "angles" to make sure there are no funny illusions - some lines can become quite S shaped if you are not careful.
But when I design something for the first time and it is a bit different from boats I have designed in the past then I often print out the panel shapes on cardboard using a computer printer. Cut it out and sticky tape it together.
Good method for a quick and more trustworthy check.
And then model boating in itself - the watery types of model ... great!
Midge - can you put some more pics up of that gorgeous 7ft tall Sydney Skiff model once you have the site updated again.
It sits just inside a corner window near the junction of the study and the living room. A downlight above. It's meant to sail - but it also looks REALLY good.
Michael
-
10th February 2008, 09:44 PM #54
Senior Member
- Join Date
- Mar 2007
- Location
- Picton, NSW
- Posts
- 143
What a great thread!
Thanks Mik for bringing it back to the top.
Midge, It took me a while before I realised that the majority of the thread was dated 2005. I had been getting very depressed on seeing Hairy's second canoe progress reports, and then after reading your lightning fast build of the model sail boat I was getting all depressed again, untill I read your comment that it is NOT FINISHED yet! My faith in myself is restored! (Yet another weekend has gone by without touching the Eureka seats ) (Grand Dad has been a bit scarce since Christmas, and so the boys are depending on me for motivation. Always a big mistake!)
So has the toy boat progressed any since the last pics in 2005?
I am intrigued at the vane controlled steering. How does that work? It looks fascinating.
In keeping with the Model Boat theme, I have included a pic of what Grand Dad does in His spare time (When not building Eureka Canoes) This one definitely does NOT get wet, although the tackle works!
regards
Walesey
-
10th February 2008, 09:53 PM #55
Pretend my avatar moves!
- Join Date
- Nov 2003
- Location
- Australia and France
- Posts
- 8,175
In short, yes, it has progressed, and no... it hasn't.
All it needs is a mast and sail, and I had the mast ready to go, but I built some whistles last year and the mast was exactly the right diameter to fit inside and tune them. Oops!
It's sitting there waiting for a bit of a sand and some varnish, and it looks as though I've got a bit of a varnish job coming up soon too!
I have only got to glue up the Eureka seats now, just exactly as they were in December!
Aaargh! (but the websites are renovated and the eureka one is coming soon!)
Cheers,
P
-
10th February 2008, 11:34 PM #56
Happily receives emails.
- Join Date
- Jul 2005
- Location
- 'Delaide, Australia
- Age
- 65
- Posts
- 8,138
Howdy Walesey,
What type of boat is it? Lateen rigs like a dhow - maybe it is.
Or is it a Portogee (Portuguese) boat?
Ask Grandad for me.
MIK
-
18th February 2008, 01:21 AM #57
AJ
- Join Date
- Jun 2007
- Location
- Aberfoyle Park SA
- Age
- 63
- Posts
- 1,787
What Walesey said. Originally Posted by Walesey

Plus
I shakes me head when I read that you weren't happy with the finish of the paint work. Me, I'm just happy when it turns out shiny like on the tin. (not quite so happy if it is shiny & the tin says "satin finish" but that's a whole 'nuther story...)
cheers
AJ
-
21st February 2008, 04:32 PM #58
Senior Member
- Join Date
- Mar 2007
- Location
- Picton, NSW
- Posts
- 143
Sorry about the delay in getting back to you Mik. Originally Posted by Boatmik
You are correct. Al Bahran is a model of a lateen rig dhow. Apparently such ships were commonly used as Arab trading vessles in the Red Sea , and Persian Gulf and the East coast of Africa. They were often armed to defend against pirates, etc
Grand Dad purchased the kit from "The MODELER'S SHIPYARD" at Nowra, NSW. It is a "Corel" ship. If you "google" "Al Bahran" you will get the Corel site and see lots of other nice ships! (Grand Dad is currently working on the "Half Moon") (Might be a while before the Eureka gets her seats finished!)
Walesey
-
21st February 2008, 07:32 PM #59
GOLD MEMBER
- Join Date
- Dec 2006
- Location
- East of Melbourne Aus.
- Age
- 72
- Posts
- 1,220
What about one a bit bigger? One of these can be made to sail if you want.
-
21st February 2008, 08:37 PM #60
Pretend my avatar moves!
- Join Date
- Nov 2003
- Location
- Australia and France
- Posts
- 8,175
Pics are no good without plans Pagie, fabulous things! Are there plans our did you make them up?
P


 Reply With Quote


