

 Thanks: 0
 Likes: 0
 Needs Pictures: 0
 Picture(s) thanks: 0
Results 1 to 10 of 10
Thread: Carpenters Tool Chest
-
29th January 2011, 08:47 AM #1
 Senior Member


- Join Date
- Jan 2009
- Location
- near Cooyar, (Toowoomba-ish), Qld
- Age
- 59
- Posts
- 221
 Carpenters Tool Chest
HI Folks,
I've never done one of these before, but made it as a 40th birthday present for my brother-in-law who does a bit of handyman stuff & would like to get into a bit more of it.
I started with the lid, and sized it to suit a handsaw & a tenon saw.
The base was to take a 7" circular saw at one end & a drill &/or jigsaw under the sliding tray (or anything, really).
The end stop slots at the left are for wood chisels.
The holes in the back of the tray are for pencils or spade bits or whatever.
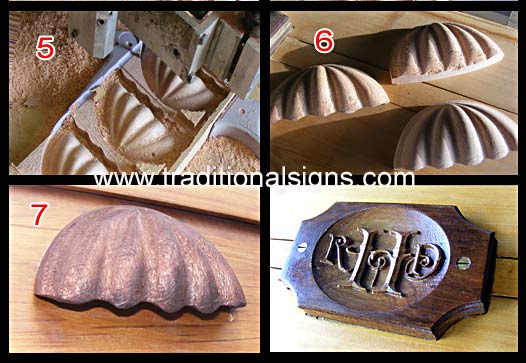
The timber was all old hoop pine from our kitchen, pulled out before we gyprocked it, and the handles were abit of silky oak from a tree we cut up years ago. I designed a clamshell file, with grooves to suit my fingers, and cut them on the CNC router then hollowed underneath with a linisher/belt sander.
The ornamental monogram & chisels on the front were in some lovely hard spotted gum offcuts I had. (aided by the cnc router). The brass hinges were salvaged from old QR railway carriage doors from Wulkuraka, near Ipswich, back in about 1980-81.
No tek-screws were used- all slotted countersunk brass or steel screws, & a few brads & exterior aquadhere. Plywood base. The idea was to spend no extra money on it-but I bought the chain & latches. It was actually really nice using the old screws. (I had a small supply of 12 & 14 gauge brass ones.)
I don't know if this is the right place for this, but happy looking anyhow!
-
29th January 2011 08:47 AM # ADSGoogle Adsense Advertisement
- Join Date
- Always
- Location
- Advertising world
- Age
- 2010
- Posts
- Many
-
29th January 2011, 09:05 AM #2
Senior Member
- Join Date
- Jan 2009
- Location
- near Cooyar, (Toowoomba-ish), Qld
- Age
- 59
- Posts
- 221

Oh, I forgot to say I worked out the height of the sides by just using two heights of the chamfer board with the beaded edge on the inside.
Last edited by Stewey; 29th January 2011 at 03:05 PM. Reason: typo
-
29th January 2011, 09:20 AM #3
GOLD MEMBER
- Join Date
- Jul 2004
- Location
- Laurieton
- Posts
- 2,251
I think your BIL is going to like this tool box. Very nice.
Bob
"If a man is after money, he's money mad; if he keeps it, he's a capitalist; if he spends it, he's a playboy; if he doesn't get it, he's a never-do-well; if he doesn't try to get it, he lacks ambition. If he gets it without working for it; he's a parasite; and if he accumulates it after a life time of hard work, people call him a fool who never got anything out of life."
- Vic Oliver
-
29th January 2011, 02:04 PM #4
Skwair2rownd
- Join Date
- Nov 2007
- Location
- Dundowran Beach
- Age
- 76
- Posts
- 19,922

 That is one spiffy toolbox! Well done.
-
29th January 2011, 03:52 PM #5
Senior Member
- Join Date
- Jan 2009
- Location
- near Cooyar, (Toowoomba-ish), Qld
- Age
- 59
- Posts
- 221
Thanks.
Here is a bit of detail on the routing of the handles. It took a little bit of thinking to create the 3D file from which to rout them...

-
1st February 2011, 01:51 PM #6
Senior Member
- Join Date
- Jun 2009
- Location
- Eaton Western Australia
- Age
- 72
- Posts
- 133
 Originally Posted by Stewey

No this is not the right place for this My place would be far more desirable.
Fantastic work and great look, Thanks for the post.
-
1st February 2011, 08:56 PM #7
Bricoleur
- Join Date
- Jul 2005
- Location
- Toowoomba Qld.
- Age
- 65
- Posts
- 2,792
Hi Stewy,
Nice work, great tool chest with some creative input and recycling!!
CheersAndy Mac
Change is inevitable, growth is optional.
-
1st February 2011, 09:18 PM #8
Heavy Machinery
- Join Date
- Mar 2008
- Location
- Lambton, Newcastle, NSW, Australia
- Posts
- 4,957
Nice job, he will be happy with that I'm sure
.
-
1st February 2011, 09:21 PM #9
 Senior Member
- Join Date
- Aug 2005
- Location
- Gladstone, QLD
- Age
- 71
- Posts
- 478
Well done your BIL will be ever so grateful. I liked also the detail photos of how you routed the handles. Thanks for sharing
-
4th February 2011, 10:43 PM #10
Senior Member
- Join Date
- Jan 2009
- Location
- near Cooyar, (Toowoomba-ish), Qld
- Age
- 59
- Posts
- 221
Thanks for the compliments.
The handles, although CNC-routed, were still done here at home, and were still created to fit 'my' hands, and were not any off-the-shelf 3D purchasable file. I think I spent about 45 minuted creating the 3D file before routing it-or maybe an hour. It was morphed as I kept thinking up improvements to the original hollowed semicircle I started out to design & make.

 Reply With Quote

Similar Threads
-
Tool Chest Bragging
By BozInOz in forum WOODWORK - GENERALReplies: 25Last Post: 21st June 2016, 01:39 PM -
carpenters chest
By dennford in forum WOODWORK - GENERALReplies: 2Last Post: 22nd November 2008, 10:41 AM -
Help with Tool Chest
By roverdisc1 in forum BOX MAKINGReplies: 5Last Post: 5th March 2007, 09:49 AM -
tool chest
By jow104 in forum Links to: BOOKS, VIDEOS & PLANSReplies: 28Last Post: 11th December 2004, 12:02 AM
