

 Thanks: 0
 Likes: 0
 Needs Pictures: 0
 Picture(s) thanks: 0
Results 91 to 105 of 112
Thread: embroidery box with 13 drawers
-
5th December 2005, 10:45 AM #91
 Ox and Herdsman Vanished


- Join Date
- May 2005
- Location
- Eden Hills, South Australia
- Age
- 63
- Posts
- 3,458
 Never heard of it: I'd be leery of trying that one, you might completely bugger up the chemistry. But you can get quick-set epoxy that sets in an hour.
 Originally Posted by jow104
Those are my principles, and if you don't like them . . . well, I have others.
Originally Posted by jow104
Those are my principles, and if you don't like them . . . well, I have others.
-
5th December 2005 10:45 AM # ADSGoogle Adsense Advertisement
- Join Date
- Always
- Location
- Advertising world
- Age
- 2010
- Posts
- Many
-
5th December 2005, 07:10 PM #92
GOLD MEMBER
- Join Date
- Sep 2002
- Location
- Paignton. Devon. U.K.
- Posts
- 6,062
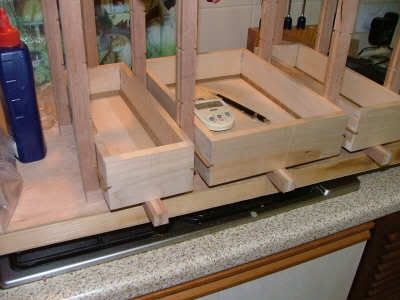
The first row of sliders are being glued in position with drawers holding the slider in place whilst PVA glue sets. Epoxy glue was not used in the finish in case there was a 24 hour handling period involved. The PVA I know from experience means I can put on another drawer set hopefully after 1 hour if fitting setup is OK.
This part of the build is slow going because if everything goes right first time there is 5 hours plus involved, longer if drawers are going to need adjustments to their base to allow a clean slide at each row.
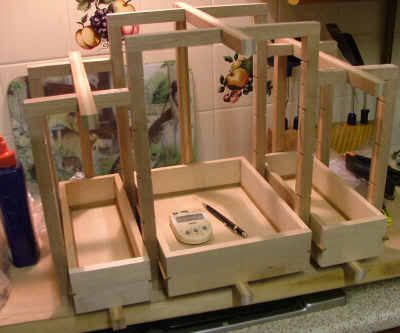
A closer view:
.woody U.K.
"Common looking people are the best in the world: that is the reason the Lord makes so many of them." ~ Abraham Lincoln
-
6th December 2005, 10:21 AM #93
Dehydrated Hydrographer
- Join Date
- Jun 1999
- Location
- Westleigh, Sydney
- Age
- 77
- Posts
- 9,555
-
6th December 2005, 06:33 PM #94
GOLD MEMBER
- Join Date
- Sep 2002
- Location
- Paignton. Devon. U.K.
- Posts
- 6,062
Thanks alexs & zenwood. I went the pva route after all.
Three rows of drawers now fitted and hoping the remaining 4 pieces do not give me any stick. The atmosphere here in Britain is that type of weather that comes about after heavy rains followed by cool temperatures. The dampness is rising but its a cold damp, which I suppose is the opposite to experienced in Australia when the damp rises it gets sticky with humidity.
So the gluing was restricted to the evening session again, and just afew minutes in the workshop machining up the handles for the drawers, which will again have to be done in the warmth of the kitchen later in the week.
However I am feeling very relaxed knowing that I must be approaching the last round up.

.woody U.K.
"Common looking people are the best in the world: that is the reason the Lord makes so many of them." ~ Abraham Lincoln
-
7th December 2005, 07:02 PM #95
GOLD MEMBER
- Join Date
- Sep 2002
- Location
- Paignton. Devon. U.K.
- Posts
- 6,062
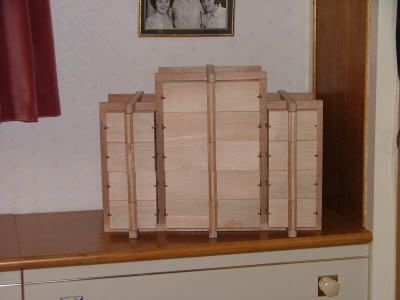
All runners and drawers together with fitted lids are now complete, this only leaves handles and compartments inside boxes .
Two of the runner strips snapped owing to wild grain but were easily replaced by breaking off runners at glued point and then cleaning out remaining strip left in rebate. The runners were cut from some reclaimed teak timber. I reckon good old English oak like the first piece of furniture would have been more suitable with hindsight.
The three photographs attached today show a front, side and rear view and the next insertion to thread should show the completed project apart from the finish which on my past history will be some time forthcoming. I dont mind making pieces but the finish of a piece never grabs my immediate attention and sometimes in the past it might be some weeks before that stage happens.
However it will be a number of coats of shellac and then wax polish applied, no staining is anticipated.
front view

side view

rear view

I did also have a further mishap and severe warning yesterday, I set up my mitre/chop saw to start cutting the 13 handles all to a uniform length of 66 mm and put a stop block on the right hand side of the saw table, in addition I clamped down the lefthand end as my usual practice, when I pulled down the saw the right hand end shot off and has not been seen again. It went off with such force it could have gone through the concrete block walls of my shop.
I want to use the chop saw and not my tablesaw because the cut is much cleaner. Comments and advice on correct usage of chop saw for this kind of cut much appreciated.woody U.K.
"Common looking people are the best in the world: that is the reason the Lord makes so many of them." ~ Abraham Lincoln
-
7th December 2005, 07:11 PM #96
SENIOR MEMBER
- Join Date
- Feb 2003
- Location
- Garvoc VIC AUSTRALIA
- Posts
- 11,464
I see you have tiled yer workshop John,
pity theres that much condensation in yer shed.
-
7th December 2005, 07:17 PM #97
GOLD MEMBER
- Join Date
- Sep 2002
- Location
- Paignton. Devon. U.K.
- Posts
- 6,062
Yes Bob, and cups of tea are so much more convenient.
 woody U.K.
"Common looking people are the best in the world: that is the reason the Lord makes so many of them." ~ Abraham Lincoln
-
7th December 2005, 07:18 PM #98
SENIOR MEMBER
- Join Date
- Feb 2003
- Location
- Garvoc VIC AUSTRALIA
- Posts
- 11,464
-
7th December 2005, 10:17 PM #99
Ox and Herdsman Vanished
- Join Date
- May 2005
- Location
- Eden Hills, South Australia
- Age
- 63
- Posts
- 3,458
If you get a crosscut blade for your tablesaw, you will get endcuts that are almost of polished smoothness. Originally Posted by jow104
Those are my principles, and if you don't like them . . . well, I have others.
-
8th December 2005, 07:22 PM #100
GOLD MEMBER
- Join Date
- Sep 2002
- Location
- Paignton. Devon. U.K.
- Posts
- 6,062
Went out to the workshop this morning and it felt cold, around 1c and frost all around so left it until after lunch and went back in again and then found the frost was thawing off the underside of the roof at around 4c. So what did I do? , I took the day off and went flying. Got out the Cesna and did a flight .
However the day was not wasted because I have solved my problem of crosscutting with the chop saw as per pictures below.


A fixed stop is fixed on the right hand side and then the correct size spacer (cut by hand) is placed against the stop, the length needing cut to this spacer size is then placed against the temporary stop, finally the temporary stop is removed and cut can then be made which will not be trapped. In addition a British member of the woodwork forums recommends a false fence be put across the machine thereby stopping any cut timber sliding into that treacherous gap. By the way the flying trip was made using Microsoft flight sim.woody U.K.
"Common looking people are the best in the world: that is the reason the Lord makes so many of them." ~ Abraham Lincoln
-
9th December 2005, 07:30 PM #101
GOLD MEMBER
- Join Date
- Sep 2002
- Location
- Paignton. Devon. U.K.
- Posts
- 6,062
The temperature reached double figures in the workshop today and forcast the same for next few days.
Very messy sort of day which also involved a force start. Handles were eventually cut OK using the setup mentioned previously.
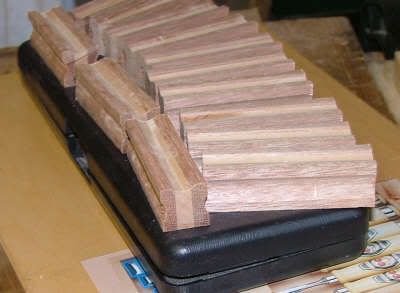
I then proceeded to drill a hole for screw support after handles were cut to both the drawer front and the rear side of handles.

However the wife called in the workshop and said the handle alignment was making her feel giddy. They did not go up the furniture in a straight vertical line.
So the drawer hole was left at its original setting but the handle was top and tailed so that the hole no longer aligned. I then put a bearing stick each side of the handle position,

and put in some old engineering feelers, placed at each handle position to avoid handles sticking to each other and to provide some space between each drawer

Posting a further thread to accomodate more pictures.woody U.K.
"Common looking people are the best in the world: that is the reason the Lord makes so many of them." ~ Abraham Lincoln
-
9th December 2005, 07:37 PM #102
GOLD MEMBER
- Join Date
- Sep 2002
- Location
- Paignton. Devon. U.K.
- Posts
- 6,062
Follow on from above thread

screwed a temporary bar across and pushed in a wedge to keep the handle in place whilst glue set.

I did have to resort to the kitchen for the gluing process and a bit of light woodwork like cutting the wedges and screwing on the temporary crossbars so I have shewn the disgraceful mess the kitchen finished in for the evening.
Seeing that the glue takes one hour to set and there are three colomns this is going to mean a second visit to the kitchen again tomorrow evening.
The wife did pop into her kitchen later in the evening, and she said,
Bluddy H ell but fortunately the commercial was just finishing on the TV and she was again fully occupied by the boys in blue.
Nearly there
woody U.K.
"Common looking people are the best in the world: that is the reason the Lord makes so many of them." ~ Abraham Lincoln
-
10th December 2005, 07:23 PM #103
GOLD MEMBER
- Join Date
- Sep 2002
- Location
- Paignton. Devon. U.K.
- Posts
- 6,062
Well the project was started I see the 29th October and 40 days hence I call the project finished, I know, I know, I know it has not had a finishing coat applied or compartments fitted but the woodwork is complete. So I will leave a little while in situ to acclimatize and if drawers continue to operate smoothly I will apply shellac and polish without any stain.
The finishing touches involved a couple of hiccups, two of the handles finished up around 1mm short, but I was able to cut a slice off an waste offcut with the bandsaw and glue on to the top of each offending handle.

In addition two more sliders have snapped (the grain of this teak does not seem to run the length of a strip and consequentially seems to have no guts) I have some oak offcuts purchased from the last Yandles show that was intended for small jewellery boxes so sometime I will cut out the rails and afix new oak runners.
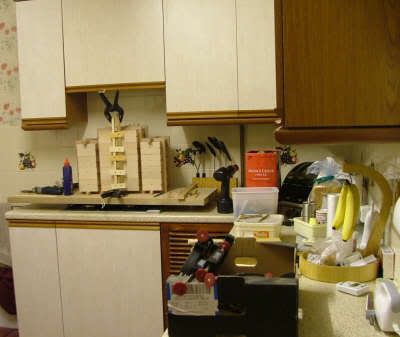
So here are a series of photographs showing different angles of the embroidery box.


Its resting place will be here:
The original box will reside at the other end of the furniture line.

Thanks all for looking, together with all those helpful comments. These all made me stick at the job and committed me to producing what I consider a successful outcome.woody U.K.
"Common looking people are the best in the world: that is the reason the Lord makes so many of them." ~ Abraham Lincoln
-
10th December 2005, 08:12 PM #104
SENIOR MEMBER
- Join Date
- Feb 2003
- Location
- Garvoc VIC AUSTRALIA
- Posts
- 11,464
-
10th December 2005, 08:31 PM #105
GOLD MEMBER
- Join Date
- Sep 2002
- Location
- Paignton. Devon. U.K.
- Posts
- 6,062
Thanks Bob.
A picture frame for the Kingfisher
and then ...................... the list is never ending.woody U.K.
"Common looking people are the best in the world: that is the reason the Lord makes so many of them." ~ Abraham Lincoln


 Reply With Quote


Similar Threads
-
Our first attempt at a box - a cutlery box
By dan_tom in forum WOODWORK PICSReplies: 19Last Post: 20th October 2005, 10:48 AM -
what hand plane to choose?
By EMistral in forum WOODWORK - GENERALReplies: 19Last Post: 19th February 2005, 08:29 AM -
Locking up a chest of drawers
By apple8 in forum WOODWORK - GENERALReplies: 9Last Post: 8th February 2005, 10:01 PM -
Cypress Gold - Bandsaw Jewelry Box
By barrysumpter in forum TIMBERReplies: 4Last Post: 25th August 2002, 11:39 AM -
vac box for template routing
By soundman in forum ROUTING FORUMReplies: 4Last Post: 27th July 2002, 11:56 PM
