

 Thanks:
  Likes:
  Needs Pictures:
  Picture(s) thanks:
 View Poll Results: Which Pallet Project is your Favourite?
- Voters
- 108. You may not vote on this poll
-
Entry 1
13 12.04% -
Entry 2
9 8.33% -
Entry 3
5 4.63% -
Entry 4
5 4.63% -
Entry 5
3 2.78% -
Entry 6
3 2.78% -
Entry 7
15 13.89% -
Entry 8
6 5.56% -
Entry 9
1 0.93% -
Entry 10
33 30.56% -
Entry 11
7 6.48% -
Enrtry 12
8 7.41%
Results 1 to 15 of 168
-
19th October 2008, 11:39 AM #1

Head Moderator
Sister of the DarkSide


- Join Date
- Dec 2004
- Location
- Toowoomba Q 4350
- Posts
- 9,217
 Weisyboy's Pallet Challenge - Entries and Poll for Voting
The overall aim of Weisyboy's challenge was for entrants to take a regular shipping pallet, similar to the ones used by Chep, and turn it into a beautiful piece of furniture or other any other item. The photos below are the results of the entrants' labours.
Once you have decided on your overall favourite, please vote in the anonymous poll at the top of this thread.
Voting will close midday Queensland time, Sunday 26 October 2008. After this time, the winners will be announced and the entrants' names published beside their pallet photos.
Comments are welcome in this thread.
Good luck deciding on your favourite
Cheers
Wendy
Head Moderator
Woodworking Australia's
WOODWORK FORUMS Box Challenge 2011 - Check out the amazing Boxes!
Twist One - Wooden Hinge/Latch/Catch/Handle
Twist Two - Found Object
Twist Three - Anything Goes
-
19th October 2008 11:39 AM # ADSGoogle Adsense Advertisement
- Join Date
- Always
- Location
- Advertising world
- Posts
- Many
-
19th October 2008, 11:44 AM #2
Head Moderator
Sister of the DarkSide
- Join Date
- Dec 2004
- Location
- Toowoomba Q 4350
- Posts
- 9,217


Underfoot
Third Place
-the pallet challenge-
I thought I'd have a tinker
but (as my wood skills will attest)
I'll just remain a thinker
I think thats probly best.


Last edited by RufflyRustic; 28th August 2011 at 07:16 PM.
Box Challenge 2011 - Check out the amazing Boxes!
Twist One - Wooden Hinge/Latch/Catch/Handle
Twist Two - Found Object
Twist Three - Anything Goes
-
19th October 2008, 11:45 AM #3
Head Moderator
Sister of the DarkSide
- Join Date
- Dec 2004
- Location
- Toowoomba Q 4350
- Posts
- 9,217

robomanic
Best Beginner
1_pallet
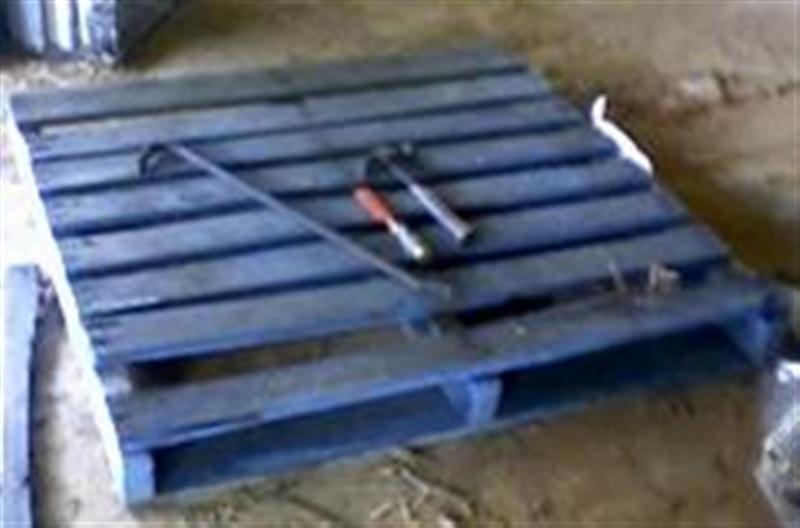
My pallet choice was a case of get what you can because I started a bit late, maybe next time I will hold out for a pallet with more timber in it! The boards twisted and cupped beyond repair after taking them off the rails, so everything in this piece is ripped from those rails.

2_post
The top is only 20mm thick and I wanted the tenon to have as much purchase as possible, so I recessed out the post and routed a trench to increase the gluing area. The post has a 50mm diameter and the recess is 15mm deep.

3_parts
The parts follow the same construction as the original, with the dowels for the legs and the plugs to go over the screws all turned out of stock from the pallet.

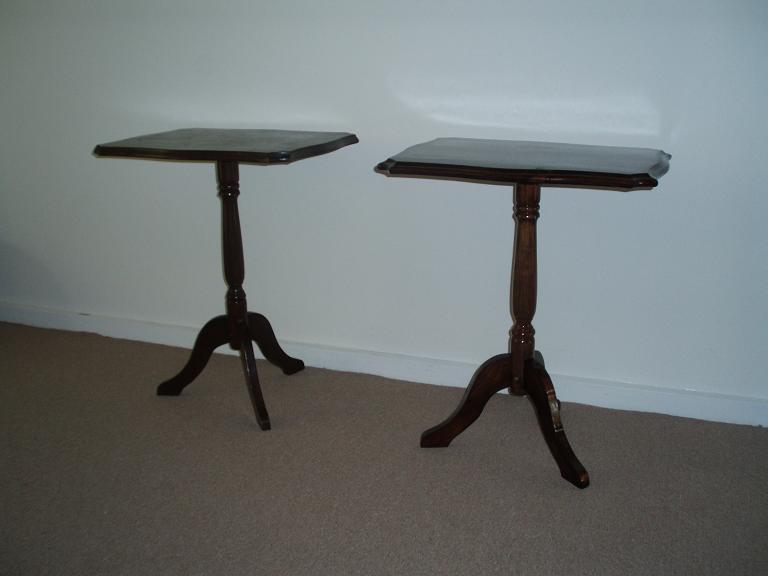
4_twins
A bit of history here because my Wife's Grandfather bought the table on the left which was handed down to here and it now lives at one end of our couch. She wanted another one so now we have the one on the right

5_finished
This is probably my most difficult finishing job to date. Sanded to P1000, 2 coats of sealer rubbing back between each, walnut stain to match and more rubbing, then clear coat over the top. Hope you like it!
 Box Challenge 2011 - Check out the amazing Boxes!
Twist One - Wooden Hinge/Latch/Catch/Handle
Twist Two - Found Object
Twist Three - Anything Goes
-
19th October 2008, 11:49 AM #4
Head Moderator
Sister of the DarkSide
- Join Date
- Dec 2004
- Location
- Toowoomba Q 4350
- Posts
- 9,217

tea lady
Pic 1 - The front pallet - 60ish by 63ish cm - removed approximately 102 nails . The three main boards I used were in between the top and bottom, the orange one was in the middle and lots of bright yellow boards off the top.

Pic 2 - Buzzed. thicknessed, sanded, Waste bits of pine glued round the edge and to the front face of the second one so the screws of the face plate don't go through. . Circle bandsawen to 40 cm Diameter.

Pic 3 - Sanded edges and wiped on the Wipe On Poly.....twice. After
drying, caressed with descending grades of sand paper by hand down to
1000# before applying another wipe with Wipe On Polly.

Pic 4 - Detail, with marbles so you can see the surface quality a bit
better. (I have pics of the underneath as well but they are not as
pretty.

Pic 5 - Another detail of the edges. Trying to show the hovering form
and the different woods..
 Box Challenge 2011 - Check out the amazing Boxes!
Twist One - Wooden Hinge/Latch/Catch/Handle
Twist Two - Found Object
Twist Three - Anything Goes
-
19th October 2008, 11:51 AM #5
Head Moderator
Sister of the DarkSide
- Join Date
- Dec 2004
- Location
- Toowoomba Q 4350
- Posts
- 9,217

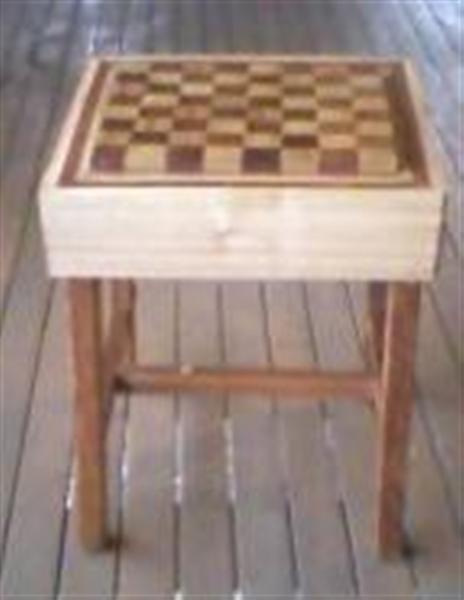
weisyboy
Chess table Putty Ironbark and Scribbely Gum 500mm x 500mm x 700mm the checker board lifts out of the top to reveal a storage compartment for pieces or that was the plan anyway now The top lifts out and reveals a hole in the table as I ran out of timber.


 Box Challenge 2011 - Check out the amazing Boxes!
Twist One - Wooden Hinge/Latch/Catch/Handle
Twist Two - Found Object
Twist Three - Anything Goes
-
19th October 2008, 11:52 AM #6
Head Moderator
Sister of the DarkSide
- Join Date
- Dec 2004
- Location
- Toowoomba Q 4350
- Posts
- 9,217

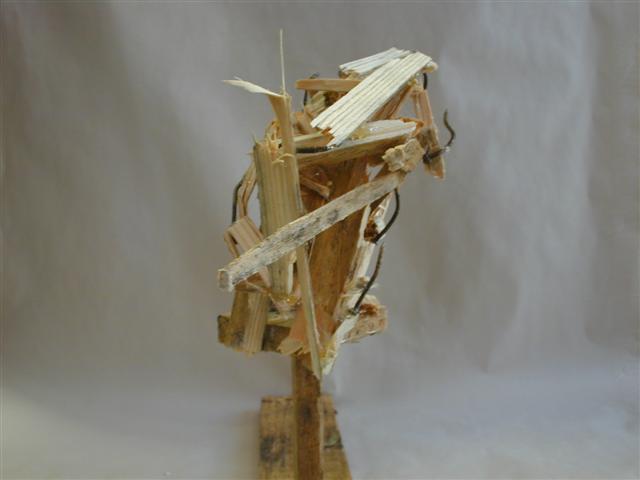
springwater
ONE
43kg of eucalyptus in its last day as a pallet was sawn in half, squeezed onto the back seat and driven home where the slats were removed from the bearers using a saw and crow bar.

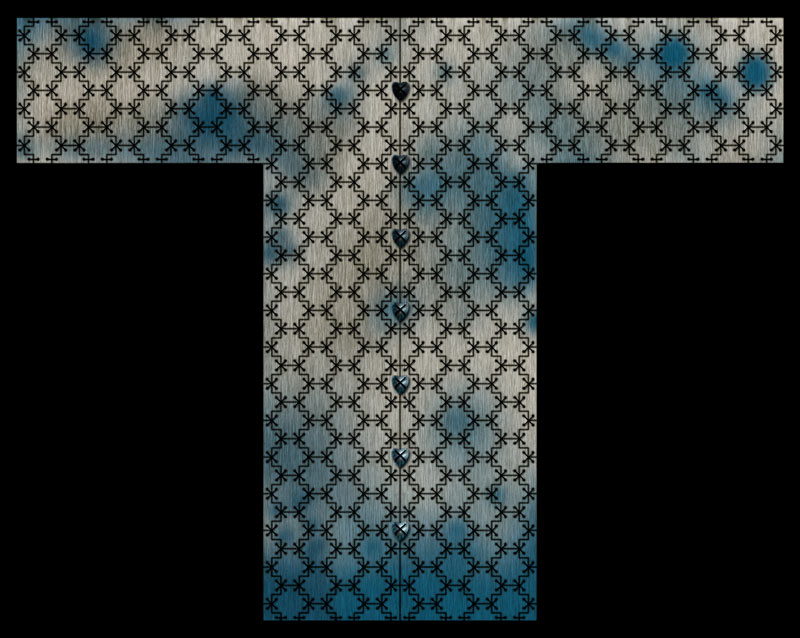
TWO
From pencil sketches to scale drawing and illustration on a computer screen, the image didn't have the worked worn, weather beaten look desired but at least the dimensions, pattern and stitching got worked out, though doubt that there was enough time to complete it by due date was born. The wood was cut into 8mmish strips by 50mm wide, marked out using templates then cut to 50mm long crosses & T shape pieces, holes were drilled in each outside corner, ah, um, missed a few on the T bits; buttons were carved in short bursts then drilled very late one night regrettably as a better way of stitching them into the body with different hole positions was thought of in the morning.

THREE
Well, here it is unfinished, arranged randomly in haste, corner bits missing and ugly buttons, laid out on asphalt basking in the last rays of day. Sadly, no time for drilling and recessing all the holes or rumbling the pieces around with sand and stones in a cement mixer let alone stitching the pieces together.

FOUR
It will eventually hang from a wall; ironically after being a pallet it's now in a cardboard box.

FIVE
Some pieces with recessed holes albeit with a few missing in the T bits and
roundly sanded edges trying to simulate tumbled worn ones. Using a shoe lace a couple of stitches done but eventually the stitching will be done with thin leather strapping.
 Box Challenge 2011 - Check out the amazing Boxes!
Twist One - Wooden Hinge/Latch/Catch/Handle
Twist Two - Found Object
Twist Three - Anything Goes
-
19th October 2008, 11:55 AM #7
Head Moderator
Sister of the DarkSide
- Join Date
- Dec 2004
- Location
- Toowoomba Q 4350
- Posts
- 9,217

corbs
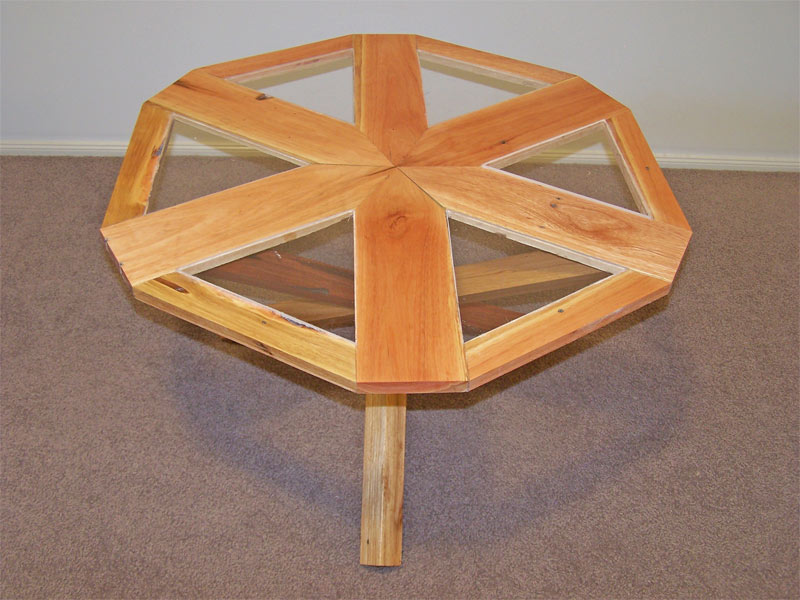
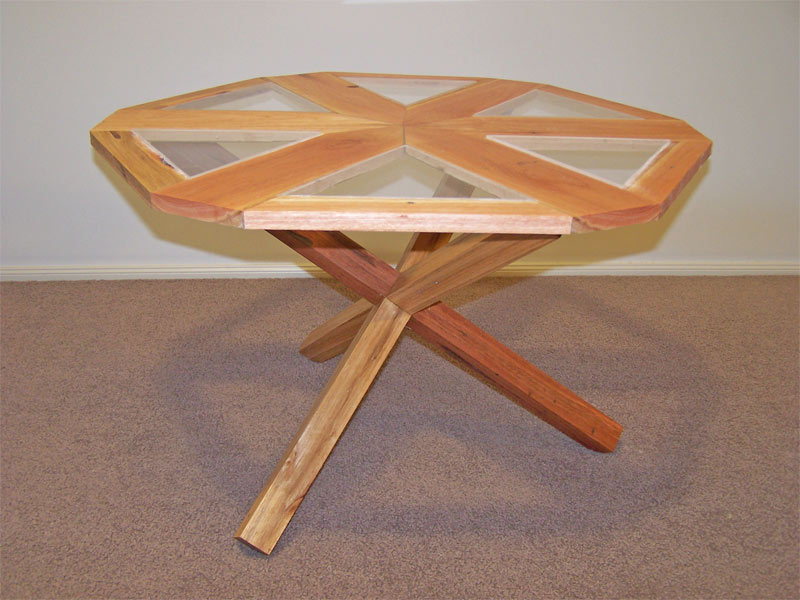
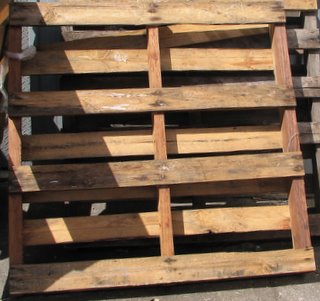
Hardwood pallet used to transport bricks. Finished with three coats of oil & Ubeaut traditional wax. Additional material used was clear perspex in triangles as I ran out of time to machine more of the pallet.


 Box Challenge 2011 - Check out the amazing Boxes!
Twist One - Wooden Hinge/Latch/Catch/Handle
Twist Two - Found Object
Twist Three - Anything Goes
-
19th October 2008, 11:57 AM #8
Head Moderator
Sister of the DarkSide
- Join Date
- Dec 2004
- Location
- Toowoomba Q 4350
- Posts
- 9,217

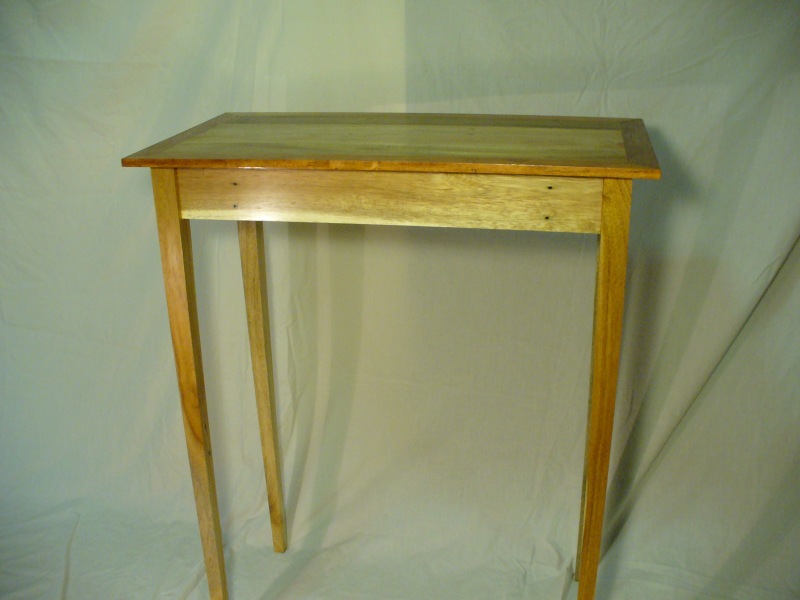
jackliveshere
Second Place
Photo 1:
The original pallet was used to ship tiles for use in a local domestic housing project. The pallet was thrown out and later retrieved through some dumpster diving before it headed to the tip.
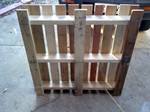
Photo 2:
The pallet was dismantled and transformed into a striking occasional table. Various colours from the pallet were exposed & blended together well to create to functional piece of furniture.

Photo 3:
Boards from the top of the pallet were edge glued together to form the top surface of the table. This was then bordered with a darker contrasting mitred frame.

Photo 4:
Long slender tapered legs were joined to the aprons with mortice & loose tenons to create the base frame.

Photo 5:
Major nail holes were filled with clear resin to provide a smooth surface. The occasional table was finished with a tung oil, linseed oil & polyurethane mix followed by a coat of wax.
 Box Challenge 2011 - Check out the amazing Boxes!
Twist One - Wooden Hinge/Latch/Catch/Handle
Twist Two - Found Object
Twist Three - Anything Goes
-
19th October 2008, 11:59 AM #9
Head Moderator
Sister of the DarkSide
- Join Date
- Dec 2004
- Location
- Toowoomba Q 4350
- Posts
- 9,217

blue3.3
Winner of the Encouragement Award
Pic1 Saw this pallet in the dumpster so i went after it. There is more colour than the pic shows

Pic2 The pallet stripped, seat is half done and legs are laminated

Pic3 Completed at last and pictured with my baby

Pic4 Front on view - all parts are laminated and finished in danish oil

Pic5 Rear view - the cross members were made from the off cuts of the legs
 Box Challenge 2011 - Check out the amazing Boxes!
Twist One - Wooden Hinge/Latch/Catch/Handle
Twist Two - Found Object
Twist Three - Anything Goes
-
19th October 2008, 12:00 PM #10
Head Moderator
Sister of the DarkSide
- Join Date
- Dec 2004
- Location
- Toowoomba Q 4350
- Posts
- 9,217

BernieP
Winner of the Wooden Spoon


 Box Challenge 2011 - Check out the amazing Boxes!
Twist One - Wooden Hinge/Latch/Catch/Handle
Twist Two - Found Object
Twist Three - Anything Goes
-
19th October 2008, 12:02 PM #11
Head Moderator
Sister of the DarkSide
- Join Date
- Dec 2004
- Location
- Toowoomba Q 4350
- Posts
- 9,217

flynnsart
Winner - First Place
1. My pallet was a light-coloured hardwood, possibly Blackbutt, with one piece maybe Spotted gum. I used the different timber for the flower spike.

2. The flower spike head was turned with its little pointy top and the
stem hand shaped. The leaves were cut with a bandsaw, then shaped with files and carving chisels.

3. The lamp is designed to sit in the corner. The fabric was saturated with a mix of pva and water.

4. Lamp lit at night.

5. Lamp lit in daytime. It is 800mm high x 750mm across the front.
 Box Challenge 2011 - Check out the amazing Boxes!
Twist One - Wooden Hinge/Latch/Catch/Handle
Twist Two - Found Object
Twist Three - Anything Goes
-
19th October 2008, 12:04 PM #12
Head Moderator
Sister of the DarkSide
- Join Date
- Dec 2004
- Location
- Toowoomba Q 4350
- Posts
- 9,217

David Mitchell
1.The pallet

2 .sketch of the project

3.Top of the table

4.Partly completed table with remaining material beside table.

5. Completed out door table Finished with Dexpress, Haymes, Deck and Timber Stain ,Merbau and Clear mixed half and half (water wash up).
 Box Challenge 2011 - Check out the amazing Boxes!
Twist One - Wooden Hinge/Latch/Catch/Handle
Twist Two - Found Object
Twist Three - Anything Goes
-
19th October 2008, 12:04 PM #13
Head Moderator
Sister of the DarkSide
- Join Date
- Dec 2004
- Location
- Toowoomba Q 4350
- Posts
- 9,217

Frank&Earnest
Photo 1
Discarded the slats of the disposable pine pallet found and salvaged the four 35x90x1200 planks. Thicknessed to 32x85, one plank ripped in 4 and thicknessed to 5x85.

Photo 2
Without CAD skills and limited freehand design skills, the outline of the scrolls was produced by resizing photographs using the Word print view measurement scales. Pieces glued in two pieces so to allow bandsaw access to the inside profile (note to self: never again use 1/2" bandsaw for this type work!).

Photo 3
Final frame glued up (back view) with the 5mm pieces glued crossgrain to provide more strength and stability while providing the recess for the mirror. Glue: Titebond II

Photo 4
Used the blown up photos to guide the carving. Tried tracing the scrolls on the timber but it was more hassle than it was worth.

Photo 5
Filled the nail holes with Polyfilla, one coat of White Knight spray undercoat and one coat of Dulux Enamel gold
 Box Challenge 2011 - Check out the amazing Boxes!
Twist One - Wooden Hinge/Latch/Catch/Handle
Twist Two - Found Object
Twist Three - Anything Goes
-
19th October 2008, 09:22 PM #14
GOLD MEMBER
- Join Date
- Jun 2003
- Location
- Paralowie SA
- Age
- 62
- Posts
- 1,315
All the entries are fantastic congrates to all the entrants

 brava
brava
Regards Michaelenjoy life we are only here a short time not a long time
-
19th October 2008, 09:27 PM #15
Dances with splinters
- Join Date
- Jul 2005
- Location
- Oberon, NSW
- Age
- 63
- Posts
- 13,359
We can only pick one, right?
Awww... decisions, decisions, decisions. Do I pick the one with the biggest "Wow! I can't believe it was a pallet" factor? Do I pick the one with what appears to have taken the most skill? The widest variety of skills? The most original idea? The one that simply appeals most to me?
It's a hard, hard choice...
You should all be proud of yourselves!
Oh... and Wendy? Will the poll results be visible now or can they be concealed until the polling closes? I'd hate to think that people could be influenced by what they think is the "popular vote." (Maybe I'm just overdosing on American Politics...? )
)
- Andy Mc


 Reply With Quote


Similar Threads
-
2008 WWF Box Challenge Entries - Polls - Results - Comments
By coffenup in forum 2008 WWF Box ChallengeReplies: 199Last Post: 22nd June 2010, 09:42 PM -
weisyboy's Pallet Challenge - Conditions of Entry
By RufflyRustic in forum WOODWORK - GENERALReplies: 261Last Post: 19th October 2008, 10:08 PM -
pallet challenge??
By weisyboy in forum WOODWORK - GENERALReplies: 102Last Post: 12th September 2008, 11:59 PM -
Pen Swap Voting Poll
By fxst in forum SWAP, BARTER, SUPPORT A WORTHY CAUSEReplies: 6Last Post: 14th September 2006, 12:51 AM
