

 Thanks: 0
 Likes: 0
 Needs Pictures: 0
 Picture(s) thanks: 0
Results 46 to 60 of 73
Thread: Coffin Smoother
-
25th October 2008, 12:37 AM #46
 SENIOR MEMBER


- Join Date
- May 2007
- Location
- Melbourne
- Age
- 58
- Posts
- 832

Well done Ray. Taking curls already. I have enjoyed watch the progress and honestly do appreciate the step by step warts and all sharing. I know that I have learnt a lot from both Peter and your good self.
Kevin
-
25th October 2008 12:37 AM # ADSGoogle Adsense Advertisement
- Join Date
- Always
- Location
- Advertising world
- Age
- 2010
- Posts
- Many
-
25th October 2008, 10:03 AM #47
.
- Join Date
- Feb 2006
- Location
- Perth
- Posts
- 27,792
+1 Originally Posted by kevjed

The grimy details make a big difference.
-
25th October 2008, 02:41 PM #48
GOLD MEMBER
- Join Date
- Jun 2008
- Location
- Victoria, Australia
- Age
- 74
- Posts
- 6,132
Originally Posted by BobL
Thanks Bob, Kev, TS,
I can now unveil the master plan, Peter shows everyone the correct way to do it, and my job, is to show everyone how NOT to do it... between the two threads, you get the whole picture grimy details and all..
Seriously, I was surprised how easy it was to get the steel to flow ( in spite of the fact that I didn't get it right). That was more a case of not being able to see what was actually happening, rather than any inherent difficulty in actually doing it. Don't be put off by my mistakes, it is easier than I am making it look.. I encourage everyone to have a crack at it, it's not hard (really) and there is nothing like the satisfaction you get from making stuff with tools that you made yourself.
Regards
Ray
-
25th October 2008, 07:24 PM #49
Peter McBride
- Join Date
- Nov 2007
- Location
- Melbourne
- Posts
- 1,139
Ray, Originally Posted by RayG
Just back from Thomas The Tank Engine Day at Puffing Billy with my Grandson...plenty of Olde Worlde stuff there!
More than a couple of plane makers I've spoken to note the failure of the metal to reach into that corner. I've been told from a few sources that back when Spiers was making planes they used wrought steel, which is much more easy to move than anything we use today. It is so hard to explain the peening because it is so much of a feel thing, suck it and see...and as you have seen it can be frustrating. The first impulse is to start at the top and bring it down from there, now that you see where it didn't go in, you can see the need to move it from the bottom. So a strategy is needed.
When working a sheet of metal, one principle to remember is that if you work harden the outer area, the softer inner area will be constrained.
Think of what happens when the metal bends, it will move and work harden immediately where it is hit and deforms first. So a hard mushroom head is formed and once hardened it will be reluctant to move underneath. When the metal is deformed about 50% it will be hard to move more, and it will be impossible at 60% or 70%. So It's best if you can push it sideways into the cavity early, by hitting at an angle from down near where you want it to move the most. This can be done by driving the hammer in just behind the cavity, and not over the top or in front of it. You might have a chance to get it down, and home before it has bent and curled over the top. I use a cross peen and a ball peen to try and control where I want the metal to move down deep. The cross peen, hit at the angle of the relief cut, and swung down so it strikes at about 60deg will move the metal into the cavity. When it is splayed out flat over the top, a sharpish ball peen hit right in the same spot should drive it home.
That's the reason why I file a half round profile in the middle of my tails, to get down into the cavity early.
Ray, what I just wrote above is probably what you have felt and seen after the first go, and like you said...get into it...most woodworkers have the empathy for the tools and the material, given a few pointers about the properties of metals...it should go well.
Isn't it a treat to get those first few curly shavings out of a plane you are making yourself?
I can't see anything happening on mine for at least another week while I play catch-up on the jewellery bench,
Regards,
Peter
-
26th October 2008, 09:05 PM #50
GOLD MEMBER
- Join Date
- Jun 2008
- Location
- Victoria, Australia
- Age
- 74
- Posts
- 6,132
Hi Peter, Originally Posted by lightwood
I'm sure Jack (and Grandad) would have had a great time on Puffing Billy. Good fun.
Those first shavings, and that crisp sound, yep.. good stuff...
Agree completely on the "feel" for peening, it all comes down to experience, and there's only one way to get that!
The over stuffed infill is coming along, as you know it's a laborious process, scrape a little, test fit, scrape a little more test fit again... after many hours it's getting pretty close.
That's probably the hardest part of the project so far, (although it doesn't look like much)
It's possible I might get time to finish this week, although there are a few jobs coming up that might slow things down.
Regards
Ray
-
28th October 2008, 08:43 AM #51
Peter McBride
- Join Date
- Nov 2007
- Location
- Melbourne
- Posts
- 1,139
Ray, Originally Posted by RayG
Great work!
That looks like a nice tight fit...(place the crude analogy of your choice here)...
Can't wait to see the final pix, better photoshop a couple of staples in the center for us old timers! I Find I have the metalwork much more under control than the woodwork, so that sometimes gets put off until I'm felling on top of my game!
Regards,
Peter
-
28th October 2008, 05:40 PM #52
GOLD MEMBER
- Join Date
- Jun 2008
- Location
- Victoria, Australia
- Age
- 74
- Posts
- 6,132
Hi Peter,
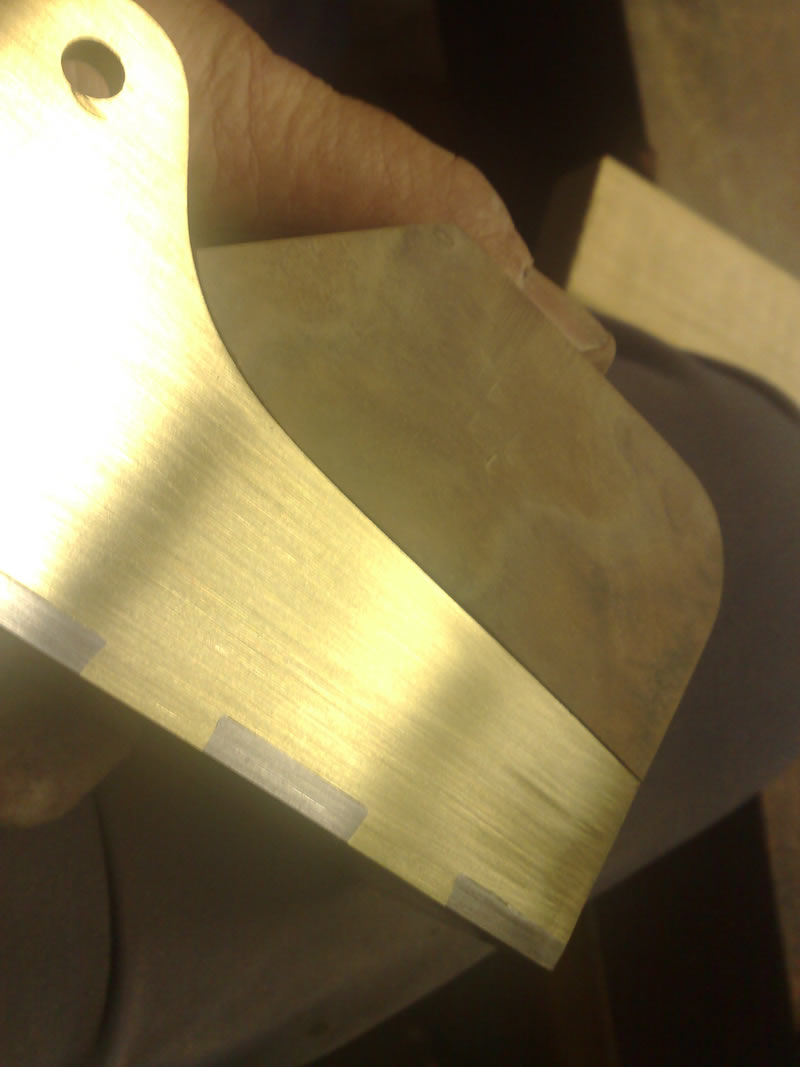
Sorry, no final photo's yet, but I did get the overstuffed infill done,
I put on a bit of 24hr epoxy and clamped it all up before doing the pins today, I got some screws from bunnings with
tapered shanks and drilled the brass to suit the shank, then peened (or should that be peined) the screws after cutting
off the heads, then linished the heads flush.
You might notice I had to re-shape the sides to blend in with the infill.
Next job will be onto the shaping of the infill and rounding off the back, another couple of days!
Almost there!
Regards
Ray
PS That's a bit of railway line for an anvil that it's sitting on.
-
28th October 2008, 11:06 PM #53
Luban White
- Join Date
- Jan 2006
- Location
- Victoria
- Posts
- 999
I bet that chunk of walnut is not even sorry it never made it to a gun stock, it looks very comfy right where it is.
Keep up the photos Ray, they are a joy.
-
29th October 2008, 04:05 AM #54
GOLD MEMBER
- Join Date
- Apr 2006
- Location
- near Mackay
- Age
- 59
- Posts
- 4,635
Thats looking real good Ray.
I think the extra work for the overstuffed infils pays off in the looks department.
Looking forward to seeing more.
-
29th October 2008, 09:16 AM #55
.
- Join Date
- Feb 2006
- Location
- Perth
- Posts
- 27,792
Nice work Ray - a labour of love but well worth it - looking forward to teh final product.
-
1st November 2008, 12:53 AM #56
GOLD MEMBER
- Join Date
- Jun 2008
- Location
- Victoria, Australia
- Age
- 74
- Posts
- 6,132
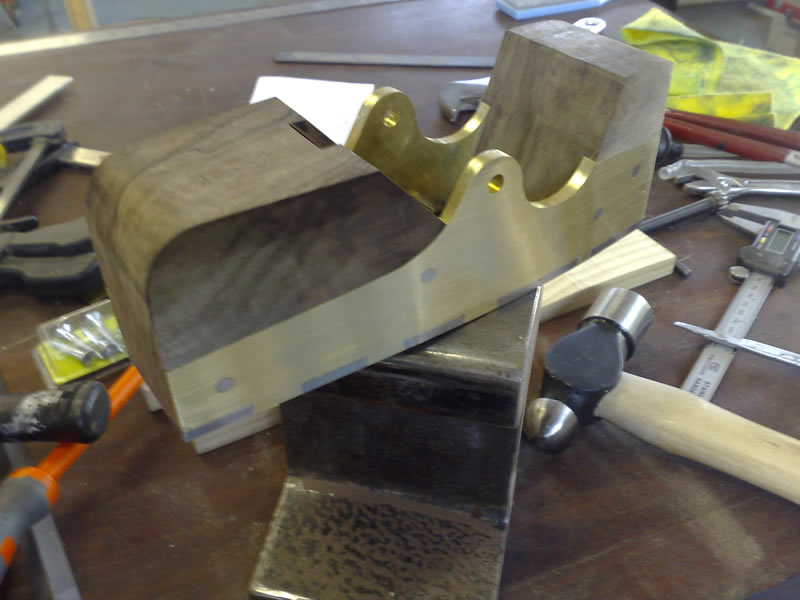
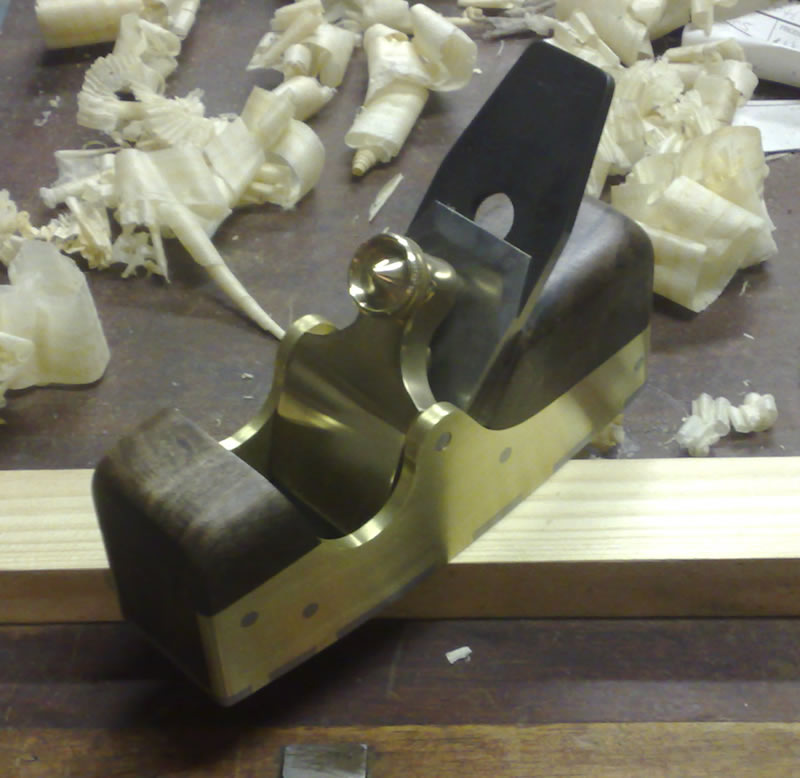
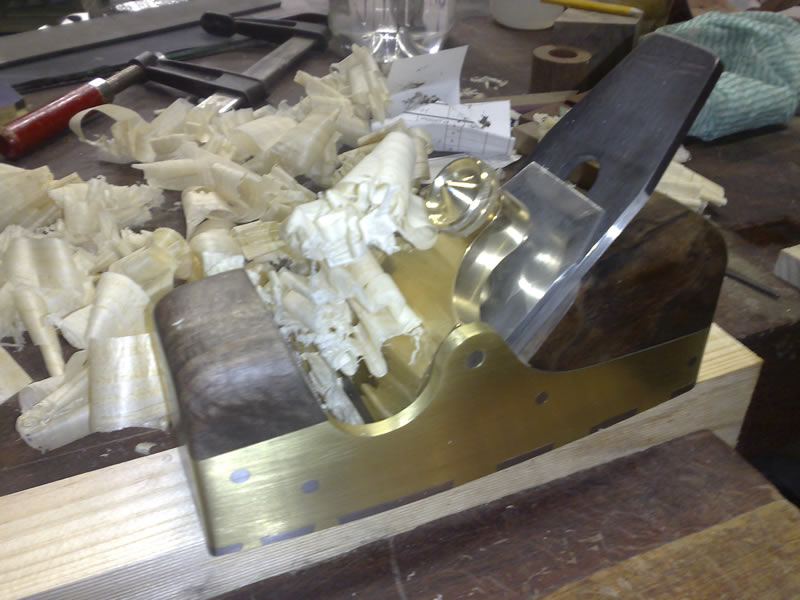
Almost There!
Well, here it is... (finally) such as it is.
I am amazed how well it works, just the sheer weight and rigidity of the thing gives
it a whole different feel to anything I have used previously. When I get a thicker blade and can close the mouth
opening a bit more it will be the smoother I always wanted. (does that sound a bit excited?)
I always wondered how comfortable it would be without a handle, but this is more comfortable to use than any
handled plane, the plane is gripped with the palm on the back, which means your hand is lower down
and more directly in line with the mass of the plane, and changes of direction are easier as others have pointed out.
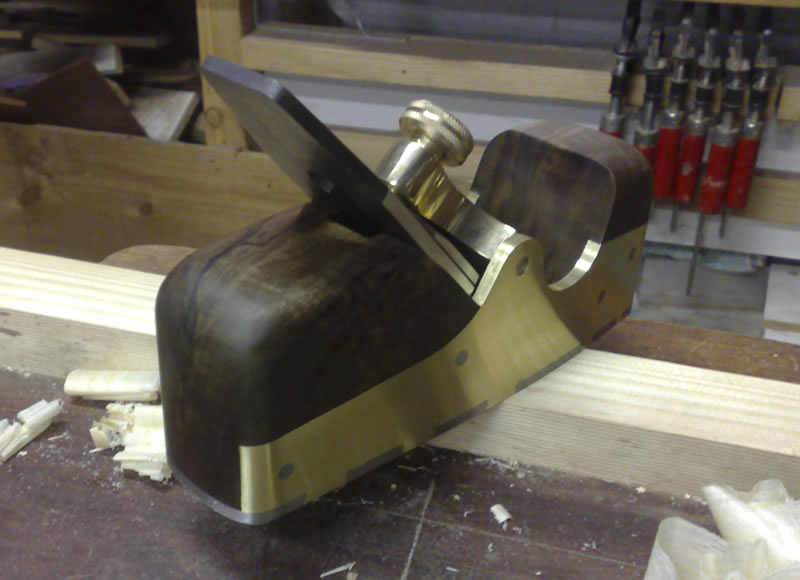
I have yet to figure out a good way of doing the lever cap pins, currently it's just press fit
but I would like a neat way of being able to remove the lever cap if desired.
The lever cap screw is a "traditional" style, next time I would be considering an infill
with the same wood as the main infill.
Next one will be a Norris Style Number 5 ( just to see how that feels in comparison)
I have to say thanks to Peter (aka Lightwood) without whose help and inspiration this would never
have been finished, the number of pitfalls and mistakes that Peter patiently negoitated me through,
some subtle, some obvious. (Thanks Peter!)
Also thanks to Helmut for the bulk brass order, without the right brass alloy for the sides this project
would have never got off the ground. (Thanks Helmut).... And Kev for the cutting and running around.
Ok, now, I would like to see some of the efforts of others to put some more of that beautiful brass to use..
I have carefully demonstrated just about every mistake possible, I'm sure you guys can do better..
Regards
Ray
Now I need to make some saws...
-
1st November 2008, 09:22 AM #57
Peter McBride
- Join Date
- Nov 2007
- Location
- Melbourne
- Posts
- 1,139
Ray,
That is a fine looking plane!
What can I say...it's a pleasure to have been a part of this, and to see what you have done.
Have you seen the spring loaded lever pin in Kingshots book?
Like a spring pin that holds a watch band onto the case?
Regards,
Peter
-
1st November 2008, 12:02 PM #58
GOLD MEMBER
- Join Date
- Jun 2008
- Location
- Victoria, Australia
- Age
- 74
- Posts
- 6,132
Hi Peter,
Here are the obligitatory "glamor" shots, you have to photoshop your own staples however!
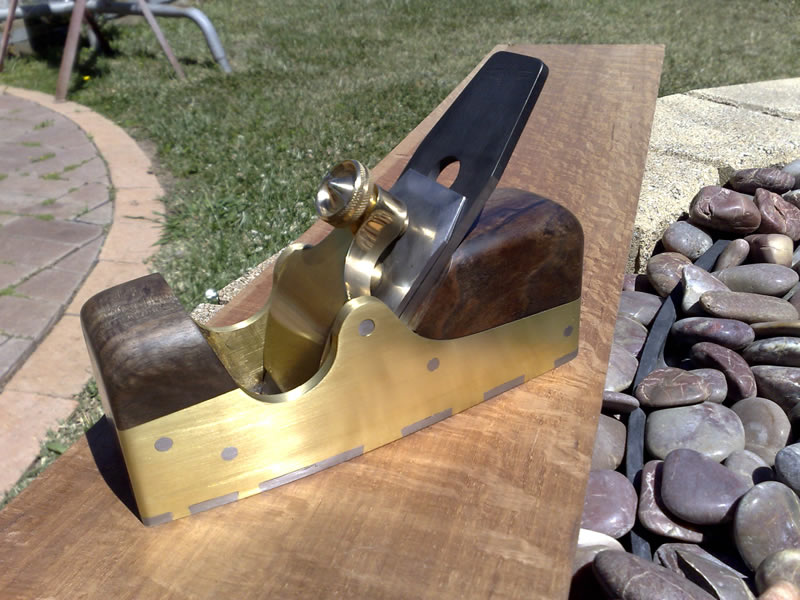
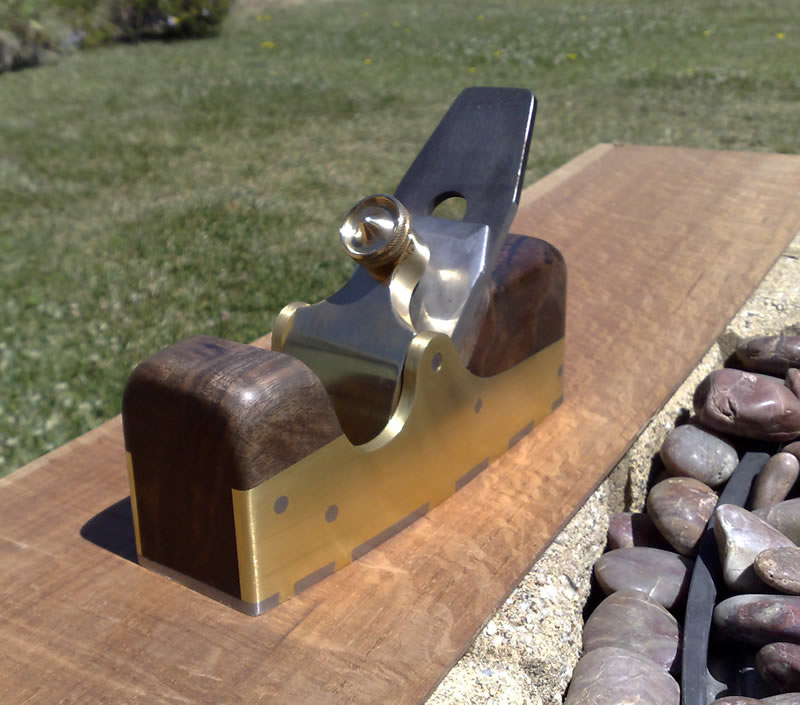
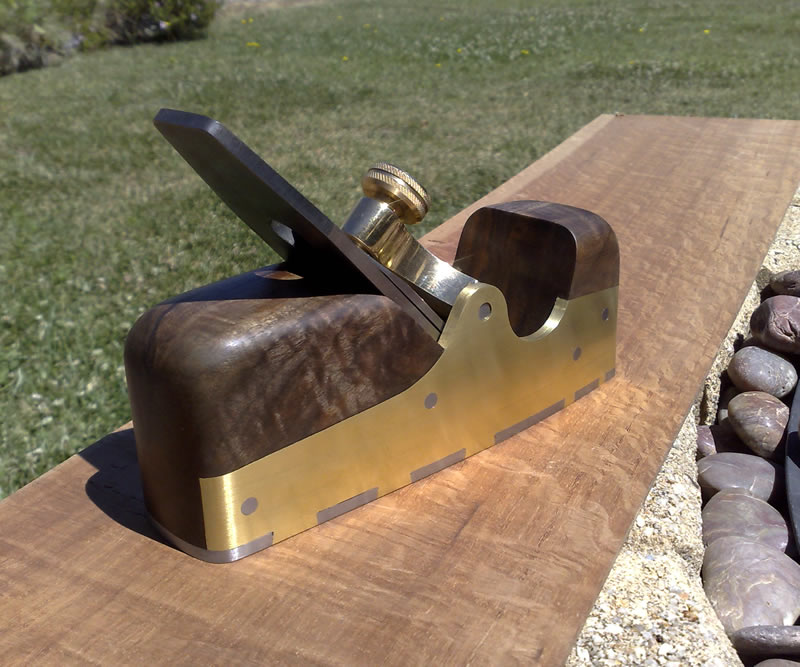
Thanks again.
Regards
Ray
-
1st November 2008, 02:10 PM #59
 GOLD MEMBER
- Join Date
- Mar 2006
- Location
- Earth
- Posts
- 3,567
Envious you have done a beautiful job. Make sure you stamp your name on the front. So tool collector can fight each other for a rare Ray original in 100 years.
-
1st November 2008, 03:22 PM #60
Hobbit Woodworker
- Join Date
- Mar 2006
- Location
- sunderland. england
- Age
- 68
- Posts
- 152

Ray, this qualifies for an,


 Reply With Quote


Similar Threads
-
building a coffin smoother?
By zac_in_ak in forum HAND TOOLS - UNPOWEREDReplies: 12Last Post: 17th September 2008, 04:17 PM -
Coffin up a joke
By Allan at Wallan in forum WOODIES JOKESReplies: 7Last Post: 21st February 2008, 11:18 AM -
The Coffin
By fenderbelly in forum WOODIES JOKESReplies: 2Last Post: 24th October 2007, 07:29 PM -
Coffin splutter
By Allan at Wallan in forum WOODIES JOKESReplies: 2Last Post: 6th September 2007, 10:00 AM -
Coffin
By ozwinner in forum WOODWORK - GENERALReplies: 2Last Post: 17th October 2003, 04:23 PM
