

 Thanks: 0
 Likes: 0
 Needs Pictures: 0
 Picture(s) thanks: 0
Results 1 to 10 of 10
Thread: Help with setup please
-
22nd January 2010, 06:00 PM #1
 Enthusiatic Amateur


- Join Date
- Jun 2007
- Location
- Toowoomba
- Posts
- 144
 Help with setup please
G'Day All,
I'm trying to attach a drawer divider which is part of a web frame to a stile. The divider and the stile have the same width dimension (20mm). In this series of images, you will see on my practice stock, layout lines that correspond to the thickness of the divider. Using the only technique I know (first image shows the Setup), I would expect the fitted domino to locate the divider exactly in the middle of my layout lines (see images 2,3 and 4). Hopefully, you will see from the images that is not so - despite several attempts.
Initially, I considered that my clamps were moving when boring into the stile, so changed them and there is definitely no movement of the stock after setup.
An additional concern is that the gap between the layout line and the top of the divider is not consistent. Obviously, there is something wrong with my technique. Does anybody have the answer?
Unfortunately, I'm away for the weekend so will not be able to respond to any queries until 24th Jan.
Cheers, Brian
-
22nd January 2010 06:00 PM # ADSGoogle Adsense Advertisement
- Join Date
- Always
- Location
- Advertising world
- Posts
- Many
-
23rd January 2010, 03:07 AM #2
Senior Member
- Join Date
- Jul 2007
- Location
- Pittsburgh, PA, USA
- Posts
- 106
Brian, I have a few ideas on what could be happening. The first thing that comes to mind is a mistake in setting the fence height correctly. I'll assume you are indexing the the Domino off the base for the cuts in the face of the wood. The centerline is 10 mm from the base to the center of the cutter. Maybe you've incorrectly set the fence height to make the cuts in the end grain piece. Of course this assumes you are using the fence to index the Domino on the center stile mortise.
However, looking at the first picture I see the two pieces clamped down. So I'd guess you are not using the fence but indexing the Domino off the base for both cuts. While this technique can work well, it does have its drawbacks. If the material isn't perfectly flat and clean of any debris you can have errors in alignment.
Next, some Dominos have problems with the stepped plastic height gauge for the fence. I don't know if this is what is happening because the stepped gauge usually isn't off by more than 1 mm and it looks like you error is more than that.
Another possibility is a too fast or too slow of a plunge rate in the end grain. This can cause problems with alignment. I don't think that is it because the mortise is usually skewed.
Maybe someone else will come up with something more helpful. Good luck.
-
23rd January 2010, 08:08 AM #3
Enthusiatic Amateur
- Join Date
- Jun 2007
- Location
- Toowoomba
- Posts
- 144
Thanks Brice,
Yes, I am indexing off the base piece and I'm not using the fence at all.
Incidentally, I'm plunging 25mm into one piece and 15mm into the other. I did read somewhere about the shoulder on the bit interfering with the depth of mortice in some instances, but even so, in my case, on measurement, it appears the shallower cut is the one in error.
It is awkward cutting downward, but I think I'm taking special precautions about lining up and speed of cut.
Cheers
Brian
-
9th July 2011, 10:11 PM #4
GOLD MEMBER
- Join Date
- Aug 2003
- Location
- Brisbane - South
- Posts
- 2,395
Dovetail, did you sort out this problem?
Cheers
Major Panic

-
10th July 2011, 05:15 PM #5
Enthusiatic Amateur
- Join Date
- Jun 2007
- Location
- Toowoomba
- Posts
- 144
Hi MP,
No, I never got to the bottom of it. For the life of me, even now on reflection I can't understand what was causing the issue. Also, it is now many months later and the project I was working on is completed but I can't remember what my 'work around' was either!
Sorry to be of no help whatsoever.
Cheers
Brian
-
10th July 2011, 08:28 PM #6
Tool Junkie
- Join Date
- Sep 2006
- Location
- MN, US
- Posts
- 93
You registered your cut into the side pieces differently from how you registered the other piece. This is actually visible in the pictures with how the tenons are laid out.
Look at page 17 of the manual I wrote, and specifically the pictures showing how to perform this type of cut. http://www.waterfront-woods.com/fest...ino_DF_500.pdf
-
11th July 2011, 08:12 PM #7
Enthusiatic Amateur
- Join Date
- Jun 2007
- Location
- Toowoomba
- Posts
- 144
Thanks Powertoolman,
I do recall referring to your excellent manual when attempting those cuts and I'm not entirely sure I understand your post. I'm on the road at present but would love to be in my workshop having another go at correcting the problems I had. Perhaps when I get home I can have another go.
In the meantime, I'm sure Major Panic has read your post and he can refer to the manual and have a go. I await the results with great interest.
Cheers
Brian
-
12th July 2011, 09:32 PM #8
Tool Junkie
- Join Date
- Sep 2006
- Location
- MN, US
- Posts
- 93
It was pretty late for me when I wrote my previous posting (although it's late again tonight), but I'll try better.
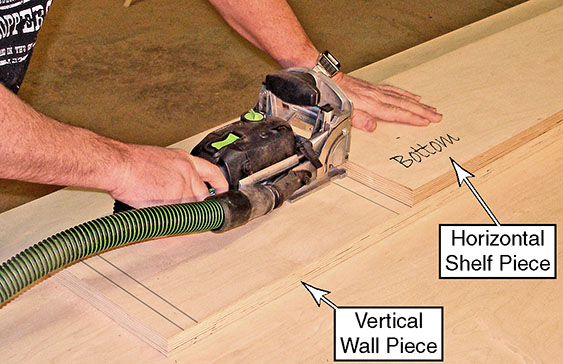
Look at this picture. In the upper piece, the tenon is closer to the word "top" than it is to the bottom. In the lower piece, the tenon is closer to the rear (of the picture) than the front. This told me that you registered your Domino off the wrong pencil line when you mortised the lower board (plunging vertically).
What is confusing is that your photo shows the board clamped correctly, but I suspect that this is not how you had it set up at the time you actually plunged the mortises.
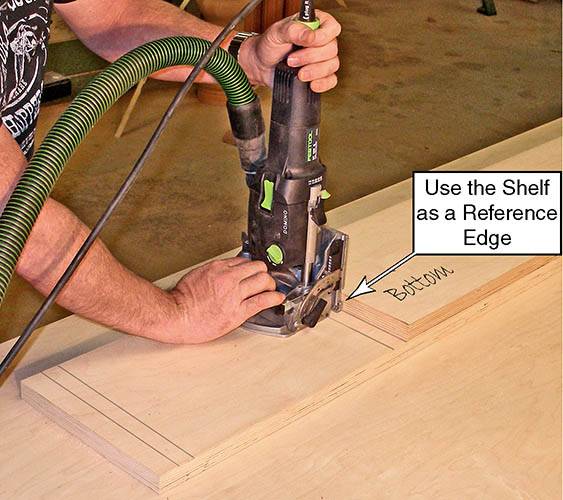
To make the vertical mortises, the bottom face of Domino should be registered off the edge of the piece of wood with the word "top" written on it (as shown in the picture). I think you originally flipped this board around so that the word "top" was on the pencil line closer to the camera.

Oh, I have the pictures from the manual uploaded already, so I will post them here. Even though my board is labeled with "bottom", it is still the same as yours with the word "top", so ignore the word itself. Your picture is the same as mine. Clamp the boards exactly the way you show in your picture (for both plunges), and plunge the mortises as shown in my pictures. What is important to note is that you do not move your boards between plunging horizontally into the shelf and vertically into the walls. Leave them clamped together for both cuts. I think you got confused on the orientation because you plunged several vertical mortises for just one horizontal plunge.
-
13th July 2011, 06:34 PM #9
Enthusiatic Amateur
- Join Date
- Jun 2007
- Location
- Toowoomba
- Posts
- 144
Hi Powertoolman,
Excellent!
I believe you are absolutely correct. I'm not able to repeat that exercise just now but what you have said makes perfect sense and I think it more than likely that I did reference the vertical plunge from the incorrect line. The point you make about not removing the clamped stock until both mortices are machined, clinches it for me.
Many thanks.
I hope Major Panic has accessed your explanation.
Cheers
Brian
-
13th July 2011, 07:52 PM #10
GOLD MEMBER
- Join Date
- Aug 2003
- Location
- Brisbane - South
- Posts
- 2,395
My problem was with the sight guide
I had to elongate the mounting holes & then it didn't make any difference, it was still out of alignment
I set up to take a series of photos & reset the sight guide & low & behold they lined up I cut 12 mortices in a row & the all lined up! so I'm still stuffed if I know what caused the 3.5mm offset in the beginning
  Cheers
Major Panic

 Reply With Quote
Similar Threads
-
my indoor setup
By nz_carver in forum WOODCARVING AND SCULPTUREReplies: 6Last Post: 11th May 2009, 02:24 PM -
vacum bag setup
By Gaza in forum WOODWORK - GENERALReplies: 5Last Post: 12th April 2009, 12:33 PM -
TTD Saw setup help needed
By BoomerangInfo in forum TABLE SAWS & COMBINATIONSReplies: 4Last Post: 6th April 2009, 04:10 PM -
tablesaw setup - help plz
By tonysa in forum TABLE SAWS & COMBINATIONSReplies: 8Last Post: 8th June 2006, 12:02 AM -
Lathe setup
By MJ in forum WOODTURNING - GENERALReplies: 4Last Post: 17th May 2000, 08:15 PM
