

 Thanks: 0
 Likes: 0
 Needs Pictures: 0
 Picture(s) thanks: 0
Results 1 to 15 of 20
Thread: Bandsaw Coolant
-
23rd September 2009, 09:53 PM #1Dave J Guest
 Bandsaw Coolant
Bandsaw Coolant
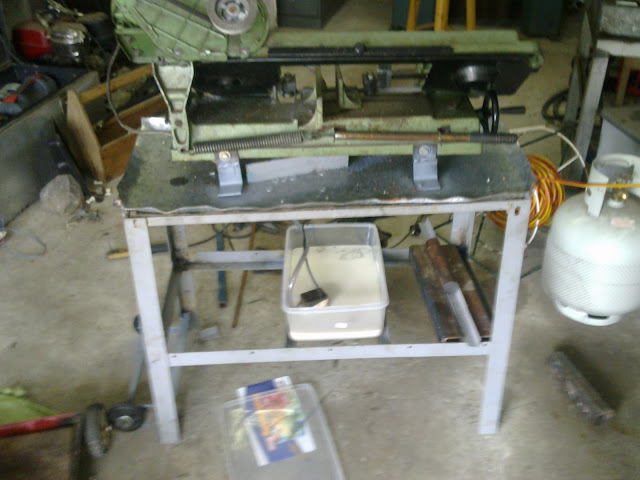
I was PMed by 'welder', to put some photo's up of my coolant system and thought I would start a new thread for it, as anybody looking for idea's for their saw could find it easy.
The pictures below show how it is set up, it was a quick and temporary afternoon mod, as I didn't want to spend lots of time or money on it . I have plans of modifying the saw into a compound mitre bandsaw at a later date. It has been on the saw for around 1 1/2 years and has worked perfectly and I do not lose any coolant at all.
I used some 75x100 metal down pipe for the tray, and the normal stock tray from underneath the saw sits on the side of it, to catch and splashes. After I ran it, I found the blade was carrying coolant around the back of the bottom wheel and dripping down the rear leg, so I added a small gutter. I also found that sometimes coolant would drip through the slots for the vice, depending on where the coolant nozzle was placed. So I put a piece of sheet metal that's sloping down to the downpipe tray under the bed. No extra holes were drilled in the saw for all of this, other than the 4 holes in the bottom of the legs, for the angle braces.
The coolant pump I picked up from Hare and Forbes, for $200.( As they had a pallet load of seconds.) I originally bought the pump for my lathe, but it never made it that far. You could use a fountain pump and a plastic container to keep costs down. I usually only have the ball valve half open on this pump so it doesn't need much flow,
I find that having the coolant nozzle washing the blade after the cut works great, as it doesn't carry the swarf around the wheels, like it used to and washes it into the tray. The coolant gets carried by the blade right around and back, to the piece being cut, as its visible on the blade.
To catch swarf from going in the tank, there is an old speaker magnet in the tray near the drain hole, then there is some fly wire and another speaker magnet under it, in the funnel and in the tank, also another magnet just in case some gets through. The fly wire in the funnel is for when I am cutting aluminium or plastic, as it's not magnetic it stops it going in the tank.
I wired it up so I can have the coolant on or off, and found a switch that fitted in the motor wiring box, to keep it out the way. Lately, I have just put an old desk lamp on it as well, which helps to see of a night time.
The saw needs a clean at the moment, but as you can see it does a lot of work. I find that if I let the swarf build up a bit, that it catches a lot more swarf in the tray, as it all gets magnetized together, rather than going down to the second magnet in the funnel.
This is only a cheap temporary coolant set-up for me,but it might give you and some others some ideas.I also inculuded a picture of the extended handle I fitted ,makes it easier to use.
Dave.
-
23rd September 2009 09:53 PM # ADSGoogle Adsense Advertisement
-
31st January 2012, 02:04 PM #2
 SENIOR MEMBER


- Join Date
- Aug 2010
- Location
- Glenbrook NSW Australia
- Posts
- 705
Hi
Dave put me on to this thread and I am giving it a go on my saw.It was a much easer way of doing it then I had in mind.
In stead of using the down pipe I am using the guttering (a left over from re-guttering the shed)
So far I'am catching 99% of the coolant. I still have to put the end catcher on but I will need to make mine different to Dave's as the coolant sprays out off the bottom wheel.
The coolant is also dripping onto the on/off switch. So I'am also looking at moving all electronics out of the path of any coolant.
I'am will want to include a auto coolant off when using the saw in the vertical position.
While doing this mod I also removed the wheels that came with the saw (never really worked anyway) and put on some 200mm wheels on the back which raise the hight of the saw which makes using it in the vertical position not a backbreaking bend for me now.
I am open for any suggestion or advice.
Thanks
Russellvapourforge.com
-
31st January 2012, 02:59 PM #3
future machinist
- Join Date
- Mar 2008
- Location
- nowra
- Posts
- 1,361
nice addition i ended up putting in a a coolant pump i find it makes the blades last much longer.
 BETTER TO HAVE TOOLS YOU DON'T NEED THAN TO NEED TOOLS YOU DON'T HAVE
Andre
-
31st January 2012, 03:15 PM #4Dave J Guest
That was quick, it will make the blades last at least 3 times long as long as they don't get jambed up doing something silly free hand (don't ask me how I know, LOL)
I see you tied the legs together which helps heaps with making the stand more rigid.
If the coolant is spraying off you probably have it running with to much pressure and too much flow, as I find thats the case with mine. A nozzle will help with reducing the amount of coolant needed, some guys cut a slot in the nozzle so it goes either side of the blade, but I have found I don't need it.
The flexible nozzles can be bought on ebay for around $5 with tap, so that would fix both the pressure and flow problems.
If you want to do something yourself a ball valve will work fine and you can machine a nozzle out of scrap.
Dave
-
2nd February 2012, 08:44 AM #5
SENIOR MEMBER
- Join Date
- Aug 2010
- Location
- Glenbrook NSW Australia
- Posts
- 705
Hi
Got the rear tray done.
Left the saw running for 15 minutes and they was no wet on the floor around it. So now on to the electrics.
I have worked out a way of doing this I will take photo when finished as this will be the best way of explaining how.
And another thing I fixed while at it was the martial stop bar. It would always wobbly as the bar was only held in one point at the grub screw. All I did to fix this was to lathe a pin on the end of the bar and drill a matching hole in the casting and knock it in and tighten the grub screw. Now it as ridged as a rock
Russellvapourforge.com
-
2nd February 2012, 02:37 PM #6Dave J Guest
It's coming along good. I had the same problem with my length stop, so I ended up re drilling the casting. I find I only get a few drips of the back of mine, did you try slowing down the flow?
Dave
-
5th February 2012, 09:09 PM #7
SENIOR MEMBER
- Join Date
- Aug 2010
- Location
- Glenbrook NSW Australia
- Posts
- 705
Dave
No still running it a full flow but I will put a nozzle on it with reduced flow, but if it don't leak at full flow all the better.
Electric are still under review
Russellvapourforge.com
-
5th February 2012, 09:37 PM #8Dave J Guest
Have you been cutting metal with the coolant running? I find it is slightly slower cutting for some reason, but that is off set buy the blades lasting longer.
Dave
-
6th February 2012, 09:22 AM #9
GOLD MEMBER
- Join Date
- Jul 2006
- Location
- Adelaide
- Posts
- 2,680
electrical conduit fittings for a drain.....tad agricultural for you dave?

but seriously $200 bucks for a coolant pump???? one must be able to get a better or cheaper pump than that...ie an evaporative cooler pump..they are only around $50
-
6th February 2012, 10:03 AM #10
 .
.
- Join Date
- Feb 2006
- Location
- Perth
- Posts
- 27,793
Small $25 water feature pump works for me. WIP here. Originally Posted by eskimo

-
6th February 2012, 01:20 PM #11Dave J Guest
This was supposed to be a temporary thing just to see what it worked like, but it worked so good I left it. The elco fitting I just had laying around and just happen to be the right size, but even they have held up. Originally Posted by eskimo
With the pump I bought it for my lathe years ago for cheap but never fitted it, so this again was supposed to be temporary but years latter it's still there. LOL
With the pump, I went down to H&F and was thinking of getting a pump as well, I asked the sales man haven't you got something cheaper than $250-$300? and he said they had a pallet load of pump set ups for $200 that had slight rust so he helped me go through and pick a good one with hardly a spot of rust on it. This guy who was really helpful every time I went down, but has left now.
With this metal container type of set up you get a good metal flexible hose/metal pipe and a good flow valve, so when you look at the price of them it brings the pump price down.
Dave
-
6th February 2012, 01:29 PM #12Dave J Guest
Originally Posted by BobL
Thats what I recommend to everyone. We have a pond and these little pumps run for years and years.
Dave
-
6th February 2012, 02:06 PM #13
.
- Join Date
- Feb 2006
- Location
- Perth
- Posts
- 27,793
That's where I got the idea from Originally Posted by Dave J

-
6th February 2012, 03:12 PM #14
GOLD MEMBER
- Join Date
- Jun 2008
- Location
- Victoria, Australia
- Age
- 74
- Posts
- 6,132
Hi Dave,
I used a submersible pump from bunnings for a while on the surface grinder, while I was waiting for a replacement pump.... I think it was $45 or so, and very good pressure and flow.
Here it is, ok, it's now $49...
Pcw-250
A ball valve at the delivery point would be needed to throttle the flow down to a more manageable rate. It would probably be better suited to flood coolant on a mill or lathe than a power hacksaw.
Regards
Ray
-
6th February 2012, 03:44 PM #15
.
- Join Date
- Feb 2006
- Location
- Perth
- Posts
- 27,793
My coolant set up pumps the coolant around an 20 mm diam open ended loop with a domestic tap in the middle of the loop to provide a slight back-pressure. I then insert a small take off point and a ball tap on the pressurized side of the loop. The two taps provide a very fine level of control of the fluid flow while the bigger loop stirs up the coolant and help keep it mixed. Originally Posted by RayG


Similar Threads
-
which coolant ?
By Oldhack in forum METALWORK FORUMReplies: 16Last Post: 1st October 2009, 08:06 AM -
Coolant/Oil proof paint?
By John H in forum METALWORK FORUMReplies: 6Last Post: 26th September 2009, 10:11 PM -
Power hacksaw coolant system
By neksmerj in forum METALWORK FORUMReplies: 4Last Post: 10th June 2009, 12:13 AM -
adding a coolant tank
By Oldhack in forum METALWORK FORUMReplies: 21Last Post: 24th June 2007, 01:24 PM -
Coolant/lubrication
By Tiger in forum METALWORK FORUMReplies: 3Last Post: 7th December 2005, 08:04 PM
 Members who have read this thread: 0
There are no members to list at the moment.