

 Thanks: 0
 Likes:
  Needs Pictures: 0
 Picture(s) thanks: 0
Results 1 to 15 of 18
-
7th August 2013, 11:28 AM #1
 .
.


- Join Date
- Nov 2008
- Location
- Perth WA
- Age
- 71
- Posts
- 5,650
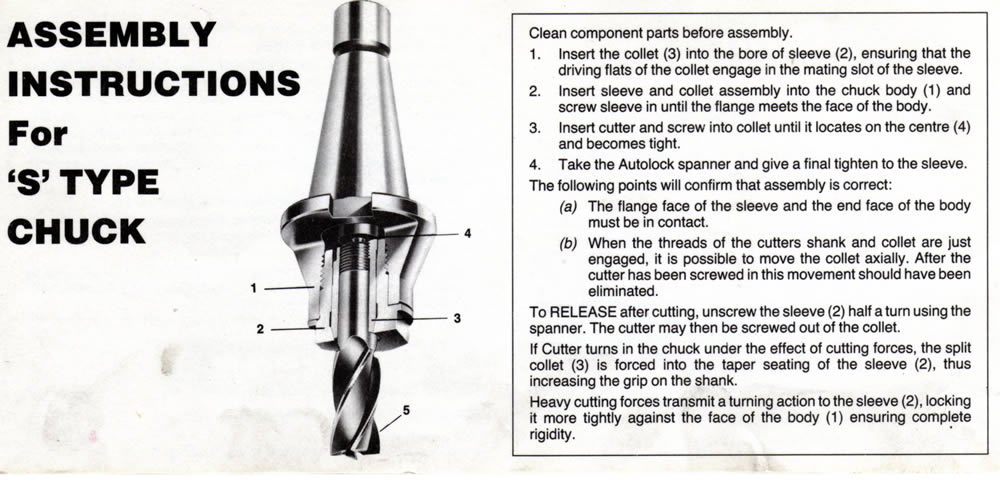
 Clarkson Autolock and Vertex Posi-Lock Chucks - Installing the Cutter
Ben has a Posi-Lock chuck he intends using in his little Hercus No.O mill and he asked me last night what the procedure was for cutter installation.
Here's my instructions -
1 .Select the appropriate collet
2. Install said collet in chuck and screw on collet nut. Not tight.
3. Insert cutter and screw cutter down till it engages the centre point at the rear of the chuck bore.
4. Screw down collet nut till it is tight on collet .
5. Nip up collet nut with gargantuan spanner supplied.
The tricky bit is the nipping up. The cutter needs to project far enough through the rear end of the collet so that when the nipping takes place, the collet nut isn't screwed hard up against the chuck's shoulder. Don't wrench on the gargantuan spanner, just a nip.
That's how I use to do it when I owned a Posi-Lock. Clarkson's instructions differ. The spanner is only used for loosening the collet nut. The nut was meant to be finger tightened, rotational cutting forces tightened the cutter in the chuck. The heavier the cut, the tighter the cutter.
Now this is where I have deviated from the correct procedure. I install cutters in my Autolocks exactly as per my "instructions" to Ben. My thinking is that if a cutter rotates (tightens) under load then the position of the cutter alters height wise. Probably such an insignificant amount that it doesn't matter but the idea of an 1 1/2" end mill finger tightened has always made me a bit nervous.
Like most others on this forum, I use ER chucks but for tasks where cutter slippage might have ruinous consequences (say tee slotting and dovetailing ) I use an Autolock chuck. Mind you I have not experienced cutter slippage in any of my ERs, both Swiss and Chinese. I'm not about to tempt fate either.
How do other Autolock / Posi-Lock users install their cutters?
Bob.
-
7th August 2013 11:28 AM # ADSGoogle Adsense Advertisement
- Join Date
- Always
- Location
- Advertising world
- Age
- 2010
- Posts
- Many
-
7th August 2013, 01:36 PM #2
SENIOR MEMBER
- Join Date
- Sep 2011
- Location
- Ballarat
- Age
- 65
- Posts
- 2,659
The only thing I would add Bob is to make sure the drive pin is located in the collet up against the face on the collet. That is, rotate the collet until it stops against the drive pin.
Phil
-
7th August 2013, 02:06 PM #3
.
- Join Date
- Nov 2008
- Location
- Perth WA
- Age
- 71
- Posts
- 5,650
A search earlier would have been useful

-
7th August 2013, 02:09 PM #4
SENIOR MEMBER
- Join Date
- Aug 2008
- Location
- Adelaide
- Age
- 68
- Posts
- 834
Same as you, in step 2 I run the nut down until it bottoms out then back it out a quarter to half a turn. The rest is as you describe. Originally Posted by Anorak Bob

-
7th August 2013, 02:31 PM #5
GOLD MEMBER
- Join Date
- Jul 2010
- Location
- Melbourne
- Posts
- 7,775
Hi BT,
What sort of chuck is that?
Its not "what I understand to be" a Clarkson. Maybe its a different model to mine?(or maybe my SKF isnt as direct a copy of a Clarkson as I thought it was?)
My chuck only has a short spanner(or was gargantuan a joke that I missed? lol)
Stuart
-
7th August 2013, 02:47 PM #6
.
- Join Date
- Nov 2008
- Location
- Perth WA
- Age
- 71
- Posts
- 5,650
OK Stu. Here's a chuck similar to my S type Clarkson. Gargantuan may have been excessive but I wouldn't call the spanner slight. Originally Posted by Stustoys


-
7th August 2013, 03:36 PM #7
GOLD MEMBER
- Join Date
- Jul 2010
- Location
- Melbourne
- Posts
- 7,775
Oh I see now, mine has finer lines though is some what uglier

(As you know)My instructions say run the nut up hand tight, install cutter firmly, then tighten nut with spanner.
This is not how I was taught to do it, I was taught more like Gavin, but maybe the chuck was different. You can in fact tighten the nut first and then put the cutter in. You do want the nut to be tight against the chuck. The cutter can tighten itself if needed. If the tapers of the chuck and nut arent tight against each other(and there by being rigid)...... what the point of them being there? Now some chucks like at least one of the ones picture above dont have the taper. But I still think you really want the nut locked to the chuck. Though you dont want to get to excited as they can be hard to undo. I think(though havent tested) that has more to do with over tightening than the cutter tightening itself.
Stuart
-
7th August 2013, 03:59 PM #8
.
- Join Date
- Nov 2008
- Location
- Perth WA
- Age
- 71
- Posts
- 5,650
Stu, Originally Posted by Stustoys
Your spanner has a non forged look to it. The originals are clunkesque.
Self teaching can lead to bad habits. I will have a go at installing a cutter after the nut has been screwed up to the chuck shoulder. I was reading an older Clarkson thread where you had yet to embrace the ER system. I imagine you are a devotee now?
BT
-
7th August 2013, 05:19 PM #9
GOLD MEMBER

- Join Date
- Mar 2011
- Location
- Dural NSW
- Age
- 82
- Posts
- 1,120
When I have used a Clarkson, in the past, just as you have outlined above Bob, however like Gavin, I run the nut down until it bottoms & then back it out a "smidgeon" maybe an eighth to a quarter turn while holding the cutter against its 60 degree centre spigot, within the chuck, & then tighten the collet nut till it bottoms. Originally Posted by Gavin Newman
It does not take much to nip up the collet nut to ensure all is secure.
However as mentioned in previous posts for my Hercus model O Mill the Clarkson simply takes up too much vertical space.
So now I use no 3 Morse Taper collets with a draw bar or 3C collets with an adaptor for the spindle & its dedicated draw bar to hold cutters.
Both work very well.
regards
Bruce
-
7th August 2013, 06:34 PM #10
New Member
- Join Date
- Oct 2012
- Location
- Bittern, Australia
- Posts
- 5
clarkson chucks
Hi Guys, Originally Posted by Abratool
If in doubt follow the manufacturers instructions for the Clarkson. The cutters self tighten and will not pull out. During my apprenticeship I saw a clown leave the nut unscrewed about half a turn, screwed up the cutter then proceded to tighten the nut with a hammer on the spanner. The collet chuck split in half and all the pieces landed at his feet on the floor. Incidentally the earlier spanners were cast aluminium and if the instructions were followed that spanner was only to undo the nut. I have used Clarkson chucks for 40 years and never had a failure yet. I do believe they are no longer manufactured so if you have one look after it.
Regards,
Borriss
PS. I have made new metric collets for my chucks from 4140 and left them unhardened and they are working well. The threads in the back of the collets are all 20 tpi threads for Imp and metric collets.
Borriss
-
7th August 2013, 06:43 PM #11
GOLD MEMBER
- Join Date
- Jul 2010
- Location
- Melbourne
- Posts
- 7,775
Yes dispite the "dormer" stamp I kind of doubt its factory Originally Posted by Anorak Bob
Embraced the ER system? Only when I have to. I have a fair load of threaded cutters what will keep me going for awhile.(forever if I ever get my grinder going). The ER32 uses a little less Z but is larger in diameter(and painful to tighten Originally Posted by Anorak Bob
).
To add a little more, I was taught that you wanted a gap between the nut and the chuck. As I said earlier maybe it was a different sort of chuck but I think it had a taper like mine. I cant see why you would want the gap? then any side loads are carried by the thread. The one cut away above doesnt have the taper, but it still says the nut(sleeve) should be tight against the chuck. Though it would seem the world wont end if its not done that way.
Stuart
p.s. I have seen centres broken out of cutters which I assume if from tightening the nut with the cutter screwed in to far(but.... thats just a guess that matches my theory)
-
7th August 2013, 07:56 PM #12
.
- Join Date
- Nov 2008
- Location
- Perth WA
- Age
- 71
- Posts
- 5,650
I reckon you are correct Borriss about Clarkson pulling the pin on the manufacture of chucks. A couple of months ago I picked up my fourth Autolock chuck, a 30 tapered Intermediate. I suppose about 8 years back I was the only bidder on a 3 Morse Intermediate in the States. Cost me 50 bucks ( and a fair bit more for postage ). Back then Clarkson Osborn had them listed on their website for about $860 US. I searched in vain for that pricelist when I picked up the 30 taper version. Originally Posted by Borriss
Bob
-
7th August 2013, 09:33 PM #13
SENIOR MEMBER
- Join Date
- Oct 2011
- Location
- sydney
- Posts
- 880
HI All,
First of all I would like to say thank you to Bob, he actually gave me the Vertex Posi-Lock chuck and collet set plus a ER32 Chuck. Its a gift that is greatly appreciated and will come in very handy.
I've sorted out the cutter insertion, following AB's and other's instructions. I was nearly there but there's a grub screw on the outside of the body that I thought was meant for something completely of track.
To cut a short story even shorter, I took a couple of cuts using two different sizes of cutters. I'll post a photo in the Hercus area as that's where I started this story.
Thanks again Bob, and everyone else.
Cheers Ben.
-
7th August 2013, 09:39 PM #14
Blacksmith, Cabinetmaker, Machinist, Messmaker
- Join Date
- Dec 2011
- Location
- Canberra
- Age
- 40
- Posts
- 4,467
 Bob!
1915 17"x50" LeBlond heavy duty Lathe, 24" Queen city shaper, 1970's G Vernier FV.3.TO Universal Mill, 1958 Blohm HFS 6 surface grinder, 1942 Rivett 715 Lathe, 14"x40" Antrac Lathe, Startrite H225 Bandsaw, 1949 Hercus Camelback Drill press, 1947 Holbrook C10 Lathe.
Bob!
1915 17"x50" LeBlond heavy duty Lathe, 24" Queen city shaper, 1970's G Vernier FV.3.TO Universal Mill, 1958 Blohm HFS 6 surface grinder, 1942 Rivett 715 Lathe, 14"x40" Antrac Lathe, Startrite H225 Bandsaw, 1949 Hercus Camelback Drill press, 1947 Holbrook C10 Lathe.
-
8th August 2013, 11:19 AM #15
.
- Join Date
- Nov 2008
- Location
- Perth WA
- Age
- 71
- Posts
- 5,650
My pleasure Ben. Originally Posted by bwal74

I was struggling to recall the screw you mention and I just found a photo. It is there to retain the removable centre in the chuck bore. Clarkson retain theirs through the hollow arbor.
I didn't have a mill when I photographed the action below.
Bob.
118_1856 (Large).JPG


Similar Threads
-
Tail Stock: To Lock or Not to Lock
By brendan stemp in forum WOODTURNING - GENERALReplies: 25Last Post: 12th October 2012, 07:52 PM -
Connecting 14mm Lock to 12 mm Lock floating floor
By biwood in forum WOODWORK - GENERALReplies: 2Last Post: 15th September 2011, 08:42 PM -
Clarkson chucks
By Stustoys in forum METALWORK FORUMReplies: 15Last Post: 26th December 2010, 09:41 PM -
Cam lock chucks
By Sterob in forum METALWORK FORUMReplies: 8Last Post: 3rd May 2007, 11:21 PM
