

 Thanks: 0
 Likes:
  Needs Pictures: 0
 Picture(s) thanks: 0
Results 1 to 15 of 19
-
21st June 2013, 04:43 PM #1
 Senior Member


- Join Date
- Jun 2011
- Location
- gold coast
- Posts
- 142
 Not only girls change their minds
Well, after paying a deposit on the al50ga earlier in the week, I drove my ute the 2 hours to Brisbane today, in terrible fog and rain and angry truckers.
When I got there they had opened a newly arrived al250g and there she was sitting snug in her ply box. I asked if they would run her and as soon as they switched her on she called me very clearly.
What could I do, I ask you?
So now I'm home after an even worse drive, but happy and warm and gloating that my brand new lathe , The al250g of course(10 x 20) is snug in the garage on the back of the truck, waiting for me to explore how to make a stand, and how to get her to sit serenely on it, so I can turn 'something'.
I guess I'm not the first, to realise when I turn the lathe on, that I then have to find something to make round and smooth.
You don't need to be to creative to guess what I will be doing every spare moment, for the next few weeks.
-
21st June 2013 04:43 PM # ADSGoogle Adsense Advertisement
- Join Date
- Always
- Location
- Advertising world
- Posts
- Many
-
21st June 2013, 05:45 PM #2
Senior Member
- Join Date
- Jul 2012
- Location
- Griffith NSW
- Posts
- 257
Thats lovely...
...but pics or it didnt happen
-
21st June 2013, 06:34 PM #3
Cba
- Join Date
- Aug 2007
- Location
- Melbourne
- Age
- 68
- Posts
- 1,417
You went to buy a slave, but she called and you found love. Its a romance in iron.
Congratulations.
-
21st June 2013, 07:22 PM #4Dave J Guest
Good to see you got the bigger lathe, I think you will be happier with that one over the other.
We all love pictures,
Dave
-
21st June 2013, 08:16 PM #5
Member
- Join Date
- Oct 2011
- Location
- Brisbane
- Posts
- 65
I am sure you are excused for changing your mind. I think you chose wisely!
-
21st June 2013, 09:29 PM #6
SENIOR MEMBER
- Join Date
- Jun 2012
- Location
- SA
- Posts
- 1,478
Yes, that's a better choice.
Good sized unit.
Rob
-
22nd June 2013, 08:41 AM #7
Man of Many Talents
- Join Date
- May 2006
- Location
- Canley Heights, Sydney
- Age
- 67
- Posts
- 302
You probably got in at the right time with the dollar dropping Hare and Forbes will stick the prices up, they jacked them up when our dollar rose, so imagine what they will do now.
 Shane
Shane
Still trying to fit a square peg into a round hole.
-
22nd June 2013, 01:16 PM #8
Senior Member
- Join Date
- Jun 2011
- Location
- gold coast
- Posts
- 142
Choosing wisely
Thanks for all the support and friendly responses everyone.
Being a newby in small lathe use
Although I have turned a few things like axles years ago, it was always under the watchful eye of a toolmaker who usually gently pushed me out of the way and told me he would 'finish it off'. (I suspected that he just didn't want anyone fiddling with his machine).
So I have no idea on what's really required in levelling and checking accuracy and changing the oil and what to use for lubricants and grease and all the things I 'should have known' if something breaks because "I should have done that first".
I am an engineer by trade, but most of my work has been done at a drawing board, except for the 'foreign orders', and the building jobs at home.
So this is a steep learning curve now. and while I want to get some steel spinning, I believe that hastening slowly and geting everything 'right' will pay off in the long run.
That being said, any advice anyone can offer, I will be truly grateful.
I intend buying some RHS possibly 50 x 50 to make a stand (I can weld) and I wonder if looking around for an offcut of hot rolled "C" section--say 200x50 to mount on top of the bench and fasten the two footplates that came with the lathe to it ?
I wondered about setting the 'C' section on 4 screws with adjustment nuts to give 4 point adjustment for levelling, or is this a bit of a wank, and I could achieve the same with shimming?
That's just my idea to start with, so if anyone has mounted a similar sized lathe in a more cleaver way, I would be grateful to know.
Once that's done I can start asking questions about checking the ways and tailstock and other 'stuff' I have heard about, and I will be back asking more questions
warm regards Brian
PS Auskat--One of the driving forces for my buying now was to buy one of the 'old stock' before the drop to 92 cents affects the 'new' price. I can only imagine the new price will be 15% more. Good call!
-
22nd June 2013, 02:27 PM #9
SENIOR MEMBER
- Join Date
- Jun 2012
- Location
- SA
- Posts
- 1,478
Both of my lathes are mounted in a similar fashion on extruded 5 mm thick rectangular section steel beams. Originally Posted by Briangoldcoast

I use shims to adjust the base if required.
Be aware that extruded and rolled channel/box section have a radius type corner, which can be quite large and reduce the effective "flat" width of the beam.
Rob
-
22nd June 2013, 02:54 PM #10
Banned
- Join Date
- Apr 2013
- Location
- adelaide
- Posts
- 295
I did it my way
I have the AL-250G for which I made a stand. This is how I did it. I made the stand from 30mm x 2mm RHS with two 50mm x 10 mm angle iron runners along the top to bolt the lathe mounting pads to. Whilst welding the stand in the correct sequence will minimise twisting, it will still twist - remember when levelling the lathe you're working in the vicinity of 0.02mm, you can't weld a stand and achieve that level of accuracy so don't make the stand from too heavy material (that's why I used 2 angles rather than one channel). I included adjustable feet with locknuts on each corner and also brackets to loxin to the floor. I mounted the stand with a slight downward slope to one corner for coolant drainage. Once I had mounted the lathe pads on the stand, I used a level to take out any twist and bolted the stand to the floor. I also used silicon between the pads and the swarf tray to stop coolant leakage. It�s not necessary to level the lathe but it is a good move to ensure there is no bed twist. For that I used feeler gauges between the pad and lathe feet and a 150mm level I bought on aliexpress for $60. The same level is available from H&F for $160. I used loxins rather than dynabolts, because you would have to lift the stand clear of the dynabolts should you ever decide to move it. In retrospect I should have loxined 4 plates to the floor and sat the stands adjustable feet on them, levelled the lathe and then tacked the adjustable feet to the plates. Another day perhaps.
-
22nd June 2013, 03:19 PM #11
Senior Member
- Join Date
- Jun 2011
- Location
- gold coast
- Posts
- 142
Thanks th62,
After my post I started to realise to get the lathe bed level I would need to have some sensible levelling screws set up under the bed and possibly levelling feet too.
What you are saying about twisting in the frame makes perfect sense, so I may set screw some of the brackets instead of welding them
I was thinking of positioning the cross members at the height of a standard car hydraulic jack, so I can lift each side of the stand and slip in industrial casters in case I have to move the whole shebang sometime (hopefully not).
By the way I was thinking of using 50 x 50 x 5mm wall RHS steel tubing for the frame.
Thank you for your insight
regrds
Brian
Originally Posted by th62
-
22nd June 2013, 03:21 PM #12
Senior Member
- Join Date
- Jun 2011
- Location
- gold coast
- Posts
- 142
Thanks nearnexis,
I take your point and will choose 5mm thick wall square tubing. I realise that welding can set up twisting in the frame.
Thanks for your comments
regards Brian
Originally Posted by nearnexus
-
22nd June 2013, 06:26 PM #13
SENIOR MEMBER
- Join Date
- Jun 2012
- Location
- SA
- Posts
- 1,478
Contraction when welding steel always causes distortion. You can allow for some, but not all. Originally Posted by Briangoldcoast
I fabricated a steel stand recently for an old Schaublin lathe and I got rid of 99% of the distortion by welding in the correct sequence (allow for/let the shrinkage work for you) and also used decent sized ratchet type tie down straps to pull the frame back into shape/square before welding the next section.
This worked fantastically well and they can easily put a lot of tension exactly where it needs to go. Mainly use them diagonally to get back to square settings.
I recommend you have some handy and correct run out as you go.
Here's a video on it.
Make a metal lathe stand that's super rigid - part 3 - YouTube
Rob
-
22nd June 2013, 07:27 PM #14
Member
- Join Date
- Oct 2011
- Location
- Brisbane
- Posts
- 65
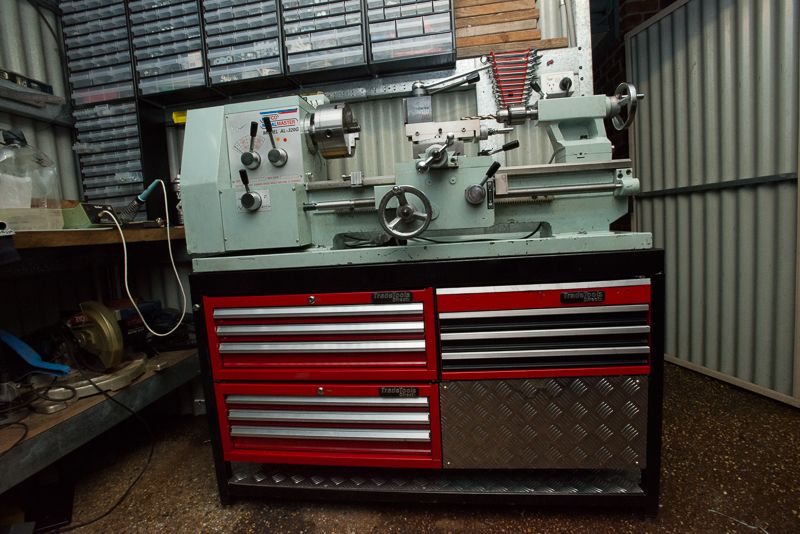
I have given you a link to my lathe stand build on one of your other threads. My stand was made out of 35x35 SHS legs with the top rails 65x35. Wall thickness was 2mm. Normally I would have gone with 50x50 SHS but I thought the deeper top rail would work better and using the smaller SHS for legs tied in with the top rail dimensions nicely. I was very particular with cutting out the components to get exact lengths and used jigs and clamps to keep it all square while I tacked it up and did not see it move much when I welded it out (with a MIG).
i am pleased with my choice of material which was in part chosen to keep to dimensions when using some toolbox drawer units.
Here is a pic
-
22nd June 2013, 07:46 PM #15
Senior Member
- Join Date
- Jun 2011
- Location
- gold coast
- Posts
- 142
What excellent pics and excellent work. Thank you--that has stimulated me to take a lot more time with my preparation and more importantly to start taking pics.
I really appreciate your help
cheers
Brian


Similar Threads
-
Something for the girls
By munruben in forum TOY MAKINGReplies: 11Last Post: 20th March 2013, 05:02 PM -
Hey Girls
By lubbing5cherubs in forum WOOD WHISPERING WOMENReplies: 36Last Post: 18th September 2007, 03:03 PM -
For the Girls!
By Tikki in forum NOTHING AT ALL TO DO WITH WOODWORKReplies: 2Last Post: 3rd March 2006, 08:51 PM -
One for the girls
By Iain in forum WOODIES JOKESReplies: 19Last Post: 20th July 2005, 12:03 AM -
One for the girls #2
By Iain in forum WOODIES JOKESReplies: 9Last Post: 19th July 2005, 10:15 PM
