

 Thanks: 0
 Likes: 0
 Needs Pictures: 0
 Picture(s) thanks: 0
Results 16 to 30 of 92
-
20th June 2011, 11:24 PM #16
 Pink 10EE owner


- Join Date
- Aug 2008
- Location
- near Rockhampton
- Posts
- 4,304

 Originally Posted by Greg Q

Maybe Ray is in the Pizza Mafia...
-
20th June 2011 11:24 PM # ADSGoogle Adsense Advertisement
- Join Date
- Always
- Location
- Advertising world
- Posts
- Many
-
21st June 2011, 05:19 PM #17
GOLD MEMBER
- Join Date
- Jun 2008
- Location
- Victoria, Australia
- Age
- 74
- Posts
- 6,132
We deliver horse heads on demand as well.. Originally Posted by .RC.
-
26th June 2011, 12:39 AM #18
GOLD MEMBER
- Join Date
- Jun 2008
- Location
- Victoria, Australia
- Age
- 74
- Posts
- 6,132
Just an update, I'll post plans when it's all finished, things keep changing...
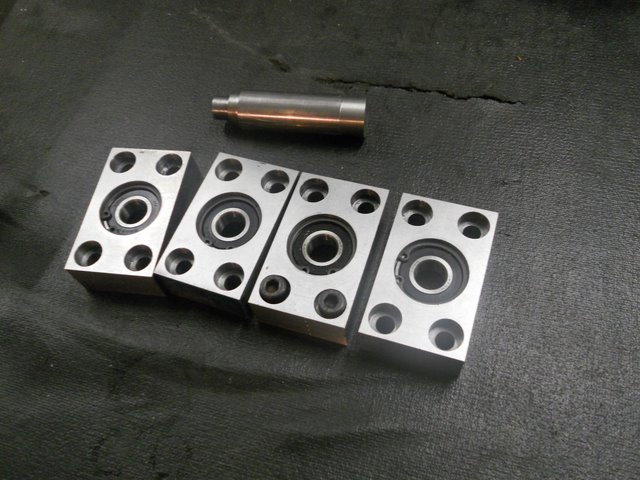
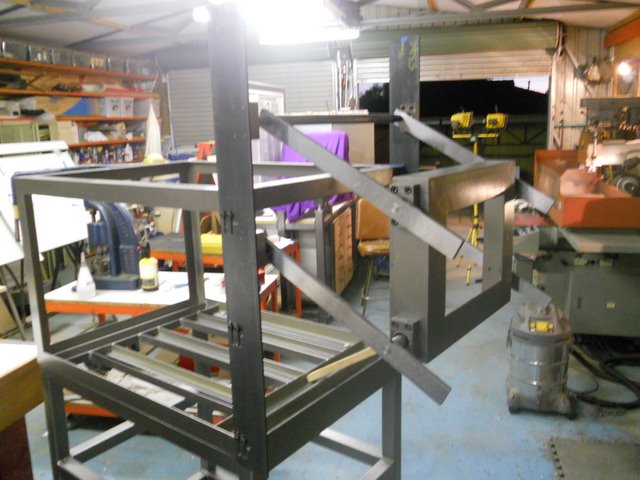
Josh made up the bearing blocks for the door mechanism, there's a total of 8 required, these 4 are to be bolted to the door.
The outer frame and trolley is finished, and painted.
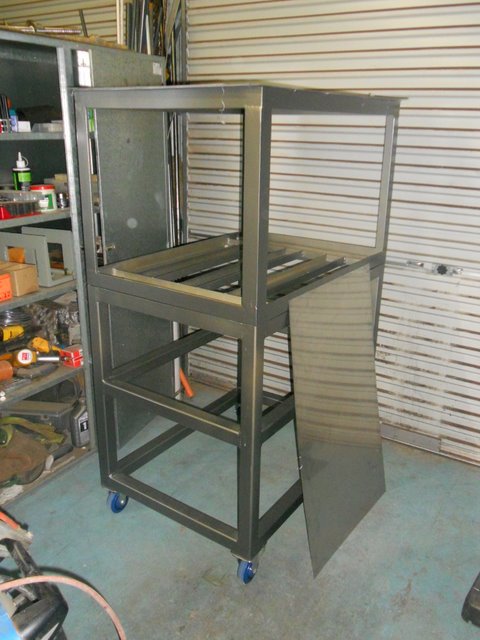
The outside is to be clad with 0.9mm 304 stainless sheet. The sheets are sitting on top at the minute, I leant one on the side for the picture.
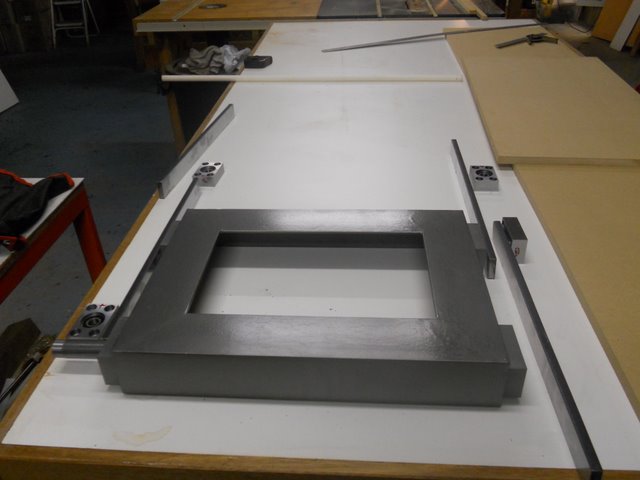
Here is the door frame, with the bearing blocks mounted, and the arms are party made.

Should finish the door mechanism and test it out in the next few days. Then the next stage is to start the final brickwork and some internal frames.
Regards
Ray
-
26th June 2011, 01:00 AM #19
GOLD MEMBER
- Join Date
- Jul 2010
- Location
- Melbourne
- Posts
- 7,775
That door really has me scratching my head. I'm sure it will make sense once it goes together. Did you get your element yet?
Stuart
Stuart "Why did you surface grind the arms?".
Ray "Because I can" hehe
-
26th June 2011, 10:48 AM #20
GOLD MEMBER
- Join Date
- Jul 2006
- Location
- Adelaide
- Posts
- 2,680
that looking really professional Ray (thinking you have way-too much time time on your hands
 )
)
on those heatload calcs...how long do you reckon it will take to get upto temp?Last edited by eskimo; 26th June 2011 at 10:49 AM. Reason: words back to front
-
29th June 2011, 07:04 PM #21
GOLD MEMBER
- Join Date
- Jun 2008
- Location
- Victoria, Australia
- Age
- 74
- Posts
- 6,132
Hi Eskimo,
I've tried to calculate how long it will take to get up to temperature, but there are too many variables, so I'll just have to wait till we arc it up and see, I'm hoping for less than 1-2 hours to get to 1100C. But I can put in extra elements if needed.
Josh has been making the parts for the door mechanism he designed in solid works, and we got to assemble the mechanism for the first time this afternoon, works nice and smoothly and we can now work out how to do the counterbalancing.
The door in it's closed position.
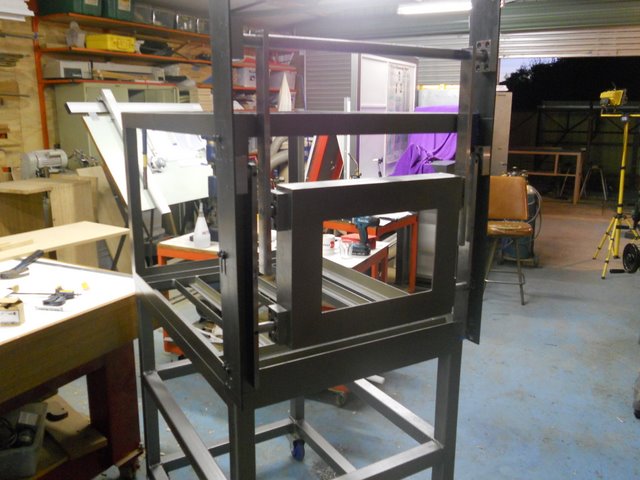
Propped open with a bit of wood makes the mechanism a bit clearer.
Close up of the door bearing
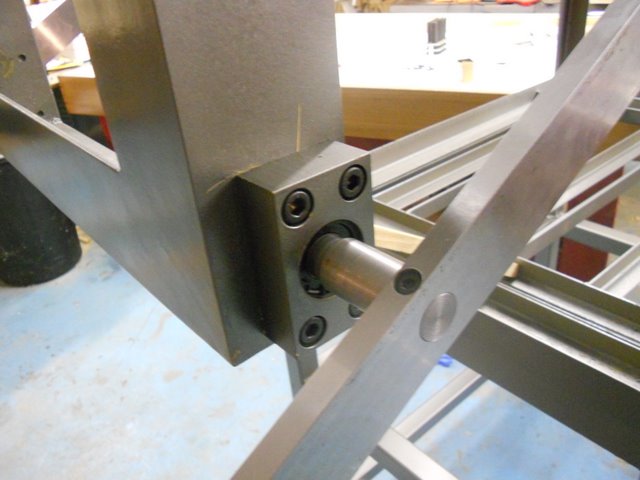
The bearing on other end of the arm, attached to the frame.
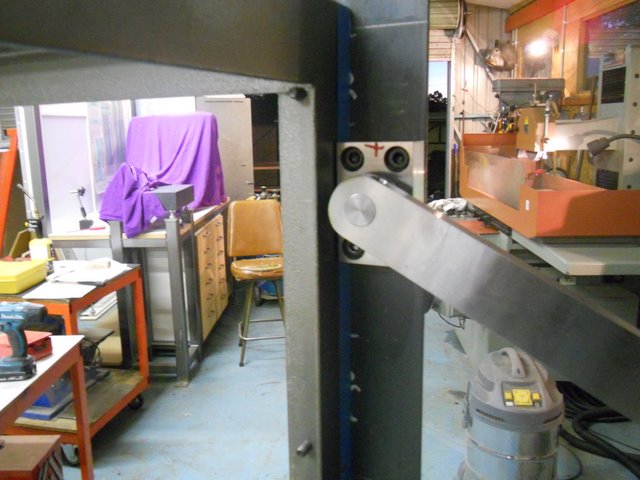
One step closer..
Regards
Ray
-
29th June 2011, 08:23 PM #22
GOLD MEMBER
- Join Date
- Jul 2010
- Location
- Melbourne
- Posts
- 7,775
Looking great Ray(and Josh),
Are you going to need to chamfer the door bricks?
Stuart
-
30th June 2011, 12:24 AM #23
GOLD MEMBER
- Join Date
- Jun 2008
- Location
- Victoria, Australia
- Age
- 74
- Posts
- 6,132
Hi Stuart, Originally Posted by Stustoys
The bricks on the door are stacked like this... looking from the inside of the furnace..
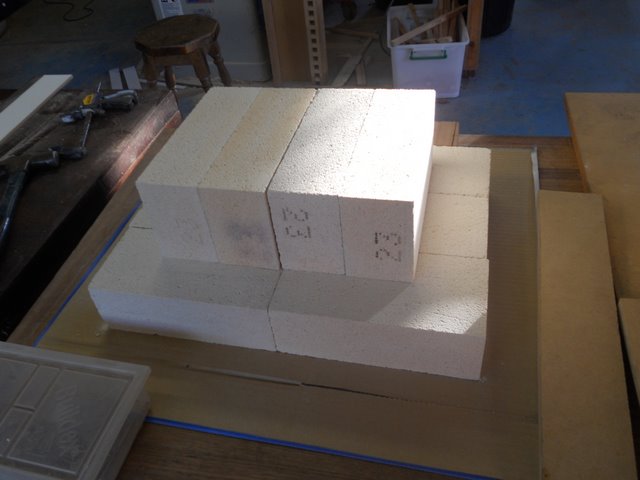
So the bottom and sides will only have a faint taper for alignment and sealing, but the inner top edge of the bit that goes on the inside will need to be chamfered to follow the arc or the door as it closes, The bricks are easily filed and shaped so it shouldn't be too hard to get right.
Regards
Ray
-
30th June 2011, 12:43 AM #24
GOLD MEMBER
- Join Date
- Jul 2010
- Location
- Melbourne
- Posts
- 7,775
Ray,
I was just thinking that is you chamfered the roof it might seal better(which it might). It then dawned on me that if you camfered both the roof and the the door you would get a tight fit. But that would need the kiln to be made a little lower and maybe I'm worrying to much about nothing.
Stuart
-
4th July 2011, 01:12 AM #25
GOLD MEMBER
- Join Date
- Jun 2008
- Location
- Victoria, Australia
- Age
- 74
- Posts
- 6,132
Hi All, Just a progress report..
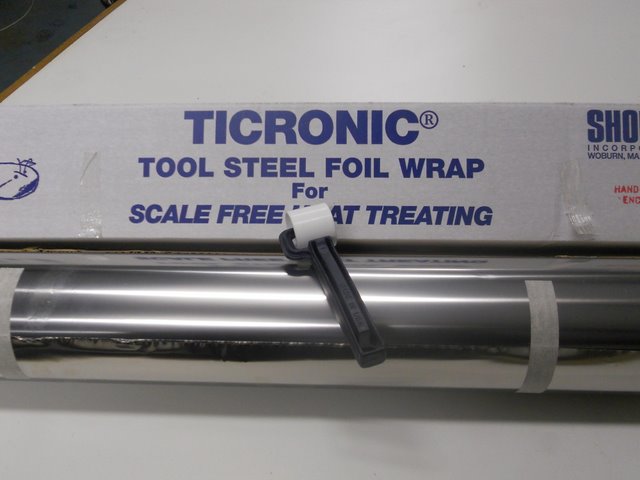
Got some cooking foil during the week...
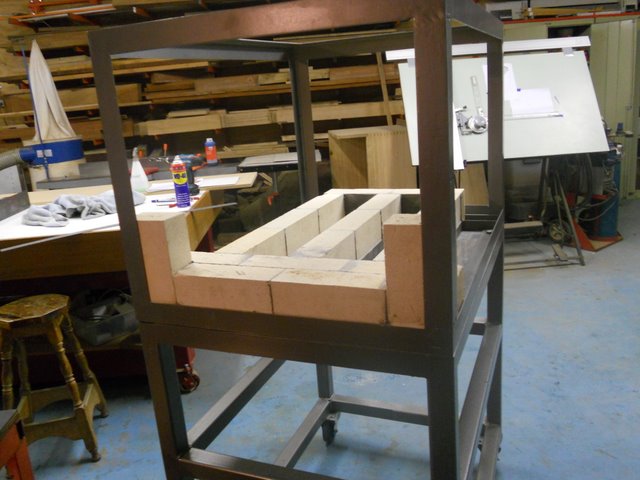
Meanwhile.. here is the construction of the furnace base...
The stainless steel sheet is fixed to the bottom of the frame with M4 stainless button head cap screws. And the first layer of support bricks can go in like so.
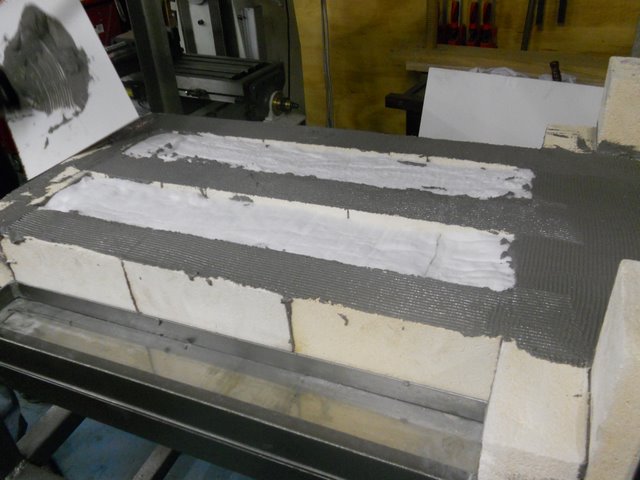
The middle gaps between the rows of support bricks is filled in with ceramic fibre blanket. And the mortar for the floor layer is laid down.
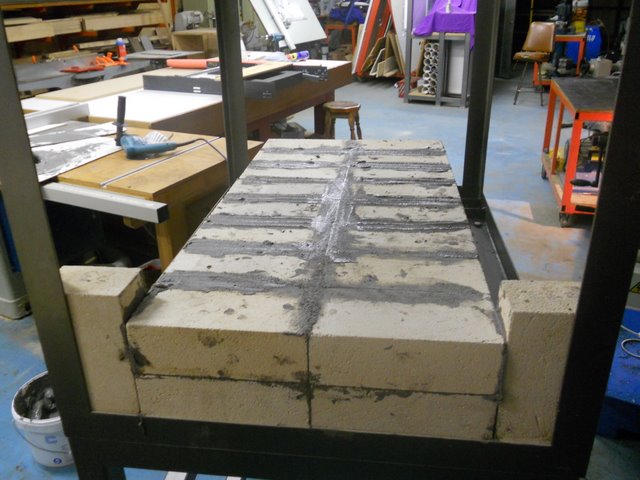
The floor level layer of bricks is laid down. The specs call for mortar gaps of 1mm, so it's not like normal brick laying, it's more like glueing bricks together.
The sides are next, and I need to cut the grooves for the heating elements, which I'll have later hopefully by next weekend.
So, next installment, installing the elements and building the sides.
Might get a chance to work on the cooling racks and work support frame before then....
Regards
Ray
PS, Forgot to mention the mortar is Vesuvious TUFSET SUPER a sodium silicate based refractory mortar.
-
4th July 2011, 09:25 AM #26
GOLD MEMBER
- Join Date
- Jul 2006
- Location
- Adelaide
- Posts
- 2,680
a drawing board..what ever happened to AutoCad and the like
-
4th July 2011, 11:54 AM #27
GOLD MEMBER
- Join Date
- Jun 2008
- Location
- Victoria, Australia
- Age
- 74
- Posts
- 6,132
Autocad, that's old school, it's all solid works nowadays, and the drawing board is the place I seem to always go back to... Originally Posted by eskimo
as in back to the...
Regards
Ray
-
4th July 2011, 05:57 PM #28
GOLD MEMBER
- Join Date
- Jul 2006
- Location
- Adelaide
- Posts
- 2,680
Ray...your always mentioning your son uses Solidworks....what does he know about the Student edition..ie is it any good? etc etc..maybe I can/should get my son to get it? Originally Posted by RayG
-
4th July 2011, 08:34 PM #29
I break stuff...
- Join Date
- Aug 2010
- Location
- Melbourne
- Posts
- 539
Solidworks is fantastic... When I did my (very) brief stint at uni, Solidworks is what they were using. Some time later, I tried to draw something in Autocad, and gave up after about 2 hours with nothing on the screen. The same part (in 3D) in Solidworks takes me maximum of ten minutes Originally Posted by RayG
. Its FAR easier to just pick up and use than Autocad (which spent all its time shouting at me, and telling me I'm doing it wrong). And then you can just tell Solidworks to make a 2D drawing, and section views from wherever you want, straight off your 3D part!
Only problem with it is the sheer cost (as is normal for programs designed for industry use).
-
4th July 2011, 10:33 PM #30
.
- Join Date
- Nov 2008
- Location
- Perth WA
- Age
- 71
- Posts
- 5,650
PS, Forgot to mention the mortar is Vesuvious TUFSET SUPER a sodium silicate based refractory mortar.
Hello Ray,
Is there any chance that you could let me know who supplied the mortar?
Bob.


Similar Threads
-
Small Furnace
By Foccacia in forum THE FOUNDRYReplies: 9Last Post: 31st May 2011, 11:24 PM -
Small furnace
By Woodwould in forum METALWORK FORUMReplies: 5Last Post: 12th July 2010, 02:53 PM -
small heat treatment oven
By .RC. in forum METALWORK FORUMReplies: 22Last Post: 25th March 2010, 07:42 PM -
Oil Burners for Casting Furnace.
By impalabazz in forum THE FOUNDRYReplies: 42Last Post: 2nd June 2007, 11:04 AM -
Furnace Filters.
By Caliban in forum WOODWORK - GENERALReplies: 10Last Post: 16th July 2004, 10:36 PM
