

 Thanks: 0
 Likes: 0
 Needs Pictures: 0
 Picture(s) thanks: 0
Results 16 to 30 of 90
Thread: Lubrication System
-
22nd June 2012, 09:44 AM #16
 GOLD MEMBER

- Join Date
- Aug 2011
- Location
- Melbourne
- Posts
- 2,951

Hi Russell,
Yea, it's amazing some of the ideas people can come up with when they have limited options. It's not the most conventional method of machining and it's certainly not pretty. Obviously my main concern was lack of control and having the cutter pull the saddle out of my grip but the mass of the saddle, the friction on the MDF, size of the cutter and depth of cut made it manageable. Also in any case if something went bad then the cutter would have most likely been sacrificed before any real damage was done. As for the mallet, well I started moving it by hand but that gave me even less control than light frequent taps with the mallet. I guess the average federate was very small, maybe 100mm/min?
I'm thinking I like the idea of the oil grooves going across. That will be another setup for each one. That's gunna kill me! I also like the groove that extends to the inside so that the dovetail gets some action too!
I may have to run over the groove again, do two passes as I would like a deeper groove than 0.5mm. 1mm would be nice but i'll see how I go.
Hi Dave, thanks for the encouragement and the link to RayG's thread. I think I'm going to do a similar thing with the oil lines into the centre. Thanks also for the pics you sent me!
Hi John, mate thanks for the offer of your mill. I have kinda gained a bit of momentum with this plan of mine. I also have family commitments on the weekend and I wouldn't be popular if I took off! For the life of me I can't work out how I'm going to do the Z oilers. I definately can't use the mill for that....... or can i? So maybe if the offer is still open then I could use your help with those later on?
Hi Stuart, Ha! as long as I don't damage my machine, I'm not too proud to try anything if it produces acceptable results.
Cheers all,
Simon
-
22nd June 2012 09:44 AM # ADSGoogle Adsense Advertisement
- Join Date
- Always
- Location
- Advertising world
- Posts
- Many
-
22nd June 2012, 10:18 AM #17
SENIOR MEMBER


- Join Date
- Apr 2012
- Location
- Healesville
- Posts
- 602
No worries Simon, I think I have 450 - 500mm between the quill and the table ? I'll measure it if you want.
Have you thought about using a ball nose cutter ?
john
-
23rd June 2012, 01:11 PM #18
GOLD MEMBER
- Join Date
- Aug 2011
- Location
- Melbourne
- Posts
- 2,951
Well I spent most of yesterday milling the grooves in the saddle. It's a very groovy saddle now!

You certainly get a lot of feedback and feel when you mill with only your hands holding the workpiece!
I'm happy with the results but at the same time I'm glad it's done! I'm proud to say that I still have the 1/8 end mill that I started with, no breakages!
Hi John, I had considered using a ball nose cutter but I don't have one. Other than aesthetics, does it make a difference using a standard end mil?
I'm just waiting for some fittings to arrive so that I can finish the job....
Simon
-
23rd June 2012, 01:55 PM #19Dave J Guest
That came up good,
 It might be an idea to cut a shallow channel in the top of the gib as well to get the oil over to the dovetail. Just make it double the width on the slots you have done and say half the depth so when you adjust the gib it will still line up to the saddle oil groove.
Dave
-
23rd June 2012, 01:57 PM #20
GOLD MEMBER
- Join Date
- Jul 2010
- Location
- Melbourne
- Posts
- 7,775
Pitty I just had an idea for you. Could you have some how clamped a nut to the mill and then used a piece of threaded rod to push against the casting? Still, a little late now and you got it done anyway Originally Posted by simonl

I've no idea which way is which. In the first picture you extended the middle groove off the way, is that to get oil to the dovetail?
Depending on which way you were feeding, you could tilt the head and have an elliptical ended cutter . I really dont know how well it would work and doubt the finish would be that good.(it may also be useful for cleaning up tee slots on a shaper table if it wont fit in your mill).
Stuart
-
23rd June 2012, 04:34 PM #21
GOLD MEMBER
- Join Date
- Aug 2011
- Location
- Melbourne
- Posts
- 2,951
Hi,
I was in a hurry when I last posted and forgot to say a few things.
Hi John, thanks mate, to do the Z saddle you really only need about 200mm headroom so you'd have plenty to spare!
Hi Dave, yep as you can see I was planning on extending the grooves into the dovetails. I always wondered if it was a good thing to do or not and seeing that Ray's had it from factory sealed the deal for me. I'm a bit hesitant to touch the gibb's, not that I'm suggesting it's not a good idea but I'm just a little concerned doing such a delicate slender piece of CI with the method I have used. In any case, the gibbs sit about 3mm lower than the edge of the way and so oil will naturally flow into the gibb. Whether it flows down onto the static side or the moving side is yet to be seen. I can make minor adjustments at a later stage. removing the gibbs is a 5 second job.
Hi Stuart,
Sorry I should explain the pics better. The first photo is the top of the X ways so the saddle is the correct way up. I extended the grooves so as to feed oil into the dovetails.
The second pic is obviously the Y ways. I have not extended the grooves here as I didn't see any point. The oil would just flow into the groove at the bottom of the dovetail and not flow up onto the dovetail itself. For this I have a different plan. The side without the gibb will have the oil feed going to two points. one point will intersect with the goove underneath, the same hole will be drilled all the way through and come out into the dovetail providing oil to the flat and the dovetails however I don't plan on putting any grooves on the dovetails themselves.
The side with the gibb I am yet to decide what to do. I plan on making a felt wiper for the front, perhaps enough oil will soak up in the felt to wick it to the gibb dovetail. Not sure, other than that, perhaps a separate oil line just above the gibb fed through the saddle. If I do that then there will be a lot of oil feeding to lots of places and I maybe making it more complex than it needs to be but if I'm making a one shot oiler, then I want it to be a one shot oiler and know that everything is sufficiently lubricated when it's activated.
Cheers,
Simon
-
23rd June 2012, 05:45 PM #22
SENIOR MEMBER
- Join Date
- Aug 2010
- Location
- Glenbrook NSW Australia
- Posts
- 705
Simon
Looking good, You are much more patient then me.
Just one question with the one shot system you are going to use and just looking at the x slide. Once you have pressurize the oil lines with the one shot, will not the oil find the least resistance and run on to the dovetail and gibb and not onto the x slides add least not to the ends of them?
Should you dam up the entry in to the gib and dovetail a bit to force the oil to the ends?
Russellvapourforge.com
-
23rd June 2012, 05:55 PM #23
GOLD MEMBER
- Join Date
- Jun 2007
- Location
- sydney
- Age
- 64
- Posts
- 3,566
Any reason why you didnt just scrape the grooves.
-
23rd June 2012, 06:32 PM #24
GOLD MEMBER
- Join Date
- Aug 2011
- Location
- Melbourne
- Posts
- 2,951
Hi Russell, Originally Posted by rusel
I had thought the same thing. Time will tell. The oil will be injected at one end of the X, not the middle so overflow to the dovetails shouldn't be any easier than continuing along the x. Either way, by the time it get to where it can flow down, at least half the X as already filled anyway. I'm also assuming that each time it gets oiled it's not flowing into a dry path and that it will be half filled with residual oil anyway. If I find that it is an issue I can then look at partially filling the groove with metal putty or similar.
Hi Pipeclay,
Three reasons, firstly I still haven't made my hand scraper yet!. Secondly, I figured if I was going to do that then I may as well hand scrape the ways flat and I don't have a straight edge or a large enough surface plate to perform any of that work yet. Other people have done what I have done long ago and have reported that they are happy with the results and some manufacturers do it from new so I figured it must work. Also it's within my capabilities.
Cheers,
Simon
-
23rd June 2012, 07:46 PM #25
GOLD MEMBER
- Join Date
- Jun 2007
- Location
- sydney
- Age
- 64
- Posts
- 3,566
A piece of hss welded to a bit of mild would of sufficed,no need to of scraped the rest of it till you make your other one.
Wouldnt hurt to make one any way out of a bit of 3/16"/1/4" hss,with a radious on it so as to remove any sharp edge from the oil slot.
-
23rd June 2012, 07:47 PM #26
GOLD MEMBER
- Join Date
- Aug 2011
- Location
- Melbourne
- Posts
- 2,951
Been thinking about this a little more. I may cut a strip of felt the length of the gibb and have it just sit on top. That would stop the flow but still wick oil in a more controlled method to the dovetail. The most difficult part in this would be to find a way of making sure it stays in place although there maybe a simple way to achieve this, I'll have a gander sometime tomorrow.... Originally Posted by rusel
Simon
-
23rd June 2012, 07:53 PM #27
SENIOR MEMBER
- Join Date
- Sep 2011
- Location
- Ballarat
- Age
- 65
- Posts
- 2,659
Thats a seriously creative bit of machining simon.
As they say "Where there's a will there's relatives". It seems the word 'fail' doesn't enter your vocabulary.
Phil
-
23rd June 2012, 08:08 PM #28
Blacksmith, Cabinetmaker, Machinist, Messmaker
- Join Date
- Dec 2011
- Location
- Canberra
- Age
- 40
- Posts
- 4,467
Hi Simon,
What sort of one shot system were you going to use? I know there was a long thread about them some time back, but one shot oilers made my head hurt so i gave up........
As per your PM i have my wipers off and will take a few snaps for you. The ones i have are just cheap pressed metal. The ones i made for Freddies ways were 1/4" brass with a 1/8" deep rebate all but 5mm from the outer edges. When you tighten the bolts up the felt kinda squeezes out onto the way. I tried 4 layers of everyday felt but it doesn't have the squashability needed. At least if i need to cut channels in my mill i can use the shaper now ! I think it depends on the worker on the day as to what was actually done to these machines.
1915 17"x50" LeBlond heavy duty Lathe, 24" Queen city shaper, 1970's G Vernier FV.3.TO Universal Mill, 1958 Blohm HFS 6 surface grinder, 1942 Rivett 715 Lathe, 14"x40" Antrac Lathe, Startrite H225 Bandsaw, 1949 Hercus Camelback Drill press, 1947 Holbrook C10 Lathe.
! I think it depends on the worker on the day as to what was actually done to these machines.
1915 17"x50" LeBlond heavy duty Lathe, 24" Queen city shaper, 1970's G Vernier FV.3.TO Universal Mill, 1958 Blohm HFS 6 surface grinder, 1942 Rivett 715 Lathe, 14"x40" Antrac Lathe, Startrite H225 Bandsaw, 1949 Hercus Camelback Drill press, 1947 Holbrook C10 Lathe.
-
23rd June 2012, 08:50 PM #29
GOLD MEMBER
- Join Date
- Aug 2011
- Location
- Melbourne
- Posts
- 2,951
Thanks Phil!
In truth there have been many projects I have thought about and floated on this forum that have not been started due to self doubt and fear of making mistakes or simply because I felt that it was beyond my capabilities....... My TS still sits at the end of the lathe waiting to be hand scraped but I don't want to make it even worse. I figure if I don't touch it then I haven't f***ed it either!
Anyway, I have been concerned for a while about the lack of adequate lubrication of this machine. If I didn't do anything then it's going to wear to a point that will put it in worse condition then anything I can do to it!
Anyway I'm glad it's over. I don't think I will attempt something like that again. I got away with it without even a damaged end mill so I will cut my losses!
I doubt I would have been as successful with anything other than CI, I think it's almost as forgiving as brass!
Hi pipeclay, yes you are correct. I got lots of HSS floating around like most.
Hi Ueee, I got a few ideas at my disposal. I have a pump similar to this: http://upload.wikimedia.org/wikipedi...ntric_pump.gif
I recovered it from the treadmill I found. It originally was used to periodically deliver lubricant to the bed of the treadmill automatically at predetermined time intervals. It's driven by a small induction type motor (similar to a kitchen exhaust fan) and then through a small reduction gearbox so the pump rotates at about 60 rpm. This is probably my most likely approach at this stage. I like the idea of a push of a button type lube system.
Other option: I have a small 120W induction motor that I can couple to an oil pump I have that came off a kawasaki motorbike. It's a small gear type pump and it would probably produce enough oil pressure and volume for a dozen machines and so may be a bit of overkill. A hand crank option on the same pump is also a variation that may work.
I cheaper and easier method is a gravity feed system from an oil reservoir from above to produce the required head pressure. Oil flow would be slow which can also be used to advantage by allowing the system to remain "on" while the machine is powered up by using some unneeded 24V AC sprinkler solenoids I have.
Finally, an idea I got from DaveJ (thanks dave!) is to use a brake master cylinder and attach a lever to manually pump when required.
Brass wipers eh Ueee? That's sounds nice. I was thinking only mild steel. Brass, I like brass!
Cheers,
Simon
-
23rd June 2012, 09:16 PM #30
Blacksmith, Cabinetmaker, Machinist, Messmaker
- Join Date
- Dec 2011
- Location
- Canberra
- Age
- 40
- Posts
- 4,467
Hi Simon,
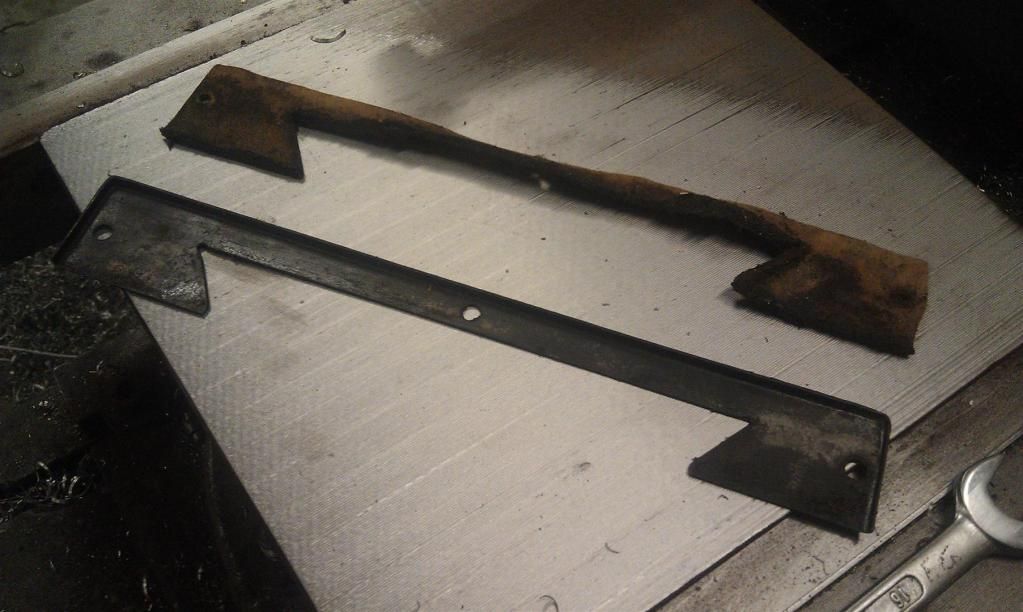
Here is a pic of the wiper of the front of my mill (HM50). It is only .6 or .8 thick. I'll do anything to postpone doing my paperwork for 10 mins......
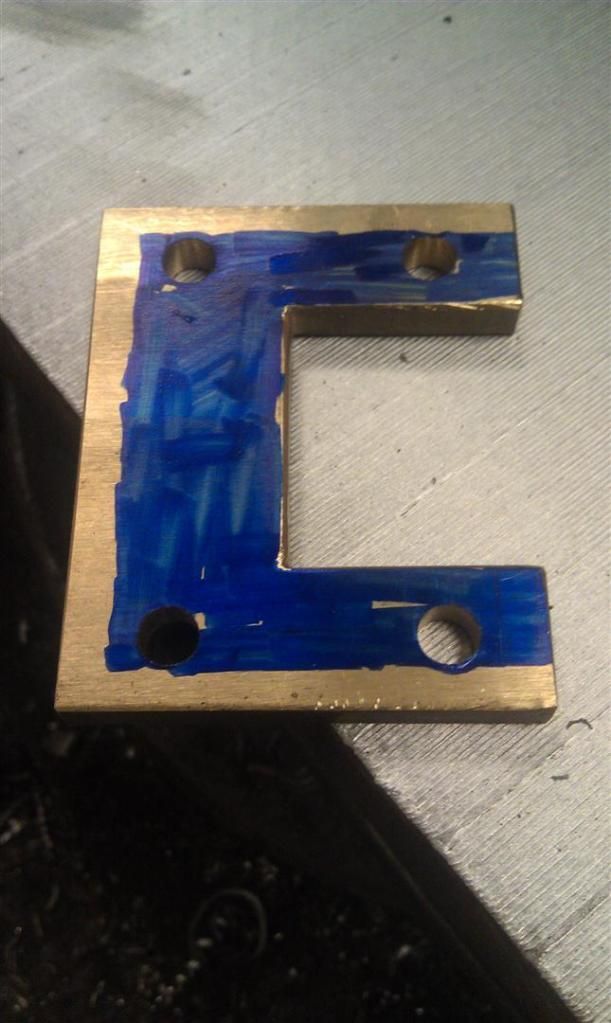
Here is one of the brass ones that i havn't machined out the back of yet. The blue will all go with the rebate. I only used brass as i had a bit and the brass stroke length pointer looked a bit lonely as the only brass on the machine. I will just use MS for the rear one for the Y axis on the mill. (mine only came with one on the front). As you may guess i found another use for a shaper- to sit things on to take photo's!
 1915 17"x50" LeBlond heavy duty Lathe, 24" Queen city shaper, 1970's G Vernier FV.3.TO Universal Mill, 1958 Blohm HFS 6 surface grinder, 1942 Rivett 715 Lathe, 14"x40" Antrac Lathe, Startrite H225 Bandsaw, 1949 Hercus Camelback Drill press, 1947 Holbrook C10 Lathe.


Similar Threads
-
lubrication
By rusel in forum METALWORK FORUMReplies: 14Last Post: 12th April 2011, 09:58 PM -
Best oil for bar lubrication
By timbertalk in forum SMALL TIMBER MILLINGReplies: 23Last Post: 30th March 2009, 02:11 AM -
ML7 Lubrication
By Poloris in forum METALWORK FORUMReplies: 8Last Post: 8th January 2008, 05:03 PM -
Coolant/lubrication
By Tiger in forum METALWORK FORUMReplies: 3Last Post: 7th December 2005, 08:04 PM -
lubrication
By Redback in forum HAND TOOLS - POWEREDReplies: 1Last Post: 22nd August 2005, 06:51 PM
