

 Thanks:
  Likes:
  Needs Pictures: 0
 Picture(s) thanks: 0
Results 16 to 30 of 44
-
30th March 2015, 11:39 PM #16
 GOLD MEMBER


- Join Date
- May 2011
- Location
- Murray Bridge SA
- Posts
- 3,339

Butcherous ba**^#*ds, shouldn't be allowed near a welder or hand tools, let alone great old machinery.
I'm sure it won't take long to get it going again, at least you'll know how it all works.
Kryn
-
30th March 2015 11:39 PM # ADSGoogle Adsense Advertisement
- Join Date
- Always
- Location
- Advertising world
- Posts
- Many
-
31st March 2015, 05:54 AM #17
GOLD MEMBER
- Join Date
- Jun 2007
- Location
- sydney
- Age
- 64
- Posts
- 3,566
Based on your figures considering wear they appear to be 14 DP.
-
31st March 2015, 09:37 AM #18
Member
- Join Date
- Nov 2013
- Location
- Brisbane
- Posts
- 85
It's a pity - I reckon between my lathe and your lathe we could build one really good one.
As requested, here's a pic of the shaft cover on mine - nothing fancy.

and if you pull your apron gearbox apart can you give me a tooth count on the missing gears in the cascade for the power crossfeed below?
If you decide to go down the path of getting new gears cut for the gearbox, I can pull my gearbox apart for you to measure?
-
31st March 2015, 04:34 PM #19
Member
- Join Date
- Nov 2013
- Location
- Brisbane
- Posts
- 85
Hudnut, clear out some of your PMs

-
31st March 2015, 05:16 PM #20
Novice
- Join Date
- Jan 2005
- Location
- Brisbane
- Age
- 51
- Posts
- 21
Done. Didn't realise there was a 5 message limit across both inbox and sent messages.
I visited another forum member today.
We confirmed that the leadscrew, powerfeed and selector gears are 14DP, measured against his involute cutters.
If I can confirm ID and OD for the gears accurately, that will assist us with making new ones in the fullness of time.
The other gears in the cluster are a different DP, to be determined.
He also showed me around his workshop and behind the scenes at a a very interesting museum, which I will re-visit with family in the near future.
He was very generous with his time and sharing his interests with a newbie such as me.
Thanks mate, we'll catch up again soon.
This afternoon I pulled apart the compound ready for cleanup.
The lathe came with a 3 jaw (on it), and a 4 jaw chuck. The 4 jaw is quite rusty and the jaws were not moving.
I made an impromptu electrolysis bath, and after half an hour it's freed up enough for me to remove it from the bath, remove the jaws, and get it ready from some manual cleaning.
-
1st April 2015, 09:41 AM #21
Member
- Join Date
- Nov 2013
- Location
- Brisbane
- Posts
- 85
Here's what my leadscrew and powerfeed gears look like for you
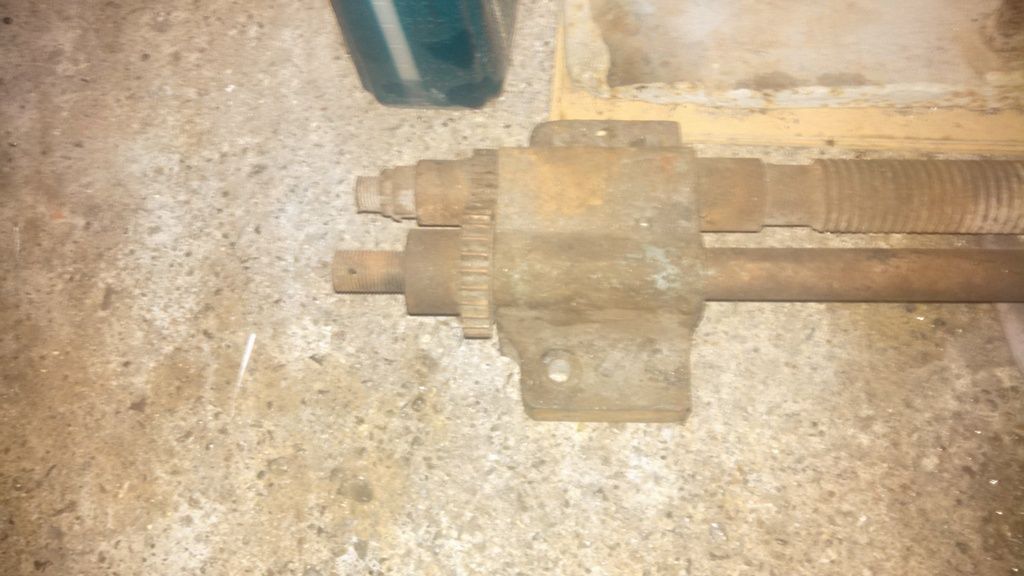
Pretty sure the rest of the gears on these things are 20DP.
-
1st April 2015, 12:08 PM #22
Novice
- Join Date
- Jan 2005
- Location
- Brisbane
- Age
- 51
- Posts
- 21
Hmmm. Mine were completely different.
In that arrangement, both shafts turn at the same time, and in opposite directions.
That would also mean the selector gear switches between both shafts turning or no shafts turning
Mine were offset, so you could engage one or the other via the selector gear.
The shafts would then turn the same way, and there would be no way to turn off shaft rotation, just selecting between the 2.
Whether the shaft would engage would depend on lever selection at the apron.
My gears are also different widths.
20150328_131548.jpg20150328_131615.jpg
-
1st April 2015, 02:16 PM #23
Member
- Join Date
- Nov 2013
- Location
- Brisbane
- Posts
- 85
There's a lever on the apron that switches between facing and turning for the power feed - I'll dummy it up tonight, but I'm pretty sure the drive gear can only engage one of the shafts.
-
3rd April 2015, 06:18 PM #24
Novice
- Join Date
- Jan 2005
- Location
- Brisbane
- Age
- 51
- Posts
- 21
A frustrating but productive couple of days.
2 days squirting an ATF concoction int the threads for the chuck, and the chuck is now off.
The belt, pulleys, spindle, headstock are now separated.
The ways are sitting on the cast iron stands.
We are nearly ready for the great paint strip and clean.
However, I have uncovered a total lack of mechanical sympathy from previous owners.
A multitude of belled shaft ends, resulting in castings starting to crack around shaft entry holes where the belled ends have been bashed in there.
Grease used where oil should have been used.
Grub screws not located properly on shafts. Just turn em harder until the shaft is marked and won't come out.
Punches used instead of C spanners.
Much frustration trying to disassemble things *gently* when it's basically been hammered together.
And the biggie....the spindle and bearings are not in good shape.
I have attached photos.
Anyone got any idea around where in the Brisbane area I can get the spindle cleaned up and the bearings sorted?
Options on how best to achieve this? Some sort of idea on cost?
If I can't get that sorted, then there probably isn't any point continuing unfortunately.
Also, I see a dirty, caked black strip of *something*, in the bottom of the journals in the headstock.
I'm assuming they are some sort of wipers connecting to oil the galleries for the spindle, but don't know what to use for replacements.
20150403_164157.jpg20150403_164211.jpg20150403_164251.jpg20150403_164328.jpg20150403_164455.jpg
-
3rd April 2015, 06:50 PM #25
Philomath in training
- Join Date
- Oct 2011
- Location
- Adelaide
- Age
- 59
- Posts
- 3,149
The wiper in the spindle is probably felt (not the craft stuff but proper felt - do you know any piano repair people?).
Did you notice how much play you had in the spindle bearings before disassembly? It may be that although the bearing looks horribly scarred, it will still turn satisfactorily.
Michael
-
3rd April 2015, 06:55 PM #26
Novice
- Join Date
- Jan 2005
- Location
- Brisbane
- Age
- 51
- Posts
- 21
Thanks Michael,
I'm sure I can get my hands on some felt. I figured that was what I'd need.
Yep, I gave it a good vertical/horizontal yank on the chuck, and with some rod in the chuck.
No play that I could tell.
I also noticed the jaws in the 3 jaw chuck were all out of position.
I forgot to mention that I've had the original 3 phase motor tested, and all looks ok.
-
3rd April 2015, 06:59 PM #27
Philomath in training
- Join Date
- Oct 2011
- Location
- Adelaide
- Age
- 59
- Posts
- 3,149
I've probably got some here if you only need a small piece.
If the spindle is not moving I would not worry about it at the moment - just remember to keep the oil up to it.
One day when you are feeling rich you can recast the bearings and have the spindle ground but personally I think it is more important to get the lathe working so you can assess whether it will do what you want it to do. If it does then you're fine.
Michael
-
10th April 2015, 06:31 PM #28
Novice
- Join Date
- Jan 2005
- Location
- Brisbane
- Age
- 51
- Posts
- 21
Thanks Michael.
It's been a busy week, with Easter in the middle (Happy Easter everyone).
But I got some quality time in the shed.
Lots of time pulling things down.
A lot of the paint was cracking and coming off. Most of it decided to stay stuck.
The flaking etc meant the whole lot was going to have to come off, and there's no way around it, you've just got to get to work.
3-4 days of getting it back to metal, and lots of round robin with the painting and second coats.
The lathe has lots of little bits missing. 3 bolts when there should be 4, 4 gibs when there should be 5.
I was getting concerned about having too much stuff apart at once and bits everywhere in various stages of paint.
However, I now have the main pieces back together and the shed is back under control.
I'm much happier now.
Next I'll continue working on stripping and painting the remaining "secondary" pieces like the gap bed and tailstock.
While the enamel dried, I also decided to start polishing the controls and get them back from their sorry rusty state.
20150409_174051.jpg20150410_164851.jpg20150410_164858.jpg
-
11th April 2015, 07:44 PM #29
Novice
- Join Date
- Jan 2005
- Location
- Brisbane
- Age
- 51
- Posts
- 21
More pics.
I put together the cross slide and compound, more to get them out of the way than any other reason.
20150411_173825.jpg
Does anyone want to guess what the thread/size oiler this is, or know where to get some?
It's tiny, and there are a reasonable number of them required.
Especially when you take into account the ones that were removed and had the holes filled with green paint.
Call me fussy, but I'm checking to ensure all of the galleries are clear.
When I chase them through it's amazing the number of times I discover another blocked oiling point.
20150411_175119.jpg
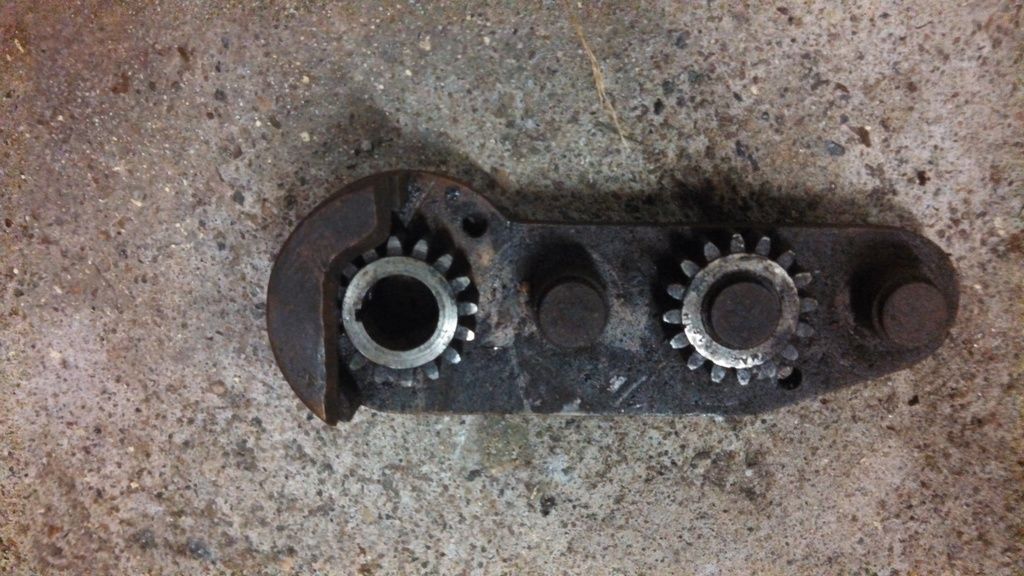
And for Gammaboy, a photo of the gears in the apron he was after.
I cannot remove the shaft that the main carriage wheel is attached to. It's pinned, and they've stuffed the pin and peined it both sides.
I don't need that pain in my life, it's the only remaining gear, so I'll polish the wheel and clean the gears while they are in the apron.
The attached might give you an idea of the handiwork I am seeing...
20150411_175415.jpg
-
12th April 2015, 12:52 AM #30
Senior Member
- Join Date
- Oct 2008
- Location
- Cairns, Q
- Posts
- 351
For a very wild guess looking at the photo it could be 5/32 Whitworth (32 TPI). If it is, 5/32W used to be a very common size for things like drawer pulls etc. Taps and dies are still available if this turns out to be the case and you need to make them. I bought a couple of Sutton(?) 5/32W dies for spares quite recently from a Bunnings specials box. Originally Posted by hudnut

If you Google the catalogue for Gits lubricators they show a 5/32" threaded oiler on page 3, This is 32 TPI UNEF thread, which would probably screw into a 5/32W threaded hole OK, but might need a 5/32W or UNEF tap run through the hole to clean out old paint etc. Someone else might make 5/32" threaded oilers with the correct Whitworth threads which would be preferable, but Gits was the first one I found that listed that size.
Frank.

Similar Threads
-
Another MARS lathe owner in Brisbane.
By hudnut in forum G'day mate - THE WELCOME WAGON -Introduce yourselfReplies: 6Last Post: 12th April 2015, 01:23 PM -
Mars lathe
By Ueee in forum EBAY, GUMTREE, AMAZON (and other sale sites) Metalwork ONLYReplies: 7Last Post: 15th July 2014, 10:21 AM -
Mars bar no, Mars lathe!
By neksmerj in forum METALWORK FORUMReplies: 20Last Post: 29th September 2012, 08:18 PM -
Unknown Hegner model
By nifty52 in forum SCROLLERS FORUMReplies: 4Last Post: 2nd August 2012, 12:44 PM
